Table of Contents
Advertisement
Advertisement
Table of Contents

Related Manuals for Fiorenzato F64E XG


Summary of Contents for Fiorenzato F64E XG
- Page 1 电动咖啡磨豆控粉机 Electronic coffee grinder-doser 说明手册 - Instruction manual...
-
Page 3: Table Of Contents
目录 Contents ENGLISH . . . . . . . . . . . . . . . . . . 15 中文... - Page 4 ZH - 中文 - 警告 • 不得开启看起来存在故障的磨豆控粉机。 • 必须使用原厂配件和部件。 • 仔细阅读并严格遵守说明与警告。 • 为避免火灾危险, 请勿遮盖磨豆控粉机。 • 使用前, 确保电源电压与机器铭牌上注明的 • 如果电源线损坏, 必须由制造商、 其技术部 电压一致。 门或具有类似经验的人进行更换以避免任 • 必须将磨豆控粉机正确连接到有效接地的 何风险。 10 A 插座。 • 不使用时, 将磨豆控粉机插头从电源上拔 • 对磨豆控粉机进行任何维护或清洁前, 始终 下。 将插头从插座上拔下。 • 移动前, 让磨豆控粉机冷却。 •...
-
Page 5: Warnings
EN - WARNINGS • Use only original accessories and parts. • To avoid the danger of fire, never cover the • Read thoroughly and stick closely to the in- grinder-doser . structions and warnings . • If the power cable is damaged, it must be re- •... - Page 6 合规性声明 The Fiorenzato M.C S.r.l society, Via Niedda 12/b - 35010 Peraga di Vigon- za (PD) Italia 声明, 磨豆控粉机和磨豆机符合以下指令的基本要求: 低电压指令 2006/95/EC 机械指令 2006/42/EC EMC 指令 2004/108/EC 这类磨豆控粉机已经按照标准 EN60335-1 (家庭及类似设备安全) 和 EN60335-2-64 (第 2 部分: 厨房设备及总体使用具体标准) 进行测试。 Fiorenzato M.C. 技术部门...
- Page 7 的影响。 所以专业人员非常重视咖啡机和磨豆机。 了解并熟悉机器, 将机器维持在良好效率, 并尽可能多地使用以充分掌握其用法, 是 各个咖啡老师都具备的能力。 好的咖啡品质是一系列操作的结果, 研磨在其中起到重 要作用。 因此磨豆控粉机是操作者的重要工具之一, 其构造必须坚固、 耐用并发挥其 功用。 尺寸 F71EK XG/XGR F83E XG/XGR 尺寸 F64e XG/XGR - F64eVO XG/XGR 20,5 cm 20,5 cm 重量: 14 kg 重量: 19 kg 27 cm 27 cm 23 cm...
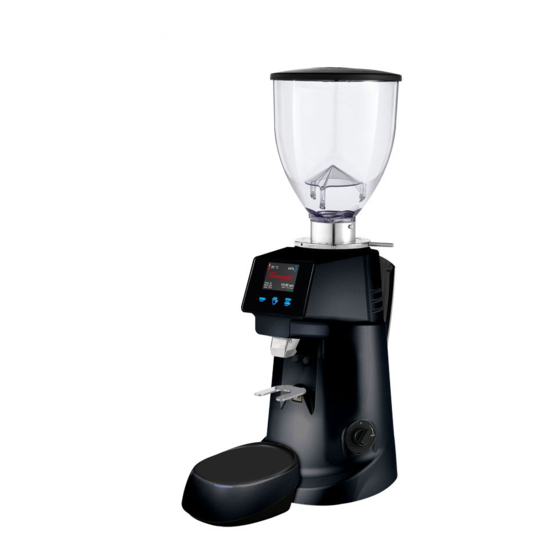
- Page 8 常规说明 料斗盖 料斗 (咖啡豆容器) 锁定滑块 防拧开调整盘锁 开关 咖啡研磨调整盘 显示 一杯 / C1 按钮 研磨 / M 按钮 两杯 / C2 按钮 启动微型开关 LED 指示灯 过滤座叉 接咖啡容器 接咖啡托盘 (可取下) 校准盘的 LED 指示灯 接咖啡容器 标签 RFID (仅针对 XGR 型号) 黑色为双杯 灰色为单杯 包装 打开包装时,...
-
Page 9: Xg/Xgr 技术
使用 操作磨豆控粉机 将校准盘正确连接至咖啡磨豆控粉机 本磨豆控粉机专为研磨咖啡豆设计。 任何 警告: 此阶段咖啡磨豆机必须与电气插座 其他用途视为不当使用, 可导致危险后 断开连接。 要将咖啡磨豆控粉机正确连 果。 制造商对不当或错误使用导致的任 何损失不承担任何责任。 请勿将磨豆控粉 接至校准盘, 必须使用校准盘下方引出的 机用于研磨其他类型食物或任何其他物 电线, 连接至咖啡研磨器下方的电气接头 品。 我公司制造的咖啡磨豆机和咖啡磨豆 (参见图 1) 。 控粉机仅面向熟练人员用于专业用途, 不 用于家庭用途。 图 1 安装与电气连接警告 必须由熟练技术人员按照现行安全规定 安装磨豆控粉机。 错误安装可能导致人 或动物受伤或者财产损失, 对此制造商不 承担任何责任。 • 磨豆控粉机必须放置在稳定平坦的表面。 • 插入磨豆控粉机前, 确保电源电压和频 率符合磨豆控粉机技术数据标牌上注... -
Page 10: 左侧 Led 灯
左侧 LED 指示灯 灭: 磨豆机关闭。 26 °C 亮: 磨豆机开启。 闪烁: 磨豆机正在研磨 (电机工作中) 。 校准盘上的 LED 指示灯 开启咖啡磨豆控粉机后, 您将注意到校准 盘前面的 LED 指示灯将变亮, 以不同颜 0:30 am 色闪烁多次: 蓝色: 已开启 er 1 Oct 2014 绿色: RFID 已连接 (仅对于 XGR 型号) 。 Standard 白色: 秤已连接。 其他操作过程中,... -
Page 11: 研磨器更换
研磨器更换 如果需要更换研磨器, 显示屏上将显示警 告。 访问设置菜单并选择研磨器更换, 可 以监测磨损状态。 更换研磨器后, 需要复位更换计时器。 要 进行此操作, 访问设置菜单, 选择研磨器 复位并确认复位。 图 2 图 2 调整研磨 在设置菜单上选择秤, 然后选择毛重。 现 要实现更细或更粗研磨并因此改变粒 在您可以测试粒度, 方法是向接咖啡容 度, 请使用料斗下方的调整盘。 器注入一杯或两杯所需的重量 (例如一杯 为 7.5 g) , 然后检查杯中产生的咖啡。 以克为单位校准重量 此操作需要约 50 秒, 建议每天进行, 允 许调整咖啡磨豆控粉机以始终获得设定... -
Page 12: 快速安装
图 3 参考我们的在线教程 快速安装 初始安装 • 将 XG / XGR 校准盘的电源线连接到 接头。 确保标签位置正确; 否则将阻碍过滤座 • 将校准盘连接到咖啡磨豆机的支架。 杯的自动识别 (参见图 4) 。 • 将咖啡豆倒入料斗。 重要信息: 执行校 准操作时, 检查料斗是否至少半满。 • 研磨少量咖啡以完全填满并调整研磨 仓。 • 通过视觉和触觉检查粒度。 • 使用两杯按钮进入秤菜单。 • 取下接咖啡托盘, 将接咖啡容器放入 底座, 按皮重按钮扣除皮重 图 4 图... -
Page 13: Rfid
在执行初始校准后设置 “研磨重量” 。 按钮将保持亮并激活。 用过滤座杯按下 • 重要信息: 我们建议每天执行一次校 启动微型开关后, 研磨开始。 要从一杯切 准, 最好在早上制作第一批咖啡并根据 换为两杯, 按相应按钮。 这样将停用持续 需要调整粒度。 研磨 (按钮 M) 。 • 重要信息: 研磨调整盘移动后, 执行校 准。 直接模式 访问设置菜单, 选择研磨模式, 然后选择 识别过滤座杯 (仅对于 XGR 型号) - RFID 直接。 使用按钮 C1 或 C2 按下所需用量 要使咖啡磨豆控粉机自动识别一杯和两... -
Page 14: 噪声水平
噪声水平 用干净的刷子和布彻底清洁研磨刀片、 螺 EEC 国家 纹和整个研磨系统。 将上研磨刀片座重新 按照 EN 60704-1 规定, 在 UNI EN ISO 安装在相关槽中后, 将调整盘拧回原位, 3741 回响腔中测量的咖啡磨豆机和磨豆 将自锁螺钉放回使盘实现最佳调整的孔 机/控粉机最大噪声排放符合 EN 60704- 中, 重新安装料斗并固定后, 根据需要调 1:1998 和 EN 607043 :1996 规定。 按照 整研磨。 ED 86/188/EEC 和 ED 200311 0/ EEC, 每 8 小时... -
Page 15: English
ENGLISH Declaration of EC conformity The company Fiorenzato M.C S.r.l, in Via Niedda 12/b - 35010 Peraga di Vigon- za (PD) Italia, declares that the coffee grinder-dosers and its produces comply with the essential requirements of the following EC directives:... -
Page 16: Introduction
Therefore, for the operator, the grinder-doser is one of the fundamental appliances, whose structure must meet certain characteristics of sturdiness, resistance and functionality . Dimensions F64e XG/XGR - F64eVo XG/XGR Dimensions F71eK XG/XGR - F83e XG/XGR 20,5 cm... -
Page 17: General Description
GENERAL dESCRIPtIoN Hopper cover Hopper (coffee bean container) Locking slide Adjustment disk lock On/Off switch Coffee grinding adjustment disk Display Single dose / button C1 Continuous Manual Grinding / button M Double dose / button C2 Start microswitch LeD indicator light Filter holder fork Coffee collection container... -
Page 18: Use
• Do not use extension cables, plug adapt- ers for multiple sockets or makeshift con- This grinder-doser has been designed nections . solely for grinding coffee beans . Any other • The motor must rotate clockwise. If the use must be understood as improper, and rotation of threephase motors is to be in- consequently hazardous. -
Page 19: Preliminaries
26 °C PRELIMINARIES SELECTION BUTTONS Make sure the hopper is positioned correctly The control panel has three blue LED but- on the coffee grinder-doser and is fastened tons for selecting the quantity required for to the upper grinding blade holder by means grinding. -
Page 20: Settings Menu
light up . U se the buttons C1 and C2 to move ADJUSTING GRINDING through the menu and change the setting . In order to achieve finer or coarser grind- Use the button M to select and confirm . exit ing and therefore vary the granulometry, the menu after confirming by pressing the use the adjustment disk located under the... -
Page 21: Calibration
fastening strap and then close it, adapting it perfectly to the handle of the filter holder cup, making sure that the Tag plate is facing DOWNWARDS to allow it to directly com- municate with the calibration plate below (see Fig .3) . Fig . -
Page 22: Rfid
INSTRUCTIONS AND TIPS the granulometry and repeat the opera- FOR CORRECT OPERATION tion . • IMPORTANT: Do not use the SCALeS • The hopper container of the coffee grind- mode to weigh any object other than the er must always be filled with coffee . coffee collection container and the coffee •... -
Page 23: Grinding Mode
• IMPORTANT: fasten the grinding adjust- DIRECT MODE ment disk correctly (refer to the chapter Access the SETTINGS menu, select GRIND- AUTOMATIC RECOGNITION OF THE FIL- ING MODe and then DIRECT . Press the re- TER HOLDER CUPS – RFID). quired dose by using the button C1 or C2 (automatic operation for XGR models) . -
Page 24: Noise Level
COFFEE OUTLET GUARD ing, resulting in greater productivity and limited overheating . The coffee outlet guard must always be fixed to the doser unit using the relevant screws, CLEANING tHE APPLIANCE which must never be removed by the user . The removal of the coffee outlet guard can Disconnect the power supply from the be done by skilled technical personnel only... - Page 25 Fig . A dIRECtIVE 2002/96EC (RAEE): INFoRMAtIoN FoR uSERS This information is addressed only to the owners of appliances bearing the sym- bol (Fig . A) on the adhesive label with the technical data applied to the product (se- rial number label): This symbol means that, according to the current regulations, this is an electrical or electronic unit and com- plies with eU Directive 2002/96/eC (RAee) .
- Page 26 NotE . . . . . . . . . . . . . . . . . . . . . . . . . . . . . . . . . . . . . . . . . . . . . . . . . . . . . . . . . . . . . . . . . . . . . . . . . . . . .
- Page 28 Fiorenzato M . C . S .r .l . Via Niedda, 12/b 35010 Peraga di Vigonza (PD) Tel. +39.049.628716 Fax +39.049.8956200 info@fiorenzato .it www .fiorenzato .it 02/2016 - COD . 110000166...
Need help?
Do you have a question about the F64E XG and is the answer not in the manual?
Questions and answers