
Related Manuals for Kimo DBM610


Summary of Contents for Kimo DBM610
- Page 1 DBM610 AIRFLOW METER SEN TRONIC Rugghölzli 2 Tel. +41 (0)56 222 38 18 mailbox@sentronic.com CH - 5453 Busslingen Fax +41 (0)56 222 10 12 www.sentronic.com Produkte, Support und Service...
- Page 2 SEN TRONIC Rugghölzli 2 Tel. +41 (0)56 222 38 18 mailbox@sentronic.com CH - 5453 Busslingen Fax +41 (0)56 222 10 12 www.sentronic.com Produkte, Support und Service...
-
Page 3: Table Of Contents
3. Mounting the airflow meter........................10 3.1. Mounting of frame..........................10 3.2. Setting of the cloth..........................11 3.3. Setting of rods............................12 4. Using DBM610 in airflow meter mode....................12 4.1. Starting up............................. 12 4.2. Configure the airflow meter........................12 4.2.1. Set the correction coefficient........................... 12 4.2.2. - Page 4 SEN TRONIC Rugghölzli 2 Tel. +41 (0)56 222 38 18 mailbox@sentronic.com CH - 5453 Busslingen Fax +41 (0)56 222 10 12 www.sentronic.com Produkte, Support und Service...
-
Page 5: Introduction
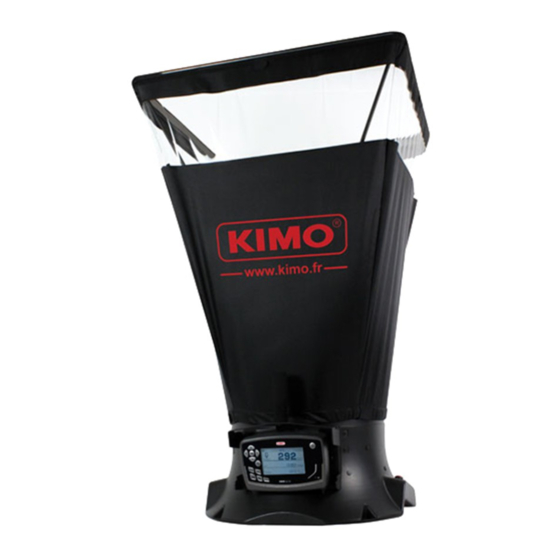
DBM610 airflow meter allows control and balancing of airflow in air conditioning system. Thanks to the interchangeable hoods, the airflow can be used on any type of grids or diffusers in air supply or exhaust. Easy to handle, lightweight, it allows accurate, sturdy and fast measurements. -
Page 6: General Technical Features
1.3. General technical features Display Large graphic back-lighted LCD Sizes : 86 x 51 mm Connectors ABS connectors, Ø 7 x 4 mm Housing Shock-proof made of ABS, IP54 protection Keypad 12 keys Conformity Electromagnetical compatibility (NF EN 61326-1 guideline) Power supply 4 alkaline batteries LR6 - Rechargeable battery Li-ion, 3.7 V 4400 mhA (optional) Environment... -
Page 7: Presentation Of Airflow Meter
2.1. Base Outside of the base : • Carrying handle Protective cover Location for the electronic housing Button of point/point measurement start Electronic card Integrated ergonomic handle Inside the base : • Temperature probe Silicone tube for pressure routing Two pressure connectors Receipt cup hood rods Measurement grid SEN TRONIC... -
Page 8: Grid
2.2. Grid The measurement grid is fixed to the base in 6 points and is made up of the following elements : 1 core made up of two chambers (for total pressure and for static pressure) • 12 tubes tapped of 4 holes •... -
Page 9: Airflow Meter Mode
2.3.1. Airflow meter mode In airflow meter mode, the device has following functions : Simultaneous display of airflow, pressure and temperature • Automatic airflow direction (supply or exhaust) • Automatic average and point by point average • HOLD function (measurement is fixed) •... -
Page 10: Hoods
To load the device : If the device is on Li-Ion battery : connect the main adapter/charger on the side of the device • If the device is on rechargeable batteries : remove batteries load them an external charger • It is also possible to load the electronic housing with the main adapter/charger supplied with Li-Ion battery. -
Page 11: Setting Of The Cloth
3.2. Setting of the cloth Before set the cloth on the frame, frame must be mounted. ➢ First, insert a corner of the frame inside a corner of the cloth. ➢ Insert the opposite corner of the frame in the corresponding corner of the cloth. The color mark must be in the middle of the frame side. -
Page 12: Setting Of Rods
3.3. Setting of rods ➢ Place the 4 holding rods inside the hood. ➢ Take a rod and insert the rounded end of the rod in the reception holding cup of the base. ➢ Slightly bend the rod and insert the flat end of the rod on the opposite corner of the holding cup. ➢... -
Page 13: Set Measurement Units
4.2.2. Set measurement units ➢ Go to " Unit " line then press OK key. ➢ Go to the required line (airflow, temperature or pressure) then press OK. ➢ Select unit with up and down arrows then press OK. Available units are : Airflow : m /h, L/s, cfm •... -
Page 14: Using Dbm610 In Micromanometer Mode
5.1. Starting up The device is disconnected from airflow meter base. ➢ Press On/Off button. The device directly displays data below (see photo) : Airflow • Air velocity • Pressure delta • Temperature compensation • Type of airflow sensor used and size of the surface •... -
Page 15: Set Measurement Units
Set diameter of the surface : ➢ Go to " Surface " then press OK. ➢ Go to " Type " line then press OK. ➢ Press OK on Diameter line. ➢ Select the required dimension with up and down arrows then press OK. ➢... -
Page 16: Activate Or Deactivate Air Velocity And Airflow
5.3. Activate or deactivate air velocity and airflow It is possible to activate or deactivate measurement in air velocity and/or airflow. ➢ Press " Menu " button. ➢ Go to " Measurement " with left and right arrows then press OK. ➢... -
Page 17: Perform An Autozero
5.5. Perform an autozero The autozero allows to offset from time to time any drift of the sensitive element during time by a manual adjustment of the zero. The autozero is made automatically when the solenoid valve is activated. ➢ Press " Zero " button during measurement. This part allows to display or delete recorded dataset in the device. -
Page 18: Set Automatic Shut-Off
➢ Press Esc to back to " Informations " menu. 8.3. After sales service ➢ Go to " After sales service " then press OK. Screen displays Kimo after sales services phone number and email. ➢ Press Esc to back to " Informations " menu. SEN TRONIC Rugghölzli 2...
Need help?
Do you have a question about the DBM610 and is the answer not in the manual?
Questions and answers