
Related Manuals for THOMSON THT741


Summary of Contents for THOMSON THT741
- Page 1 Empfänger für hochauflösendes Antennenfernsehen THT741 Bedienungsanleitung User Manual...
- Page 2 TV SCART MODEL DIGITAL TERRESTRIAL HD RECEIVER THT741 100 mA max. COAXIAL ETHERNET S/PDIF ANT IN AC 220-240 V~ USB: 5 V 800 mA max. 50/60 Hz, 12 W max.
- Page 3 TV SCART MODEL DIGITAL TERRESTRIAL HD RECEIVER THT741 100 mA max. COAXIAL ETHERNET S/PDIF ANT IN AC 220-240 V~ USB: 5 V 800 mA max. 50/60 Hz, 12 W max. TV SCART MODEL DIGITAL TERRESTRIAL HD RECEIVER THT741 100 mA max.
- Page 4 This product has been manufactured and sold under the responsibility of STRONG Group. THOMSON and the THOMSON logo are trademarks of Technicolor (S.A.) or its affiliates and are used under license by STRONG Group. Represented by STRONG Ges.m.b.H. Franz-Josefs-Kai 1 1010 Vienna, Austria Email: support_at@thomsonstb.net...
- Page 5 This product has been manufactured and sold under the responsibility of STRONG Group. THOMSON and the THOMSON logo are trademarks of Technicolor (S.A.) or its affiliates and are used under license by STRONG Group. Any other product, service, company, trade name and logo referenced herein are neither endorsed nor sponsored by Technicolor (S.A.) or its affiliates.
-
Page 6: Table Of Contents
TABLE OF cONTENTS 1.0 iNTRODUcTiON 1.1 Safety Instructions 1.2 Storage 1.3 Equipment Set-up 1.4 Accessories 1.5 Usage of external USB devices 2.0 YOUR REcEiVER 2.1 DEFAULT PIN: 0000 2.2 Front Panel 2.3 Rear Panel 2.4 Remote control 2.5 Installing the batteries 2.6 Using the remote control 3.0 cONNEcTiON 3.1 Connecting to a terrestrial antenna... -
Page 7: Introduction
1.0 IntroductIon 1.1 Safety Instructions DO NOT iNSTALL YOUR REcEiVER: - In a closed or poorly ventilated cabinet; directly on top of or under any other equipment; on a surface which might obstruct the ventilation slots. DO NOT EXPOSE THE REcEiVER OR iTS AccESSORiES: - To direct sunlight or any other equipment that generates heat;... -
Page 8: Equipment Set-Up
1.3 Equipment Set-up We recommend you to consult a professional installer to set up your equipment. Otherwise, please follow the instructions below: - Refer to the user manual of your TV and, if applicable, your antenna. - Make sure that the HDMI cable and, if applicable, outdoor components are in a good condition. - If you use the TV SCART connection, use a well shielded SCART cable. -
Page 9: Your Receiver
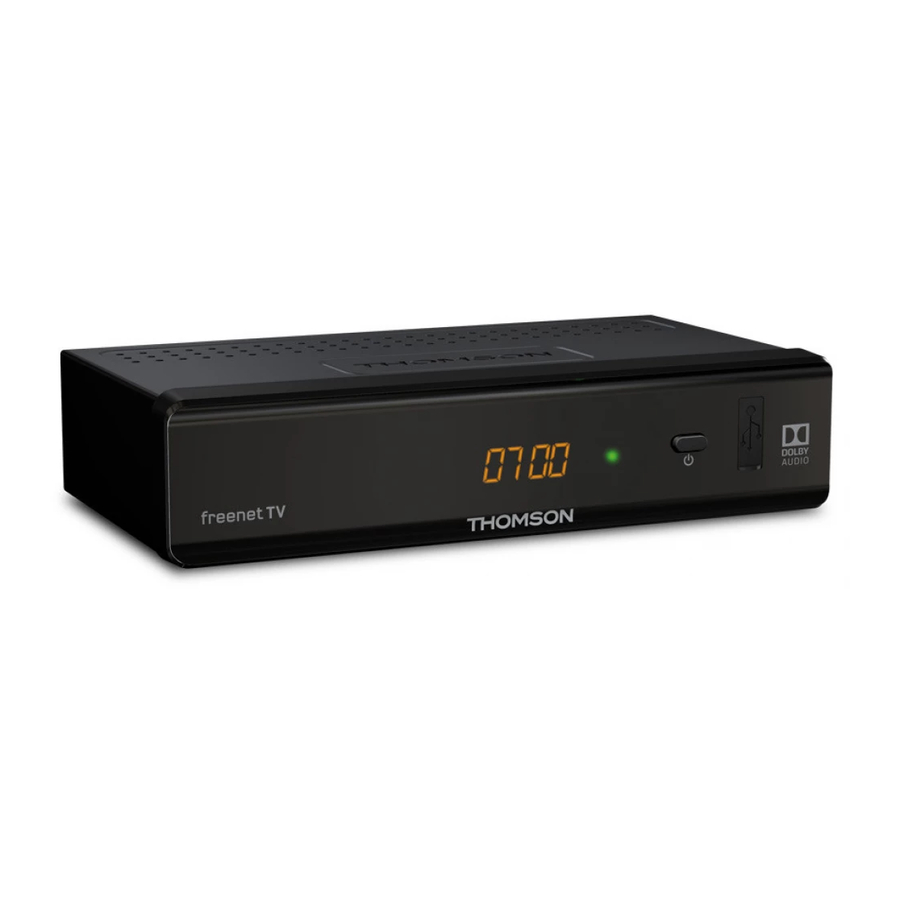
2.0 Your rEcEIvEr 2.1 dEFAuLt PIn: 0000 2.2 Front Panel Fig. 1 Receives commands from the remote control iR Sensor Shows channel number and time in standby LED Display RED indicates that the receiver is in STANDBY mode. GREEN Mode indicatorLED indicates that the receiver is in OPERATING mode. -
Page 10: Installing The Batteries
Opens the EPG* (Electronic Programme Guide) in TV mode. 10. pq Change channel to next/previous. Menu: Moves the cursor up/down. 11. t u Decreases/increases the volume level. Menu: Change settings for specific menus. 12. OK Opens the current channel list in menu: for confirmation 13. -
Page 11: Connection
3.0 connEctIon 3.1 connecting to a terrestrial antenna Fig. 6 To receive broadcast signals, your terrestrial indoor or outdoor antenna must be connected to the ANT IN connector on the back of the receiver. Use a proper shielded antenna cable and suitable connectors. Note: If the signals at your location are too weak to receive proper signals with an indoor antenna, we recommend using an outdoor antenna... -
Page 12: Starting Up For The First Time
Amplifier or home cinema set with a suitable cinch cable to the S/PDIF connector on the back of the receiver. Alternatively, if you’re using an analogue amplifier, then connect the audio output jack for stereo audio. connecting to a digital audio amplifier and TV using HDMi By connecting your receiver to an HDMI equipped digital amplifier or home cinema set you will enjoy the best possible sound quality and multi-channel audio (depending on broadcast). -
Page 13: Quick Guide To Using Your Receiver
5.0 QuIck guIdE to uSIng Your rEcEIvEr We at THOMSON understand that you can’t wait to enjoy your new high definition digital terrestrial receiver. The following quick guide will make you familiar with the basic operation of this device. We do, however, advice you to read the full manual to get the best performance from your receiver. -
Page 14: Info Banner
6.1.2 channel list Press OK in viewing mode to display the current TV list. Use pq in the channel list to highlight your channel of choice and press OK to switch. Press OK again to leave the channel list mode. Inside the channel list it is possible to use the PG+/PG- buttons as well in order to scroll page-wise through the list to speed up. -
Page 15: Record, Time Shift And Format
6.7 record, time shift and Format* * This part of the user manual describes the full functionality including the recording function and may not be applicable if the software for recording via USB has not yet been installed and activated. Please, visit our website www.thomsonstb.net to get more information. -
Page 16: Main Menu
Stops playback Opens the option menu to select and deselect for deleting a recorded file(s). This menu item opens only if you have selected first a file by using pq. Marks a recording for deletion. When all recordings you want to delete are marked, select Deleted Selected press OK. -
Page 17: Channels
7.1.4 Load Factory Settings This option allows you to reset the receiver back to the factory settings, which also clears all stored channels. Use pq to select Load Factory Settings in the Installation menu and press OK. You are asked to enter your PIN code. -
Page 18: Lock Channels
It is recommended to start with the selection of the channel you’d Note: like to have at position 1 in the favourite list and then add others in the desired order one by one. However, sorting of favourite channels afterwards is possible by using the GREEN Move button, but only if the Logical Channel Numbering function is switched Off. -
Page 19: Settings
7.2.2 radio Manager Create favourite lists, move channels in order, lock channels with PIN protection and delete channels from the radio list. The functions of handling are the same as in the TV Manager as described above. The only difference is that in the Radio manager there is no video information, so it will always display the radio background on the preview screen. -
Page 20: General Settings
OSD Timeout: Sets the time after which on screen banners and messages disappear. The range is 3~10 seconds. HDMI Audio Output: Toggles between PCM and Bitstream output. When PCM is selected, all digital audio will be converted to stereo audio. Bitstream enables you to listen or transfer Dolby®... -
Page 21: Parental Control
7.3.3.4 Logical channel numbering This receiver supports Logical Channel Numbering (LCN). This means that the channel numbers are operator defined and automatically sorted into the main channel list. Sorting in the main list is therefore not possible. In this case the Move function is marked grey and cannot be selected. After new software versions, the default setting for this function is Off and you are free to sort the channels in the main channel list. -
Page 22: Multimedia
The timer setup menu will now be displayed. The following settings are available: Timer Status: Choose between Once (Timer will wake up the receiver) or Off (Timer will not start the scheduled event). Also you can select Monday-Friday, Daily and Weekly. Timer Action: Select Booking to wake-up the receiver and switch to the selected channel. - Page 23 Warning: device. Please make a backup copy of all data you wish to keep before entering the Format menu. THOMSON cannot be held responsible for loss of data from USB devices used with this receiver. It is possible to use USB storage devices already formatted in NTFS.
-
Page 24: Network
7.5 network This menu consists of the following submenus: RSS, Weather and IP Settings. First connect a CAT5E (or higher quality) cable to the RJ-45 (ETHERNET) port of your receiver and ensure the other end is connected to the internet accordingly. If there are questions or problems with the internet connection, we recommend you to check details via the support or helpline of your internet provider. -
Page 25: Troubleshooting
not be available in your region. Please visit our website www.thomsonstb.net or contact your local service hotline for more information about this option. 7.6.2 upgrade by uSB This feature allows you to update the receiver software via the USB port. When a new software is available for your receiver, it can be downloaded from our website www.thomsonstb.net Place the software file (unzipped) in the root directory of your USB storage device (HDD, memory stick etc.) and connect the device to the USB port of the receiver. -
Page 26: Technical Specifications
Problem Possible cause What to do No picture or sound on HDMI or SCART is not selected Switch to correct TV/amplifier input TV or amplifier on your TV or amplifier or the Select lower resolution on receiver unit is set to higher resolution Switch TV/amplifier on. - Page 27 Tuner Front End: DVB-T/T2, UHF Tuner Input frequency range: UHF: 474 ~ 786 MHz Input signal level: DVB-T: -75 ~ -25 dBm DVB-T2: -70 dBm ~ -25 dBm Antenna power: 5 V DC, max. 100 mA, shortcut protected Video Decoder Profile level: MPEG-2 MP@ML, MP@HL, MPEG-4 H.264/AVC, MPEG-4 H.265/HEVC Video resolutions: 576i, 576p, 720p, 1080i, 1080p...
Need help?
Do you have a question about the THT741 and is the answer not in the manual?
Questions and answers