Table of Contents
Advertisement
Available languages
Available languages
Quick Links
Advertisement
Table of Contents

Related Manuals for Griven GR0570 HMI 2500 W


Summary of Contents for Griven GR0570 HMI 2500 W
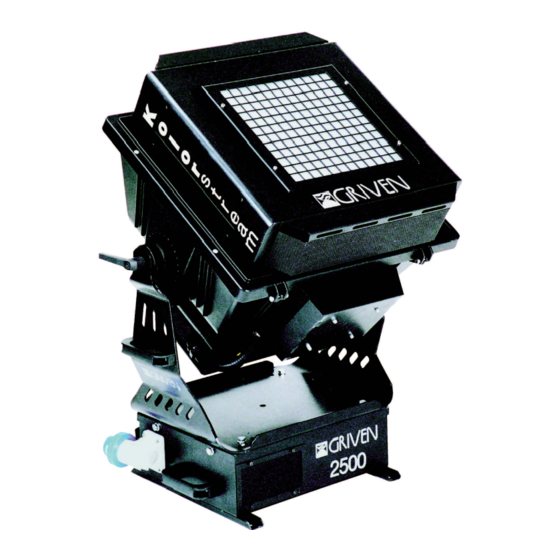
- Page 1 KOLORSTREAM ® GR0570 HMI 2500 W Manuale di istruzioni Instructions manual...
-
Page 2: Table Of Contents
INDICE Pag. 1.0 CONTENUTO DELL’IMBALLAGGIO 2.0 SICUREZZA 3.0 INSTALLAZIONE DEL PROIETTORE 3.1 Montaggio della Lampada 3.2 Posizionamento del Proiettore 3.3 Installazione con ballast separato 3.4 Installazione 3.5 Installazione del paraluce 3.6 Collegamento elettrico 4.0 LETTURA DEL DISPLAY ED USO DEI COMANDI 4.1 Opzioni 5.0 USO DEL PROIETTORE 5.1 Funzionamento con DMX... -
Page 3: Contenuto Dell'imballaggio
1.0 CONTENUTO DELL’IMBALLAGGIO Controllate attentamente il contenuto del cartone e, in caso di danni al prodotto, contattate il Vs. trasportatore. Nell’imballaggio del presente proiettore sono conte- nuti i seguenti prodotti: n° 1 Foglio di Istruzioni n° 1 proiettore KOLORSTREAM® MK2 n°... -
Page 4: Posizionamento Del Proiettore
3.2 Posizionamento del proiettore NOTA: Per installazioni a soffitto, ruotare la forcella intorno al proiettore come mostrato in figura. Il proiettore NON DEVE essere capovolto. 3.3 Installazione con ballast separato 3.4 Installazione... -
Page 5: Installazione Del Paraluce
3.5 Installazione del paraluce e regolazione zoom Ruotare nella direzione della Ruotare nella direzione della freccia per stringere il fascio freccia per allargare il fascio 3.6 Collegamento elettrico 1. Cablate la presa fornita con un cavo di alimentazione di sezione minima 3x2.5mm2. 2. -
Page 6: Opzioni
4.1 Opzioni: 1= Master On/Off: Master On -Funzionamento in AUTOMATICO Master Off -Funzionamento con centralina DMX 2= Preset Colours: Raggruppa in un solo canale i colori base (Giallo, Cyan, Magenta) 3= Remote switch lamp On/Off: Permette di accendere o spegnere la lampada tramite la centralina DMX. 4= Dimmer shutter, lamp On/Off Independent setting: Permette di settare l’... -
Page 7: Indicazione Dei Canali
La connessione delle prese XLR 3 poli dovrà avvenire come di seguito descritto: pin 1= function GND (SHIELD) pin 2= function SIGNAL - pin 3= function SIGNAL + Verificate che i fili siano correttamente collegati nel connettore e che essi non ne tocchino il guscio (utilizzare filo schermato). -
Page 8: Funzionamento In Automatico
6.0 FUNZIONAMENTO IN AUTOMATICO Il proiettore KOLORSTREAM® MK2 per poter funzionare in modo automatico deve essere settato in MASTER ON. Per far questo agite sul pulsante Select, quando sul display compare la scritta 1.OF premere il tasto (+) oppure (-) per ottenere la scrit- ta 1.ON. -
Page 9: Master-Slave
6.1 Master-Slave E’ possibile settare più proiettori KOLORSTREAM® MK2 in modalità Slave per fare in modo che seguano il programma eseguito da un proiettore Master. Il proiettore Master deve essere settato in Master ON, i proiettori Slave in Master Off (con indiriz- zo 1 e le opzioni 2, 3 e 4 in OFF). -
Page 10: Informazioni Tecniche
8.0 INFORMAZIONI TECNICHE 9.0 PARTI DI RICAMBIO Tutti i componenti del proiettore KOLORSTREAM® MK2 sono disponibili come parti di ricambio ed il relativo catalogo è disponibile su richiesta. -
Page 11: Packing
1.0 PACKING Check carefully the content of the box and in case of damage contact your for- warder immediately. The following items are included in the box: n° 1 instructions leaflet n° 1 KOLORSTREAM® MK2 n° 2 XLR 3 poles plugs (1 male + 1 female) n°... -
Page 12: Mounting Position
3.2 Mounting position NOTE: For “from the top” installations, turn the bracket upwards around the unit, as shown in picture. The projector must NOT be turned upside down. 3.3 Separate ballast set-up 3.4 Mounting... -
Page 13: 4-Leaf Barndoor Set Up
3.5-leaf barndoor set up Ruotare nella direzione della Ruotare nella direzione della freccia per stringere il fascio freccia per allargare il fascio 3.6 Electrical connection 1. Cable the provided mains plug with a supply cable 3x2.5 mm minimum; 2. Connect the lantern to a mains supply of 230V - 50/60Hz. Ensure that the mains cable is connected to earth;... -
Page 14: Options
4.1 Options: 1= Master On/Off: Master On -AUTOMATIC MODE Master Off -DMX MODE 2= Preset Colours: Yellow, Cyan, Magenta, all in one channel. 3= Remote switch lamp On/Off: Lamp On/Off through the DMX controller. 4= Dimmer shutter, lamp On/Off Independent setting: To enter this option push SELECT after you have set option 4 to ON(the display shows the current projector addressing);... -
Page 15: Channel Indication
The connection of the XLR 3 poles must be as follows: pin 1 = function GND (SHIELD) pin 2 = function SIGNAL - pin 3 = function SIGNAL + Please ensure that the cables are properly connected. Use shielded cable. In order to protect the PCB housing from water penetration, it is strictly recommen- ded to position the DMX connecting plugs as illustrated below. -
Page 16: Automatic Mode
6.0 AUTOMATIC MODE KOLORSTREAM® MK2 has to be set to MASTER ON to access it in automatic mode: push SELECT, when 1.OF is displayed push (+) or (-) to obtain 1.ON. Now press ENTER. The unit is set to MASTER ON. The unit starts working in automatic mode and is ready for the programming procedure. -
Page 17: Master-Slave
6.1 Master -Slave More KOLORSTREAM® MK2 unit can be set to ‘SLAVE’ to follow the ‘MASTER’ unit in synchrony. The ‘MASTER’ unit must be set to MASTER ON, the ‘SLAVE’ units must be set to ‘MASTER OFF’(with address number 1 and options 2,3 and 4 set to off). Slave Slave Master... -
Page 18: Technical Information
8.0 TECHNICAL INFORMATION 9.0 SPARE PARTS All components for KOLORSTREAM® MK2 are available. The exploded diagram and the catalogue are available on request. - Page 19 Importanti informazioni per il corretto riciclaggio/ smaltimento di questa apparecchiatura La direttiva Europea 2002/96/CE sui rifiuti di apparecchiature elettroniche (RAEE), prevede che gli apparecchi illuminanti non debbano essere smaltiti nel normale flusso dei rifiuti solidi urbani. Gli apparecchi dismessi debbono essere raccolti separatamente per ottimizzare il tasso di recupero e riciclaggio dei materiali che li compongono ed impedire potenziali danni per la salute e l’ambiente.
- Page 20 Via Bulgaria, 16 - 46042 CASTEL GOFFREDO (MN) - Italy Telefono 0376/779483 - Fax 0376/779682 - 0376/779552 http://www.griven.com/ e-mail griven@griven.com http://www.griven.it/ e-mail griven@griven.it User’s manual rel. 1.00...
Need help?
Do you have a question about the GR0570 HMI 2500 W and is the answer not in the manual?
Questions and answers