HP ProCurve Switch 5406zl Installation And Getting Started Manual
Hide thumbs
Also See for ProCurve Switch 5406zl:
- Advanced traffic management manual (460 pages) ,
- Access security manual (390 pages) ,
- Planning and implementation manual (168 pages)

Related Manuals for HP ProCurve Switch 5406zl


Summary of Contents for HP ProCurve Switch 5406zl
- Page 1 Installation and Getting Started Guide ProCurve Switch ONE Services zl Module www.hp.com/networking...
- Page 2 HP ProCurve Services zl Module Installation and Getting Started Guide...
- Page 3 Nothing herein March 2012 should be construed as constituting an additional warranty. HP shall not be liable for technical or editorial errors or omissions contained herein. Applicable Products Hewlett-Packard assumes no responsibility for the use or...
-
Page 4: Table Of Contents
HP Customer Support Services ........3-1... - Page 5 B Waste Electrical and Electronic Equipment (WEEE) Statements C Hardware Components Front Panel Buttons and LEDs ........C-1 Internal Ports .
-
Page 6: Hardware Installation
The module is managed through an easy to use Command Line Interface (CLI). The module can be installed in any HP ProCurve zl switch (either the switch series 5400zl or 8212zl). A maximum of four Services Modules can be installed in the same chassis. -
Page 7: Installing The Module
Hardware Installation Installing the Module For a description of the front panel buttons and LEDs, see Table C-1 on page www. procurve.com/manuals. in the Web version of this document at N o t e The printed version of this document contains the basic information needed to get you started using the Services Module. -
Page 8: Installation Procedure
Hardware Installation Installing the Module Installation Procedure N o t e Before installing the Services Module, confirm that the switch has the most current version of module-compatible software installed. Otherwise the switch will not recognize the Services Module. For directions on how to check the switch software version, see “Initial Configuration”... -
Page 9: Verifying That The Module Is Installed Correctly
Hardware Installation Installing the Module The procedure to replace or remove a Services Module is described on page www. procurve.com/manuals. in the Web version of this document at Appendix C also describes the procedure to replace the module’s Hard Disk Drive (HDD) and the Compact Flash (CF) card. -
Page 10: Environmental Specifications
Hardware Installation Environmental Specifications Environmental Specifications Temperature Operating Non-Operating 0°C to 40°C (32°F to 104°F) -10°C to 65°C (-10°F to 149°F) Relative humidity 15% to 90% at 40°C (104°F) 15% to 90% at 65°C (149°F) (non-condensing) Maximum altitude 3.0 km (10,000 ft) 4.6 km (15,000 ft) a. - Page 11 Hardware Installation Environmental Specifications...
-
Page 12: Getting Started
The Services Module does not ship with any product software installed. When the module is installed in a switch for the first time, the system boots directly into the Service OS. From here, HP ProCurve certified product software can be downloaded, installed, and activated on the module. Product software includes both the application and the product OS. - Page 13 Getting Started The figure below shows where the three different operating systems reside on the Services Module. Note that the Service OS and the product OS live in independent partitions on the hard disk. Figure 2-1. Module Operating Systems CLI commands are available to boot the module from one OS to another. The following examples show the CLI commands to switch between operating systems.
-
Page 14: Initial Configuration
Getting Started Initial Configuration Initial Configuration The Command Line Interface (CLI) must be used to carry out the steps required to configure the module. The module CLI is accessed through the switch CLI, and is available in all three OS environments: Service OS, CF Service OS, and product OS (limited command set). -
Page 15: Updating Services Module Software
Getting Started Initial Configuration An example output from this command looks as follows: Status and Counters - Services Module C Status HP Services zl Module J9154A Versions : A.01.06, B.01.03 Current status : running Description Version Status --------------- ------------------- --------- Services zl Module B.01.03... -
Page 16: Service Os Installation
Service OS does not require the product to be removed first. Service OS Installation Periodically, Service OS updates are available from HP ProCurve. To check the Service OS version installed on the Services Module, first boot the Service OS, if it is not already booted. Then, access the module’s Service OS CLI:... -
Page 17: Downloading A Product
Using the Service OS CLI, a user can download a product via the network or through the USB interface. The product is certified, that is, signed and encrypted, to authenticate that it is from HP ProCurve. Once validated, the bits are stored on the Services Module's hard disk and are ready for installa- tion. -
Page 18: Activating A Product
Getting Started Activating a Product Activating a Product To activate a product, a license must be applied to the module to bind the product to the specific Services Module. Once the license has been validated, the module then boots directly into the product OS. Follow the steps below to activate the product: Access the Service OS CLI. -
Page 19: Downloading Multiple Products
Getting Started Downloading Multiple Products After the product boots, the product CLI becomes available: hostswitch# services c 2 hostswitch(services-module-C:PR)# A detailed description of the product activation process is on page D-6 in the www. procurve.com/manuals. Web version of this document at Downloading Multiple Products It is possible to download multiple products to the Services Module. -
Page 20: Troubleshooting
HP Customer Support Services HP offers support 24 hours a day, seven days a week through the use of a number of automated electronic services. See the Customer Support/Warranty booklet that came with the product for information on how to use these services to get technical support. - Page 21 Troubleshooting HP Customer Support Services...
-
Page 22: A Emc Regulatory Statements
EMC Regulatory Statements EMC Regulatory Statements U.S.A. - FCC Class A This equipment has been tested and found to comply with the limits for a Class A digital device, pursuant to Part 15 of the FCC Rules. These limits are designed to provide reasonable protection against interference when the equipment is used in a commercial environment. -
Page 23: Japan - Vcci Class A
EMC Regulatory Statements Japan - VCCI Class A Korea Taiwan... - Page 24 Waste Electrical and Electronic Equipment (WEEE) Statements Waste Electrical and Electronic Equipment (WEEE) Statements Disposal of Waste Equipment by Users in Private Household in the European Union This symbol on the product or on its packaging indicates that this product must not be disposed of with your other household waste.
- Page 25 Waste Electrical and Electronic Equipment (WEEE) Statements Laitteiden hävittäminen kotitalouksissa Euroopan unionin alueella Jos tuotteessa tai sen pakkauksessa on tämä merkki, tuotetta ei saa hävittää kotitalousjätteiden mukana. Tällöin hävitettävä laite on toimitettava sähkölaitteiden ja elektronisten laitteiden kierrätyspisteeseen. Hävitettävien laitteiden erillinen käsittely ja kierrätys auttavat säästämään luonnonvaroja ja varmista- maan, että...
- Page 26 Waste Electrical and Electronic Equipment (WEEE) Statements Smaltimento delle apparecchiature da parte di privati nel territorio dell'Unione Europea Questo simbolo presente sul prodotto o sulla sua confezione indica che il prodotto non può essere smaltito insieme ai rifiuti domestici. È responsabilità dell'utente smaltire le apparecchiature consegnan- dole presso un punto di raccolta designato al riciclo e allo smaltimento di apparecchiature elettriche ed elettroniche.
- Page 27 Para obter mais informações sobre locais que reciclam esse tipo de material, entre em contato com o escritório da HP em sua cidade, com o serviço de coleta de lixo ou com a loja em que o produto foi adquirido.
-
Page 28: C Hardware Components
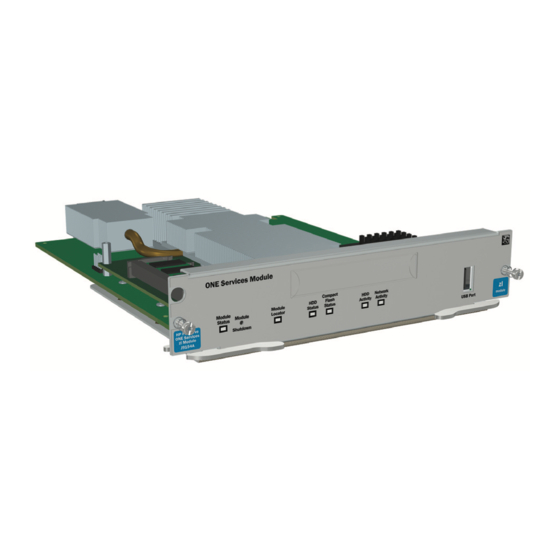
Hardware Components Front Panel Buttons and LEDs Hardware Components Front Panel Buttons and LEDs This section describes the different buttons and LEDs on the front panel of a Services Module: Module Shutdown button: This button is used to shut down the module. ■... - Page 29 Hardware Components Front Panel Buttons and LEDs Module LED State Meaning This LED is off by default. Flashing cycle (green or orange) is 400ms on – 400ms off. Module Flashing/ Solid during boot only when the module is inserted into a Locator solid chassis, soft reboots do not enable this LED.
-
Page 30: Internal Ports
A1 and A2. Serial Numbers Serial numbers are required when contacting HP or a reseller for warranty assistance or for coverage under a service agreement. For future reference, record the serial and product numbers in the warranty booklet. - Page 31 Hardware Components Serial Numbers Module serial number SN: SGxxxxxxxx Figure C-2. Locating the module serial number The serial number of the module also can be obtained through the CLI by using the following command: hostswitch# show modules Status and Counters - Module Information Chassis: 5406zl J8697A Serial Number: SG736SU06F...
-
Page 32: Switch Leds
Hardware Components Switch LEDs Switch LEDs The following figures show the Test, Fault, and Module Status LEDs on the switches the Services Module can be installed in. Test LED Module Status LEDs Fault LED Figure C-3. Test, Fault, and Module Status LEDs on a Series 5400zl switch Test LED Module Status LEDs Fault LED... -
Page 33: Replacing The Disk Drive
Hardware Components Replacing the Disk Drive C a u t i o n A 5-second delay is mandatory between removing a module, and either re- installing it, or replacing it with another. To replace one module with another, or to remove a module without replacing it, use the following procedure: Unscrew the retaining screws enough to disconnect them from the threaded holes in the switch. -
Page 34: Replacing The Flash Card
Hardware Components Replacing the Flash Card Re-install the module into the switch. 10. Use an equal amount of pressure and push both extractor handles closed to completely seat the module. 11. Tighten the retaining screws. Extractor Handles Retaining Screws Disconnected Retaining Screws Figure C-5. - Page 35 Hardware Components Replacing the Flash Card Using either a flat-bladed or Torx T-10 screwdriver loosen the retaining screws securing the module. Using the extractor handles, pull the module out from the slot and turn it over. Slide out the old flash card by applying slight pressure to the top of the flash card.
-
Page 36: D Software Components
When an update is needed, use the following steps to update the switch software: www. procurve.com Visit the HP ProCurve Web portal at to check the version number of the latest module-compatible software. Check the version number of the software installed on the switch. -
Page 37: Updating The Service Os
Updating Service OS via FTP The Services Module uses FTP to download its software. This requires that a local FTP server must be setup. The software update from HP ProCurve is packaged as a "zip" file containing a top-level folder which needs to be extracted onto the FTP server so that the folder name is visible to download from the module CLI. - Page 38 Software Components Updating the Service OS Check the images repository to verify that the updated CF Service OS was downloaded to the Services Module: hostswitch(services-module-C:HD)# show images Uninstall the previous version of the CF Service OS. hostswitch(services-module-C:HD)# uninstall cf_service Install the updated CF Service OS. hostswitch(services-module-C:HD)# install cf_service <CF image>...
- Page 39 Updating the Service OS N o t e HP ProCurve does not recommend downloading product images while booted into the CF Service OS. These should be downloaded from the Service OS; the HD allows for larger and faster downloads than the CF.
-
Page 40: Updating Cf Service Os Via Usb
Software Components Updating the Service OS Updating CF Service OS via USB N o t e Any image folder (Service, CF Service, tools, or product) can be put on a USB flash drive and transferred to the Service or CF Service image repository. Insert a USB flash drive into a Windows PC. -
Page 41: Product Activation
This section describes the steps required to obtain and install the product activation license key. Registration on the HP My ProCurve portal is required to activate products installed on the Services Module. Registration is free. To register, go to https://my.procurve.com and follow the registration instructions. - Page 42 Software Components Product Activation The following figure summarizes the process to activate the product Figure D-1. Product Activation Summary...
- Page 43 Software Components Product Activation The process details are provided below: 1. Using the switch CLI boot the Service OS on the module. Then enter the following: hostswitch# services c 1 This assumes the Services Module is in slot C. Enter this command at the next prompt: hostswitch(services-module-C:HD)# licenses hardware-id activation The CLI returns a Hardware ID number.
- Page 44 Software Components Product Activation Click ProCurve Device Software to continue to the Registration ID page. Enter the registration ID number in the Registration ID field. (This number is not case-sensitive.) It is located at the bottom of the card that is included with the license product.
- Page 45 Software Components Product Activation 3. Enter the Hardware ID copied from the console session (from Step 1). Optionally, enter notes in the Customer Notes field. These might, for instance, identify which device has been licensed and where it is located. These notes are kept, along with the registration ID number, in your user account on the My ProCurve portal.
- Page 46 Software Components Product Activation Copy the license key from the screen or write it down. This will be entered into the CLI in the next step. 4. Enter this command at the Services Module’s CLI prompt: hostswitch(services-module-C:HD)# licenses install activation license key <...
-
Page 47: Uninstalling A License
This returns the user back to the switch context. The module is ready to use when the following command shows “running” as the current status: hostswitch(config)# show services c Status and Counters - Services Module C Status HP Services zl Module J9154A Versions : A.01.06, B.01.03 Current status... -
Page 48: Viewing The License Summary
Software Components Product Activation Click Uninstall license. Enter the uninstall verification key on the next page. A registration ID will be generated. To view all the registration ID numbers in a My ProCurve account, click View available reg IDs on the page in Step 3 above. This displays the Available Registration IDs page. - Page 49 Software Components Product Activation D-14...
-
Page 50: Index
Hardware ID … 2-7, D-6, D-8, D-9, D-10 License Activation Page … D-8, D-12 Hardware ID Page … D-9 License Agreement Page … D-10 HP Customer Support Services … 3-1 License Key … 2-7, D-6, D-10, D-11 License Key Confirmation Page … D-10 License Summary Exporting …... - Page 51 Licenses Activation License Card … D-9 Waste Electrical and Electronic Equipment (WEEE) Installation … D-6 Statements … B-1 Uninstallation … D-12 zl Switch … 1-1, C-5 Module Front Panel … 1-1, C-1 Module Shutdown … C-1 USB Port … C-1 Module Overview …...
- Page 52 © Copyright 2008, 2009, 2012 Hewlett-Packard Development Company, L.P. March 2012 Manual Part Number 5998-3250...
Need help?
Do you have a question about the ProCurve Switch 5406zl and is the answer not in the manual?
Questions and answers