
Subscribe to Our Youtube Channel
Related Manuals for Swisscom Aton CL315


Summary of Contents for Swisscom Aton CL315
- Page 1 Bedienungsanleitung Mode d’emploi Istruzioni per l’uso Aton CL315/CLT315 Handapparat Combiné Telefono portatile...
-
Page 2: Aton Cl315/Clt315 - More Than Just A Telephone
53). Please note Device names are listed according to the original name in the software tool. The following list provides the equivalent Swisscom device name for each original name: Gigaset S790 = Aton CL315 Gigaset S795 = Aton CLT315 Gigaset S79H = Aton CLx315, 415i handset ¢... -
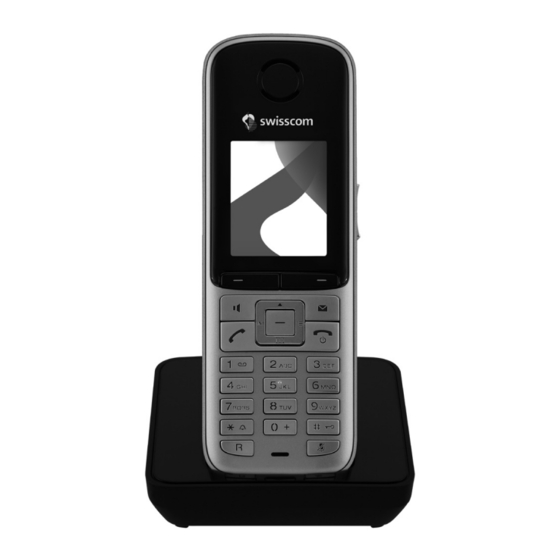
Page 3: The Handset At A Glance
The handset at a glance The handset at a glance 1 Display in idle status ¢ 2 Battery charge status ( page 15) 3 Side keys ¢ Set call ( page 44) or ¢ ringtone volume ( page 45) ¢ 4 Display keys ( page 19) ¢... -
Page 4: Display Symbols
Display symbols Display symbols The following symbols are displayed dependent on the settings and the operating status of your telephone: ¢ Signal strength i ( page 36) ¢ or ECO Mode+ icon ¼ ( page 36) ¢ Bluetooth activated ( page 41) or ô/ õ... -
Page 5: Table Of Contents
"Swisscom Hotline" ........ - Page 6 Contents Using the Missed Alarms List ........34 Using the Network Mailbox (Combox) .
-
Page 7: Safety Precautions
Safety precautions Safety precautions Warning Be sure to read this user guide and the safety precautions before using your telephone. Explain their content and the potential hazards associated with using the telephone to your children. Use only the power adapter supplied, as indicated on the underside of the base. Use only rechargeable batteries that correspond to the specification pro- vided on page 52, as this could otherwise result in significant health risks and personal injury. -
Page 8: Environmental Benefits Of The Aton Cl315/Clt315
Power consumption in standby mode is approx. 1.3 watt. Minimal radiation The Aton CL315/CLT315 with its preset Eco Mode plus switches off all radiation when in idle status. During a call, the handset reduces the transmission power according to the distance from the base station. -
Page 9: First Steps
First steps First steps Checking the package contents One handset Two batteries One battery cover One charger One power adapter One belt clip One plastic headset socket cover One user guide One headset... -
Page 10: Setting Up The Charger
First steps Setting up the charger The charger is designed for use in dry rooms in a temperature range of +5°C to +45°C. ¤ Place the charger on a level, non-slip surface or mount it on the wall ¢ page 55). Please note Pay attention to the range of the base. -
Page 11: Setting Up The Handset For Use
First steps Setting up the handset for use The display and keypad are protected by plastic films. Remove the protective films! Inserting the batteries and closing the battery cover Warning ¢ Use only rechargeable batteries recommended ( page 52), i.e., never use a conventional (non-rechargeable) battery, as this could result in significant health risks and personal injury. - Page 12 First steps ¤ Insert the plastic cover provided for the headset socket to ensure optimum sound in speaker mode. Attaching the belt clip The handset has notches on each side to attach the belt clip. ¤ To attach – press the belt clip onto the back of the handset so that the protrusions on the belt clip engage with the notches.
-
Page 13: Registering The Handset
First steps Registering the handset A handset can be registered on up to four bases. You must initiate handset reg- istration on the handset and on the base. When the registration process has completed successfully, the handset returns to idle status. The handset's internal number is shown in the display, e.g., 1. - Page 14 First steps Initial charging and discharging of the batteries The correct charge level can only be displayed if the batteries are first fully charged and discharged. ¤ Charge the handset for 8.5 hours in the charger. ¤ Then remove the handset from the charger and do not replace it until the bat- 8.5 hrs...
-
Page 15: Setting The Date And Time
First steps Setting the date and time Set the date and time so that the correct date and time can be assigned to incoming calls, and so that the alarm can be used. ¤ Press the key below on the dis- §Time§... -
Page 16: Charge Status Of The Batteries
First steps Back Save ¤ Press the key below on the dis- §Save§ play screen to confirm your entry. Date/Time ‰ The display shows Saved. You will hear Saved a confirmation tone and the handset will automatically return to idle status. Display in idle status Once the phone is registered and the time is set, the idle status is shown as in this example. -
Page 17: Connecting The Headset
After removing the plastic cover, you can connect a headset to the left-hand side of your handset with the 2.5 mm jack connector. HAMA, Plantronics M40, MX100 and MX150 and Swisscom headsets are all sui- table. The headset volume corresponds to the settings for the ¢... -
Page 18: What Would You Like To Do Next
Use the following guide to quickly locate the most important subjects. If you are unfamiliar with menu-driven devices such as other Swisscom tele- ¢ phones, read the section entitled "Using the phone" first ( page 18). -
Page 19: Using The Phone
Using the phone Using the phone Using the control key The side of the control key that you must press in the respec- tive operating situation is marked in black below (top, bot- tom, right, left, centre), e.g., v for "press right on the control key"... -
Page 20: Using The Display Keys
"Swisscom Hotline" Press the display key. §§§§Hotline§§§§ Select Hotline. You will be directly connected to the Swisscom Contact Centre. The access number is pre-programmed as 0800 800 800 but can be changed. Please note: Swisscom Contact Centre 0800 800 800... -
Page 21: Correcting Incorrect Entries
Using the phone Correcting incorrect entries You can correct incorrect characters in the input fields by navigating to the incorrect entry using the control key. You can then: Ñ Delete the character to the left of the cursor with the display key (press and hold to delete the word) Insert characters at the cursor position Overwrite the highlighted (flashing) character, e.g., when entering time and... -
Page 22: Activating/Deactivating The Handset
Using the phone Submenus The functions in the submenus are displayed as lists Settings (example on the right). To access a function: Date/Time ¤ Scroll to the function with the control key q and Audio Settings press §OK§ Display Briefly press the display key or the end call §Back§... -
Page 23: Using This Guide
Using the phone Using this guide The operating steps are shown in abbreviated form. Example: The illustration: ¢ ¢ ¢ Ï (³ = on) Display Large Font means: ¤ Press right on the control key v to open the main menu. ¤... - Page 24 Using the phone Display ¤ Press down on the control key s Screensaver ´ until the Large Font menu option Large Font appears on the display. Colour Schemes Backlight Back Change ¤ Press the display key §Change§ activate/deactivate the function. Display Screensaver The change is effective immediately...
-
Page 25: Menu Overview
Menu overview Menu overview Setting standard mode or expert mode The menu display can be Complete (expert mode) or Simplified (standard mode). To change these settings: Ï ¢ ¢ ¢ Select v (standard mode) or (expert mode) Menu View Simplified Complete ¢... - Page 26 Menu overview Ï Settings ¢ Date/Time page 14 ¢ Audio Settings Handset Volume page 44 • ¢ Advisory Tones page 47 ¢ Ringtones(Handset) page 45 Ringtones (Base) (dependent on base) • Music on hold (dependent on base) ¢ Display Screensaver page 43 ¢...
-
Page 27: Making Calls
Making calls Making calls Ending a call Press the end call key. Making an external call Accepting a call External calls are calls using the public tel- The handset indicates an incoming call in ephone network. three ways: by ringing, by a display on the screen and by the flashing talk key c. -
Page 28: Switching To Mute
Making calls Making internal calls Switching between earpiece and speaker mode Internal calls to other handsets registered Press the speaker key. on the same base are free. Activate/deactivate speaker mode during a call. Calling a specific handset If you wish to place the handset in the Initiate internal call. -
Page 29: Using The Directory And Lists
Using the Directory and lists Using the Directory and lists Saving a number in the Directory ¢ <New Entry> ¤ The options are: You can enter data in the following Directory fields: Redial List First Name: / Surname: Enter first names and/or surnames. Incoming SMS Message List If you do not enter a name in either of (dependent on base) - Page 30 Using the Directory and lists Order of Directory entries Managing Directory entries Directory entries are generally sorted Viewing entries alphabetically by surname. Spaces and ¢ s (Select entry) digits take first priority. If only the first name was entered in the Directory, this is Press the display key.
- Page 31 Using the Directory and lists Please note: Copy Entry Internal: Send a single entry to a Entries with identical numbers are not ¢ handset ( page 30). overwritten on the receiving handset. SMS: Send a single entry in vCard via The transfer is cancelled if the phone vCard format via SMS.
- Page 32 Using the Directory and lists Copying the displayed number to the Please note Directory A time must be specified for reminder calls. If you select a visual signal, a time You can copy numbers displayed in a list, is not required and is automatically set e.g., the Call List or the Redial List, or in an to 00.00.
-
Page 33: Using The Redial List
Using the Directory and lists Using the Redial List Using the Incoming SMS Message List (dependent The Redial List contains the twenty num- on base) bers last dialled with the handset (max. 32 digits). If one of the numbers is in the Directory, the corresponding All received SMS messages are saved in name is displayed. -
Page 34: Opening Lists With The Message Key
Using the Directory and lists Date and time of call (if set, page 14) An advisory tone sounds as soon as a new message arrives in a list. The f key Type of entry: › flashes (it goes off when the key is –... -
Page 35: Using The Missed Alarms List
Using the Directory and lists Using the Missed Alarms List Missed (unacknowledged) appointments ¢ from the Calendar ( page 36) and anni- ¢ versaries ( page 31) are saved in the Missed Alarms List under the following circumstances: You do not accept an appointment/ anniversary. -
Page 36: Using The Network Mailbox (Combox)
Using the Network Mailbox (Combox) Using the Network Mailbox Calling the Network Mailbox Press and hold. You are con- (Combox) nected directly to the Network Mailbox. Press speaker key d if The Network Mailbox is your network pro- vider's Answering Machine within the net- required. -
Page 37: Minimal Radiation
Options The radiation can only be reduced if your base supports this function. The current day is selected (highlighted The Aton CL315/CLT315 with its preset in white). Eco Mode plus switches off all radiation Days on which appointments have when in idle status. During a call, the... - Page 38 Setting an appointment (Calendar) ¤ You can enter data in the following ØáÚ fields: Activation: Select or Off. Date: Enter day/month/year in 8-digit format. Meeting Time: 03.11.09 15:38 Enter hours/minutes in 4-digit format. Text: Enter text (max. of 16 characters). The text appears as the appointment name in the list and is displayed on the screen You can either deactivate or answer an...
-
Page 39: Displaying Missed Appointments, Anniversaries
Setting the Alarm Clock Setting the Alarm Clock Deleting all appointments ¢ ¢ Delete all §Options §OK§ Confirm the security prompt with Prerequisite: The date and time have §Yes§ ¢ All appointments are deleted. already been set ( page 14). Activating/deactivating the Alarm Displaying missed Clock and setting the wake-up time... -
Page 40: Using A Handset As A Room Monitor
Using a handset as a Room Monitor Deactivating the wake-up call/ If you deactivate then reactivate the hand- set, the Room Monitor remains activated. repeating after a pause (Snooze mode) Prerequisite: A wake-up call is sounding. Warning! Always check the operation of the Press the display key. -
Page 41: Using Bluetooth Devices
Using Bluetooth devices ¤ Press to save the settings. To reactivate the Room Monitor with the §Save§ same phone number: When the Room Monitor function is acti- ¤ Turn on the activation again and save vated, the idle display appears as shown ¢... - Page 42 Using Bluetooth devices Activating/deactivating Bluetooth Repeat Search Select and press mode §OK§ ò ¢ ¢ Activation Editing the list of Known (trusted) In idle status, the ò icon on the handset Devices shows that Bluetooth mode is activated ¢ page 3). Open list ò...
-
Page 43: Setting Up The Handset
Setting up the handset Setting up the handset Rejecting/accepting an unregistered Bluetooth device Your handset is preconfigured, but you If a Bluetooth device that is not registered can change the settings to suit your indi- in the list of Known Devices tries to con- vidual requirements. -
Page 44: Changing The Display Language
Setting up the handset Selecting numbers/changing an More Functions... More features are available: assignment Call Lists ¢ Prerequisite: The digit key already has a Display Call Lists ( page 32). number assigned to it. ¢ When the handset is in idle status ¤... -
Page 45: Activating/Deactivating Auto Answer
Setting up the handset If a screensaver is activated, the The current setting is displayed. Screen- menu option is marked with μ. ¤ saver You can enter data in the following Ï ¢ ¢ ¢ fields: Display Screensaver In Charger The current setting is displayed. -
Page 46: Changing Ringtones
Setting up the handset The setting will automatically be saved While the phone is ringing, you can per- after approximately 3 seconds or press the manently change the volume by pressing the side keys ø (louder) or ÷ (quieter). display key §Save§... -
Page 47: Using The Resource Directory
Setting up the handset Using the Resource Directory Activating/deactivating the ringtone You can deactivate the ringtone on your The Resource Directory on the handset handset before you answer a call or when manages sounds, which you can use as the handset is in idle status; the ringtone ringtones, and pictures (Caller Pictures can be deactivated permanently or just for and Screensavers). -
Page 48: Activating/Deactivating Advisory Tones
Setting up the handset • Activating/deactivating Playing back sounds/viewing Caller Pictures Advisory Tones É ¢ ¢ Resource Directory ¢ Your handset uses Advisory Tones to tell Screensavers / Caller Pictures / you about different activities and statuses. (select entry) Sounds The following Advisory Tones can be acti- Pictures: vated/deactivated independently of each... -
Page 49: Setting Your Own Area Code
Setting up the handset • • Setting your own area code Restoring the handset default settings To transfer phone numbers (e.g., in vCards), it is essential that your area code You can reset individual settings and (international and local area code) is changes that you have made. -
Page 50: Warranty/Maintenance/Repair/ Approval
If you have any general questions about products, services etc., please contact your Swisscom Information Centre (toll- free number 0800 800 800). * An exception is damage to wearing parts (cable, labels, batteries etc.) and due to improper handling (damage from dropping, infiltrated fluids etc.). -
Page 51: Faults And Self-Help With Troubleshooting
Faults and self-help with troubleshooting Faults and self-help with Please register handset flashes on the display. Handset has not been registered with the base troubleshooting or has been deregistered. ¥ ¢ Register the handset ( page 12). Handset does not ring. Not every problem signifies a fault in your 1. -
Page 52: Approval
ò Bluetooth Qualified Design Identity 3. Pat all parts dry, then place the handset The Bluetooth QD ID for your Aton CL315/ with the battery compartment open CLT315 is B015360. and the keypad facing down in a dry, warm place for at least 72 hours (not in a microwave, oven etc.). -
Page 53: Specifications
Appendix Specifications General specifications DECT standard Is supported Batteries GAP standard Is supported Technology: No. of channels 60 duplex channels Nickel-metal-hydride (NiMH) Radio frequency range 1880–1900 MHz Size: AAA (Micro, HR03) Voltage: 1.2 V Duplex method Time multiplex, 10 ms frame length Capacity: 550 - 1000 mAh Channel grid 1728 kHz... -
Page 54: Accessing Additional Functions Via The Pc Interface
Writing digits the original name in the software tool. The following list provides the equiva- Upper case * lent Swisscom device name for each Lower case original name: * First letter in capitals, all others in lower case Gigaset S790 = Aton CL315... - Page 55 Accessing additional functions via the PC interface Transferring data Procedure in case of an error If the update procedure fails or your Start the "Gigaset QuickSync" program. phone does not work properly following You can now: the update, repeat the update procedure Synchronise your handset Directory as follows: ¤...
-
Page 56: Accessories
Accessories Accessories Use only original accessories. This will avoid possible health risks and personal injury, and also ensure that all the relevant regulations are complied with. Mounting the charger on the wall 23.5 mm approx. 4 mm... -
Page 57: Index
Index Index deregistering devices ... list of Known Devices ... registering devices ... . . transferring directory (vCard) . - Page 58 Index Dialling using Quick Dial ... . Handset using the directory ... . . activating/deactivating ..Directory .
- Page 59 Index Keys Message key ....control key ....opening lists .
- Page 60 Index Ringtone changing ....setting volume ....Ringtone deactivated for anonymous call .
Need help?
Do you have a question about the Aton CL315 and is the answer not in the manual?
Questions and answers