Advertisement
Available languages
Available languages
Quick Links
AR 4020
Bedienungsanleitung/Garantie
Instrucciones de servicio • Manual de instruções • Manuale d'istruzione
Instruction Manual • Podręcznik Użytkownika/Gwarancja
Autoradio mit CD/USB und Card Reader
Radio de coche con CD/USB y lector de tarjetas • Auto-rádio com CD/USB e leitor de cartões
Autoradio con CD/USB e lettore di schede • Car radio with CD/USB and Card Reader
Radio samochodowe z CD/USB i czytnikiem kart
Advertisement
Chapters

Related Manuals for AEG AR 4020


Summary of Contents for AEG AR 4020
- Page 1 AR 4020 Bedienungsanleitung/Garantie Instrucciones de servicio • Manual de instruções • Manuale d’istruzione Instruction Manual • Podręcznik Użytkownika/Gwarancja Autoradio mit CD/USB und Card Reader Radio de coche con CD/USB y lector de tarjetas • Auto-rádio com CD/USB e leitor de cartões Autoradio con CD/USB e lettore di schede •...
-
Page 2: Table Of Contents
Inhalt DEUTSCH ITALIANO Inhalt Contenuto Übersicht der Bedienelemente ..........Seite Posizione dei comandi ............. Pagina Inhaltsverzeichnis ..............Seite Contenuto................Pagina 48 Technische Daten ..............Seite 16 Dati tecnici ................Pagina 59 Garantie ..................Seite 17 Indice ..................Pagina 61 Index ....................Seite 19 ESPAÑOL ENGLISH Índice Contents Indicación de los elementos de manejo .... -
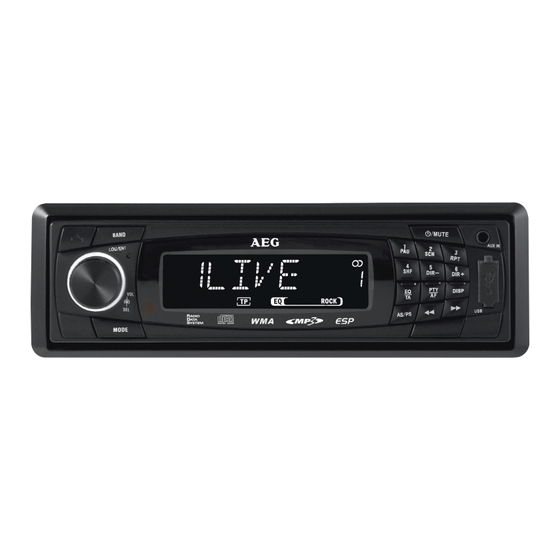
Page 3: Übersicht Der Bedienelemente
Übersicht der Bedienelemente Indicación de los elementos de manejo • Descrição dos elementos Posizione dei comandi • Overview of the Components Przegląd elementów obsługi... -
Page 4: Inhaltsverzeichnis
Deutsch Inhaltsverzeichnis Einführung ..................5 Vorwort ....................5 Informationen zu dieser Bedienungsanleitung.......5 Urheberrecht ..................5 Haftungsbeschränkung ..............5 Warnhinweise..................5 Bestimmungsgemäße Verwendung ..........5 Sicherheit ..................5 Grundlegende Sicherheitshinweise ..........5 Gefahr durch Laserstrahlung ............6 Verkehrssicherheit ................6 Bedienelemente (siehe Ausklappseite) .........6 Einbauen und Anschließen ............7 Sicherheitshinweise ................7 Lieferumfang und Transportinspektion ........7 Entsorgung der Verpackung............7 Anschluss ....................7 Ein- und Ausbau ..................8... -
Page 5: Einführung
Umgang mit dem Gerät erleichtern. Informationen zu dieser Bedienungsanleitung Diese Bedienungsanleitung ist Bestandteil des Stereo Bestimmungsgemäße Verwendung Autoradios AR 4020 (nachfolgend als Gerät bezeichnet) und gibt Ihnen wichtige Hinweise für den bestimmungs- Dieses Gerät ist nur bestimmt gemäßen Gebrauch, die Sicherheit, den Anschluss sowie ■... -
Page 6: Gefahr Durch Laserstrahlung
Deutsch ■ Personen, die aufgrund ihrer körperlichen, geistigen Bedienelemente (siehe Ausklappseite) oder motorischen Fähigkeiten nicht in der Lage sind Entriegelungstaste für Bedienteil das Gerät sicher zu bedienen, dürfen das Gerät nur Taste BAND/LOU/ENT: unter Aufsicht oder Anweisung durch eine verantwort- Frequenzbereich wählen/LOUDNESS-Funktion ein- liche Person benutzen. -
Page 7: Einbauen Und Anschließen
Deutsch Einbauen und Anschließen Anschluss WARNUNG Sicherheitshinweise Bei der Installation des Gerätes können Sachschäden WARNUNG auftreten! Bei der Inbetriebnahme des Gerätes können Personen- ► Lassen Sie das Gerät nach Möglichkeit von einem und Sachschäden auftreten! Fachbetrieb einbauen. Beachten Sie die folgenden Sicherheitshinweise um die ►... -
Page 8: Ein- Und Ausbau
Deutsch Wichtige Zusatzinformationen zum Einbau Ihres Auto- ACHTUNG radios! ► Verwenden Sie Lautsprecher mit einer Impedanz von 1. Das Gerät ist für den Minuspol der Batterie ausgelegt, mindestens 4 Ohm. der an die Fahrzeugkarosserie angeschlossen sein ► Die Lautsprecherverkabelung muss Massefrei sein. muss. - Page 9 Deutsch einer Rundbuchse auf der Radioseite. Zweitens ISO- Stecken Sie den Einbaurahmen in den ISO-Einbau- ‹ genormte Antennenstecker (150 Ohm). Adapter für schacht. beide Formate bieten Zubehörhersteller und/oder Biegen Sie die Laschen des Einbaurahmens mit einem ‹ Ihrer KFZ Werkstatt an. Schraubendreher um, so dass dieser fest im Einbau- schacht fixiert ist.
-
Page 10: Inbetriebnahme
Deutsch Das Gerät ausbauen Inbetriebnahme Zum Schutz vor Diebstahl können Sie das Bedienteil Ihres Gerätes abnehmen. Bewahren Sie das abgenommene Bedienteil nicht in Ihrem Fahrzeug auf. HINWEIS Um das Gerät wieder auszubauen, gehen Sie wie folgt ‹ ► Bewahren Sie das Bedienteil zum Schutz immer im vor: Etui auf. -
Page 11: Bedienung Und Betrieb
Deutsch weitere Einstellungen über den Multiregler Halten Sie den Multiregler (21) für einige Sekunden ‹ gedrückt, um weitere Einstellmöglichkeiten aufzu- rufen. Jeder weitere Druck des Multireglers ruft den nächsten Einstellungspunkt auf. Drehen Sie den Multiregler, um die angezeigte Einstel- ‹ lung zu ändern. -
Page 12: Radiofunktionen
Deutsch Drehen Sie den Multiregler (21), um die Einstellung ‹ MASK Einstellung, welche Sender bei der Sendersuche vorzunehmen. ausgeschlossen werden sollen: ■ DPI: Alternative Frequenzen mit unter- Radio zurücksetzen (RESET) schiedlichem PI-Code werden von der Um das Gerät in den Auslieferungszustand zurückzuset- Suche ausgeschlossen. -
Page 13: Allgemeine Cd-Funktionen
Deutsch Drücken Sie eine der Zifferntasten (4), um den gespei- Verkehrsfunk (TA - „Traffic Announcement“) ‹ cherten Sender aufzurufen. Halten Sie die Taste EQ/TA (19) gedrückt, um diesen ‹ Modus ein- oder auszuschalten. Bei eingeschalteter Automatisches Speichern Funktion wird TA angezeigt. Wählen Sie mit der Taste BAND/LOU/ENT (2) den Im TA-Modus wird von anderen Betriebsarten sofort... -
Page 14: Zusatzfunktionen Für Mp3/Wma-Cds
Deutsch Betriebsart CD wählen (bei eingelegter CD) Suchfunktionen Drücken Sie so oft die Taste MODE (20), bis CDP PLAY Suche nach Titelnummer ‹ AS/PS (18). auf dem Display angezeigt wird. Drücken Sie die Taste ‹ Drehen Sie den Multiregler (21), bis die gewünschte ‹... -
Page 15: Kartenleser (Sd/Mmc)
Deutsch Datenträger entnehmen HINWEIS Drücken Sie auf das Ende der Speicherkarte, um diese ‹ ► Bitte beachten: Der USB Anschluss dient ausschließ- wieder zu entnehmen. lich zur Wiedergabe von Speichermedien und nicht zum Aufladen von anderen externen Geräten (wie z.B. Wiedergabe und Suchfunktionen Smartphones). -
Page 16: Technische Daten
Deutsch Fehler Mögliche Ursache Lösung Fehler Mögliche Ursache Lösung Die Zündung ist nicht Schalten Sie die Radio und/ Das Antennenkabel ist Überprüfen Sie das Gerät lässt eingeschaltet. Zündung durch oder die Au- nicht korrekt ange- Antennenkabel auf sich nicht Drehen des Schlüs- tomatische schlossen korrekten Sitz. -
Page 17: Garantie
Deutsch sind Garantieansprüche ausgeschlossen, wenn nicht Radio von uns autorisierte Stellen Arbeiten an dem Gerät Frequenzbereich FM (UKW) 87,5 - 108 MHz vornehmen. nutzbare Empfindlichkeit (UKW) 10 µV 5. Durch Garantieleistungen wird die Garantiezeit nicht Zwischenfrequenz (UKW) 10,7 MHz verlängert. Es besteht auch kein Anspruch auf neue Kanaltrennung >25 dB Garantieleistungen. -
Page 18: Konformitätserklärung
Industriering Ost 40 D-47906 Kempen/Germany Konformitätserklärung Hiermit erklärt die Firma ETV – Elektro-Technische Ver- triebsgesellschaft mbH, dass sich das Gerät AR 4020 in Übereinstimmung mit den grundlegenden Anforderungen der Kfz-Richtlinie 2004/104/EG befindet. Eine Kopie der Konformitätserklärung können Sie über die... -
Page 19: Index
Deutsch Index Alternative Frequenzen (AF)............13 Lieferumfang ..................7 Anschlüsse an der Geräterückseite ..........7 Loudness-Funktion................12 Anschluss eines externen Verstärkers ..........8 Antennenstrom-Anschluss A5 (ISO A) ........8 Anti-Schock-Funktion ..............13 Programmtyp (PTY) ................13 Ausbau ....................10 Ausschalten ..................11 Automatisches Speichern ...............13 Schneller Vor-/Rücklauf ..............14 Sender automatisch suchen ............12 Sender manuell einstellen ..............12 Bedienteil abnehmen ...............10 Sender speichern ................12... -
Page 20: Instrucciones De Servicio
ESPAÑOL Índice Introducción ................21 Prólogo ....................21 Sobre este Manual de Usuario .............21 Derechos de Autor ................21 Limitación de Responsabilidad .............21 Advertencias ..................21 Finalidad de Uso .................21 Seguridad ..................21 Normas Básicas de Seguridad ............21 ¡Peligro por Radiación Láser! ............22 Seguridad en la Circulación ............22 Ubicación de los Controles (Véase Página Desplegable) 22 Instalación y Conexión............23 Precauciones de Seguridad............23... - Page 21 Sobre este Manual de Usuario Este manual de usuario es una parte de su radio estéreo Finalidad de Uso de coche AR 4020 (en adelante, unidad); le informa sobre la finalidad de uso, seguridad, conexión y funcionamiento Esta unidad está diseñada para: de esta unidad.
- Page 22 ESPAÑOL ■ Esta unidad no está diseñado para ser utilizado por Ubicación de los Controles (Véase Página personas con su capacidad física, sensorial o psíquica Desplegable) reducida, al menos que sean supervisados o instruidos acerca del uso de esta unidad por una persona respon- Desbloquear el botón del panel frontal sable de su seguridad.
- Page 23 ESPAÑOL Instalación y Conexión Conexión AVISO Precauciones de Seguridad ¡Existe riesgo de daños durante la instalación de la AVISO unidad! ¡Hacer funcionar esta unidad puede provocar daños o ► Si fuese posible, haga que un taller especializado heridas! instale la unidad. Siga las siguientes medidas se seguridad para evitar ►...
- Page 24 ESPAÑOL Información adicional importante para instalar su radio ATENCIÓN del coche ► Use altavoces con una resistencia de al menos 4 Ohm. 1. El equipo está diseñado para una instalación en la que ► El cableado del altavoz debe tener la conexión a el polo negativo de la batería debe conectarse al cha- tierra flotante.
- Page 25 ESPAÑOL 6. Dispone de dos estándares distintos para la conexión Extraiga la carcasa (D) y el marco (B) de la unidad. Si ‹ de la antena. El primero es el antiguo (50 Ohm) con fuese necesario, utilice las llaves de instalación (C). un contacto redondo proyectado largo en el lateral Coloque la carcasa en la ranura ISO.
- Page 26 ESPAÑOL Extracción la Unidad Puesta en march Para proteger el dispositivo contra ladrones, extraiga el panel frontal. No guarde el panel frontal en el coche. NOTA ► Guarde el panel frontal en el estuche. Para extraer la unidad, tenga en cuenta las siguientes ‹...
- Page 27 ESPAÑOL Otras funciones con el mando de control múltiple Pulse y mantenga pulsado el mando de control múl- ‹ tiple (21) para acceder a otras funciones de configu- ración. Cada pulsación posterior del multicontrolador pasa al siguiente punto establecido. Gire el mando de control múltiple para cambiar la con- ‹...
- Page 28 ESPAÑOL Reiniciar la Radio MASK Configurar una emisora máscara durante la Para reiniciar la unidad a las configuraciones por defecto búsqueda: pulse el botón RESET (25) con un objeto punzante, a ■ DPI: Se excluyen de la búsqueda, las Fre- saber, un bolígrafo.
- Page 29 ESPAÑOL Pulse y mantenga pulsado el botón AS/PS (22), en Funciones Generales del CD ‹ la pantalla aparece SEARCH. Con la búsqueda se Función Antidescargas (ESP – Protección contra Descar- comprueban las primeras 18 emisoras. Las respectivas gas Eléctricas) emisoras programadas parpadean. La unidad está...
- Page 30 ESPAÑOL Modo Repetición Seleccione el título deseado girando el multicontrola- ‹ Pulse RPT (7) para repetir el título actual. En la pantalla dor (21). Inicie la reproducción pulsando el multicon- ‹ aparece REP ONE. Se muestran S-RPT y el título ac- trolador.
- Page 31 ESPAÑOL Lector de Tarjetas (SD/MMC) Precauciones de Seguridad NOTA AVISO ► La gran variedad de tarjetas de memoria que hay Siga las siguientes instrucciones para evitar riesgos y en el mercado nos impide garantizar una completa daños: ► compatibilidad con todas las tarjetas de memoria. Por Las reparaciones eléctricas deben llevarse a cabo úni- esta razón puede ocurrir que, en casos excepcionales, camente por personal técnico especializado, instruido...
-
Page 32: Datos Técnicos
ETV – Elektro-Technische Vertriebsgesellschaft mbH. de- los dispositivos dispo- de que el dispositivo vo USB no clara que esta unidad AR 4020 cumple con los requisitos nibles cumplen con está formateado en funciona. básicos de la directiva de interferencias de radio (compati- los estándares. -
Page 33: Índice
ESPAÑOL Índice Acceder a una Emisora Almacenada .........28 Frecuencias Alternativas (AF) ............29 Alimentación de la Antena del vehiculo A5 (ISO A) ...24 Función Antidescargas ..............29 Almacenamiento Automático ............28 Funcion Búsqueda................30 Almacenar una Emisora ..............28 Función Loudness ................28 Anuncios sobre el Tráfico (TA) ............29 Apagar ....................27 Avance/ Retroceso Rápido .............29 Instalación en una Ranura ISO ............25... -
Page 34: Português
PORTUGUÊS Visão geral Introdução ..................35 Prefácio ....................35 Sobre este Manual do Utilizador..........35 Direitos de Autor ................35 Limitação de Responsabilidade ............35 Avisos ......................35 Utilização a que se Destina............35 Segurança ...................35 Precauções de Segurança Básicas ..........35 Perigo de Radiação Laser ..............36 Segurança de Trânsito ..............36 Descrição dos elementos (Consulte a Página Dobrável) 36 Instalação e Ligação ..............36 Precauções de Segurança ...............36... -
Page 35: Introdução
Sobre este Manual do Utilizador Utilização a que se Destina Este manual do utilizador é parte do auto-rádio estéreo AR 4020 (daqui em diante referido como o aparelho), Este aparelho destina-se apenas a informa-o sobre a utilização a que se destina, segurança, ■... -
Page 36: Descrição Dos Elementos
PORTUGUÊS ■ As reparações devem ser realizadas apenas por um Botão RPT: perito autorizado ou o serviço ao cliente. As reparações Activa e desactiva as funções repetir Botão DIR +: incorrectas podem ser de grande risco para o utilizador. Além do mais, a garantia será anulada. Selecciona o álbum seguinte ■... -
Page 37: Acessórios Incluídos E Inspecção Para Verificar A Existência De Danos De Transporte
PORTUGUÊS Acessórios Incluídos e Inspecção para Verificar a Exis- Ligações do Painel traseiro tência de Danos de Transporte O aparelho é entregue com os seguintes componentes: ■ Auto-rádio (incluindo o painel frontal) ■ Cilindro (fixo ao aparelho) ■ Estrutura (fixa ao aparelho) ■... -
Page 38: Instalação E Remoção
PORTUGUÊS Ligação Eléctrica da Antena do Carro A5 (ISO A) Dados os diferentes tipos de veículos e fabricantes de automóveis, a ligação correcta do conector ISO não é ATENÇÃO assegurada mesmo quando os conectores de ligação Possíveis danos ao aparelho! ISO estão adaptados mecanicamente. - Page 39 PORTUGUÊS Instruções de Montagem Caso necessário, fixe o aparelho para evitar o roubo. ‹ As ferramentas correctas explicam automaticamente a Fixe as cavilhas e a faixa de montagem com os mate- ‹ instalação do sistema Hi-FI num automóvel. riais de fixação na parede de protecção. Insira o aparelho na entrada ISO ou seleccione um ‹...
-
Page 40: Ligar
PORTUGUÊS Utilize as faixas na lateral da caixa (A) para montar o apa- relho no suporte do veículo (fornecido com o seu carro). Os buracos estão marcados com T (para Toyota) e N (para Nissan). Defina o painel de controlo do lado esquerdo em ‹... -
Page 41: Configurações
PORTUGUÊS Configurações Informação de trânsito Volume ■ TA SEEK: Com a função TA activada, o apa- relho pesquisa uma estação com informa- AVISO ção de trânsito. Danos de audição devidos a volume elevado! ■ TA ALARM: Sem pesquisa automática de O volume elevado pode danificar permanentemente a estações. -
Page 42: Funções De Rádio
PORTUGUÊS Pressione e mantenha pressionada a tecla numérica (4) ‹ INDICAÇÃO durante cerca de 2 segundos para guardar a estação ► Se não estiver disponível nenhuma informação, é actual. Pode ser ouvido um bip após ter memorizado as apresentado NO CLOCK ou NO PTY. estações com sucesso (excepto se tiver BEEP OFF). -
Page 43: Funções Gerais De Cd
PORTUGUÊS Informação de Trânsito (TA) Pausa Pressione o botão EQ/TA (19) para ligar ou desligar Prima PAU (5) para pausar a reprodução. PAUSE é ‹ ‹ este modo. TA é exibido com o modo activo. mostrado no visor. PAU (5) para continuar a reprodu- No modo TA, mudar de qualquer modo de funciona- Prima novamente ‹... -
Page 44: Saída Usb
PORTUGUÊS Prima BAND/LOU/ENT (2) para confirmar. São apresen- ‹ Leitor de Cartões (SD/MMC) tadas todas as faixas que começam pelos caracteres INDICAÇÃO inseridos. Seleccione o título que deseja rodando o multi-con- ‹ ► A grande variedade de cartões de memória existentes trolador (21). -
Page 45: Características Técnicas
PORTUGUÊS Precauções de Segurança Problema Causa Possível Solução O microcomputador Prima RESET (25). AVISO integrado não está a Siga as seguintes precauções de segurança para evitar funcionar, devido ao As teclas de perigos e danos: ruído. função não ► As reparações eléctricas só devem ser executadas por O painel frontal Remova o painel funcionam. -
Page 46: Declaração De Conformidade
44,1 kHz Declaração de Conformidade A ETV – Elektro-Technische Vertriebsgesellschaft mbH de- clara que o aparelho AR 4020 está em conformidade com os requisitos básicos da directiva de interferência rádio (compatibilidade electromagnética) de veículos 2004/104/ Pode ser pedida uma cópia da declaração de conformida-... -
Page 47: Índice
PORTUGUÊS Índice Aceder a posições de estações .............42 Ligação dos terminais ISO ..............37 Acessórios incluídos ................37 Ligação eléctrica da antena do carro A5 (ISO A) ....38 Avançar/retroceder rapidamente ..........43 Ligações do painel traseiro ............37 Ligar......................40 Ligar amplificador externo ............38 Botão DISP....................41 Botão EQ ....................41 Botão RESET ..................42 Modo repetir ..................43... -
Page 48: Italiano
ITALIANO Contenuto Introduzione ................49 Prefazione .....................49 A proposito di questo manuale utente........49 Copyright ....................49 Limiti garanzia ..................49 Avvertenze ....................49 Uso previsto ..................49 Sicurezza ..................49 Precauzioni di sicurezza di base ..........49 Pericolo da radiazione laser! ............50 Sicurezza nel traffico ...............50 Posizione dei comandi (vedere la pagina pieghevole) ..50 Installazione e collegamento ..........50 Precauzioni di sicurezza ..............50 Portata di consegna e controllo danni di trasporto ....51... -
Page 49: Introduzione
ITALIANO Introduzione ATTENZIONE Un’avvertenza con questo livello di rischio indica un Prefazione potenziale danno per la proprietà. Gentile cliente, Non evitare questa situazione può causare danni. Grazie per aver scelto il nostro prodotto. ► Seguire le istruzioni di questa avvertenza per evitare Leggi l’informativa di questo manuale per ottenere dime- danni. -
Page 50: Pericolo Da Radiazione Laser
ITALIANO ■ Le riparazioni devono essere effettuate solo da esperti Pulsante SCN: autorizzati o dal servizio clienti. Riparazioni improprie Attivare la funzione SCAN Pulsante RPT: possono comportare un pericolo considerevole per l’utente. Inoltre, la garanzia verrà invalidata. Attivare e disattivare le funzioni di ripetizione ■... -
Page 51: Portata Di Consegna E Controllo Danni Di Trasporto
ITALIANO Portata di consegna e controllo danni di trasporto Collegamenti sul pannello posteriore La portata di consegna standard di questa unità compren- de i seguenti componenti: ■ Autoradio (compreso il pannello anteriore) ■ Inserto (allegato) ■ Montatura (allegato) ■ Pista di montaggio (materiali di fissaggio allegati) ■... -
Page 52: Installazione E Rimozione
ITALIANO Alimentazione antenna automatica A5 (ISO A) meccanicamente. Quindi può essere necessario sosti- tuire la connessione elettrica o usare un adattatore ATTENZIONE specifico del veicolo. È possibile un danno all’unità! NOTA ► Non collegare il morsetto per il caricamento dell’an- ►... - Page 53 ITALIANO Collegare solo tramite i connettori ISO. ‹ Installare l’unità in modo che non sia possibile il surri- ‹ scaldamento e che l’unità sia ben ventilata. Se l’angolo di installazione supera i 30º l’unità potrebbe ‹ non funzionare bene. Evitare l’installazione dell’unità se essa è soggetta a ‹...
-
Page 54: Avvio
ITALIANO Imposta il pannello di controllo prima con il lato sini- ‹ stro nella cornice. Poi spingere il lato destro fino ad emettere un clic. ‹ Spingere il pannello di controllo in posizione finché ‹ non emette un clic. Assicurarsi che il pannello anteriore sia attaccato ade- ‹... - Page 55 ITALIANO Regolare l’unità su silenzioso Spostarsi in un’area dove si ricevono due Premere il tasto /MUTE (11) per disattivare l’audio ‹ stazioni con AF identico, ma diverso codice Pl dell’unità. L’indicatore MUTE compare sul display. (PI = informazione del programma) destabilizza /MUTE (11) per disatti- Premere nuovamente il tasto ‹...
-
Page 56: Funzioni Radio
ITALIANO Ora tenere il tasto premuto DISP finché non lampeg- Salvataggio automatico ‹ giano i minuti. Premere BAND/LOU/ENT (2) per selezionare la fre- ‹ Ruotare il multi-controller (21), per effettuare l’impo- quenza di banda desiderata. ‹ AS/PS (22). SEARCH viene visualiz- stazione. -
Page 57: Funzioni Generali Del Cd
ITALIANO Tenere premuto il tasto EQ/TA (19) durante la ripro- Modalità riproduzione ‹ duzione della radio sul traffico per interrompere la Premere RPT (7) per ripetere il brano corrente. Lo ‹ schermo mostra REP ONE. S-RPT e il brano corrente funzione TA senza disattivare la funzione. -
Page 58: Porta Usb
ITALIANO Ricerca cartella Collegamento Media Premere tre volte AS/PS (18). Rimuovere il pannello di controllo (vedi pagina 54). ‹ ‹ Selezionare la cartella desiderata ruotando il multi- Inserire una scheda di memoria con l’etichetta rivolta ‹ ‹ controller (21) (ROOT = Directory principale). verso l’alto nella fessura finché... -
Page 59: Dati Tecnici
ITALIANO Ricerca dei guasti Problema Possible causa Soluzione Il terminale 4 del Verificare il cablag- Problema Possible causa Soluzione La memo- connettore ISO (po- gio. Osservare il L’interruttore di Se l’alimentazione ria delle sitivo continuo) non capitolo “Collega- accensione dell’auto è... -
Page 60: Dichiarazione Di Conformità
Dichiarazione di conformità Di seguito nel presente contesto ETV – Elektro-Technische Vertriebsgesellschaft mbH, dichiara che il dispositivo AR 4020 è conforme ai requisiti di base della direttiva di interferenza radio (compatibilità elettromagnetica) per i veicoli 2004/104/EG. Una copia della dichiarazione di conformità può essere... -
Page 61: Indice
ITALIANO Indice Accesso alla stazione salvata ............56 Modalità riproduzione ..............57 Alimentazione antenna automatica A5 (ISO A) ....52 Modalità salta ..................57 Annunci sul traffico (TA) ..............56 Attaccare il pannello anteriore ............54 Avanzamento/Riavvolgimento rapido ........57 Off ......................54 On ......................54 Circolo tra le stazioni salvate ............56 Collegamenti sul pannello posteriore ........51 Pausa .......................57 Collegare l’amplificatore esterno ..........52... -
Page 62: Overview
ENGLISH Overview Introduction ................63 Foreword ....................63 About this User Manual ..............63 Copyright ....................63 Limitation of Liability ...............63 Warnings ....................63 Intended Use..................63 Safety ...................63 Basic Safety Precautions ..............63 Danger from Laser Radiation ............64 Traffic Safety ..................64 Overview of the Components (See Fold-out Page) ..64 Installation and Connection..........64 Safety Precautions ................64 Scope of Delivery and Inspection for Transport Damages .64... -
Page 63: Introduction
About this User Manual ■ playback MP3 and WMA files from CD, USB device or This user manual is part of the stereo car radio AR 4020 SD/MMC memory card (hereinafter referred to as unit); it informs you about in- ■... -
Page 64: Danger From Laser Radiation
ENGLISH Danger from Laser Radiation 14 DISP button: Display additional information WARNING button: Manual search up/ auto search up/ skip to next track The unit is equipped with a class 1 Laser. button: Laser radiation can damage your eyes! Manual search down/ auto search down/ skip to Please observe the following safety precautions to avoid previous track laser radiation:... -
Page 65: Disposal Of Packaging Materials
ENGLISH Configuration ISO Connectors NOTE ISO connector A Not connected ► Check the content for completeness and visible dam- Not connected age. Not connected ► Should you notice any transport damage, please Continuous plus (memory) contact your dealer immediately. Control voltage for electron- ic/motor antenna or power Disposal of Packaging Materials amplifier... -
Page 66: Installation And Removal
ENGLISH Installation and Removal already equipped with a noise filter as standard. In spite of this, interferences may be caused depending The unit can be installed in any ISO installation slot. Please on the vehicle. contact the car manufacturer or the local dealer if your vehicle does not come with an ISO slot. - Page 67 ENGLISH Remove sleeve (D) and frame (B) from the unit. Use Remove Unit ‹ installation keys (C), if necessary. Place the sleeve in the ISO slot. ‹ Bend the claws outward with a screwdriver for perfect ‹ fit. Follow these instructions to remove the unit: ‹...
-
Page 68: Start-Up
ENGLISH Start-up To protect against theft remove the front panel. Do not keep the front panel in the car. NOTE ► Keep the front panel in its casing. ► Do not touch the contacts on the unit or on the front panel. -
Page 69: Radio Functions
ENGLISH Further Settings with the Multi Control Knob Sound Settings Press and hold the multi control knob (21) to access Repeatedly press EQ/TA (19) to cycle through the ‹ ‹ settings FLAT, CLASSIC, POP, ROCK or EQ OFF. The further setting options. Each further pressing of the multi-controller switches to the next set point. -
Page 70: General Cd Functions
ENGLISH Press (15) or (16) to step through the FM fre- After selecting the PTY genre the unit searches for the ‹ quency band in steps of 0.05 MHz and 9 kHz for AM respective stations and stops when a station is found. If no station with the respective PTY genre is found, NO PTY until the desired frequency is displayed. -
Page 71: Additional Functions Mp3/Wma Cds
ENGLISH Skip Mode Press AS/PS (18) twice. ‹ Press (15) or (16), to skip to the next or previous Turn the multi control knob (21), until the desired ‹ ‹ track. The title number and the elapsed playing time character is displayed and press the multi control knob are shown on the display. -
Page 72: Card Reader (Sd/Mmc)
ENGLISH Card Reader (SD/MMC) Troubleshooting Problem Possible cause Solution NOTE The car ignition If the power supply ► The large variety of memory cards on the market switch is not on. is properly con- prevent us from guaranteeing full compatibility with Unit cannot nected to the car all memory cards. -
Page 73: Technical Data
Connect a USB- Here with ETV – Elektro-Technische Vertriebsgesellschaft for proper USB de- conform device. mbH, declares that the device AR 4020 complies with USB device vices. Not all available Ensure the media is the basic requirements of the radio interference directive... -
Page 74: Index
ENGLISH Index Access Saved Station ...............70 Pause .......................71 Alternative frequencies (AF) ............70 Program type (PTY) ................70 Anti-shock function .................70 Attach front panel ................68 Auto Antenna Power Supply A5 (ISO A) ........65 Random playback ................71 Auto save ....................70 Rear panel connections..............65 Auto search ..................69 Removal ....................66 Remove CD ...................70... -
Page 75: Przegląd
JĘZYK POLSKI Przegląd Wprowadzenie ................76 Słowo wstępne..................76 O Podręczniku Użytkownika ............76 Prawa autorskie ..................76 Ograniczenie odpowiedzialności ..........76 Ostrzeżenia ...................76 Przeznaczenie urządzenia ..............76 Bezpieczeństwo .................76 Podstawowe środki ostrożności ...........76 Zagrożenia związane z promieniowaniem laserowym ..77 Bezpieczeństwo w ruchu drogowym ........77 Przegląd elementów obłsugi (Patrz składana część... -
Page 76: Wprowadzenie
► Informacje dodatkowe, ułatwiające obsługę urządze- O Podręczniku Użytkownika nia. Niniejszy podręcznik stanowi element zestawu radio- odbiornika samochodowego AR 4020 (zwanego dalej Przeznaczenie urządzenia urządzeniem); zawiera informacje na temat przeznaczenia urządzenia, bezpieczeństwa użytkowania, podłączenia i Urządzenie jest przeznaczone wyłącznie do: obsługi. -
Page 77: Zagrożenia Związane Z Promieniowaniem Laserowym
JĘZYK POLSKI ■ Osoby o ograniczonych zdolnościach fizycznych, Przegląd elementów obłsugi (Patrz składana psychicznych lub czuciowych nie mogą obsługiwać część okładki) urządzenia chyba, że znajdują się pod nadzorem osoby odpowiedzialnej za ich bezpieczeństwo lub zostały Przycisk zdejmowania panelu przedniego przez nią poinstruowane. Przycisk BAND/LOU/ENT: ■... -
Page 78: Instalacja I Podłączenie
JĘZYK POLSKI Instalacja i podłączenie Podłączenie OSTRZEŻENIE Środki ostrożności Podczas instalacji mogą wystąpić szkody! OSTRZEŻENIE ► O ile to możliwe, urządzenie należy zamontować w Wprowadzenie urządzenia w użycie może prowadzić do wyspecjalizowanym warsztacie. uszkodzenia ciała lub przedmiotów! ► Jeśli instalują Państwo urządzenie samodzielnie, Aby uniknąć... -
Page 79: Instalowanie I Wyjmowanie
JĘZYK POLSKI 2. Prosimy uwzględnić pod kątem instalacji/połączenia UWAGA zestawu, że nie każdy pojazd wyposażony jest w ► Użytkowanie: głośniki z impedancją co najmniej „połączenie ISO”. W takim przypadku zalecamy użycie 4 Ohm. adaptera ISO, specjalnie do pojazdu. ► Kable głośnika muszą przechodzić na podłodze. Adaptery dostępne są... - Page 80 JĘZYK POLSKI WSKAZÓWKA ► Należy ściśle przestrzegać dla VW/Audi: Antena pojazdu może być antena aktywną To wymaga napięcia dostarczanego wyłącznie przez orygi- nalne radia samochodowe. Jeśli tak się dzieje, prosimy użyć adaptera anteny na zasilaniu fanto- mowym. Adaptery antenowe dostępne są u sprzedawców akcesoriów samochodowych i/lub w warsztacie samochodowym.
-
Page 81: Uruchamianie
JĘZYK POLSKI Włożyć klucze instalacyjne w otwory (pazury zostaną Zakładanie panelu przedniego ‹ zgięte z powrotem). Wysunąć urządzenie z tulei. ‹ WSKAZÓWKA ► Nierówności obudowy mogą spowodować zablo- kowanie pazurów. Odblokować je z pomocą kluczy instalacyjnych. Instalacja w samochodach marek Toyota i Nissan WSKAZÓWKA ►... -
Page 82: Obsługa
JĘZYK POLSKI Obsługa Dostępne są następujące ustawienia: BEEP (Dźwięki przycisków): W tym rozdziale znajdują się ważne instrukcje dotyczące ■ BEEP 2ND: Urządzenie wyda sygnał obsługi urządzenia. dźwiękowy po wciśnięciu i przytrzymaniu przycisku wielo-funkcyjnego. Włączanie/Wyłączanie ■ BEEP ALL: Urządzenie wyda sygnał dźwię- /MUTE (11), aby włączyć... -
Page 83: Funkcje Radiowe
JĘZYK POLSKI Ustawienia dźwięku Wyszukiwanie zakończy się, gdy odnaleziona zostanie Wciskać EQ/TA (19), aby wybrać spośród opcji FLAT, stacja. ‹ CLASSIC, POP, ROCK i EQ OFF. Wyświetlone zostaną Wyszukiwanie ręczne wybrane ustawienia. Wcisnąć i przytrzymać (15) lub (16) do momentu ‹... -
Page 84: Ogólne Funkcje Cd
JĘZYK POLSKI Charakter programu (PTY) WSKAZÓWKA Niektóre stacje FM, oprócz nazwy stacji, nadają także ► Wskazówka: informację o charakterze programu. Wielka różnorodność programów do wypalania i Możliwe jest wyszukiwanie stacji, grających określony kompresji powoduje, że występują różnice w jakości gatunek muzyczny. pomiędzy płytami dostępnymi na rynku oraz płytami Nacisnąć... -
Page 85: Dodatkowe Funkcje Obsługi Plików Mp3/Wma
JĘZYK POLSKI Dodatkowe funkcje obsługi plików MP3/WMA WSKAZÓWKA Przechodzenie pomiędzy albumami ► Uwaga: Port USB przeznaczony jest tylko do odtwa- DIR - (9) lub DIR +(8), aby przejść do na- Wcisnąć ‹ rzania danych z pamięci ą, a nie celem ładowania stępnego lub poprzedniego albumu. -
Page 86: Czyszczenie
JĘZYK POLSKI Czyszczenie Problem Możliwa przyczyna Rozwiązanie Błąd na płycie Sprawdzić płytę w Środki ostrożności nagranej przez innym odtwarzaczu. użytkownika. UWAGA Płyty nie W samochodzie Schłodzić wnętrze lub Możliwość uszkodzenia urządzenia można panuje zbyt wysoka zaczekać, aż tempe- ► Upewnić się, że podczas czyszczenia do urządzenia włożyć... -
Page 87: Dane Techniczne
Sprzęt do naprawy powinien być dostarczony w komplecie Firma ETV – Elektro-Technische Vertriebsgesellschaft mbH, wraz z dowodem zakupu oraz z ważną kartą gwarancyj- deklaruje niniejszym, że urządzenie AR 4020 jest zgodne z ną do sprzedawcy w miarę możliwości w oryginalnym podstawowymi wymo-gami dyrektywy zakłóceń radio- opakowaniu lub innym odpowiednim dla zabezpieczenia wych (kompatybilność... -
Page 88: Indeks
JĘZYK POLSKI Indeks Automatyczne zapisywanie ............83 Ustawienia AREA ....................82 Balans.....................82 Charakter programu (PTY) ..............84 BEEP ....................82 Częstotliwości alternatywne (AF) ..........83 Głośność ..................82 MASK .....................82 Niskie tony ...................82 Dostęp do pamięci stacji ..............83 PI ......................82 RETUNE ..................82 TA .....................82 Funkcja Loudness ................82 Tłumik nastawny ...............82 Funkcja przeciwwstrząsowa ............84 Wysokie tony ................82... - Page 90 AR 4020 GARANTIE-KARTE Guarantee card AR 4020 24 Monate Garantie gemäß Garantie-Erklärung 24 months guarantee according to guarantee declaration Kaufdatum, Händlerstempel, Unterschrift Purchase date, Dealer stamp, Signature Elektro-technische Vertriebsgesellschaft mbH Industriering Ost 40 47906 Kempen Elektro-technische Vertriebsges. mbH Industriering Ost 40 • 47906 Kempen Telefon 0 21 52/20 06-666 Hotline@etv.de...
Need help?
Do you have a question about the AR 4020 and is the answer not in the manual?
Questions and answers