Advertisement
UNPACKING AND CHECKING CARTON CONTENTS

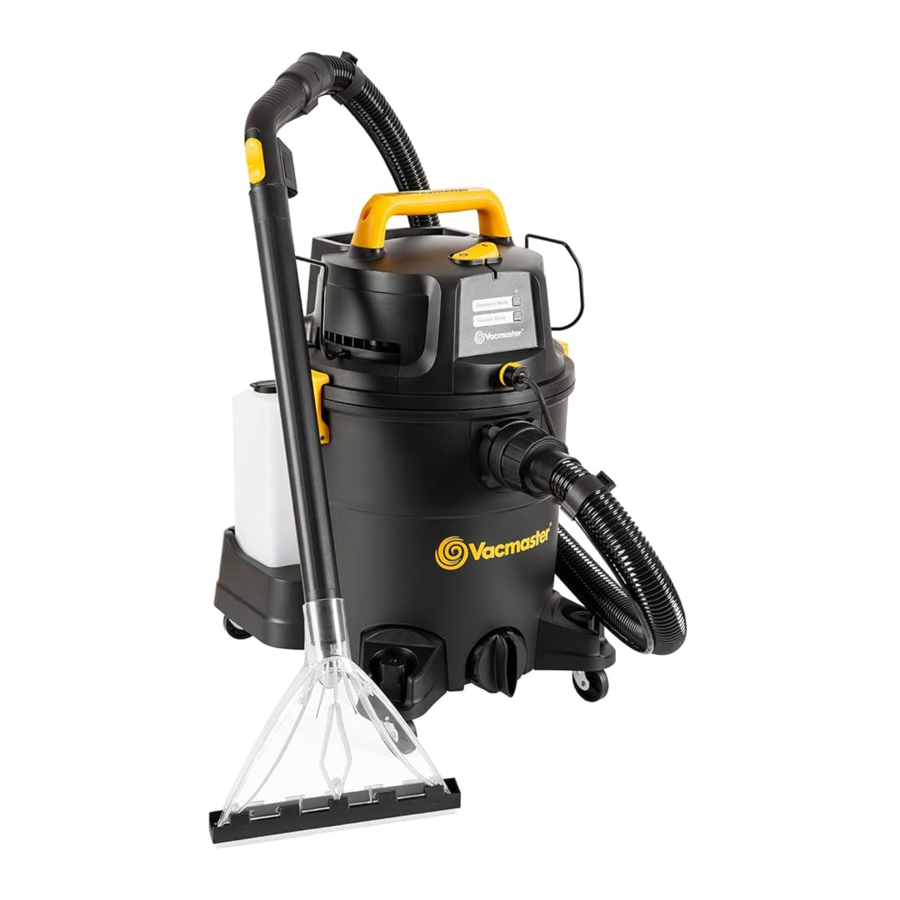
- Carry Handle
- On/Off Switch
- Detergent Mode Button
- Vacuum Mode Button
- Detergent Outlet Coupling
- Suction Port
- Drainage Port
- Front Caster
- Accessory Storage
- Container
- Detergent Tank
- Latch
- Power Head
- Hose Storage Rack
- Power Cable Storage Hook
- Detergent Tank Connecting Hose
- Detergent Tank Inlet Coupling
- Rear Caster
- Detergent Tank Cap
- Exhaust Filter Cover
- Cartridge Filter (pre-installed)
- Foam Wet Filter
- Dust Bag
- Exhaust Filter (pre-installed)
- Dual Mode Floor Nozzle
- Floor Nozzle
- Carpet Lance
- Handheld Lance
- Crevice Tool
- Round Dust Brush Suction Hose with
- Remote Control Handle
- Extension Wand (x2)
- Screw (x4)
- Battery and Battery Cover
- Carpet Detergent
- Instruction Manual
ASSEMBLY
 NOTE: A Phillips screwdriver is required.
- Remove all the contents from inside of the vacuum cleaner container.
- Turn the container upside down and insert the two feet with front casters into the slots and apply pressure until they click into place. Secure them with supplied screws (Fig. 1).
- Insert the rear casters into the slots and apply pressure until they click into place (Fig. 2).
- Attach the carry handle into the slots located on the top of the power head. Secure them with supplied screws (Fig. 3).
- To position the hose storage rack, insert one end into the channel on the side of the power head, making sure it is secured in place. Apply inward pressure to the other side and insert it into the opposite channel (Fig. 4 & 5).
- Your vacuum cleaner comes ready for dry vacuum cleaning with the cartridge filter pre-installed. If the cartridge filter is not installed.
- Optionally, for improved dust filtration and hygienic disposal, fully fit the dust bag flange onto the inlet stub (Fig. 6).
![warning]() NOTE: The dust bag is for dry pick-up only.
NOTE: The dust bag is for dry pick-up only. - For wet vacuuming and carpet shampoo cleaning, replace the cartridge filter with the foam filter supplied. Do not use a dust bag when wet vacuuming or carpet shampoo cleaning. If the foam filter is not installed.
- Secure the power head back on the container using the 2 side latches.
- Insert the detergent connecting hose into the detergent tank inlet coupling (Fig. 7).
- Insert the locking end of the hose into the suction port of the container and turn clockwise to lock into place. Connect the detergent delivery tube onto the detergent outlet coupling located in the front of the power head (Fig. 8).
- Insert the supplied battery into the suction hose handle ensuring the terminals are correctly inserted in the direction as shown (Fig. 9).
- Insert the battery cover into position. Angle the cover into the slot on the battery compartment and press down the battery cover to click into place (Fig. 10 & 11).
- Choose the desired accessories and/or the extension wand and push fit onto the remote control handle (Fig. 12).
OPERATION
*This vacuum cleaner is suitable for use with both liquids and dry materials.
Switching On/Off
Connect the mains plug to a suitable power outlet.

| Position | Status |
| I | on |
| O | off |
Programming Remote Control
NOTE: The remote control supplied with your vacuum cleaner is already pre-set and does not require pairing upon first use. To reset the remote control, follow the steps below.
- Ensure the vacuum is plugged into the power outlet.
- Switch the on/off switch to the "I" ON position.
- Locate the detergent mode button on the vacuum head indicated by the following symbol
![]() .
. - Press and hold the detergent mode button until the indicator light (
![]() ) illuminates continuously (Fig. 13).
) illuminates continuously (Fig. 13). - With the light still illuminated, press and hold the detergent mode button on the remote control handle until the indicator light on the vacuum head starts to flash to indicate pairing is successful. You should now be able to operate the detergent and vacuum modes using the remote control handle (Fig. 14).
- If the indicator light does not flash, repeat the previous steps or consult the troubleshooting section.
 .
. ) illuminates continuously (Fig. 13).
Wet & Dry Vacuum Operation

ENSURE YOU READ, UNDERSTAND AND APPLY SECTION ENTITLED 'SAFETY INFORMATION'.
- Verify that the correct filter is installed for wet or dry vacuuming and the container latches are secured.
- Secure the locking end of the hose into the vacuum suction port.
- Push the desired accessories onto the remote control handle or extension wand.
- Plug the power cord into a power outlet.
- Turn on the motor by assigning the switch to the "I" ON position. Press the vacuum mode button, indicated by the following symbol
![]() , on either the remote control handle or the vacuum head (Fig. 15).
, on either the remote control handle or the vacuum head (Fig. 15). - Once you have completed vacuuming, switch off the vacuum by pressing the vacuum mode button on either the remote control handle or the vacuum head. Switch to the "O" OFF position and unplug the power cord from the power outlet (Fig. 16).
For Dry Vacuuming
BEFORE INSTALLING, REMOVING OR CLEANING THE VACUUM CLEANER FILTER, ENSURE THAT THE POWER CORD IS UNPLUGGED AND SWITCHED OFF.
- To prepare your vacuum cleaner for dry vacuuming, install the cartridge filter over the filter cage with the flat end of the filter towards the vacuum power head. Carefully push filter until it sits flush forming a tight seal.
- Place the filter retainer cap on top of cartridge filter over the raised lip and tighten the retainer lock clockwise to secure against the internal filter cage (Fig. 17).
- Optionally, fully fit the dust bag flange onto the inlet stub. The vacuum cleaner can be used with or without dust bags (Fig. 18).

Check the filter regularly for optimal performance. An old or blocked filter will reduce suction performance.
For Wet Vacuuming
- To prepare your vacuum cleaner for wet vacuuming, remove the dry use cartridge filter.
- Carefully install the supplied foam filter over the internal filter cage, making sure the whole cage is covered (Fig. 19).
![]()
DO NOT USE THE CARTRIDGE FILTER OR DUST BAG FOR WET VACUUMING.
When vacuuming large quantities of liquids, do not immerse the nozzle completely; leave a gap at the tip of the nozzle to allow air inflow. The machine is fitted with a float valve that stops the suction action when the container reaches its maximum capacity. You will notice an increase in motor noise. When this happens, turn off the machine, disconnect from power supply, and drain the liquid. To continue vacuuming, replace the drainage cap. After wet vacuuming, empty the container, clean and dry inside before storage.
Carpet/Upholstery Cleaning Operation
ENSURE YOU READ, UNDERSTAND AND APPLY SECTION ENTITLED 'SAFETY INFORMATION'.
Water, mixed with a suitable carpet detergent solution, is pumped deep into the fibres of the carpet via the detergent application nozzle. The dirty liquid is then sucked back into the container along with the dirt and grime dislodged by the cleaning solution.
- To prepare your vacuum cleaner for carpet/upholstery cleaning, remove the dry use cartridge filter and dust bag if installed.
- Carefully install the supplied foam filter over the internal filter cage, making sure the whole cage is covered.
- Remove the detergent tank from the vacuum base. Open the detergent tank cap and pour the detergent solution into the tank. Ensure the detergent solution is mixed correctly with the proper proportion of water: 25ml of detergent solution mixed with 1 liter of warm water. When the supplied detergent sample is empty, buy a low foam detergent and refer to the applicable carpet solutions 'directions for use' (Fig. 20).

THE DETERGENT SOLUTION CAN CAUSE SERIOUS SKIN AND EYE IRRITATION. WASH AFFECTED AREA CAUTIOUSLY WITH WATER FOR SEVERAL MINUTES. IF IRRITATION PERSISTS, SEEK MEDICAL ATTENTION IMMEDIATELY.
INDIVIDUALS WITH SENSITIVE SKIN SHOULD WEAR RUBBER GLOVES. WASH HANDS THOROUGHLY AFTER USE. DO NOT INGEST. KEEP OUT OF REACH OF CHILDREN.
DO NOT RUN THE PUMP WHEN THERE IS NO DETERGENT IN THE DETERGENT TANK.
ALWAYS USE A LOW FOAM DETERGENT OR USE A DE-FOAMING AGENT.
- Close the detergent tank cap. Replace the detergent tank into the vacuum. Ensure the detergent tank connecting hose is locked securely into the inlet coupling.
- Secure the locking end of the suction hose into the vacuum suction port. Connect the end of the detergent delivery tube onto the outlet coupling on the front of the power head.
- Push the end of the remote control handle into the extension wand, make sure that the coupling (
![]() ) on the remote control clicks into the detergentinlet connector (
) on the remote control clicks into the detergentinlet connector (![]() ) on the extension wand (Fig. 21 & 22).
) on the extension wand (Fig. 21 & 22). - Attach the carpet lance to the extension wand and make sure it clicks into place (Fig. 23 & 24).
For best performance, it is recommended to remove the brush holder during carpet cleaning. To remove the brush holder, slide this to the right as indicated by the arrow and then move down (Fig. 25).
To re-install the brush holder, make sure to first align the arrows on the brush holder and the carpet lance as shown. Then move the brush holder to the left as indicated by the arrow until you hear a "click" (Fig. 26).
![]()
NEVER PRY OR ROTATE THE SPRAY OUTLETS OF THE CARPET LANCE AND HANDHELD LANCE WITH A SCREWDRIVER OR ANY OTHER TOOL (Fig. 27 & 28). - To clean fabrics and upholstery, connect the handheld lance onto the remote control handle (Fig. 29).
![warning]() NOTE: Adjust the air flow regulation to decrease the suction power if the suction power is high. If there is dirt or debris accumulated in the handheld lance, press the release button and remove the cover from the lance for cleaning (Fig. 30).
NOTE: Adjust the air flow regulation to decrease the suction power if the suction power is high. If there is dirt or debris accumulated in the handheld lance, press the release button and remove the cover from the lance for cleaning (Fig. 30). - Plug the power cord into a power outlet.
- Turn on the motor by assigning the switch to the "I" ON position. Press the detergent selection mode button, indicated by the following symbol
![]() , on either the remote control handle or the vacuum head and operate the vacuum for detergent application only. Select both the detergent mode and vacuum mode for simultaneous detergent application and wet vacuuming (Fig. 31).
, on either the remote control handle or the vacuum head and operate the vacuum for detergent application only. Select both the detergent mode and vacuum mode for simultaneous detergent application and wet vacuuming (Fig. 31).
![]()
THE MOTOR NOISE CHANGES TO A HIGHER PITCH WHEN THE CONTAINER IS FULL OR BLOCKED. STOP THE VACUUM IMMEDIATELY AND EMPTY THE CONTAINER. - Once you have completed cleaning, switch off the vacuum by pressing detergent mode button on either the remote control handle or the vacuum head. Switch to the "O" OFF position, unplug the power cord from the power outlet and drain the liquid (Fig. 32).
 ) on the remote control clicks into the detergentinlet connector (
 ) on the extension wand (Fig. 21 & 22).
 , on either the remote control handle or the vacuum head and operate the vacuum for detergent application only. Select both the detergent mode and vacuum mode for simultaneous detergent application and wet vacuuming (Fig. 31).
 NOTE:
- Vacuum the carpet/upholstery thoroughly before washing it. For carpet cleaning it is recommended to remove all furniture from the room to be cleaned or move it away from the cleaning area. Clean the whole carpet systematically in squares of approximately 1.5m each.
This avoids walking over the cleaned carpet until it is completely dry. - Start furthest away from the doorway to the room, extend the hose and work backwards.
- Pull the carpet lance back towards you, in lengths of approximate 1.5m. Refill the detergent tank if the fluid spray stops.
- Select the vacuum mode, indicated by the following symbol
![]() , to suck up the dirty solution and repeat the wet vacuuming steps. Apply more detergent particularly in any dirty area. The dirty solution is visible as it is sucked up through the carpet lance. Stop vacuuming when there is no more dirty fluid.
, to suck up the dirty solution and repeat the wet vacuuming steps. Apply more detergent particularly in any dirty area. The dirty solution is visible as it is sucked up through the carpet lance. Stop vacuuming when there is no more dirty fluid. - Do not walk over any newly cleaned area until it is completely dry.
- The handheld lance is ideal for cleaning sofas, chairs, stairs and car interiors.
- The carpet lance is ideal for cleaning carpets.
DO NOT REPLACE FURNITURE UNTIL THE CARPET IS COMPLETELY DRY!
MAINTENANCE
REMOVE THE POWER CORD FROM THE POWER SUPPLY BEFORE CARRYING OUT ANY MAINTENANCE.
- Remove the suction hose from the vacuum. Press down the latch on the detergent outlet coupling and unplug the delivery tube connector from the vacuum (Fig. 33).
- Keep all safety devices, air vents and the motor housing free of dirt and dust. Use a soft, dry brush to clean the equipment regularly.
- Clear all dirt or debris from the collection tank after each use. Allow to dry before replacing the power head. Do not use cleaning agents or solvents; these may damage the appliance.
- Check the hose, attachments, and power cord to verify that they have not been damaged, or any debris is trapped and blocking airflow.
Cleaning Cartridge Filter
- Remove the filter and clean by gently tapping or brushing dirt off. For optimal performance it is recommended to replace the old filter with a new filter regularly.
- If necessary, use a mild soap and water solution to wash cartridge filter and rinse with clean water. Allow the filter to air dry before re-installing.
Cleaning Foam Filter
Remove the foam filter and use a mild soap and water solution to wash and rinse with clean water (Fig. 34). Allow the filter to air dry before installing and using again.
Cleaning & Replacing Exhaust Filter
- Unlock the exhaust filter cover by lifting the locking tab upwards to the release. Pull the cover out (Fig. 35).
- Remove the exhaust filter from the vacuum and clean by gently tapping or brushing off dirt. For optimal performance it is recommended to replace the old filter with a new filter regularly (Fig.36).
- Install the cleaned or new filter. Then insert the filter cover tabs into the upper slots and lock the filter cover into place.
Changing the Battery in Remote Control Handle
NOTE: Only replace the battery with a 27A 12V Alkaline battery.
- Pry off the battery cover and remove it from the battery compartment (Fig. 37).
- Remove the battery from the battery compartment. Insert the new battery with the terminals in the direction as shown (Fig. 38).
- Install the battery cover back into place following the instructions.
TROUBLESHOOTING
TO REDUCE THE RISK OF ELECTRIC SHOCK, UNPLUG BEFORE TROUBLESHOOTING.
Cleaning Performance
Vacmaster vacuum cleaners are tested for endurance. If your motor is operating, then the most likely cause for a loss in suction is a blockage or an opening in the vacuum.
To maintain a high cleaning performance from your machine, it is important to replace or clean cartridge filters as necessary. A performance drop with clean filters can only be caused by a blockage in the tools or the hose.
| PROBLEM | POSSIBLE CAUSE | SOLUTION |
| The appliance does not work. | No power. | Check the power supply and fuse. |
| Functional fault in the power cord, switch, or motor. | Have the damaged part checked by qualified personnel or contact the after sales helpline. | |
| Dust is escaping from the motor cover. | The cartridge filter is missing or damaged. | Put in a cartridge filter or replace it. |
| Misuse the cartridge filter when wet vacuuming, causing the damage of cartridge filter. | Replace the damaged cartridge filter with a new one when dry vacuuming. | |
| Misuse the foam filter when dry vacuuming. | Replace the foam filter with the cartridge filter. | |
| Low suction power and high operating noise / vibrations. | Suction nozzle, hose, or tank inlet is blocked. | Check the suction nozzle, hose, and tank inlet for obstructions. |
| Cartridge filter is blocked. | Remove the cartridge filter and clean. | |
| Float valve has closed. | Empty the container of any liquid waste and ensure the float valve located underneath the filter is able to move freely. | |
| No solution spraying out. | Detergent mode is not selected. | Press the detergent mode button. |
| Detergent tank is empty. | Add more detergent. | |
| Incorrectly fitted pipes. | Check fittings and connections. Ensure there are no kinks in tubes. | |
| The water pump inside the power head overheats. | Let the vacuum cool down to reach a normal temperature, then re-start the vacuum. | |
| Foam is escaping from the air outlet on motor cover. | Misuse the high foaming shampoo detergent. | Replace with low foaming shampoo detergent. |
| The remote control does not work. | The battery is depleted. | Replace the old battery with a new one. |
| The remote control is not paired correctly. | Reset the remote control follow the instructions. |
TECHNICAL DATA
| Model Number | VK1323PFR |
| Motor | 220-240V~50Hz |
| Power Input | 1300W |
| Tank Volume | 23L |
| Net Weight | 10.75KG |
FOR YOUR SAFETY
CAREFULLY READ AND UNDERSTAND ALL INSTRUCTIONS.
SYMBOLS
| | Caution |
 | Read instruction manual. |
 | Appliance in which protection against electric shock does not rely on basic insulation only but in which additional safety precautions are provided, such as double insulation or reinforced insulation, there being no provision for protective earthing or reliance upon installation conditions. |
 | Do not dispose of electrical equipment in domestic waste. |
SAFETY INFORMATION
READ AND UNDERSTAND ALL INSTRUCTIONS BEFORE USING THIS VACUUM CLEANER.
When using the equipment, a few safety precautions must be observed to avoid injuries and damage. Please read the complete operating manual with due care. Keep this manual in a safe place so that the information is always available. If you give the equipment to any other person, give them these operating instructions as well. We cannot accept any liability for damage or accidents which arise due to a failure to follow these instructions and the safety information.
- Never leave the appliance switched on unattended, if you leave the work area, switch the appliance off or unplug it from the power supply.
- Do not vacuum or use this Wet and Dry vacuum cleaner near flammable liquids, gases or explosive vapours like gasoline or other fuels, lighter fluids, cleaners, oil-based paints, natural gas, hydrogen, or explosive dusts like coal dust, magnesium dust, grain dust or gun power. Sparks inside the motor can ignite flammable vapours or dust.
- This vacuum cleaner is not suitable for the vacuuming of asbestos or asbestos dust.
- Do not vacuum anything that is burning or smoking, such as cigarettes, matches, or hot ashes.
- Ensure the hose and connections are always pointed away from the users face, hair, ears and eyes during operation and never direct the nozzle towards persons or animals.
- Clear the working area of any items or possessions that you do not wish to be vacuumed before operation.
- Keep cord away from heated surfaces.
- Do not expose to rain. Store indoors.
- Do not unplug by pulling on the cord. To unplug, grasp the plug, not the cord.
- Do not use with damaged cord, plug or other parts.
- Do not pull or carry by cord, use cord as handle, close a door on cord, or pull cord around sharp edges or corners.
- Do not handle the plug or vacuum cleaner with wet hands.
- To reduce the risk of health hazards from vapours or dusts, do not vacuum toxic materials.
- Frequently check that the float valve positioned underneath the motor is able to move freely.
- Do not use or store near hazardous materials.
- Do not use this vacuum cleaner with a torn filter or without the filter installed.
- Do not allow to be used as a toy. Close attention is necessary when used by or near children.
- To reduce the risk of injury from accidental starting, unplug power cord before changing or cleaning filter.
- Unplug from power supply when not in use and before carrying out maintenance.
- Do not cover the ventilation openings. Do not vacuum with any ventilation openings blocked; keep free of dust, lint, hair or anything that may reduce air flow.
- Keep hair, loose clothing, fingers, all parts of body away from openings and moving parts.
- If the supply cord is damaged, it must be replaced by the manufacturer, a qualified service agent or similarly qualified persons in order to avoid a hazard.
- This appliance can be used by children aged from 8 years and above and persons with reduced physical, sensory or mental capabilities or lack of experience and knowledge if they have been given supervision or instruction concerning use of the appliance in a safe way and understanding the hazards involved.
- Children shall not play with the appliance.
- Cleaning and user maintenance shall not be made by children without supervision.
- For additional protection: It is recommended that this vacuum cleaner can be used in conjunction with residual current device (RCD) with a rated residual current of 30mA or less.
- If foam or liquid escapes from the machine, switch off immediately.
- Check the float valve regularly for moving freely and examine it for signs of damage.
- For user servicing, the machine must be dismantled, cleaned and serviced, as far as is reasonably practicable, without causing risk to the maintenance staff and others. Suitable precautions include decontamination before dismantling, provision for local filtered exhaust ventilation where the machine is dismantled, cleaning of the maintenance area and suitable personal protection.
- Perform a technical inspection at least annually, consisting of, for example, inspection of filters for damage, air tightness of the machine and proper function of the control mechanism.
- Besides the operating instructions and the binding accident prevention regulations valid in the country of use, observe recognized regulations for safety and proper use.
- When dust removers are used, the rate at which air is exchanged in the room must be adequate if the exhaust air from the vacuum cleaner is blown into the room (please observe regulations valid in your country).
- Before starting work, the operating staff must be informed on
- use of the vacuum cleaner,
- risks associated with the material to be picked up,
- safe disposal of the picked up material.
- Before transporting the collection tank, close all the locks. Do not tilt the cleaner if there is liquid in the collection tank. Do not use a crane hook to lift the cleaner.
- When using an extension lead, check the minimum cross-sections of the cable:
| Cable length | Cross section | |
| < 16 A | < 25 A | |
| up to 20 m | 1.5 mm2 | 2.5 mm2 |
| 20 to 50 m | 2.5 mm2 | 4.0 mm2 |
WHEN CARRYING OUT SERVICE OR REPAIR OPERATIONS, ALL CONTAMINATED ITEMS WHICH CANNOT BE SATISFACTORILY CLEANED ARE TO BE DISPOSED OF; SUCH ITEMS SHALL BE DISPOSED OF IN IMPERVIOUS BAGS IN ACCORDANCE WITH ANY CURRENT REGULATION FOR THE DISPOSAL OF SUCH WASTE.
Documents / ResourcesDownload manual
Here you can download full pdf version of manual, it may contain additional safety instructions, warranty information, FCC rules, etc.
Advertisement


Need help?
Do you have a question about the VK1323PFR and is the answer not in the manual?
Questions and answers