Table of Contents
Advertisement
Advertisement
Table of Contents

Subscribe to Our Youtube Channel
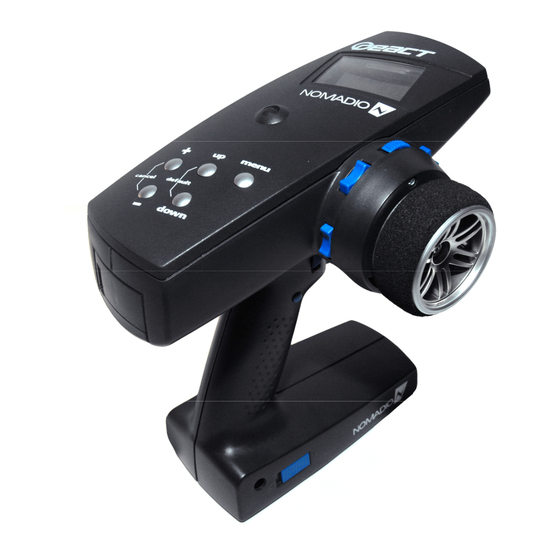
Summary of Contents for React nomadio
- Page 1 Link to Download Desktop Software: HTTP://SUPPORT.NOMADIO.NET/REACT User’s Guide...
-
Page 3: Table Of Contents
Link to Download Desktop Software: SUPPORT.NOMADIO.NET/REACT Copyright 2006 Nomadio Published November, 2006 Table of Contents Getting to Know Your React .........................8 Power Switch..........................8 Display Screen ..........................8 Navigation Buttons ........................8 Selection Buttons .........................9 Trim Buttons..........................9 Grip Buttons ..........................9 Charging and Installing Batteries ....................10 Installing the Batteries ........................10... - Page 4 Connecting the Tach Sensor ........................17 Binding the Transceiver........................18 How the Binding Process Works....................18 Binding your transceiver the first time....................18 React Controls..........................19 Top Menu Level ........................20 Steering Functions ..........................21 Steering Trim..........................21 Adjusting Steering Trim using the Function Menu ..............22 Adjusting Steering Trim using the Steering Trim Buttons ............22 Steering Dual Rate ........................23...
- Page 5 Trim and EPA Interaction ......................42 Throttle End Point........................43 Adjusting the Throttle End Point ....................44 Trim and EPA Interaction ......................44 Throttle Dual Rate Mode......................45 Changing the Throttle Dual Rate Mode..................45 Throttle Servo Reverse.......................46 Changing the Throttle Servo Reverse Setting ................46 Throttle Servo Type ........................47 Changing the Throttle Servo Type....................47 Throttle Speed..........................48 Changing the Throttle Speed ......................49...
- Page 6 React Digital RC Desktop ........................83 Minimum System Requirements.....................83 Installing the RC Desktop.......................84 Connecting the React to your Computer ..................87 2. Plug the smaller end of the included USB cable into the cable with the matching USB connector inside the React’s battery compartment....................87 Using the React Digital RC Desktop....................88...
- Page 7 Nomadio 1 Year Limited Warranty .....................99 Warranty Coverage ........................99 Exclusions and Limitations ......................99 Consumer Protection Laws ......................101 Obtaining Warranty Service .....................101...
-
Page 8: Getting To Know Your React
Getting to Know Your React Power Switch This switch turns the React on and off. It is recessed to prevent accidental switching during travel or use. Display Screen This is the screen you’ll be seeing 95% of the time while using the React. It... -
Page 9: Selection Buttons
Selection Buttons Button In the function menu Sets the currently edited value to its maximum value Sets the currently edited value to its minimum value Cancels any changes made and resets value to where it was before editing started Resets the value to its factory default Trim Buttons Button In the drive screen... -
Page 10: Charging And Installing Batteries
Charging and Installing Batteries The React is powered by a 4 cell battery pack(included). Also inside the battery compartment is the 4 wire Receiver Programming Cable. This cable can be plugged into the receiver’s TACH pins in order to upgrade the software on the receiver. The RC Desktop will instruct you when a software upgrade is available. -
Page 11: Charging The Batteries
Charging the Batteries Make sure the Nomadio React battery pack is properly installed and the React is switched off. Batteries other than the Nomadio React battery pack cannot be charged by the React, and attempting to do so will void the warranty. Batteries other than the Nomadio React battery pack must be removed prior to connecting over USB for any reason, even when just using RC Desktop. -
Page 12: Installing The Transceiver
Installing the Transceiver Mounting the Transceiver Install the transceiver so it is protected from vibration or shock. • Use double-sided tape or Velcro® to mount the transceiver. • Position the transceiver where it will not contact other solid components. • Mount the transceiver away from moving parts, sharp corners, and possible contaminants (fuel, •... -
Page 13: Servo Connection
FCC Compliance Reminder If you install the React transceiver inside of a vehicle, and you are not the final end user, FCC regulations require you to make the React Transceiver’s FCC ID easily visible to the end user. See the... -
Page 14: Installing The Optional Sensors
Installing the Optional Sensors Your React radio system has several optional sensors that you can install in your vehicle and connect to the transceiver. When properly installed and connected, these sensors will send information back to the React so that you can monitor the readings while you drive. -
Page 15: Temperature Sensor
After you install the temperature sensor in the vehicle, plug it into the “Sensor 1” or “Sensor 2” receptacle. The four-pin connector on the sensor cable has only three wires populated. The unpopulated pin should be the one furthest from the connector key in the receiver plastic. The React transceiver will automatically detect which sensors are installed. -
Page 16: Tachometer Sensor
You will need to measure the distance your model rolls in order to provide the React with enough information to give you an accurate speed. We recommend that you get a tape measure and measure several rotations of the wheel to reduce the measurement error. -
Page 17: Connection
(labelled “digital”). The transceiver will automatically detect which sensors are installed. Test your sensor’s installation. Power on React and transceiver and bind them Verify communication between tachometer and transceiver by selecting RPM reading from drive... -
Page 18: Binding The Transceiver
How the Binding Process Works The binding process is set in motion by depressing the “bind” button on the transceiver when the React is in “bind mode.” This clears the React ID saved on the transceiver, and allows it to connect to a React. -
Page 19: React Controls
React Controls The functions of the React are controlled through the function menu and/or trim controls. To perform this action... Press..Toggles between the driving screen and the function menu or returns to the previous level from a sub-menu Menu: Go to the selected sub-menu Menu: Move to the next higher menu item. -
Page 20: Top Menu Level
Top Menu Level The following illustration shows the function menu structure for the top-level menu. All main sub- menus may be accessed from the top menu level. Channels 3 & 4 have identical setups, and are documented together. Manage Models Active Model New Model Delete Model... -
Page 21: Steering Functions
Steering Functions Steering Trim Steering trim adjusts the center point of the steering servo by adjusting the center point within the steering servo’s total travel range. Unlike steering sub-trim, the steering left and right end points are unaffected by steering trim;... -
Page 22: Adjusting Steering Trim Using The Function Menu
Adjusting Steering Trim using the Function Menu Use the navigation controls to adjust steering trim as follows: 1. Access the top function menu from the driving screen. 2. Navigate to the Steering (Ch1) menu. then 3. Navigate to Trim. Value Description Steering trim is centered within the servo range. -
Page 23: Steering Dual Rate
Steering Dual Rate Steering dual rate adjusts the range of servo movement when the steering wheel is fully turned in either the left or right direction. This is used to increase or decrease the steering sensitivity across the entire servo range. -
Page 24: Adjusting Steering Dual Rate Using The Function Menu
Adjusting Steering Dual Rate using the Function Menu Use the navigation controls to adjust steering dual rate as follows: 1. Access the top function menu from the driving screen. 2. Navigate to the Steering (Ch1) menu. : then 3. Navigate to Dual Rate. Value Description Steering servo range is set to minimum. -
Page 25: Steering Exponential
Steering Exponential Steering exponential adjusts how quickly or slowly the steering servo responds with respect to the amount that the steering wheel is turned. This affects the sensitivity of the steering servo near its neutral position (center). Adjusting the steering exponential value affects both left and right steering response at the same rate. -
Page 26: Adjusting Steering Exponential
Adjusting Steering Exponential Use the navigation controls to adjust steering exponential as follows: 1. Access the top function menu from the driving screen. 2. Navigate to the Steering (Ch1) menu. then 3. Navigate to Expo. Value Description Neutral steering response (linear). -ve value 4. -
Page 27: Steering Sub-Trim
Steering Sub-Trim Steering sub-trim adjusts the center point of the steering servo. This differs from steering trim in that steering sub-trim adjusts the servo’s entire travel range; by moving the center point of the servo, the left and right end points (left, right) stay the same relative “distance”... -
Page 28: Steering Left End Point
Steering Left End Point The steering left end point value adjusts how far the steering servo turns to the LEFT with respect to its full range of motion to the left. End point adjustment should be adjusted prior to other steering settings, as the left end point value affects other steering settings. -
Page 29: Use The Navigation Controls To Adjust The Left End Point As Follows
The position of the pointer on the bar is affected by the steering end point settings (left and right) and trim setting; increasing the left end point value may visually appear to have the same effect as decreasing the right end point value. An end point setting of 100 (the default) is typical for most servos, and should always be used for ESCs. -
Page 30: Steering Right End Point
Steering Right End Point The steering right end point value adjusts how far the steering servo turns to the RIGHT with respect to its full range of motion to the right. End point adjustment should be adjusted prior to other steering settings, as the right end point value affects other steering settings. -
Page 31: Trim And Epa Interaction
Changing the right end point value has the following visual effect on the driving screen bars. Right end point value is approximately the same as the left end point value. Increased right end point value (more servo travel to right is possible). Decreased right end point value (less servo travel to right is possible). -
Page 32: Steering Servo Reverse
Steering Servo Reverse Steering Servo Reverse reverses the direction the servo moves upon receiving an input from the steering wheel. Changing the Steering Servo Reverse Setting Use the navigation controls to change the steering servo reverse setting as follows: 1. Access the top function menu from the driving screen. -
Page 33: Steering Speed
Steering Speed Steering speed allows you to limit the maximum speed that the steering servo will be driven to match your movements on the wheel. There are three parameters that can be adjusted to precisely set up your limiting. Trigger sets the minimum amount of control input before the speed limiter becomes active. -
Page 34: Throttle Functions
Throttle Functions The following illustration shows the function menu structure for the throttle functions: Throttle Trim Throttle trim adjusts the resting (centered) position of the throttle servo horn (electric or nitro vehicle) or the neutral point of an ESC (electric vehicle). When initially setting up the vehicle, the throttle trim setting should be set to 0. -
Page 35: Adjusting Throttle Trim Using The Function Menu
Adjusting Throttle Trim using the Function Menu Use the navigation controls to adjust throttle trim as follows: 1. Access the top function menu from the driving screen. 2. Navigate to the Throttle (Ch2) menu. then 3. Navigate to Trim. Value Description Throttle trim is centered within servo range. -
Page 36: Throttle Dual Rate
Throttle Dual Rate Throttle dual rate adjusts the range of servo movement when the throttle trigger is moved from full brake to full throttle position. This is used to increase or decrease the throttle sensitivity across the entire servo range. The throttle dual rate value is applied to both throttle and brake end, and is expressed as a... -
Page 37: Adjusting Throttle Dual Rate Using The Function Menu
Adjusting Throttle Dual Rate using the Function Menu Use the navigation controls to adjust throttle dual rate as follows: 1. Access the top function menu from the driving screen. 2. Navigate to the Throttle (Ch2) menu. then 3. Navigate to Dual Rate. Value Description Throttle/brake range is set to minimum. -
Page 38: Throttle Exponential
Throttle Exponential Throttle exponential adjusts how quickly or slowly the throttle servo responds with respect to the amount that the throttle trigger is moved to the THROTTLE end. This affects the sensitivity of the throttle servo near its neutral position. Adjusting the throttle exponential does not affect the brake exponential;... -
Page 39: Brake Exponential
Brake Exponential Brake exponential adjusts how quickly or slowly the throttle servo responds with respect to the amount that the throttle trigger is moved to the BRAKE end. This affects the sensitivity of the throttle servo near its neutral position. Adjusting the brake exponential does not affect the throttle exponential;... -
Page 40: Throttle Sub-Trim
Throttle Sub-Trim Throttle sub-trim adjusts the center point of the throttle servo. This differs from throttle trim in that throttle sub-trim adjusts the servo’s entire travel range; by moving the center point of the servo, the throttle and brake end points (throttle, brake) stay the same relative “distance”... -
Page 41: Brake End Point
Brake End Point The brake end point value adjusts how far the throttle goes to the BRAKE end with respect to its full range of motion to the brake end. End point adjustment should be adjusted prior to other throttle settings, as the brake end point value affects other throttle settings. -
Page 42: Adjusting The Brake End Point
Changing the brake end point value has the following visual effect on the driving screen bars. Brake end point value is approximately the same as the throttle end point value. Increased brake end point value (more servo travel for BRAKING is possible). Decreased brake end point value (less servo travel for BRAKING is possible). -
Page 43: Throttle End Point
Throttle End Point The throttle end point value adjusts how far the throttle goes to the THROTTLE end with respect to its full range of motion to the throttle end. End point adjustment should be adjusted prior to other throttle settings, as the throttle end point value affects other throttle settings. -
Page 44: Adjusting The Throttle End Point
Changing the throttle end point value has the following visual effect on the driving screen bars. Throttle end point value is approximately the same as the brake end point value. Increased throttle end point value (more servo travel for THROTTLE is possible). Decreased throttle end point value (less servo travel for THROTTLE is possible). -
Page 45: Throttle Dual Rate Mode
Throttle Dual Rate Mode Dual Rate Mode controls the behavior of the Dual Rate setting for the throttle servo. Changing the Throttle Dual Rate Mode Use the navigation controls to change the dual rate mode as follows: 1. Access the top function menu from the driving screen. -
Page 46: Throttle Servo Reverse
Throttle Servo Reverse Throttle servo reversing reverses the direction the throttle servo moves upon receiving an input from the throttle trigger. Changing the Throttle Servo Reverse Setting Use the navigation controls to change the throttle servo reverse setting as follows: 1. -
Page 47: Throttle Servo Type
Throttle Servo Type Throttle servo type lets you select the type of throttle servo (analog or digital) in the vehicle. Analog servos are sent signals at 50 frames/sec, while Digital servos are sent signals at 100 frames/sec. If you are running an electric car with an ESC, it may perform better with the digital setting. -
Page 48: Throttle Speed
Throttle Speed Throttle speed allows you to limit the maximum speed that the throttle servo will be driven to match your movements on the trigger. There are four parameters that can be adjusted to precisely set up your limiting. Throttle Speed determines the percentage of full speed that is applied to the throttle movements that are above the throttle trigger setting. -
Page 49: Changing The Throttle Speed
Changing the Throttle Speed Use the navigation controls to change the steering servo type as follows: 1. Access the top function menu from the driving screen. 2. Navigate to the Steering (Ch1) menu. then 3. Navigate to Throttle Speed. Value Description Throttle The amount of limiting applied to servo throttle... -
Page 50: Channel 3 And Channel 4 Servo Functions
Channel 3 and Channel 4 Servo Functions Each of these servos can be used as a number of auxiliary functions such as shifting or acting as a second braking or steering servo. The following illustration shows the function menu structure for Channel 3 (Shift) and Channel 4 (Power): Channels 3 / 4 Servo Trim Channel 3 and Channel 4 servo... -
Page 51: Adjusting Channel 3 / 4 Servo Trims
Adjusting Channel 3 / 4 Servo Trims Use the navigation controls to adjust shift servo trim as follows: 1. Access the top function menu from the driving screen. 2. Navigate to the Channel 3 or Channel 4 menu. then 3. Navigate to Trim. Value Description Shift servo trim is centered within the... -
Page 52: Channel 3 / 4 Servo Dual Rate
Channel 3 / 4 Servo Dual Rate Channel 3 and Channel 4 servo dual rates adjust the range of servo movement when the grip buttons are activated. The servo dual rate value is applied to both low and high ends, and is expressed as a percentage of servo range (configured by end point adjustments). -
Page 53: Dual Rate And End Point Adjustment
Dual Rate and End Point Adjustment Full servo range is determined by the shift servo low and high end point adjustments. The dual rate value determines the relative servo range between the low and high end points. The servo will never move beyond the set end point adjustments, no matter what dual rate setting is applied. -
Page 54: Adjusting The Low End Point
Adjusting the Low End Point The low end point value is a relative value, and is expressed as the percentage of full travel to the LOW end. Use the navigation controls to adjust the low end point as follows: 1. Access the top function menu from the driving screen. -
Page 55: High End Point
High End Point The shift servo high end point value adjusts the servo’s ending position after shifting upwards. This is intended to be high gear and goes with the upshift sound event (reverse the servo if this is not the case on your model). -
Page 56: Adjusting The High End Point
Changing the high end point value has the following visual effect on the driving screen bars. High end point value is approximately the same as the low end point value. Increased high end point value (more servo travel on HIGH end is possible). Decreased high end point value (less servo travel on HIGH end is possible). -
Page 57: Channel 3 / 4 Dual Rate Mode
Channel 3 / 4 Dual Rate Mode Dual Rate Mode controls the behavior of the Dual Rate setting for the channel 3 and channel 4 servos. Changing the Channel 3 / 4 Dual Rate Mode Use the navigation controls to change the dual rate mode as follows: 1. -
Page 58: Channel 3 /4 Servo Reverse
Channel 3 /4 Servo Reverse Servo reversing reverses the direction the shift servo moves upon receiving an input from the grip buttons. Changing the Channel 3 / 4 Servo Reverse Setting Use the navigation controls to change the servo reverse setting as follows: 1. -
Page 59: Channel 3 / 4 Servo Type
Channel 3 / 4 Servo Type Servo type lets you select the type of servo (analog or digital) in the vehicle. Analog servos are sent signals at 50 frames/sec, while Digital servos are sent signals at 100 frames/sec. If you are running an electric car with an ESC, it may perform better with the digital setting. -
Page 60: Channel 3 / 4 Servo Mode
Channel 3 / 4 Servo Mode Shift servo mode controls the behavior of the channel 3 and channel 4 servos. Changing the Channel 3 / 4 Servo Mode Use the navigation controls to change the servo mode as follows: 1. Access the top function menu from the driving screen. -
Page 61: Channel 3 / 4 Servo Speed
Channel 3 / 4 Servo Speed Input/Throttle Speed determines the percentage of full speed that is applied to the throttle movements that are above the throttle trigger setting. 100 is maximum servo movement rate. 1 is minimum rate. Default is 100 (full speed). Return/Brake Speed determines the percentage of full speed that is applied to braking movements that are above the trigger setting. -
Page 62: Changing The Channel 3 / 4 Servo Speed
Changing the Channel 3 / 4 Servo Speed Use the navigation controls to change the steering servo type as follows: 1. Access the top function menu from the driving screen. 2. Navigate to the Channel 3 or Channel 4 menu. then 3. -
Page 63: Advanced Features
T ank Mode Events The Events menu is where you control the feedback and alerts that the React delivers to you, based on Reacts and user actions. Note that you configure the actual vibration patterns which are triggered by these events... -
Page 64: Event Summary
Event Summary For each Event, the “Affects” column shows which Vibration Patterns and Sounds in the RC Desktop are tied to that event. The units for Speed and Temperature are based on the Units setting in the Controller setup menu. Event Level Default... -
Page 65: Idle Up
Idle Up Idle Up changes the throttle servo position when the trigger is centered, it has no affect at other trigger positions. When Idle Up -> Active is On and the trigger is centered, the throttle moves to Idle Up -> Level percent. This is typically used to warm up a nitro engine by running it at high idle (just shy of the clutch engaging). -
Page 66: Autostart
AutoStart Configuring AutoStart Use the navigation controls to configure AutoStart as follows: 1. Access the top function menu from the driving screen. 2. Navigate to the Advanced menu. then 2. Navigate to the Idle Up submenu. then Value Description Armed Enables or disables the AutoStart function 4. -
Page 67: Antilock Braking System (Abs)
Antilock Braking System (ABS) React supports ABS brakes to give better traction during stopping. Configuring ABS Use the navigation controls to configure ABS as follows: 1. Access the top function menu from the driving screen. 2. Navigate to the Advanced menu. -
Page 68: Failsafes
Failsafes You can set up the failsafe positions of the servos so that in the event of loss of signal, the servos go to their set failsafe positions. Default failsafe positions are centered steering and trim. You should always set your failsafe positions after making changes to your model, and should test your settings before driving. -
Page 69: Setting Failsafe Positions
At the end of the countdown, a confirmation message indicates that the servo failsafe positions were stored. 8. To test the failsafe positions, turn off the React and observe the reactions of the connected servos. The servos should go to the failsafe positions you just set. -
Page 70: Calculation Method
Convert that number to a fraction that can be input into the React. You can do this by multiplying the number by 200 or more and then rounding to the nearest whole number. -
Page 71: Measurement Method
Make sure you are measuring using the same units (inches or centimetres) that the React is currently set up to use. Position your car against a wall with the wheels pointed straight ahead. The back end of the car should be touching the wall. -
Page 72: Tach (Rpm)
The React must be programmed with the gear ratio between the motor and the tach sensor. The React then “does the math” in real time to provide you with a tachometer function to monitor your engine speed. -
Page 73: Tank Mode
Tank Mode The Tank mode combines steering and throttle inputs to left-side and right-side drive. Tank mode Uses Ch1 as right drive servo and Ch2 as left drive servo. Throttle inputs affect both outputs equally. Steering input increases output on one side and decreases output on the other side. -
Page 74: Model Management
Model Management The following illustration shows the function menu structure for the model management functions: Active Model The React can store all settings for up to forty vehicles. The Active Model function is used to select the model to be used. -
Page 75: New Model
New Model You can create a new model settings profile if there are any model memories remaining. Creating a new model allows you to store the settings for another model. By default, the new model setting is given the number of the next highest model number (For example, if there are currently 4 model settings, creating a new model will create “Model 5”... -
Page 76: Delete Model
Delete Model You can delete a model settings profile. This removes all stored settings for the model from memory. Deleting a Model Use the navigation controls to delete a model as follows: 1. Access the top function menu from the driving screen. -
Page 77: Copy Model
Copy Model You can copy settings from one model profile to create a new duplicate model. If all model profiles already exist, you cannot copy a model. Copying a Model Use the navigation controls to copy a model as follows: 1. -
Page 78: Rebinding
5. Navigate to and activate Rebind. then 6. If the receiver was previously bound to a different React, turn on the model and perform the binding process again by activating the Bind button until the LED illuminates. Otherwise, just turn on the model. -
Page 79: Controller Setup
Controller Setup The following illustration shows the function menu structure for the controller setup functions: Vibrator As you might guess, this option lets you turn the vibration option on and off. Use the navigation controls to turn the vibrator on/off as follows: 1. -
Page 80: Units
Units This option affects the display units for temperature (F/C), speed (MPH/KPH), and tach rollout (in/cm). Note: Changing this setting does not convert existing temperature and speed alerts, nor tach rollout to the new units. You must go through and reset those settings manually after a conversion. -
Page 81: Calibrate
Recalibrating the React Use the navigation controls to recalibrate the React as follows: 1. Access the top function menu from the driving screen. 2. Navigate to the Controller Setup menu. -
Page 82: About
About The About screen displays the version number and ID number for your React. If you are connected to a transceiver the version number and VIN for the transceiver are also shown. This function also displays your startup screen and user name. -
Page 83: React Digital Rc Desktop
USB port on your computer, allowing your React and the RC Desktop to communicate and exchange information. The RC Desktop interface has the same menu structure as that contained within your React; and has been designed to be very easy to use. -
Page 84: Installing The Rc Desktop
Installing the RC Desktop .When the installation begins you will be presented with a Setup Wizard that begins with the Nomadio License Agreement. Click I Agree to continue. - Page 85 .Next choose the destination folder for the Digital RC Desktop by either typing in the path or clicking the Browse button and picking the folder you wish to use. Click the Next button to continue .At the next screen, select the Start Menu folder for the Digital RC Desktop’s shortcuts. Click the Do not create shortcuts checkbox if you do not want shortcuts created.
- Page 86 .Digital RC Desktop Setup is now almost done. Click Next to continue. .Leave the Run Nomadio Digital RC Desktop now? checkbox selected for the Setup Wizard to launch the program after exiting the Setup Wizard. Click Finish to exit the Nomadio Digital RC Desktop...
-
Page 87: Connecting The React To Your Computer
React’s battery compartment. Turn on your React. (note that if your battery is dead, it will power off the USB port when you plug in. Do still put the switch in the On position. Your computer will recognize the React as being connected and will likely make a beeping noise. -
Page 88: Using The React Digital Rc Desktop
Using the React Digital RC Desktop To start the RC Desktop From the START menu, click (All) Programs, Nomadio Digital RC Desktop, then Nomadio Digital RC Desktop. To make changes to the Navigate through the functions of the RC Desktop, and make changes as appropriate to settings global settings, or to settings for individual models. -
Page 89: Registration
Your React ID will be automatically read from your React and filled in. 4.When you click the Register button, a confirmation e-mail will be sent to you. This will e-mail will contain a link back to Nomadio’s registration site where you will be able to get your registration code. -
Page 90: Registering A Second Computer
If you wish to register a second computer (for example, a laptop you take to the track, your work computer, etc) simply repeat the installation and registration process using the same email address. If you encounter problems or no longer have access to the email address you used to register send an email to support@nomadio.net. -
Page 91: Receiving Settings From The React
Receiving Settings From the React The Digital RC Desktop will attempt to receive settings from the React on startup. You can also choose the Connection menu and then choose Receive Settings from React. Finally you can choose the Receive Settings From React toolbar button. -
Page 92: Using Softkeys
Using Softkeys Softkeys allows you to choose the function of the button and trims on the React. Click on the pull down button and choose the function you would like that button or trim tab to control. -
Page 93: Saving Settings
Settings to React. You can also send your settings by choosing the Send Settings to React toolbar button. If you forget to send your settings to the React after editing them, the Digital RC Desktop will prompt you to send your settings on exit. -
Page 94: Specifications
Specifications Specifications subject to change without notice. React Controller Radio Type: digital spread spectrum 2.4Ghz Anti-Lock: brake anti-lock with cycle, delay, and depth Radio Mode: direct sequence (DSSS) and frequency Idle Up: yes Tactile Alarm: programmable vibrator hopping (FHSS) spread spectrum Range: 1000ft. -
Page 95: Support
Support Nomadio is committed to providing the best support in the RC market for its products. If you have any issues with your React, please visit our support website at http://support.nomadio.net There you will find a wealth of knowledge from other React users as well as Nomadio’s support staff. -
Page 97: Statement Of Compliance
This transmitter has been tested and meets the FCC RF exposure guidelines when used with the Nomadio accessories supplied or designated for this product, and provided at least 20 cm separation between the antenna and the user’s body is maintained. Use of other accessories may not ensure... -
Page 98: Modular Approval Statement
Modular Approval Statement If you install the React transceiver inside of a vehicle, and you are not the final end user, FCC regulations require you to make the React transceiver’s FCC ID easily visible to the end user. In order... -
Page 99: Nomadio 1 Year Limited Warranty
Nomadio hardware. Manufacturers, suppliers, or publishers, other than Nomadio, may provide their own warranties to the end user purchaser, but Nomadio, in so far as permitted by law, provides their products “as is”. Software distributed by Nomadio with or without the Nomadio brand name (including, but not limited to system software) is not covered under this Limited Warranty. - Page 100 Nomadio; (f) to consumable parts, such as batteries, unless damage has occurred due to a defect in materials or workmanship; or (g) if any Nomadio serial number has been removed or defaced.
-
Page 101: Consumer Protection Laws
An Nomadio representative or Nomadio Authorized Service Provider will help determine whether your product requires service and, if it does, will inform you how Nomadio will provide it. Nomadio or its Nomadio Authorized Service Providers will provide warranty service on products that are tendered or presented for service during the Warranty Period, as permitted by law.
Need help?
Do you have a question about the nomadio and is the answer not in the manual?
Questions and answers