Table of Contents
Advertisement
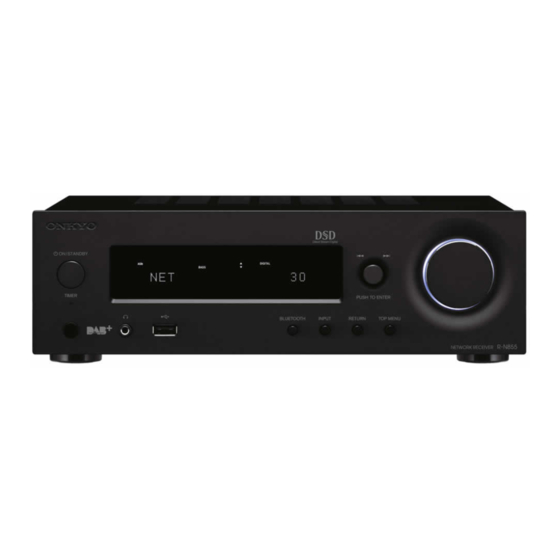
NETWORK RECEIVER
R-N855
Instruction Manual
Thank you for purchasing an Onkyo product. Please read
this manual carefully before making any connections or
using this product. By following these instructions, you'll get
the best audio performance and the most listening pleasure
from your Onkyo product. Keep this manual for future
reference.
Getting Started
............................En-
Initial Setup
................................ En-
Advanced Setup
...................... En-
2
10
12
14
29
32
34
37
E
n
Advertisement
Table of Contents

Related Manuals for Onkyo R-N855


Summary of Contents for Onkyo R-N855
-
Page 1: Table Of Contents
..... En- Troubleshooting ...... En- Thank you for purchasing an Onkyo product. Please read this manual carefully before making any connections or using this product. By following these instructions, you’ll get the best audio performance and the most listening pleasure from your Onkyo product. -
Page 2: Important Safety Instructions
WARNING: AVIS WARNING TO REDUCE THE RISK OF FIRE OR RISK OF ELECTRIC SHOCK RISQUE DE CHOC ELECTRIQUE DO NOT OPEN NE PAS OUVRIR ELECTRIC SHOCK, DO NOT EXPOSE THIS The lightning flash with arrowhead symbol, within APPARATUS TO RAIN OR MOISTURE. an equilateral triangle, is intended to alert the user to the presence of uninsulated “dangerous CAUTION:... - Page 3 [*] R-N855 – RoHS Directive, 2011/65/EU This [*] uses radio waves in the 2.4 GHz and 5 GHz – Hereby, Onkyo & Pioneer Corporation, declares that frequency bands. There are nations and regions this [*] is in compliance with the essential...
- Page 4 – Onkyo & Pioneer Corporation izjavlja, da je ta [*] v Directive 1999/5/EC. skladu z bistvenimi zahtevami in drugimi relevant- – С настоящето, Onkyo & Pioneer Corporation, nimi določili direktive 1999/5/ES. декларира, че [*] е в съответствие със...
-
Page 5: What's In The Box
Contents What's in the box What's in the box..........5 Front Panel............6 Rear Panel ............7 Remote Controller ..........8 Display..............9 Main unit (1) Connect the Speakers........10 Connecting the Antennas and Power Cord, etc..11 Power On & Initial Setup........12 Time Settings ............ -
Page 6: Front Panel
Front Panel 1. ÍON/STANDBY button : Turns the unit on or to standby mode. 2. TIMER indicator : This lights when the alarm is set. 3. Display ( 4. -
Page 7: Rear Panel
TV or CD player, with an analog audio cable. 12.ANTENNA DAB terminal : Connect the supplied DAB/ FM wire antenna. REMOTE CONTROL jacks : Connect an Onkyo product with an RI jack using an RI cable to synchronize with this unit. ( P24) -
Page 8: Remote Controller
Remote Controller 1. Í button : Turns the unit on or into standby mode. 2. TIMER button : Used to set the alarm. 3. SLEEP button : Set the sleep timer. When the time set (30, 60, or 90 minutes) has elapsed, the unit switches ... -
Page 9: Display
Display ASb DSD DIGITAL SLEEP MUTING BASS DIRECT AUTO FM ST RDS 1. Lights when “Auto Standby” ( P29) is set to “On”. 2. Lights when the audio signal being input is DSD. 3. -
Page 10: Connect The Speakers
Connect the Speakers a Speaker cable Refer to the illustration to connect your own speakers. After inserting the speaker cables, tighten the terminals firmly by turning to the right. Also make sure the exposed wires of the speakers do not stick out of the speaker terminals when connecting. -
Page 11: Connecting The Antennas And Power Cord, Etc
Connecting the Antennas and Power Cord, etc. a DAB/FM wire antenna, b Power cord Antenna Hookup Move the antenna around while playing the radio to find the position with the best reception. Power Cord Hookup Connect the power cord to the power outlet after completing all other connections. -
Page 12: Power On & Initial Setup
Power On & Initial Setup e t u p N e t w o r k S Wi-Fi connection settings Scan Networks When you first turn the power on, the initial setup screen is displayed automatically, allowing you to easily make Wi-Fi connection settings. -
Page 13: Time Settings
P27). SPEAKER...” item on the screen of the iOS device and select “Next”. 0 This unit is displayed as “Onkyo R-N855 XXXXXX”. 3. After “Check Network” is displayed on this unit, when the Wi-Fi settings are complete, the display changes. -
Page 14: Usb Storage Device/Hdd Playback
USB Storage Device/HDD Playback Basic operations You can play music files by connecting a USB storage device or HDD (hard disk drive) to the USB port on the front or rear of the unit. 0 The USB port on the front supports a maximum 5 V/ 0.5 A power supply. - Page 15 USB Storage / HDD Device Requirements FLAC (.flac/.FLAC) : 0 Supported sampling rates : 44.1 kHz, 48 kHz, 0 Note that operation is not guaranteed with all USB 88.2 kHz, 96 kHz, 176.4 kHz, 192 kHz storage devices or HDD. 0 Quantization bit : 8 bit, 16 bit, 24 bit 0 This unit can use USB storage devices that comply with the USB mass storage device class standard.
-
Page 16: Internet Radio
Internet Radio Basic operations When this unit is connected to a network, you can listen to TuneIn or other preregistered Internet radio services. 1. Turn the unit on. 2. Press NETWORK. 3. Select “TuneIn Radio” with (a) on the remote controller and press ENTER (b). -
Page 17: Spotify
(f) Play the next track. 3. Select this unit. Onkyo R-N855 xxxxxx 0 This unit is displayed as “Onkyo R-N855 XXXXXX”. 4. This unit turns on automatically and the input selector changes to NET and streaming of Spotify starts. 0 If “Option” - “PWR Setting” - “NET Stby” is set to “Off”... -
Page 18: Listening To The Fm/Dab Radio
Listening to the FM/DAB Radio Listening to FM Radio 4. Select the station you want to listen to while pressing (a) on the remote controller. 0 The frequency changes by 1 step each time you press the button. The frequency changes continuously if the button is held down and stops when the button is released. -
Page 19: Listening To Dab Digital Radio
Classics (Serious classics) Other M (Other music) Weather Finance Children (Children's programmes) Social (Social affairs) Religion Phone In Travel Leisure Jazz (Jazz music) Country (Country music) Nation M (National music) Oldies (Oldies music) Folk M (Folk music) Document (Documentary) 0 The very first time you select DAB, the Auto Tuning 0 The information displayed may sometimes not function automatically scans the DAB Band 3 for the match the content being broadcast by the station. - Page 20 Registering a station To give a name to a registered station (FM stations only) : 1. Press TUNER. 2. Press (d) on the remote controller to select a preset number. 3. Press MENU (b) on the remote controller. 4. Press (a) on the remote controller to select “Option”...
-
Page 21: Bluetooth
“0000”. Onkyo R-N855 xxxxxx 0 Due to the characteristics of BLUETOOTH wireless 0 This unit is displayed as “Onkyo R-N855 XXXXXX”. technology, the sound produced on this unit may 4. “Now Pairing...” on the display changes to the name of slightly be behind the sound played on the the BLUETOOTH enabled device. -
Page 22: Airplay
Onkyo R-N855XX 0 This unit is displayed as “Onkyo R-N855 XXXXXX”. 0 If an “AirPlay PW” has been set on this unit, enter the password you set. 4. Play the music files on the iOS device. -
Page 23: Connections
Playing Audio from an External Device Connections You can play the audio from external devices such as TVs, CD players, and turntables with MM cartridges through this unit. Connect as follows according to the output jacks on the external devices you are connecting. When using a digital optical cable, connect to the DIGITAL IN OPTICAL terminal on this unit. - Page 24 Connecting with Onkyo RI Components By connecting an Onkyo component with RI jack to the unit by using an RI cable and an analog audio cable, you can link the unit’s power and input selection and enable operation with this unit’s remote controller. For details, refer to the instruction manual of the component with the RI jack.
-
Page 25: Music Server
Music Server It is possible to stream music files stored on PCs or NAS 4. Press NETWORK. devices connected to the same network as this unit. The network servers this unit is compatible with are those PCs with players installed that have the server ®... -
Page 26: Playback
Supported Audio Formats This unit supports the following music file formats. 0 Note that playback via wireless LAN of sampling rates of 88.2 kHz or higher, and DSD are not supported. 0 Remote play of FLAC, and DSD is also not supported. 0 Variable bit-rate (VBR) files are supported. -
Page 27: Using The Alarm To Start Play
Using the Alarm to Start Play At the set time, the unit switches on and starts play of the Next set the hour and minutes for the end time. desired source. You can set two different timers, “TIMER 8. Press (c) to set the volume (00 to 50) for the 1”... -
Page 28: Entering Text, Adjusting Sound Quality, Etc
Entering Text, Adjusting Sound Quality, etc. Entering text (left) / (right) : Select to move the cursor. BS (backspace) : Removes a character on the left of the Text entry, for passwords, etc., uses the following cursor. The cursor moves left. procedure. -
Page 29: Advanced Settings
Advanced Settings ■ DHCP The unit allows you to configure advanced settings to provide you with an even better experience. Select the item with (c) on the remote controller and press ENTER (d). “On” (Default Value) : Auto configuration by DHCP “Off”... -
Page 30: Tuner Setting
■ Bt Setting NET Stby When this feature is turned “On”, you can turn on the power of the unit via the Bluetooth Select whether or not to use the network using an application that can BLUETOOTH function. control this unit. Select the item with (c) on the Select the item with... -
Page 31: System Info
and press ENTER (d). ■ LINE OUT/SW Change the settings according to the devices connected to the LINE OUT jacks on this unit. When changing this setting, perform without devices connected to the LINE OUT jacks. Select the item with (c) on the remote controller and press ENTER (d). -
Page 32: Firmware Update
If an error message is displayed : When an error occurs, “ * - ** Error!” is displayed on the display of this unit. Check the following: http://www.onkyo.com/manual/upd/nap/2.pdf 0 * -01, * -10 : Ethernet cable not found. Connect the Ethernet cable properly. - Page 33 “Network” on the display. Network 6. Press and ENTER to select “Update” - “via USB” in order. Update 0 “Update” is not displayed if there are no firmware updates. 7. Press ENTER to start the firmware update. 0 “Completed” is displayed when the update is complete.
-
Page 34: Troubleshooting
Troubleshooting Before starting the procedure Volume reduces after switching to standby When operation is unstable, problems may be solved by 0 This unit protects circuits by reducing the volume to 40 simply turning the power on or to standby or the next time the unit is switched on if the volume was disconnecting/connecting the power cord, rather than above 40 when it was switched to standby. - Page 35 ■ Connected to an SSID different to the SSID Network function selected 0 Some access points allow you to set multiple SSIDs 0 If you cannot select a network service, it will become for one unit. If you use the automatic setting button on selectable when the network function is started.
- Page 36 ■ Cannot connect with this unit 0 Check that the BLUETOOTH function of the BLUETOOTH enabled device is enabled. 0 If an already paired unit cannot be connected, delete the pairing information on the BLUETOOTH enabled device, then pair again. ■...
-
Page 37: Specifications
General Specifications Audio Section General Rated Output Power (IEC) Power Supply AC 220 - 230 V, 50/60 Hz 2 ch 70 W at 4 ohms, 1 kHz, 2 ch driven of 1% Power Consumption THDiN (Total Harmonic DistortioniNoise) 60 W 0.08% (1 kHz, 8 ohms, 1 W) 0.2 W (Standby) Input Sensitivity and Impedance (1 kHz, 100 W/8 h) -
Page 38: License And Trademark Information
® The BLUETOOTH word mark and logos are registered trademarks owned by Bluetooth SIG, Inc. and any use of such marks by Onkyo Corporation is under license. Other trademarks and trade names are those of their respective owners. "VLSC" and "VLSC (logo)"are trademarks of Onkyo Corporation. - Page 39 Through this device you are able to link to other services or websites which The software package installed in this product includes software licensed to Onkyo & Pioneer Corporation (hereinafter, called "O&P Corporation") directly or indirectly by third party developers. Please be sure to read this are not under the control of any company which has designed, notice regarding such software.
- Page 40 NO WARRANTY * tool for writing it). Whether that is true depends on what the Library does and what the program that uses the 15. BECAUSE THE LIBRARY IS LICENSED FREE OF CHARGE, THERE IS NO WARRANTY FOR THE Library does. LIBRARY, TO THE EXTENT PERMITTED BY APPLICABLE LAW.
- Page 41 conditions. You may not impose any further restrictions on the recipients' exercise of the rights granted herein. The licenses granted in Section 2.1 with respect to any Contribution become effective for each Contribution on You are not responsible for enforcing compliance by third parties to this License. the date the Contributor first distributes such Contribution.
- Page 42 Please refer to the PDF files on the following website about the notice in response to requests wpa-supplicant from the copyright owners of each piece of software. Copyright (c) 2002-2014, Jouni Malinen <j@w1.fi> and contributors http://www.onkyo.com/manual/oss/2016wsp.pdf All Rights Reserved. 本製品には弊社が第三者より直接的に又は間接的に使用の許諾を受けた下記ソフトウェアが含まれてお boost ります。各ソフトウェアの著作権者の要求に基づく通知については、以下のサイトより...
- Page 43 Memo...
- Page 44 2-3-12, Яэсу, Чуо-ку, г. Токио, 104-0028, ЯПОНИЯ The above-mentioned information is subject to change without prior notice. Visit the Onkyo web site for the latest update. (C) Copyright 2016 Onkyo & Pioneer Corporation Japan. All rights reserved. F1608-0 http://www.onkyo.com/privacy/ Printed in Malaysia / Imprimé en Malaisie / Напечатано в Малайзии...
Need help?
Do you have a question about the R-N855 and is the answer not in the manual?
Questions and answers