Onkyo HT-R380 Instruction Manual
Av
Hide thumbs
Also See for HT-R380:
- Quick setup manual (2 pages) ,
- Service manual (75 pages) ,
- Service manual (83 pages)
Table of Contents
Advertisement
AV Receiver
HT-R380
Instruction Manual
Thank you for purchasing an Onkyo AV Receiver.
Please read this manual thoroughly before making
connections and plugging in the unit.
Following the instructions in this manual will enable
you to obtain optimum performance and listening
enjoyment from your new AV Receiver.
Please retain this manual for future reference.
Contents
Introduction ...................................2
Connections.................................11
Turning On & Basic Operations ......18
Advanced Operations .................28
Controlling iPod & Other
Components............................37
Others...........................................44
E
n
Advertisement
Table of Contents

Subscribe to Our Youtube Channel
Related Manuals for Onkyo HT-R380


Summary of Contents for Onkyo HT-R380
- Page 1 Advanced Operations ....28 Controlling iPod & Other Components......37 Others...........44 Thank you for purchasing an Onkyo AV Receiver. Please read this manual thoroughly before making connections and plugging in the unit. Following the instructions in this manual will enable you to obtain optimum performance and listening enjoyment from your new AV Receiver.
-
Page 2: Important Safety Instructions
WARNING: WARNING AVIS RISK OF ELECTRIC SHOCK RISQUE DE CHOC ELECTRIQUE TO REDUCE THE RISK OF FIRE OR ELECTRIC DO NOT OPEN NE PAS OUVRIR SHOCK, DO NOT EXPOSE THIS APPARATUS TO The lightning flash with arrowhead symbol, within an RAIN OR MOISTURE. -
Page 3: Precautions
EN60065, wet or damp. If water or any other liquid gets inside EN55013, EN55020 and EN61000-3-2, -3-3. this unit, have it checked by your Onkyo dealer. GROEBENZELL, GERMANY 8. Handling Notes • If you need to transport this unit, use the original K. -
Page 4: Supplied Accessories
Supplied Accessories Make sure you have the following accessories: Indoor FM antenna (➔ AM loop antenna (➔ Remote controller and two batteries (AA/R6) (➔ In catalogs and on packaging, the letter at the end of the prod- uct name indicates the color. Specifications and operations are the same regardless of color. -
Page 5: Table Of Contents
About AV Connections ..........13 Controlling iPod ............. 37 Connecting Components with HDMI ......14 Connecting an Onkyo Dock .......... 37 Connecting External Components........ 15 Using the Onkyo Dock ..........38 Using the AUX INPUT jack on the front panel....15 Controlling Your iPod............ -
Page 6: Features
DTS-HD High Resolution Audio, Dolby TrueHD “Dolby”, “Pro Logic” and the double-D symbol are trade- Dolby Digital Plus, DSD and Multi-CH PCM marks of Dolby Laboratories. Music Optimizer™ is a trademark of Onkyo Corporation. • Non-Scaling Configuration • A-Form Listening Mode Memory • Direct Mode “HDMI, the HDMI Logo, and High-Definition Multimedia... -
Page 7: Front & Rear Panels
Front & Rear Panels Front Panel The actual front panel has various logos printed on it. They are not shown here for clarity. The page numbers in parentheses show where you can find the main explanation for each item. ON/STANDBY button (➔... -
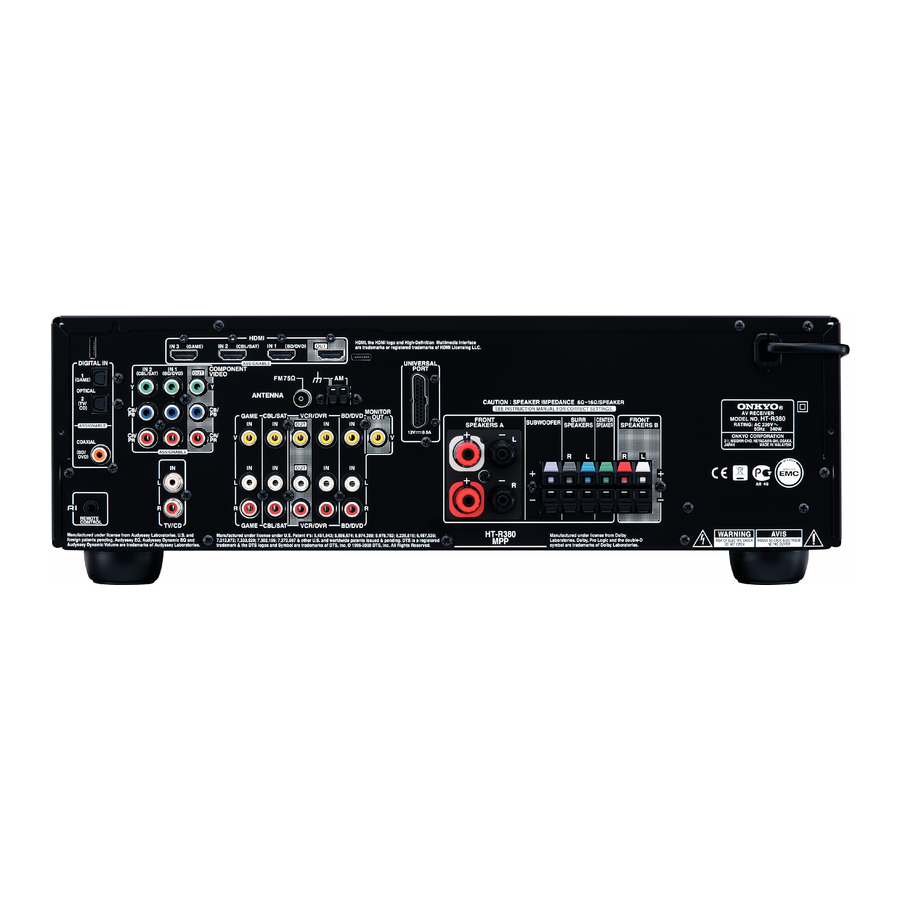
Page 8: Display
Display For detailed information, see the pages in parentheses. 10, 20) A and B speaker indicators (➔ RDS indicator (➔ Audio input indicators SLEEP indicator (➔ Listening mode and format indicators (➔ 19, 25) MUTING indicator (➔ Tuning indicators (➔ Message area Rear Panel DIGITAL IN COAXIAL and OPTICAL jacks... -
Page 9: Remote Controller
Controlling the AV Receiver To control the AV receiver, press RECEIVER to select Receiver mode. You can also use the remote controller to control Onkyo Blu-ray Disc/DVD player, CD player, and other components. See “Entering Remote Control Codes” for more details (➔... -
Page 10: About Home Theater
With Blu-ray Discs, you can enjoy DTS and Dolby Digital. With analog or digital TV, you can enjoy Dolby Pro Logic II, DTS Neo:6, or Onkyo’s original DSP listening modes. -
Page 11: Connections
Connecting the AV Receiver Connecting Your Speakers Speaker Configuration The following table indicates the channels you should use depending on the number of speakers that you have. For 5.1-channel surround-sound playback, you need five speakers and a subwoofer. Number of channels ✔... - Page 12 Connecting the Speaker Cables Screw-type speaker terminals Strip 12 to 15 mm of insulation from the 12 to 15 mm ends of the speaker cables, and twist the bare wires tightly, as shown. (Supplied speaker cables are already stripped.) Push-type speaker terminals Strip 10 to 12 mm of insulation from the ends of the speaker 10 to 12 mm cables, and twist the bare wires tightly, as shown.
-
Page 13: About Av Connections
About AV Connections Connected image with AV components : Video & Audio HDMI cable Other cables : Video : Audio AV receiver AV receiver Blu-ray Disc/ Blu-ray Disc/ DVD player Game console Game console TV, projector, etc. TV, projector, etc. DVD player •... -
Page 14: Connecting Components With Hdmi
Connecting Components with HDMI Game console TV, projector, etc. Satellite, cable, set-top box, etc. Blu-ray Disc/DVD player Connect your components to the appropriate jacks. The default input assignments are shown below. ✔: Assignment can be changed (➔ 29). Jack Signal Components Assignable ✔... -
Page 15: Connecting External Components
Connecting External Components The on-screen setup menus appear only on a TV that is connected to the HDMI OUT. If your TV is connected to the MONITOR OUT V or the COMPONENT VIDEO OUT, use the AV receiver’s display when changing settings. Connect your components to the appropriate jacks. -
Page 16: Connecting Onkyo Components
Connecting Onkyo Components Note Step 1: Make sure that each Onkyo component is connected • Use only cables for connections. cables are supplied with an analog audio cable (connection in the hookup with Onkyo players (DVD, CD, etc.). 15). examples) (➔... -
Page 17: Which Connections Should I Use
Which Connections Should I Use? The AV receiver supports several connection formats for compatibility with a wide range of AV equipment. The format you choose will depend on the formats supported by your components. Use the following sections as a guide. The on-screen setup menus appear only on a TV that is connected to the HDMI OUT. -
Page 18: Turning On/Off The Av Receiver
Turning On/Off the AV Receiver ON/STANDBY STANDBY indicator ON/STANDBY RECEIVER Front panel Remote controller Turning On Press ON/STANDBY on the front panel. Press RECEIVER followed by ON/STANDBY on the remote controller. The AV receiver comes on, the display lights, and the STANDBY indicator goes off. Turning Off Press ON/STANDBY on the front panel or the remote controller. -
Page 19: Basic Operations
Basic Operations Displaying Source Information This manual describes the procedure using the remote controller unless otherwise specified. You can display various information about the current input source as follows. Playing the Connected Component Press RECEIVER followed by DISPLAY repeat- ■ Operating on the AV receiver edly to cycle through the available information. -
Page 20: Muting The Av Receiver
Muting the AV Receiver Changing the Input Display You can temporarily mute the output of the AV receiver. When you connect an -capable Onkyo component, you must configure the input display so that can work Press RECEIVER followed by MUTING. -
Page 21: Listening To The Radio
Listening to the Radio ■ Manual tuning mode This section describes the procedure using the but- tons on the front panel unless otherwise specified. Press TUNING MODE so that the AUTO indicator goes off on the display. Using the Tuner Press and hold TUNING / . -
Page 22: Presetting Fm/Am Stations
Presetting FM/AM Stations Using RDS You can store a combination of up to 40 of your favorite RDS works only in areas where RDS broadcasts are FM/AM radio stations as presets. available. Tune into the FM/AM station that you want to When tuned into an RDS station, the RDS indicator lights. - Page 23 ■ Finding Stations by Type (PTY) RDS program types (PTY) Type Display You can search for radio stations by type. None None Press RT/PTY/TP twice. News reports News The current program type appears on the display. Current affairs Affairs Information Info Use PRESET to select the type of program...
-
Page 24: Recording
Recording This section explains how to record the selected input source to a component with recording capability, and how to record audio and video from different sources. Connecting a Recording Component Recording Separate AV Sources Here you can record audio and video from completely separate sources, allowing you to overdub audio onto your video recordings. -
Page 25: Using The Listening Modes
Using the Listening Modes Selecting Listening Modes See “About Listening Modes” for detailed information about the listening modes (➔ 25). Listening Mode Buttons MOVIE/TV button This button selects the listening modes intended for use Press with movies and TV. RECEIVER first. MUSIC button This button selects the listening modes intended for use with music. -
Page 26: Listening Modes
■ Speaker Layout The illustration shows which speakers are activated in each channel. See “Sp Config (Speaker Configuration)” for the 30). speaker setup (➔ Front speakers Center speaker Subwoofer Surround speakers Listening Modes Listening Mode Description Input Speaker Source Layout Direct In this mode, audio from the input source is output without surround-sound process- ing. - Page 27 M u s Use this mode with any stereo movie (e.g., TV, DVD, VHS). • Neo:6 Music Use this mode with any stereo music source (e.g., CD, radio, cassette, TV, VHS, DVD). Onkyo-Original DSP Listening Modes Listening Mode Description Input Speaker...
-
Page 28: Advanced Setup
Advanced Setup On-screen Setup Menus Common Procedures in Setup Menu The on-screen setup menus appear only on a TV that Remote indicator is connected to the HDMI OUT. If your TV is con- nected to the composite video MONITOR OUT or the COMPONENT VIDEO OUT, use the AV receiver’s display when changing settings. -
Page 29: Hdmi Input
Explanatory Notes Component (Component Video Input) Menu Sp Config Menu Component Subwoofer If you connect a video component to a component video Yes: input, you must assign that input to an input selector. For Select if a subwoofer is connected. example, if you connect your Blu-ray Disc/DVD player to COMPONENT VIDEO IN 2, you must assign “IN2”... -
Page 30: Sp Config (Speaker Configuration)
■ Crossover (Crossover Frequency) Note This setting is advantageous for the speakers that you • When an HDMI IN is assigned to an input selector in “HDMI specified as “Small” in the “Sp Config (Speaker Con- Input” (➔ 29), this input assignment is automatically set to the figuration)”... -
Page 31: Level Cal (Level Calibration)
■ ■ Left, Center, Right, Surround Right, Surround Input Ch(Mux) Left, Subwoofer Main: Specify the distance from the each speaker to your lis- The main channel is output. tening position. Sub: The sub channel is output. Note M/S: • The speaker distance setting cannot be changed while a pair of Both the main and sub channels are output. -
Page 32: Name Edit
1, 2, or 3 Setting a value “0” in the middle is set to hear a sound. When several Onkyo components are used in the same Sound is spread in left and right (the outside) so that the room, their remote ID codes may overlap. To differenti- set value is made big. - Page 33 ■ Audio Return Ch (ARC) Note Off: “ ” • If is selected and the signal can be output by the TV, the Select “Off” if you don’t want to use audio return AV receiver will output no sound through its speakers. channel (ARC) function.
-
Page 34: Using The Audio Settings
■ TV Control Note Off: • To bypass the bass and treble tone circuits, select the Direct lis- TV Control disabled. tening mode. • This procedure can also be performed on the AV receiver by TV Control enabled. using its TONE, –, and + buttons (➔... - Page 35 For Dolby TrueHD sources, the options are: Audio Selector Auto: You can set priorities of audio output when there are both The Late Night function is set to “On” or “Off” digital and analog inputs. automatically. ■ Off: AudioSel Late Night function off. ARC: The audio signal from your TV tuner can be sent to Late Night function on.
-
Page 36: Digital Input Signal Formats
Digital Input Signal Formats Adjusting the Bass & Treble The digital input signal formats are available only for the You can adjust the bass and treble for Speakers A and B input sources that you have assigned a digital input jack front speakers, except when the Direct listening mode is (➔... -
Page 37: Controlling Ipod
Controlling iPod Connecting an Onkyo Dock Onkyo Dock Cable Note Page UP-A1 Dock — • When UP-A1 Dock that seated iPod is (➔ (Universal Port Option Dock) connected, the power consumption on standby mode slightly increases. • You can control your iPod when “PORT”... -
Page 38: Using The Onkyo Dock
AV receiver at a Dock is sold separately. specified time. The AV receiver’s input source will auto- For the latest information on the Onkyo Dock compo- matically be set to the PORT selector. nents, see the Onkyo web site at: Note http://www.onkyo.com... -
Page 39: Controlling Your Ipod
Controlling Your iPod Note • Enter the appropriate remote control code before using the AV By pressing REMOTE MODE that’s been programmed receiver’s remote controller for the first time (➔ 41). with the remote control code for your Dock, you can con- •... - Page 40 • For detailed operation of the iPod, please refer to the instruction manual. This button does not turn the Onkyo DS-A2 or DS-A2X RI Dock on or off. Your iPod may not respond the first time you press this button, in which case you should press it again.
-
Page 41: Controlling Other Components
(➔ so choose a REMOTE MODE that corresponds with the If you want to control an Onkyo component by pointing input to which you connect your component. For example, the remote controller directly at it, or you want to control if you connect your CD player to the CD input, choose an Onkyo component that’s not connected via... -
Page 42: Resetting Remote Mode Buttons
If you want to control an Onkyo component by pointing the Controlling Other Components remote controller directly at it, use the following remote control codes: By pressing REMOTE MODE that’s been programmed 32900: with the remote control code for your component, you can Onkyo Blu-ray Disc player control Onkyo component as below. - Page 43 ✔: Available buttons Press the appropriate REMOTE MODE first. Components Buttons ✔ ✔ ✔ ✔ ✔ ✔ ON/STANDBY ✔ ✔ ✔ GUIDE ✔ TOP MENU ✔ ✔ ✔ ✔ ✔ / / / ENTER ✔ ✔ ✔ ✔ ✔ SETUP ✔...
-
Page 44: Others
If you can’t resolve the issue yourself, try resetting the power cord disconnected for 1 hour. After that, AV receiver before contacting your Onkyo dealer. reconnect the power cord and set the volume to max- To reset the AV receiver to its factory defaults, turn it imum. - Page 45 ■ ■ Only the front speakers produce sound Noise can be heard Using cable ties to bundle audio cables with power — When the Stereo or Mono listening mode is selected, — cords, speaker cables, and so on may degrade the only the front speakers and subwoofer produce audio performance, so don’t do it.
- Page 46 Try resetting your iPod. — Depending on your iPod, some buttons may not — If it’s an Onkyo component, make sure that the work as expected. cable and analog audio cable are connected properly. Connecting only an cable won’t work.
- Page 47 Recording Onkyo is not responsible for damages (such as CD ■ Can’t record rental fees) due to unsuccessful recordings caused by the unit’s malfunction. Before you record important On your recorder, make sure the correct input is —...
-
Page 48: Specifications
Specifications Amplifier Section General Rated Output Power Power Supply AC 230 V, 50 Hz × All channels: Power Consumption 340 W 1 ch 100 W at 6 ohms, 1 kHz, 1 ch driven (IEC) Stand-by Power Consumption 160 W (3 Ω, Front) Dynamic Power 0.3 W 125 W (4 Ω, Front) -
Page 49: About Hdmi
About HDMI Designed to meet the increased demands of digital TV, HDMI (High Definition Multimedia Interface) is a new digital interface standard for connecting TVs, projectors, Blu-ray Disc/DVD players, set-top boxes, and other video compo- nents. Until now, several separate video and audio cables have been required to connect AV components. With HDMI, a single cable can carry control signals, digital video, and up to eight channels of digital audio (2-channel PCM, multichan- nel digital audio, and multichannel PCM). -
Page 50: Using An Rihd-Compatible Tv, Player, Or Recorder
Using an RIHD-compatible TV, Player, or Recorder , which stands for Remote Interactive over HDMI, is the name of the system control function found on Onkyo components. The AV receiver can be used with CEC (Consumer Electronics Control), which allows system control over HDMI and is part of the HDMI standard. - Page 51 ■ How to connect and setup Confirm the settings. 1. Turn on the power for all connected components. Confirm the connecting and setting. 2. Turn off the power of the TV, and confirm that 1. Connect the HDMI OUT jack to the HDMI input the power of the connected components is turned jack of the TV.
- Page 52 Unit 1 & 12, 9/F, Tower 1, Ever Gain Plaza, 88, Container Port Road, Kwai Chung, N.T., Hong Kong. Tel: 852-2429-3118 Fax: 852-2428-9039 http://www.ch.onkyo.com/ Y1001-1 SN 29400408 (C) Copyright 2010 ONKYO CORPORATION Japan. All rights reserved. * 2 9 4 0 0 4 0 8 *...
Need help?
Do you have a question about the HT-R380 and is the answer not in the manual?
Questions and answers