
Related Manuals for Yale HSA3095


Summary of Contents for Yale HSA3095
- Page 1 Kit 5 Home-monitoring and intruder alarm system HSA3095 Installation ¥ Programming ¥ Operating Keep in a handy place for reference and for future maintenance 01902 635998 Helpline An ASSA ABLOY Group brand...
- Page 2 ¥ Doorstep aggression ¥ Falls by the elderly or infirm Information and illustrations are subject to change within this document. Yale reserves the right to alter the specification and product design at anytime without notice. Yale¤ is a registered trademark. ' 2003 Security Products UK Ltd. All rights reserved.
-
Page 3: Table Of Contents
Contents Recommended installation sequence Contents We recommend you follow the simple install 1 Location planning sequence, headings numbered 1-5. Subsequent sections provide: 2 Unpack the parts ¥ Use of additional accessory devices including keypad and keyfob remote controls 3 Easy install programming ¥... -
Page 4: Flood Detector
Location planning Work out the best places to locate the devices for maximum protection. Having chosen the locations do not mount at this stage. Home and away mode planning Keypad remote control accessory The home arming mode allows the premises to When used as second keypad, it is ideal in be part armed so that no one can get inside without bedrooms or at the top of a stairwell so the... - Page 5 Smoke detector ¥ Mount on the ceiling at the top of a stairwell, or where smoke would most likely be detected. Siren Choose a position on an external wall where the siren would be most prominent. Mount as high as possible, out of easy reach. Door/Window contact Select a door that will be the main point of entry and exit, usually your front door.
-
Page 6: Unpack The Parts
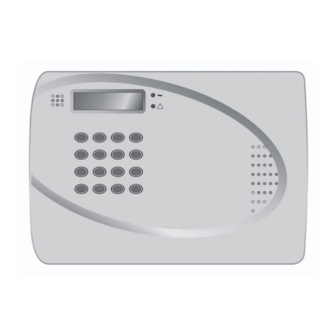
Unpack all the parts The easiest way to get to know the system and get it up and running quickly is to get all the devices and accessories programmed on a table top before locating and mounting them. Control unit Plug the power adaptor into the mains supply wall socket and the other end into the control unit. - Page 7 PIR movement detector Smoke detector Remove the fixing screw and cover assembly and Twist off the back and insert the 4 AAA batteries insert the three AA batteries as shown. as shown. ¥ The light steadily flashes for 30 seconds while components initialise.
-
Page 8: Easy Install Programming
Easy install programming The easiest way to get to know your system and get it up and running quickly is to get all the devices and accessories programmed before locating and mounting them. Control panel 7 The system asks you for a new PIN code. Think of one you can remember and key it in. - Page 9 The Temporary code is used to arm/disarm the system for a temporary user and is valid only once per Arming and once per Disarming. Afterwards, the 2 2ABCabc Temporary Code is automatically erased and needs 3 3DEFdef Delete character to be reset for a new Temporary user. 4 4GHIghi and backspace ¥...
- Page 10 1 Press # (program key), enter your prorgam code Programming menu and press OK. and press OK. 2 Select Add Devices and press OK. 2 Select Devices +/- by 3 Press the learn/test button Extension terminals Learn/Test scrolling down the the rear of the PIR.
- Page 11 sound a two-tone confirmation and the control is useful for testing. Ensure the jumpers are unit will confirm. Please ensure that you test placed into the positions desired before replacing smoke detectors regularly. the cover. 3 Program the control unit by selecting Devices Add the flood detector +/- menu, then Program Siren menu, then Learn Siren .
- Page 12 ¥ With J7 off , jamming by radio interference is until the previous sensor is deleted. To delete a detected when continuously present for more sensor, choose Remove Device in the Device +/- than 30 seconds and activates the siren only menu, all the used zones with the sensor names are when armed.
-
Page 13: Installation/Mounting
Walk Test /Program mode. Mounting methods Control unit Yale provide two methods of mounting. Choose Using the four holes of either the self adhesive pads or the screws and wall the wall mounting cross plugs supplied. - Page 14 ¥ Do not position a PIR to look directly at a door screw. Test it by opening and closing the door or protected by a door contact, this could cause the window. The light will flash when an open door contact and PIR radio signals to be condition is detected.
-
Page 15: Testing The System
Testing the system Testing the system should be done on a regular basis and after any alterations. PIR sleep feature ¥ If the control unit receives a signal, it will sound a chime and the display will show the sensor and The PIR has a built-in sleep timer to save battery zone number which has been tested. -
Page 16: Monitoring Service
Connecting to the Intamac Home Monitoring service Connect to the online home monitoring and messaging service, with your free 12 months subscription. Call or register online with Intamac Connecting your alarm - Telephone connection Telephone Intamac on 0845 230 0708 during A telephone lead and 2-way adaptor is included working hours (Mon-Thurs 9am-5pm, Fri 9am-4pm) so you can have your telephone and the control unit... -
Page 17: Using The System
Using the system Arm and disarm the system and practice using it. Trigger the alarm by arming the system and opening protected doors/windows and walking past PIR s. Now is the time to show the rest of the family how simple it is to use. The telephone features are yet to be programmed. Arming the system 6 Press OK to confirm the selection. -
Page 18: Alarm Memory
system will sound an alarm. then afterwards you can arm the system 1 Key in your PIN code, and then press OK, the ¥ However if you want to put the system into Arm audible alarm will stop. mode with the fault situation persisting, it is still ¥... - Page 19 a tamper alarm when the system is disarmed. To signal its condition to the control unit when it is enable the display to be cleared a tamper condition activated. To be able to clear the display the has to be rectified. For example, if a detector has batteries in the detector will have to be changed.
-
Page 20: Configuring Your System
Configuring your system Fine tune the operation of the control panel to your requirements; advanced programming for PIRs and door/window contacts. General settings menu 1 Press arrow keys to select the option. 2 Press OK to confirm. Note: Siren ON is set as factory default. It is recommended Pin code that the control unit siren is left on. - Page 21 3 Now the day will flash, use arrow keys to select the day. Note: This number must be entered to allow reporting to the 4 Press OK to confirm. intamac Home Manager Service. Note: Date will be reset if all power to the unit is lost. Check-in report Panel siren Sends a monitoring signal every 7 days if no other reporting...
- Page 22 system is home armed, but cause an instant alarm when fully armed or home mode armed; Points for consideration ¥ To commence an entry countdown upon detection when the ¥ In home mode, detectors set as Burglar will cause an alarm system is fully or home armed.
-
Page 23: Installing And Using Accessories
Adding accessories To provide additional protection you can add extra door/window contacts, PIRs, keyfob remote controls, keypad remote controls, help buttons and smoke detectors. These are available separately from your local stockist. Keyfob remote control accessory The system is armed by pressing the Arm or Home button for at least 1 second (this delay feature prevents accidental operation). -
Page 24: Changing The Batteries
Changing the batteries Always use alkaline batteries as replacements, any other type of battery can cause problems with the operation of the system. Typical life of batteries is three years. Ensure the correct steps are taken when changing batteries in tamper protected devices. Siren The LED will either be very dim or will not light at all when the battery is low. -
Page 25: Trouble Shooting
Trouble shooting Siren ¥ Check pets have no access to protected area. ¥ Check that PIR is not pointed at sources of heat Siren does not respond to arming or disarming or moving objects, e.g. fluttering curtains. ¥ Check that PIR is not mounted above convector ¥... -
Page 26: Specifications
HSA3080 REN rating 1 HSA3030 HSA3070 Siren HSA3095 Siren output 104dBA sound pressure @ 1m minimum Radio 433.92MHz AM super heterodyne receiver with jamming detection Power supply 6V, 4 x D alkaline cells. 3 years minimum typical service life... -
Page 28: Key Points
See how to change a battery, page 24 Yale THE YALE BRAND, with its unparalleled global reach and range of products, reassures The Meadows, Cannock Road, more people in more countries than any other consumer locking solution.
Need help?
Do you have a question about the HSA3095 and is the answer not in the manual?
Questions and answers