
Related Manuals for Yale SmartHome Alarm series


Summary of Contents for Yale SmartHome Alarm series
-
Page 1: Table Of Contents
SmartHome Alarm series User/Master Manual Table of contents Operation Summary Control panel keys overview Entering the user manual Disarming the system iButton Duress code User Menu Fault List Hear Answer MC Full Arm Part Arm#1/2/3 Lone Occupant -Forced Arming -Arming with Door Opened... -
Page 2: Operation Summary
Operation Summary Arming Modes: Full Arming: Control panel- Enter pincode, press “0” Keypad- Enter pincode, press Full Arm button Keyfob- Press Full arm button. Part Arming #1/2/3: Control panel- Enter pincode, press “1”, “2” or “3” Keypad- Enter pincode, press the associated Part Arm button Keyfob- Press the associated part arm button. -
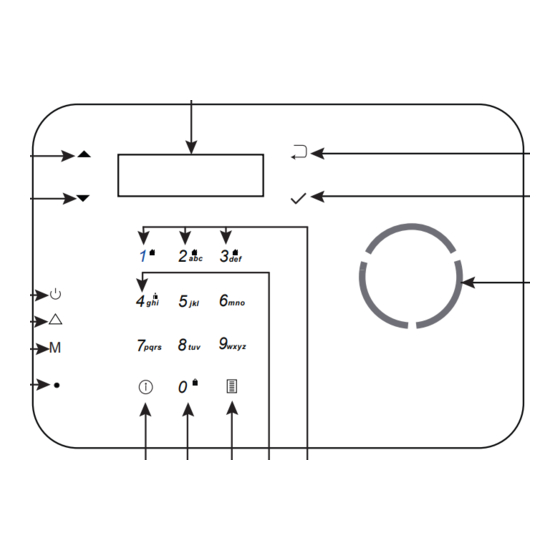
Page 3: Control Panel Keys Overview
Control panel Overview pqrs wxyz 7 8 9 10 11 Control Panel Keys Overview 8. Numeric Key 0 (Full Arm Key) • Used as a numeric key 1. Backlit LCD Screen • Also used to Full Arm the system 2. Up arrow Key 9. -
Page 4: Entering The User Menu
2) Selection shown will depends on Entering the User Menu User attribute setting. Under the “Alarm off” condition, 3) Part Arm 2 and 3 will be shown if user can access the user menu via enabled. entering a valid user code. 4) RSPS/ILPS/ZE88 and GSM will Press any key to wake up the only be shown if the relevant device... -
Page 5: Disarming The System
Disarming the system i button (voice assist) Using the Control panel Should the user require further assistant during system operation, press the i button to playback Under the “Alarm on” condition supplementary information. Press (system armed), the user can disarm the i button for a second time during the system via entering a valid user playback to stop this function. -
Page 6: User Menu
User Menu control panel is connected to either the GSM/GPRS or PSTN phone line. Fault List When the caller leaves messages on the system, this option will be The fault list allows you to see/ shown. Once selected, it will inform delete a list of fault events. -
Page 7: Full Arm
Keyfob- Press disarm Full Arm Keypad- Enter pincode follow by pressing disarm. Control panel- Enter pincode and The Full Arm mode is intended press OK. for fully arming the property when there are no occupants. If Area 2 is Stop Exit Delay defined, the system may ask you to choose one of the areas for arming (if the user have access to both... -
Page 8: Part Arm#1/2/3
sensors so that it will not trigger the Part Arm 1/2/3 Alarm for one-time only operation. This feature is ideal when the The Part Arm Mode is used when occupant plans to stay in one area the user wish to secure part of the for a prolonged length of time, and premise while leaving the another they wish to arm all other areas. -
Page 9: Forced Arming
Force Arming time to exit 30 sec Force Arming allows the user to full arm or part arm (lone occupant When the Exit Delay timer expires, the Control Panel will emit a long mode included) the system with a Fault condition present. beep and the system is now in the designated Arm Mode. -
Page 10: Arming With Supervisory Fault
Arming with Supervisory Set Time/Date fault This option allows you to set the system time and date. You can also The Siren, PIR sensor, Door Contact, define your local daylight saving and Smoke detector will transmit a hour. periodic Supervision signal to the control panel. -
Page 11: Daylight
Daylight Bypass Sensors This feature allows the user to As a one-time operation, the user define their local daylight saving can bypass any learnt sensor so hour that it is omitted from the system. Choose from a list of sensors to .disable bypass start month... -
Page 12: Rsps/Ilps/Ze88
RSPS/ILPS/ZE88 Allows the user to manually control This feature is only shown if GSM/ (Turn On/Off) their Power switch and GPRS module is available. ZE88. This option is only shown if there is at least one RSPS, ILPS or .GSM signal ZE88 in the system. -
Page 13: Master Setup
Master Setup GSM reset fail ! The Master Setup selection is only To exit GSM reset, press return shown if a Master user (Defined follow by ok to return to the previous through User attribute) log into the menu. user menu. .user setting engineer access alarm clock... - Page 14 • Use-Once Code access to Full/Away arm the system. (default=enable) This code can be used to arm and then disarm (or disarm and then arm) 1: representing if the user is set to have the system once. Once used, the code access to Part Arm#1.
-
Page 15: Engineer Access
Alarm via phone: Engineer Access You can set the alarm to call a phone number at the designated time. Enter the phone number when prompt. Determine whether the alarm engineer can access the system without any users being present. Panel Key LED eng. -
Page 16: Front Tamper
Front Tamper The front face plate of the control panel is tamper protected. This option allows the user to enable or disable this tamper function. Desk Tamper The control panel has a built in tilt sensor to protect against unauthorised removal (movement). This feature can be enable or disable accordingly. -
Page 17: Pstn And Gsm/Gprs Functions
PSTN and GSM/GPRS Functions Telephone function Remote Command The control panel can be used as a The control panel can be controlled hand free telephone. by Remote commands via SMS and PSTN/GSM/GPRS. Press up button once to enter the handfree telephone mode. Enter a Continue next page... - Page 18 2) If you do not wish to receive Via SMS confirmation SMS from the control panel, please skip the “00” at the end when sending remote command. For example, GSM/GPRS module is required “Jke_11234_11” to enable SMS remote command. Remember to change the language setting of your mobile phone to 3) If Area 2 had not been enabled, English before proceeding.
- Page 19 51101 1st Power Switch Open Via PSTN/GSM/GPRS ~51199 for 1 Hour to 99 Hours 52101 2nd Power Switch Open User can issue remote commands to ~52199 for 1 Hour to 99 Hours the control panel via voice calling (Either through PSTN or GSM/GPRS phone 53101 3rd Power Switch Open line).
-
Page 20: Rec. Voice Message
Rec. Voice message If the answer machine is enabled, the panel will pick up unanswered call and playback a voice prompt. The caller can record a short voice message (maximum 1 minute) after the voice prompt. The maximum number of messages is 20, and once it is full the oldest message will be deleted and replace with new recording. - Page 22 Has not been modified or damaged in any way. • Has not been subjected to unauthorized repairs. Yale are responsible under this guarantee for repairing the product or replacing the product as we deem necessary. If there is fault with the product, please...
Need help?
Do you have a question about the SmartHome Alarm series and is the answer not in the manual?
Questions and answers