Table of Contents
Advertisement
Quick Links
Advertisement
Table of Contents

Related Manuals for Eneo HDC-2100M1080


Summary of Contents for Eneo HDC-2100M1080
- Page 1 INSTRUCTION MANUAL Full HD SDI CAMERA HDC-2100M1080...
- Page 2 WARNING TO REDUCE THE RISK OF FIRE OR ELECTRIC SHOCK, DO NOT EXPOSE THIS PRODUCT TO RAIN OR MOISTURE. DO NOT INSERT ANY METALLIC OBJECTS THROUGH THE VENTILATION GRILLS OR OTHER OPENINGS ON THE EQUIPMENT. CAUTION CAUTION RISK OF ELECTRNIC SHOCK CAUTION: TO REDUCE THE RISK OF ELECTRIC SHOCK, DO NOT REMOVE COVER (OR BACK).
-
Page 3: Fcc Compliance Statement
FCC COMPLIANCE STATEMENT FCC INFORMATION: THIS EQUIPMENT HAS BEEN TESTED AND FOUND TO COMPLY WITH THE LIMITS FOR A CLASS A DIGITAL DEVICE, PURSUANT TO PART 15 OF THE FCC RULES. THESE LIMITS ARE DESIGNED TO PROVIDE REASONABLE PROTECTION AGAINST HARMFUL INTERFERENCE WHEN THE EQUIPMENT IS OPERATED IN A COMMERCIAL ENVIRONMENT. -
Page 4: Important Safety Instructions
IMPORTANT SAFETY INSTRUCTIONS Read these instructions. Keep these instructions. Heed all warnings. Follow all instructions. Do not use this apparatus near water. Clean only with dry cloth. Do not block any ventilation openings. Install in accordance with the manufacturer’s instructions. Do not install near any heat sources such as radiators, heat registers, stoves, or other apparatus (including amplifiers) that produce heat. -
Page 5: Table Of Contents
TABLE OF CONTENTS CONTENTS OF PACKAGE --------------------------------------------------------------- 6 INTRODUCTION ---------------------------------------------------------------------------- 7 CAMERA OVERVIEW --------------------------------------------------------------------- 8 CAMERA INSTALLATION ---------------------------------------------------------------- 9 DC Auto Iris Lens Installation & Adjustment ------------------------------------------ 10 OSD Menu Setup ---------------------------------------------------------------------------- 11 CAMERA OPERATION --------------------------------------------------------------------- 13 CONNECTIONS / DAY&NIGHT IN & ALARM OUT TERMINALS --------------- 18 SPECIFICATIONS ---------------------------------------------------------------------------... -
Page 6: Contents Of Package
CONTENTS OF PACKAGE Installation of the camera must be performed by qualified service personnel in accordance with all local and national electrical and mechanical codes. Carefully remove the color camera and its accessories from the carton and verify that they were not damaged in shipment. -
Page 7: Introduction
INTRODUCTION Full HD 2Mega pixel Camera HD-SDI 1080@30fps HD-SDI & Composite Video OUT. Features: Full HD (1920x1080p) Real Time High definition, 1080p video over 100m of RG59 or equivalent cable Advanced Technology for Surveillance - WDR( Wide Dynamic Range ) / BLC - 3D-Digital Noise Reduction - Digital Image Stabilization - Digital Slow Shutter... -
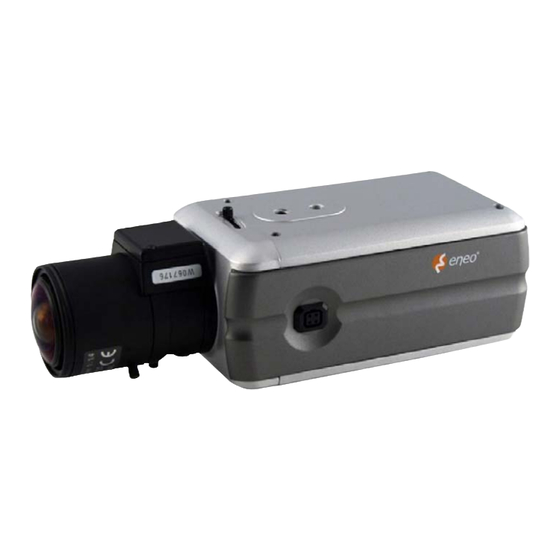
Page 8: Camera Overview
CAMERA OVERVIEW TOP VIEW SIDE VIEW ① FOCUS ADJUSTING / FIXING screw : Tighten this screw after focus the lens of a camera. ② AUTO IRIS LENS connector : Connect the DC auto iris lens 4-pin connector into this connector to control the amount of light allowed through the lens. -
Page 9: Camera Installation
CAMERA INSTALLATION Connection Overview Starting Installation Install the Lens Be careful the lens does not touch camera sensor when installer try to enter the lens into camera. Install manual lens or DC auto iris lens. If DC auto iris lens needs to install, connect DC auto iris 4-pin connector into iris drive connector located on the side of the camera. -
Page 10: Dc Auto Iris Lens Installation & Adjustment
DC AUTO IRIS LENS INSTALLATION & ADJUSTMENT The camera supports DC-type auto iris lenses. Perform the following steps to install and adjust a DC-type auto iris lens. Solder the lens control wires to the connector supplied with the camera. Figure 1. 4-Pin iris driver connector Attach the DC-type auto iris lens to the lens mount on the front of the camera. -
Page 11: Osd Menu Setup
OSD MENU SETUP The following table shows the list of menu items and options. You can adapt the camera to your requirements by setting up the respective items in these menus Main Menu Sub Menu Contents WDR/BLC OFF/WDR/BLC/ HSBLC BRIGHTNESS 0 to 100 OFF/LOW/MIDDLE/ HIGH X64, ..., x2, AUTO, OFF,... - Page 12 3D-DNR MIDDLE HIGH RED, GREEN, COLOR 0 to 255 BLUE TRANSPARENCY 0 to 16 MASK NUMBER AREA1 to AREA8 RECT. DISPLAY ON/OFF HEIGHT 4 to 100 RECTANGLE WIDTH 4 to 100 MOVE Y 2 to 98 MOVE X 2 to 98 MASK NUMBER AREA1 to AREA2 PRIVACY...
-
Page 13: Camera Operation
CAMERA REBOOT RESET FACTORY RESET EXIT EXIT CAMERA OPERATION Main Menu Click Button on the OSD control Window. The camera setting menu appears on the view picture CAMERA SETTING ▶ CAMERA ID EXPOSURE WHITE BAL DAY/NIGHT AUTO MOTION DET 3D-DNR HIGH PRIVACY SPECIAL ◄... -
Page 14: White Balance Setting
■ Exposure mode: Supports exposure modes to control the amount of light detected by the camera sensor base on settings for light conditions. The default setting is ALC. ● ALC: Automatic Light Control for indoor scenes. ● ELC: Electronic Light Control for outdoor scenes. ●... - Page 15 ● AWC_PUSH: Auto White Balance Control. If you select this mode, you will be able to set up the White Balance by push triggered white balance in fixed mode. ● Manual : You can set the white balance options manually. >...
- Page 16 < PRIVACY setting> Use the Privacy Mask tab for aiming at the protection of personal privacy. ■ Mode: Select an ON mode for Privacy Mask function. ● Off: Not in use. ● On: Set and Use the P-Mask function. 1. Select an ON mode and click the Save button. Then P-Mask OSD windows will be appears. 2.
- Page 17 < SPECIAL setting> Implement various functions. ● D-ZOOM : You can select the digital zoom level. ● D-EFFECT : You can select the digital effect. ● SHARPNESS : The degree to which boundary of the two portions is clearly distinguished. ●...
-
Page 18: Connections/Day&Night In & Alarm Out Terminals
CONNECTIONS/DAY&NIGHT IN & ALARM OUT TERMINALS DAY&NIGHT IN Terminals To select Day/Night mode using external equipment, by connecting control lines to the appropriate terminals. ● DAY/NIGHT EXTERNAL INPUT Switches the cameras D/N mode to either Day or Night based on the input status. Refer to the diagram below. -
Page 19: Specifications
SPECIFICATIONS Item HD-SDI Camera Type HDC-2100M1080 Art. No. 200838 Power source DC 12V / AC 24V ± 10% Power Power consumption 0.3A Lens Optional Image sensor 1/2.8” 2Mega Pixel CMOS Sensor Effective pixels 1920(H) x 1080(V) Scanning Mode Progressive Scan... - Page 20 Videor E. Hartig GmbH ® Exclusive distribution through specialised trade channels only Videor E. Hartig GmbH Carl-Zeiss-Straße 8 · 63322 Rödermark, Germany Tel. +49 (0) 6074 / 888-0 · Fax +49 (0) 6074 / 888-100 Technical changes reserved www.videor.com...
Need help?
Do you have a question about the HDC-2100M1080 and is the answer not in the manual?
Questions and answers