Table of Contents
Advertisement
Quick Links
Advertisement
Table of Contents

Related Manuals for Novus NDR-EA2416


Summary of Contents for Novus NDR-EA2416
- Page 1 U s e r ’s m a n u a l NDR-EA2104 NDR-EA2208 NDR-EA2416...
-
Page 2: Important Safeguards And Warnings
NDR-EA2104 / NDR-EA2208 / NDR-EA2416 User’s manual ver. 1.0 IMPORTANT SAFEGUARDS AND WARNINGS INFORMACJE EMC (2004/108/EC) and LVD (2006/95/EC ) Directives CE Marking Our products are manufactured to comply with requirements of following directives and national regulations implementing the directives: Electromagnetic compatibility EMC 2004/108/EC. - Page 3 RESPONSIBILITY MANUFACTURER FOR THE RESULTS OF SUCH AN ACTION SHELL BE EXCLUDED. 1. The installation of NDR-EA2104, NDR-EA2208 and NDR-EA2416 DVRs should be made by a qualified service person or a professional safety system installer. 2. Recorders mustn’t be placed in places where ventilating holes are partially or fully covered.
-
Page 4: Table Of Contents
NDR-EA2104 / NDR-EA2208 / NDR-EA2416 User’s manual ver. 1.0 TABLE OF CONTENTS CONTENTS ........................... 4 1. FOREWORD INFORMATION ....................6 1.1. Main characteristics ......................6 1.2. NDR-EA2104/NDR-EA2208/NDR-EA2416 recorders technical data .......7 2. STARTING THE DEVICE ....................... 8 2.1. Getting ready to work ......................8 2.2. - Page 5 NDR-EA2104 / NDR-EA2208 / NDR-EA2416 User’s manual ver. 1.0 TABLE OF CONTENTS 4. OPERATING THE DVR ......................66 4.1. Live monitoring ....................... 67 4.2. Live audio ........................68 4.3. PIP (picture in picture)..................... 69 4.4. Zoom function ......................... 69 4.5. PTZ camera control ......................69 4.6.
-
Page 6: Foreword Information
• Power supply: 12 VDC (100 ~ 240 VAC/12 VDC PSU in-set included) * The list of recommended disk models and their capacity is available on Novus Security website in the Compatible Disk file in the product tab All rights reserved © AAT Holding sp. z o.o. -
Page 7: Ndr-Ea2104/Ndr-Ea2208/Ndr-Ea2416 Recorders Technical Data
2 kg (without HDD) Weight The list of recommended disk models and their capacity is available on Novus Security website in the Compatible Disks file in the product tab Loop-through connection is performed via NDR-EA/LOOP cable, which needs to be purchased separately. Single NDR-EA/LOOP cable supports up to 8 video channels. -
Page 8: Starting The Device
NDR-EA2104 / NDR-EA2208 / NDR-EA2416 User’s manual ver. 1.0 STARTING THE DEVICE STARTING THE DEVICE 2.1. Getting ready to work Unpack the device carefully. After unpacking, please ensure that package contains the following items: NDR-EA2104 or NDR-EA2208 or NDR-EA2416 Power supply... -
Page 9: Hdd Mounting
NDR-EA2104 / NDR-EA2208 / NDR-EA2416 User’s manual ver. 1.0 HDD MOUNTING 2.2 HDD mounting NDR-EA2104, NDR-EA2208 and NDR-EA2416 support up to two 3,5" SATA HDD. Note: In order to obtain info on latest compatible HDDs together with their capacities, please contact your distributor or visit www.novuscctv.com website. AAT HOLDING company does not bear responsibility for any issues arising from usage of unsupported SD cards/HDDs. - Page 10 NDR-EA2104 / NDR-EA2208 / NDR-EA2416 User’s manual ver. 1.0 HDD MOUNTING By default, 2 SATA as well as power cables are connected to the mainboard, ready for connecting HDDs and recorder, as depicted below: After removing top cover of the DVR, please mount the included HDDs using screws (4 screws for each HDD), next, connect power and signal cables.
-
Page 11: Electrical Connection And Other Back Panel Elements Ndr-Ea2104
NDR-EA2104 / NDR-EA2208 / NDR-EA2416 User’s manual ver. 1.0 STARTING THE DEVICE 2.3.1 Electrical connection and other back panel elements of the NDR-EA2104 DVR NDR-EA2104 view VIDEO IN: 4 video inputs for connecting video signal sources to the DVR. Note: When using twisted pair cable counting several hundred meters in... - Page 12 NDR-EA2104 / NDR-EA2208 / NDR-EA2416 User’s manual ver. 1.0 STARTING THE DEVICE VGA Monitor BNC Monitor LIVE PLAYBACK LIVE DIGITAL SIGNAGE LIVE PLAYBACK N/A PLAYBACK DIGITAL SIGNAGE N/A LIVE PLAYBACK DIGITAL SIGNAGE LIVE PLAYBACK N/A DIGITAL SIGNAGE DIGITAL SIGNAGE AUDIO OUT: Audio output for connecting speakers and amplifier.
-
Page 13: Electrical Connection And Other Back Panel Elements Ndr-Ea2208
NDR-EA2104 / NDR-EA2208 / NDR-EA2416 User’s manual ver. 1.0 STARTING THE DEVICE 2.3.2 Electrical connection and other back panel elements of the NDR-EA2208 and NDR-EA2416 NDR-EA2416 view VIDEO IN: 16 or 8 (depending on the model) video inputs for connecting video signal sources to the DVR. - Page 14 NDR-EA2104 / NDR-EA2208 / NDR-EA2416 User’s manual ver. 1.0 STARTING THE DEVICE AUDIO OUT: Audio output for connecting speakers and amplifier. Connecting the speakers directly to the output is not advised. RS-485: RS-485 bus connector for connecting external keyboard, PTZ camera or any devices that generate information in the ASCII standard (ATMs, cash registers).
-
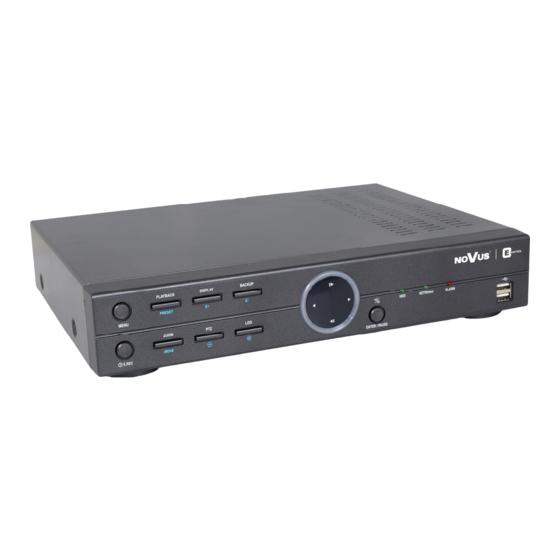
Page 15: Front Panel Description
NDR-EA2104 / NDR-EA2208 / NDR-EA2416 User’s manual ver. 1.0 STARTING THE DEVICE 2.4. Front panel description NDR-EA2416 view MENU Press MENU button to enter recorder’s settings menu (after correct login). Menu functions are detailed in the following chapters of this manual. The button is also used to exit the menu or going to a higher level of the particular submenus. - Page 16 NDR-EA2104 / NDR-EA2208 / NDR-EA2416 User’s manual ver. 1.0 STARTING THE DEVICE - Press the button to play video backward at regular speed. Pressing the button again switches the playback speed between R.PLAY, RWx2, RWx4, RWx8, RWx16, RWx32. - Press the button to go to the next image.
-
Page 17: Connecting Peripheral Equipment
NDR-EA2104 / NDR-EA2208 / NDR-EA2416 User’s manual ver. 1.0 STARTING THE DEVICE 2.5. Connecting of peripheral equipment to NDR-EA2104, NDR-EA2208 and NDR-EA2416 recorders System connection should be performed only by qualified personnel. Please familiarize yourself with the scheme located below, depicting possible implementation of the DVR in the system, before installation. -
Page 18: Controlling Via Ir Remote Controller
NDR-EA2104 / NDR-EA2208 / NDR-EA2416 User’s manual ver. 1.0 STARTING THE DEVICE 2.6. Controlling via IR remote controller The set includes an IR remote controller. Its range depends on battery status and may vary between a few and few tens of meters. Single remote may control up to 99 DVRs. If an ID number of the device equals 0, the IR remote control of that device is possible instantly, without any additional setup (furthermore, simultaneous controlling of few DVRs with the same remote is possible). - Page 19 NDR-EA2104 / NDR-EA2208 / NDR-EA2416 User’s manual ver. 1.0 STARTING THE DEVICE navigation buttons used to: - navigate through recorder’s menu and change parameter values. - selection of successive channels (both in full– and split-screen modes, live and playback view).
-
Page 20: Plugging In The Power
NDR-EA2104 / NDR-EA2208 / NDR-EA2416 User’s manual ver. 1.0 STARTING THE DEVICE pressing the button in „live” or playback modes allows to enable digital zoom function. Function becomes available only after switching a desired channel into full-screen mode. In order to select a magnified area please use navigation buttons. - Page 21 RECORDER’S MENU RECORDER’S MENU NDR-EA2104 / NDR-EA2208 / NDR-EA2416 recorders feature a multilingual OSD menu allowing for adjusting the settings of the device. Available languages are: English, Polish, Korean, Spanish, Slovak, Czech, Turkish, Dutch, Russian, Chinese, Chinese Simplified, Italian, French, Greek, Japanese, German, Finnish, Portuguese and Thai.
- Page 22 NDR-EA2104 / NDR-EA2208 / NDR-EA2416 User’s manual ver. 1.0 RECORDER’S MENU A virtual keyboard is available whenever the need for entering names and titles arises. Use the arrow keys to highlight the desired character and press ENTER/PAUSE button. The selected character appears in the title bar and the cursor moves to the next position.
-
Page 23: Recorder's Menu
NDR-EA2104 / NDR-EA2208 / NDR-EA2416 User’s manual ver. 1.0 RECORDER’S MENU 3.1. SYSTEM After selecting SYSTEM from the main menu, the window depicted below appears: SYSTEM menu contains five sub-menus regarding the system settings. 3.1.1. Information Selecting this sub-menu and pressing ENTER displays the following screen: DVR Name field allows for entering the title associated with this DVR (e.g. - Page 24 NDR-EA2104 / NDR-EA2208 / NDR-EA2416 User’s manual ver. 1.0 RECORDER’S MENU To update the firmware, please connect Flash type memory (containing a firmware appropriate for a given recorder, in *.pkg format ) to the USB port and select Update. After the update window is displayed, a proper file needs to be selected and the whole update process confirmed.
-
Page 25: Date /Time
NDR-EA2104 / NDR-EA2208 / NDR-EA2416 User’s manual ver. 1.0 MENU REJESTRATORA RECORDER’S MENU 3.1.2. Date & time Selecting this sub-menu and pressing ENTER displays the following screen: This submenu is responsible for adjusting the date and time using navigation and ENTER buttons. - Page 26 NDR-EA2104 / NDR-EA2208 / NDR-EA2416 User’s manual ver. 1.0 RECORDER’S MENU MENU REJESTRATORA MENU REJESTRATORA MENU REJESTRATORA Update allows server synchronization, therefore testing function’s operation. To activate it, please check the Use NTP box. Note: Time sync function is especially useful in dispersed systems, when a necessity of synchronizing time with external devices (e.g.
-
Page 27: User
NDR-EA2104 / NDR-EA2208 / NDR-EA2416 User’s manual ver. 1.0 RECORDER’S MENU 3.1.3. User Selecting this sub-menu and pressing ENTER displays the following screen: This submenu allows to add, edit and assign passwords/privileges for users and groups. Privileges are assigned to groups, with particular users being added to them. - Page 28 NDR-EA2104 / NDR-EA2208 / NDR-EA2416 User’s manual ver. 1.0 RECORDER’S MENU To add a user, please select the „+”. A window opens, as depicted below: User name allows to enter the user’s name with the help of virtual keyboard. Group allows to assign group for newly added user.
- Page 29 NDR-EA2104 / NDR-EA2208 / NDR-EA2416 User’s manual ver. 1.0 RECORDER’S MENU Selecting Group tab displays the following screen: Selecting Group column displays window that allows to change group’s privileges (detailed description described in further parts of the manual). Note: Editing Administrator and Guest groups is not possible.
- Page 30 NDR-EA2104 / NDR-EA2208 / NDR-EA2416 User’s manual ver. 1.0 RECORDER’S MENU Group Name field requires entering the group’s name with the help of virtual keyboard. In order to define rights for a group, check desired parameters from available. Camera column allows to select cameras for which privileges are to be applied.
-
Page 31: Quick Setup
NDR-EA2104 / NDR-EA2208 / NDR-EA2416 User’s manual ver. 1.0 RECORDER’S MENU 3.1.4. Quick setup After selecting this sub-menu and pressing ENTER the following screen appears: This submenu allows to configure basic DVR parameters. Moving to a next window is achieved via clicking the “>>“... -
Page 32: System Log
NDR-EA2104 / NDR-EA2208 / NDR-EA2416 User’s manual ver. 1.0 RECORDER’S MENU 3.1.5. System Log After selecting the submenu and pressing ENTER, the following screen appears: Maximum log capacity is 5000 entries, with the oldest events being overwritten by the latest ones. Log contains information about event type, as well as its date and time of occurrence. -
Page 33: Camera
NDR-EA2104 / NDR-EA2208 / NDR-EA2416 User’s manual ver. 1.0 RECORDER’S MENU 3.2.1. Camera After selecting this submenu and pressing ENTER the following screen appears: First column allows for enabling/disabling desired camera inputs (enabling/disabling all of the cameras is possible by checking/un-checking the boxes). - Page 34 Note: Pelco-D (N) protocol is a special modification of Pelco-D protocol that allows control of selected PTZ and box cameras with RS-485 Novus brand. Using this protocol setting minimum and maximum speed values in the Speed column is not recommended.
-
Page 35: Audio
3.2.2. Audio After selecting this submenu and pressing ENTER the following screen appears: NDR-EA2416 and NDR-EA2208 digital video recorders feature the possibility of recording up to 8 audio channels while NDR-EA2104 are able to record up to 4 audio channels. -
Page 36: Alarm
NDR-EA2104 / NDR-EA2208 / NDR-EA2416 User’s manual ver. 1.0 RECORDER’S MENU 3.2.3. Alarm After selecting this sub-menu and pressing ENTER the following screen appears: Alarm duration allows for setting the alarm output activation period, ranging 5 secs to 10 mins. -
Page 37: Keyboard
NDR-EA2104 / NDR-EA2208 / NDR-EA2416 User’s manual ver. 1.0 RECORDER’S MENU Adding an alarm schedule is performed via the + button. Schedule may contain up to 10 positions. Day define the days of the week the schedule is performed on. From ~ To column allows for setting the time interval (in the 15-min. -
Page 38: Rs232 / Rs485
NDR-EA2104 / NDR-EA2208 / NDR-EA2416 User’s manual ver. 1.0 RECORDER’S MENU 3.2.5. RS232 / RS485 After selecting this submenu and pressing ENTER the following screen appears: RS-232 and RS-485 may be configured in this submenu. bps column allows for setting the transmission speed of RS232/RS-485 ports (with 300bps, 600bps, 1200bps, 2400bps, 4800bps, 9600bps, 19200bps, 38400bps, 57600bps, 115200bps values available). -
Page 39: Display
NDR-EA2104 / NDR-EA2208 / NDR-EA2416 User’s manual ver. 1.0 RECORDER’S MENU 3.3. DISPLAY DISPLAY menu contains four sub-menus dealing with display settings. 3.3.1. Display After selecting this submenu and pressing ENTER the following screen appears: Language allows for changing the OSD menu language to one of the listed: English, Polish, Korean, Spanish, Slovak, Czech, Turkish, Dutch, Russian, Chinese, Chinese Simplified, Italian, French, Greek, Japanese, German, Finnish, Portuguese and Thai. -
Page 40: Vga
NDR-EA2104 / NDR-EA2208 / NDR-EA2416 User’s manual ver. 1.0 RECORDER’S MENU 3.3.2. VGA After selecting this submenu and pressing ENTER the following screen appears: Vertical OSD Margin margins for status information on VGA monitor may be set (to fit the screen display) using this option. -
Page 41: Cvbs
NDR-EA2104 / NDR-EA2208 / NDR-EA2416 User’s manual ver. 1.0 RECORDER’S MENU 3.3.3. CVBS Settings referring to CVBS output are identical to those in chapter 3.3.2 (VGA menu). 3.3.4. Digital Signage After selecting this submenu and pressing ENTER, the following screen appears: DVRs feature the possibility of displaying ads during its operation. - Page 42 NDR-EA2104 / NDR-EA2208 / NDR-EA2416 User’s manual ver. 1.0 RECORDER’S MENU This tab allows to enable/disable and configure up to 10 screen saver schedules. Select + to add a schedule. DAY sets the days of the week that the recording schedule is performed in.
-
Page 43: Record
NDR-EA2104 / NDR-EA2208 / NDR-EA2416 User’s manual ver. 1.0 RECORDER’S MENU 3.4. RECORD RECORD menu consists of three sub-menus regarding recording and HDD settings. 3.4.1. Storage Selecting this submenu and pressing ENTER displays the following screen: Capacity displays the information on the capacity of mounted HDDs (when an optical drive is installed, the N/A information is displayed instead). - Page 44 NDR-EA2104 / NDR-EA2208 / NDR-EA2416 User’s manual ver. 1.0 RECORDER’S MENU To format the HDDs select Format. After that, the following screen appears: Note: All data stored on the formatted HDDs are lost in the process! To select an HDD for formatting please select it in the first column to the left.
-
Page 45: Record
NDR-EA2104 / NDR-EA2208 / NDR-EA2416 User’s manual ver. 1.0 RECORDER’S MENU 3.4.2. Record Selecting this submenu and pressing ENTER displays the following screen: Selecting Overwrite results in oldest video material being overwritten by most recent one during recording process. Leaving the Overwrite box empty stops the recording as soon as the disk is full. - Page 46 NDR-EA2104 / NDR-EA2208 / NDR-EA2416 User’s manual ver. 1.0 RECORDER’S MENU Pre-Event Duration allows to enable/disable said function, as well as setting its time in 5~30 seconds range. Pre-Event recording is performed in accordance to the parameters set in the Event column.
- Page 47 NDR-EA2104 / NDR-EA2208 / NDR-EA2416 User’s manual ver. 1.0 RECORDER’S MENU After selecting Setting, the following screen appears: ips column allows to set the recording speed, ranging from 1 to 25 images per second for a given schedule, both in Time and Event modes.
-
Page 48: Utilities
NDR-EA2104 / NDR-EA2208 / NDR-EA2416 User’s manual ver. 1.0 RECORDER’S MENU Note: When total recording speed set in the settings exceeds maximum available speed, the DVR automatically records with the highest speed possible. Note: When more than one schedule has been set for the same period of time the recording is performed according to the schedule with a higher number. - Page 49 NDR-EA2104 / NDR-EA2208 / NDR-EA2416 User’s manual ver. 1.0 RECORDER’S MENU Submenu allows to estimate the time left until the disk is full basing on certain recording parameters. Please set proper recording parameters in sections of this sub-menu and then please press Calculate.
-
Page 50: Network
NDR-EA2104 / NDR-EA2208 / NDR-EA2416 User’s manual ver. 1.0 RECORDER’S MENU 3.5. NETWORK Network menu contains four sub-menus dealing with network settings as well as remote notify settings. 3.5.1. Address After selecting this submenu and pressing ENTER, the following screen appears: Type field allows to select a network address that DVR is operating under. - Page 51 NDR-EA2104 / NDR-EA2208 / NDR-EA2416 User’s manual ver. 1.0 RECORDER’S MENU DNS server address automatically position allows to enable/disable automatic detection of the DNS servers. Function is not available when Static IP option is selected in the “Type” position. After selecting Port tab, the following screen appears: Port numbers used by particular services can be changed by user in certain ranges: Network Port (Live): from 8000 to 12000, Web: 80~12000, Playback: 8001~12001, Setup: 8002~12002.
-
Page 52: Ddns
NDR-EA2104 / NDR-EA2208 / NDR-EA2416 User’s manual ver. 1.0 RECORDER’S MENU 3.5.2. DDNS After selecting this submenu and pressing ENTER, the following screen appears: DDNS address update is used for assigning a static name for dynamic IP address. Note: Although the DVR features the ability to manage dynamic IP addresses, activating the DDNS service in a router connected to the DVR is advised. -
Page 53: Notification
NDR-EA2104 / NDR-EA2208 / NDR-EA2416 User’s manual ver. 1.0 RECORDER’S MENU 3.5.3. Notification After selecting this submenu and pressing ENTER, the following screen appears: Submenu depicted above allows to define up to 10 IP addresses for computers with E-Viewer software installed, that will be able to receive information on pre-defined events such as motion detection, video loss, S.M.A.R.T alarm or exceeding available storage space etc. - Page 54 NDR-EA2104 / NDR-EA2208 / NDR-EA2416 User’s manual ver. 1.0 RECORDER’S MENU Said sub-menu allows to define up to 5 e-mail addresses for sending the messages about pre-defined events such as motion detection, video loss, S.M.A.R.T alarm or exceeding available storage space etc.
-
Page 55: Transmission
NDR-EA2104 / NDR-EA2208 / NDR-EA2416 User’s manual ver. 1.0 RECORDER’S MENU 3.5.4. Transmission After selecting this submenu and pressing ENTER the following screen appears: Limit bandwidth allows to enable (Limit) or disable (No Limit) function of limiting the bandwidth used by the DVR during network transmission. After selecting Limit, a box that allows to limit the bandwidth from 1 to 100 Mb/sec appears. -
Page 56: Event
NDR-EA2104 / NDR-EA2208 / NDR-EA2416 User’s manual ver. 1.0 RECORDER’S MENU 3.6. EVENT EVENT menu contains five sub-menus covering event settings. The DVR features ability to detect various event types. Depending on the settings, a desired action may then be taken. - Page 57 NDR-EA2104 / NDR-EA2208 / NDR-EA2416 User’s manual ver. 1.0 RECORDER’S MENU After selecting Record tab, the following screen appears: The tab depicted above allows to set the DVR’s response to the activation of a desired alarm input. Record column allows to assign cameras that start recording after an alarm event associated with them occurs.
- Page 58 NDR-EA2104 / NDR-EA2208 / NDR-EA2416 User’s manual ver. 1.0 RECORDER’S MENU After selecting Notification the following screen appears: Notification column allows both to assign IP addresses to particular alarm inputs in order to enable callback function as well as e-mail addresses that the notification messages are sent to after particular alarm inputs become activated.
-
Page 59: Motion
NDR-EA2104 / NDR-EA2208 / NDR-EA2416 User’s manual ver. 1.0 RECORDER’S MENU 3.6.2. Motion After selecting Motion and pressing ENTER, the following screen appears : Submenu allows to configure motion detection function of the DVR. First column to the left allows to enable/disable the motion detection function. -
Page 60: Video Loss
NDR-EA2104 / NDR-EA2208 / NDR-EA2416 User’s manual ver. 1.0 RECORDER’S MENU Pressing MENU on the DVR’s front panel displays the detection field settings: SELECT– selects all cells in the field, • CLEAR - clears all cells in the field, •... -
Page 61: Text-In
NDR-EA2104 / NDR-EA2208 / NDR-EA2416 User’s manual ver. 1.0 RECORDER’S MENU 3.6.4. Text-in After selecting this submenu and pressing ENTER, the following screen appears: The DVR features simultaneous displaying of ASCII text (originating from ATMs, cash registers, PCs with access control software installed) and a video image associated with it. Furthermore, device supports up to 2 text-generating external devices connected to RS-232 and RS-485 ports. - Page 62 NDR-EA2104 / NDR-EA2208 / NDR-EA2416 User’s manual ver. 1.0 RECORDER’S MENU Leftmost column of the table allows to enable/disable the text-in function for desired ports (RS-232 or RS-485). Title column allows to change the title of a given port. Selecting Setup displays the following screen:...
-
Page 63: System
NDR-EA2104 / NDR-EA2208 / NDR-EA2416 User’s manual ver. 1.0 RECORDER’S MENU Note: In order to enable said function, please adjust settings in DEVICES, and RS232/RS485 submenu. The DVRs may be programmed, so the device starts a desired action (i.e. starts recording, enables internal buzzer, activates relay outputs, or sends notifying messages) whenever it receives some pre- defined text string. - Page 64 NDR-EA2104 / NDR-EA2208 / NDR-EA2416 User’s manual ver. 1.0 RECORDER’S MENU The DVR may be configured to automatically diagnose its status and generate reports. S.M.A.R.T. Threshold position allows to set the HDD temperature threshold that when exceeded generates a notification message. 45˚C / 113˚F, 50˚C / 55˚C / 131˚F, 60˚C / 140˚F, 65˚C / 149˚F, 70˚C / 158˚F temperature values are available.
-
Page 65: Logout/ Shutdown
NDR-EA2104 / NDR-EA2208 / NDR-EA2416 User’s manual ver. 1.0 RECORDER’S MENU 3.7. LOGOUT/ SHUTDOWN After selecting this submenu the following screen appears: To log out a user please select LOGOUT, and press OK. Additional window prompting for confirmation appears. To confirm, select YES. -
Page 66: Operating The Dvr
NDR-EA2104 / NDR-EA2208 / NDR-EA2416 User’s manual ver. 1.0 OPERATING THE DVR 4. OPERATING THE DVR DVR control may be performed via front panel buttons (detailed button description can be found in chapter 2.4 of this manual), USB mouse connected to the DVR as well as remote IR controller. -
Page 67: Live Monitoring
NDR-EA2104 / NDR-EA2208 / NDR-EA2416 User’s manual ver. 1.0 OPERATING THE DVR 4.1. Live monitoring As soon as the DVR completes its initialization process, it starts displaying live video via the connected monitor. DVRs feature independent display on two monitors simultaneously. Operating the DVR is possible only from one monitor at a time. -
Page 68: Live Audio
NDR-EA2104 / NDR-EA2208 / NDR-EA2416 User’s manual ver. 1.0 OPERATING THE DVR Enters the main menu in „live” mode, opens additional function menu in playback mode. Information about disk usage: data size / installed HDD size. Blue color indicates active overwrite function, gray color indicates inactivity of the function. -
Page 69: Pip (Picture In Picture)
NDR-EA2104 / NDR-EA2208 / NDR-EA2416 User’s manual ver. 1.0 OPERATING THE DVR 4.3. PIP (picture in picture) After pressing the PIP button in full screen, a menu allowing to select a camera appears. The selected camera is then displayed in a window, superimposed on a full screen camera view. Disabling the function is performed analogically. -
Page 70: Event Monitoring
If the cameras were defined as COVERT 2, they aren’t displayed . For COVERT 2 cameras, only the camera name is displayed. 4.8. Recording the video Table below presents recording speeds for NDR-EA2104 / NDR-EA2208 and NDR-EA2416 for different recording resolutions. Resolution Maximum recording speed (PAL) NDR–EA2104... -
Page 71: Playback Recorded Data
NDR-EA2104 / NDR-EA2208 / NDR-EA2416 User’s manual ver. 1.0 OPERATING THE DVR 4.10. Playing recorded video Users, that have the privileges to watch stored recordings, after logging in to the DVR may do so. To start the playback, please press the PLAYBACK button. If the stored material is viewed for the first time since the device power-up, latest recordings will be shown. -
Page 72: Playback Backup Data
NDR-EA2104 / NDR-EA2208 / NDR-EA2416 User’s manual ver. 1.0 OPERATING THE DVR 4.11. Playing backup material Recorders feature the function of playing back previously stored recordings. Only *. STRG format recordings are recognized by the system during playback, without the player compiled. Playback feature is enabled only if an external memory is connected. -
Page 73: Go To Time
NDR-EA2104 / NDR-EA2208 / NDR-EA2416 User’s manual ver. 1.0 OPERATING THE DVR 4.12.1. Go to time After selecting Go to time the following menu appears: To set the time and date, please select particular date/time values using navigation buttons. After confirming via OK button, the images associated with selected time are displayed. - Page 74 NDR-EA2104 / NDR-EA2208 / NDR-EA2416 User’s manual ver. 1.0 OPERATING THE DVR Note: The day bar is divided into 1-hour segments. Highlighting of a segment doesn’t imply that the recordings are available for the whole highlighted hour. When date and time are changed (automatically or manually) a situation may emerge, in which two video streams have the same time and date.
-
Page 75: Event Search
NDR-EA2104 / NDR-EA2208 / NDR-EA2416 User’s manual ver. 1.0 OPERATING THE DVR 4.12.3. Event search After selecting said function, the following screen appears: All events are stored in the device’s log. Opening the log may be performed via pressing the LOG button on the front panel of the DVR, or by selecting Event search in the extended menu.. -
Page 76: Text-In Search
NDR-EA2104 / NDR-EA2208 / NDR-EA2416 User’s manual ver. 1.0 OPERATING THE DVR 4.12.4. Text-in search After selecting the text-in search submenu, the following window appears: Text-in search allows to search a pre-defined range of records for string of characters associated with a particular recording. -
Page 77: Backup
NDR-EA2104 / NDR-EA2208 / NDR-EA2416 User’s manual ver. 1.0 OPERATING THE DVR 4.13. Backup NDR-EA2104/NDR-EA2208 and NDR-EA2416 digital multiplexers provide a wide branch of methods when it comes to copying the recordings. User may copy recordings to external storage devices. The DVR features the possibility of copying the recordings to an external HDD connected via the USB, or to copy the data onto Flash memories. -
Page 78: Copying*.Exe Oraz *.Strg
NDR-EA2104 / NDR-EA2208 / NDR-EA2416 User’s manual ver. 1.0 OPERATING THE DVR 4.13.1 Copying *.exe and *.strg In order to enter the backup mode please bring up function menu in „live” view, next, select Backup, and again Backup. The following screen appears: Source allows to select the disks that the data are copied from. -
Page 79: Mp4 Copying
NDR-EA2104 / NDR-EA2208 / NDR-EA2416 User’s manual ver. 1.0 OPERATING THE DVR 4.13.2 *.mp4 copying In order to enter the backup mode please bring up function menu while in „live” view, next, select Backup and Clip Maker. The following screen appears: *.m4v format differs from *.exe and *.strg only in the ability to copy only one channel (Camera field). -
Page 80: Playback Of Copied Materials
NDR-EA2104 / NDR-EA2208 / NDR-EA2416 User’s manual ver. 1.0 OPERATING THE DVR 4.14. Playback of copied materials Playback depends directly on the format that recordings have been saved in. 4.14.1 *.exe format playback. Recordings stored in this format may be played back on a PC without any additional software installing. - Page 81 NDR-EA2104 / NDR-EA2208 / NDR-EA2416 User’s manual ver. 1.0 OPERATING THE DVR Next, select the ADVANCED button and TROUBLESHOOTING tab, then select the maximum value of hardware acceleration. To check version number of the libraries installed, please enter „dxdiag” in the RUN bar, located in the START menu, and press ENTER.
- Page 82 NDR-EA2104 / NDR-EA2208 / NDR-EA2416 User’s manual ver. 1.0 OPERATING THE DVR View of the playback software window is depicted below: Clicking LMB on a selected picture displays it full screen, subsequent pressing returns to previous display mode. Description of the functions: - skips to the beginning of the recording - plays the recording backward with normal speed.
-
Page 83: Playing Back The *.M4V Videos
NDR-EA2104 / NDR-EA2208 / NDR-EA2416 User’s manual ver. 1.0 OPERATING THE DVR 4.14.2 Playing back the*.mp4 videos. To playback a recording on a PC please use any software able to play MP4 files. 4.14.3 Playing back the*.strg recordings. Recordings in this format may be played back either via a PC computer or using DVR. -
Page 84: Connecting And Controlling Ptz Cameras
(check the user’s manual of the camera for more details). The description presented below is valid for Novus CAMA-III cameras. To connect cameras of other manufacturers, please contact respective tech support and/or consult the user’s manuals for each of the cameras in question. - Page 85 NDR-EA2104 / NDR-EA2208 / NDR-EA2416 User’s manual ver. 1.0 CONNECTING AND CONTROLLING PTZ CAMERAS NDR-EA2416 view UTP 5 max 1200m CAMA III nr 4/8/16 CAMA III nr 1 All rights reserved © AAT Holding sp. z o.o.
-
Page 86: Connecting External Devices To Alarm Inputs/Outputs
CONNECTING EXTERNAL DEVICES TO ALARM INPUTS/OUTPUTS 6. CONNECTING EXTERNAL DEVICES TO ALARM INPUTS/OUTPUTS NDR-EA2104, NDR-EA2208 and NDR-EA2416 are equipped with 4 alarm inputs (including emergency recording input), and 2 open-collector type alarm outputs. Connectors are equipped with clamp-on terminals. Layout of particular connectors is presented in chapter 2.3.1 oraz 2.3.2. - Page 87 NDR-EA2104 / NDR-EA2208 / NDR-EA2416 User’s manual ver. 1.0 CONNECTING EXTERNAL DEVICES TO ALARM INPUTS/OUTPUTS Employing TTL alarm outputs: TTL/CMOS alarm inputs are best implemented in circuits with low current devices, i.e. LEDs, relay coils. An example of circuit implementing the TTL alarm output is presented below...
-
Page 88: Operating The Dvr Via System Keyboards
7. OPERATING THE DVR VIA SYSTEM KEYBOARDS Operating the DVR via NV-KBD30 and NV-KBD70 system keyboards. NDR-EA2104, NDR-EA2208 and NDR-EA2416 may be remotely controlled using NV-KBD70 or NV-KBD30 keyboard. System is controlled either via RS-485 or RS-232 (after using an appropriate adapter) port connection. -
Page 89: Controlling The Dvr Via Nv-Kbd30 Keyboard
NDR-EA2104 / NDR-EA2208 / NDR-EA2416 User’s manual ver. 1.0 OPERATING THE DVR VIA SYSTEM KEYBOARDS 7.2 Controlling the DVR via the KBD30 keyboard: RS-485 (+) TRX + RS-485 RS-485 ( TRX - RS485(TX+) styk 5 styk 4 RS485 (TX-) NV-KBD30... - Page 90 NDR-EA2104 / NDR-EA2208 / NDR-EA2416 User’s manual ver. 1.0 OPERATING THE DVR VIA SYSTEM KEYBOARDS IR REMOTE BUTTON/COMBINATION OF NV- BUTTON/COMBINATION OF NV- FUNCTION KBD30 KEYS KBD70 KEYS 1 + MAIN 1 + MAIN 2 + MAIN 2 + MAIN...
- Page 91 NDR-EA2104 / NDR-EA2208 / NDR-EA2416 User’s manual ver. 1.0 OPERATING THE DVR VIA SYSTEM KEYBOARDS IR REMOTE BUTTON/COMBINATION OF BUTTON/COMBINATION OF FUNCTION NV-KBD30 KEYS NV-KBD70 KEYS SHIFT + SEQ Image freeze SHIFT + FREEZE SHIFT + ZOOM CTRL + ZOOM...
-
Page 92: Controlling The Dvr Via Usb Mouse
NDR-EA2104 / NDR-EA2208 / NDR-EA2416 User’s manual ver. 1.0 CONTROLLING THE DVR VIA USB MOUSE 8. CONTROLLING THE DVR VIA USB MOUSE DVR features the possibility of establishing control over the DVR using an USB mouse connected to the USB port. Functions described below are available in „live” mode. - Page 93 NDR-EA2104 / NDR-EA2208 / NDR-EA2416 User’s manual ver. 1.0 CONTROLLING THE DVR VIA USB MOUSE Particular functions of the buttons presented on previous page are described below: Auto pan - enables / disables no. 1 scan Tour - enables / disables no. 1 tour Pattern - enables / disables no.
-
Page 94: Controlling The Dvr Via Internet Explorer
CONTROLLING THE DVR VIA INTERNET EXPLORER 9. CONTROLLING THE DVR VIA INTERNET EXPLORER NDR-EA2416, NDR-EA2208 and NDR-EA2104 digital multiplexers feature the possibility of network operation using TCP/IP and Internet Explorer 7.0 (or newer) web browser. Up to 4 simultaneous connections with the DVR are possible in „live” monitoring mode, up to 2 connections in playback mode, allowing to view recordings on remote terminals and 1 connection in setup mode. - Page 95 Please select Install or change the security settings of the web browser in order to install the applet. Note: Interface view shown in the chapters 9.3 and 9.4 refers to the NDR-EA2416. Differences of interface view in case of NDR-EA2208 and NDR-EA2104 are caused by the lowers number of channels.
-
Page 96: Live Monitoring Interface
NDR-EA2104 / NDR-EA2208 / NDR-EA2416 User’s manual ver. 1.0 CONTROLLING THE DVR VIA INTERNET EXPLORER Live monitoring interface. After successful logging into a user interface using IE web browser, the following window opens: Web interface description: DVR setup Closes the browser window... -
Page 97: Overview Of The User Interface In Search And Playback Modes
NDR-EA2104 / NDR-EA2208 / NDR-EA2416 User’s manual ver. 1.0 CONTROLLING THE DVR VIA INTERNET EXPLORER Overview of the user interface in search and playback modes. - switches to „live” view - selects camera to be displayed full-screen - Searching the records using calendar as well as timeline at the bottom of the screen. Days marked red indicate the presence of recordings for that day. -
Page 98: Remote Setup Overview
NDR-EA2104 / NDR-EA2208 / NDR-EA2416 User’s manual ver. 1.0 CONTROLLING THE DVR VIA INTERNET EXPLORER - „Search by text” function. After selecting this icon, the following screen appears: Date sets the date of search. Only the days that had a text-in event are available. -
Page 99: Remote Live Dvr To Dvr Connection
Remote Live DVR to DVR connection 10. Remote Live DVR to DVR connection NDR-EA2416, NDR-EA2208 and NDR-EA2104 are equipped with the function of preview on one DVR images from other DVRs connected to the network. The table shown compatibility of the particular DVR models is shown below. - Page 100 NDR-EA2104 / NDR-EA2208 / NDR-EA2416 User’s manual ver. 1.0 Remote Live DVR to DVR connection - selects camera for full screen display - identical to OSD on the IR remote - analogue of ZOOM on the IR remote - connects/disconnects remote site - analogue of ! E.REC on the IR remote...
- Page 101 NDR-EA2104 / NDR-EA2208 / NDR-EA2416 User’s manual ver. 1.0 Remote Live DVR to DVR connection Connecting with the Remote Sites (servers) In order to connect with the remote site select it from the list. When for the remote site Auto Login option was enabled, entered parameters are correct and the network connection is available the images from the remote site will displays as shown below.
-
Page 102: Appendix 1 - Preparing The Advertising Files
NDR-EA2104 / NDR-EA2208 / NDR-EA2416 User’s manual ver. 1.0 Appendix 1 - preparing the advertising files Appendix 1 Preparing files to display in Image option: Files must be placed in the advertise folder The following file format must be maintained: filename_00001.jpg, filename_00002.jpg .. - Page 103 NDR-EA2104 / NDR-EA2208 / NDR-EA2416 User’s manual ver. 1.0 Appendix 1 - preparing the advertising files - Select File -> Open video file ..., then select a desired file in a AVI format, to export it to advertisements files. Successful selection displays the following screen: - Select Video ->...
- Page 104 NDR-EA2104 / NDR-EA2208 / NDR-EA2416 User’s manual ver. 1.0 Appendix 1 - preparing the advertising files - adjust settings according to the screenshot above, then select OK twice. - select Video -> Frame Rate ... The following window appears: - adjust settings according to the screenshot above (enter 15 in the marked position), and then select - select File ->...
- Page 105 NDR-EA2104 / NDR-EA2208 / NDR-EA2416 User’s manual ver. 1.0 Appendix 1 - preparing the advertising files - It is possible to change the filenames globally under Filename position. Please bear in mind however, that a new filename requires the “ _” character succeeding it.
- Page 106 NDR-EA2104 / NDR-EA2208 / NDR-EA2416 User’s manual ver. 1.0 NOTES Notes: All rights reserved © AAT Holding sp. z o.o.
- Page 107 NDR-EA2104 / NDR-EA2208 / NDR-EA2416 User’s manual ver. 1.0 NOTES Notes: All rights reserved © AAT Holding sp. z o.o.
- Page 108 2011-09-09 MM AAT Holding sp. z o.o., ul. Puławska 431, 02-801 Warszawa, Polska tel.: 22 546 07 00, faks: 22 546 07 59 www.novuscctv.com...
Need help?
Do you have a question about the NDR-EA2416 and is the answer not in the manual?
Questions and answers