
Related Manuals for Dranetz PowerGuide 4400


Summary of Contents for Dranetz PowerGuide 4400
- Page 1 PowerGuide 4400 ® USER’S GUIDE DRANETZ 1000 New Durham Road Edison, New Jersey 08818-4019 1.800.561.8187 information@itm.com www. .com...
- Page 2 Edison, NJ 08818-4019 USA Telephone: 1-800-372-6832 or 732-287-3680 Fax: 732-248-1834 Web site: www.dranetz.com Copyright © 2003, 2004, 2005 Dranetz All rights reserved. No part of this book may be reproduced, stored in a retrieval system, or transcribed in any form or by any means—electronic, mechanical, photocopying, recording,...
- Page 3 ADVERTENCIA na conexión incorrecta de este instrumento puede producir la muerte, lesiones graves y riesgo de incendio. Lea y entienda este manual antes de conectar. Observe todas las instrucciones de instalación y operación durante el uso de este instrumento. La conexión de este instrumento a un sistema eléctrico se debe realizar en conformidad con el Código Eléctrico Nacional (ANSI/NFPA 70-2005) de los E.E.U.U., además de cualquier otra norma de seguridad correspondiente a su establecimiento.
-
Page 4: Safety Summary
Safety Summary WARNING statements inform the user that certain conditions or practices could result Definitions in loss of life or physical harm. CAUTION statements identify conditions or practices that could harm the 4400, its data, other equipment, or property. NOTE statements call attention to specific information. The following International Electrotechnical Commission (IEC) symbols are marked Symbols on the top and rear panel in the immediate vicinity of the referenced terminal or device:... - Page 5 Safety Summary, Continued Les messages d’AVERTISSEMENT préviennent l’utilisateur que certaines conditions Définitions ou pratiques pourraient entraîner la mort ou des lésions corporelles. Les messages de MISE EN GARDE signalent des conditions ou pratiques susceptibles d’endommager “4400”, ses données, d’autres équipements ou biens matériels. Les messages NOTA attirent l’attention sur certains renseignements spécifiques.
- Page 6 Safety Summary, Continued The following safety precautions must be followed whenever any type of voltage or Safety precautions current connection is being made to the 4400. • Wear proper Personal Protective Equipment, including safety glasses and insulated gloves when making connections to power circuits. •...
-
Page 7: Statements And Notices
Statement of warranty material and workmanship for a period of one year from the date of delivery. Dranetz will repair or replace, at its option, all defective equipment that is returned, freight prepaid, during the warranty period. There will be no charge for repair provided there is no evidence that the equipment has been mishandled or abused. - Page 8 Dranetz, 1000 New Durham Road, Edison, New Jersey 08818. Copyright © 2003, 2004, 2005 Dranetz All Rights Reserved.
-
Page 9: Table Of Contents
Table of Contents Safety Summary ........................Statements and Notices......................CHAPTER 1 - Getting Started Overview ..........................Unpacking the 4400....................... Standard Accessories......................4400 Controls, Indicators, and Connectors ................Top and Side Views ......................Front View ........................Bottom View ........................Rear View ........................Upgrading Firmware from a Data Card................. - Page 10 Table of Contents, Continued CHAPTER 4 - Instrument Settings Overview ..........................Access Instrument Settings Menu ..................Time and Date Settings......................Select Language........................Set Display Preferences ......................Touch Screen Calibration ...................... Turn Threshold Beeper On/Off ..................... Communications........................4-10 Data Card..........................4-12 Reset to Factory Configurations ....................
- Page 11 Table of Contents, Continued RMS Variation Limit......................Waveform Capture ........................ 6-13 Characterizer Options ......................6-14 Journal Limit.......................... 6-15 Journal Interval for Timed Readings ..................6-18 EN50160 Power Quality (for strict EN50160 monitoring only) ........... 6-20 CHAPTER 7 - View Event Data Overview ..........................
- Page 12 Table of Contents, Continued APPENDIX A - Optional Accessories Overview ..........................Hardware Accessories List & Descriptions................Software Accessories List ..................... APPENDIX B - Technical Specifications Overview ..........................General........................... Interfaces ..........................Measured Parameters......................Computed Parameters......................Parameter Settings in Each Monitoring Mode ..............TR2500 Current Probe......................
- Page 13 Dranetz PowerGuide 4400 ® xiii 1.800.561.8187 information@itm.com www. .com...
- Page 14 1.800.561.8187 information@itm.com www. .com...
-
Page 15: Chapter 1 - Getting Started
Dranetz software applications such as NodeLink and DranView ® ® This manual contains instructions for operating the Dranetz PowerGuide 4400. This manual 1.800.561.8187 information@itm.com www. .com... - Page 16 Overview, continued The following topics are covered in this chapter. In this chapter Topic See Page Unpacking the 4400 Standard Accessories 4400 Controls, Indicators and Connectors Upgrading Firmware from a Data Card 1-10 4400 Features 1-12 Basic Operation 1-14 1.800.561.8187 information@itm.com www.
-
Page 17: Unpacking The 4400
NOT return the 4400 without prior instructions from Dranetz Customer Service Department. Dranetz Customer Service Department can be reached at (732) 287- 3680 or 1-800-372-6832. If the unit must be returned to Dranetz for service or repair, wrap the unit securely Repacking for return shipment in heavy packaging material and place in a well padded box or crate to prevent damage. -
Page 18: Standard Accessories
FAX: (732) 248-9240 Fill out the Repair/Service Order form enclosed in the shipping carton and ship it along with the unit to the Dranetz Repair Department. (If this form is missing, ask the Dranetz Customer Service Department for a replacement.) 1.800.561.8187... -
Page 19: 4400 Controls, Indicators, And Connectors
CH 1/ Getting Started 4400 Controls, Indicators, and Connectors 4400 is a self-contained, portable instrument weighing less than 4 pounds and Dimensions measuring 8" (20.3 cm) deep by 12" (30.5 cm) wide by 2.5" (6.4 cm) high. This section identifies and describes the controls, indicators, and connectors on all panels of the 4400 shown with rubber boot installed. -
Page 20: Top And Side Views
4400 Controls, Indicators, and Connectors, continued The top (circuit connection) view features the input voltage and current connectors. Top and Side views The left side contains the optical interface port. The right side contains the AC adapter input connector. Both sides have rings for attaching the supplied carrying strap. See below for descriptions of the top and side connectors. -
Page 21: Front View
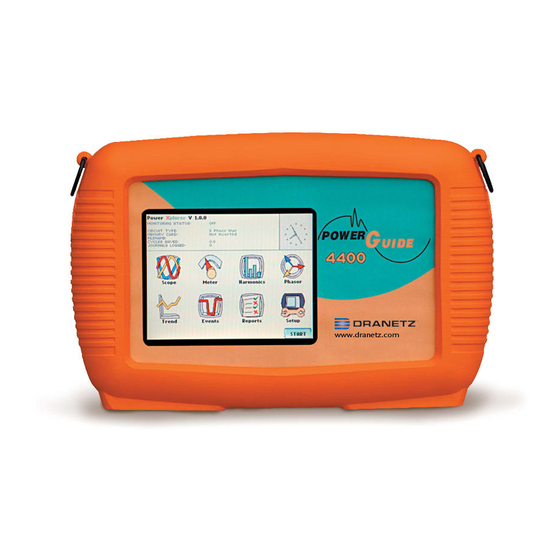
CH 1/ Getting Started The front view primarily shows the color touch screen LCD. See below for descriptions Front view of the 4400 front panel. Parts table Part Function Mainframe Protective Rubber Boot Enclosure Liquid Crystal Display (LCD). Provides 3.75 x 4.75 inches display consisting of 1/4 VGA size screen of text and graphic information. -
Page 22: Bottom View
4400 Controls, Indicators, and Connectors, continued The bottom view features two slots. Either slot can be used to hold the data card. Bottom view NOTE: Use only one card slot (one data card) at a time. The additional slot will be used for future communications options. -
Page 23: Rear View
CH 1/ Getting Started The rear view shows the battery compartment and the easel studs to mount the unit to Rear view desired angular position for use on a flat surface or to hang from a panel. 1.800.561.8187 information@itm.com www. .com... -
Page 24: Upgrading Firmware From A Data Card
4400 internal memory. Refer to the instructions below on how to upgrade the 4400 firmware. Firmware upgrades for the 4400 can be downloaded from the Dranetz website. Log on to www.dranetz.com for the latest information on 4400 firmware update releases. - Page 25 Dranetz Technical Support at 1-800-372-6832 for assistance. Turn the unit on by pushing the on/off button. The loader should display “Booting from program card”. If not, call Dranetz Technical Support for assistance. The instrument will prompt the user to verify whether or not to upgrade the firmware.
-
Page 26: 4400 Features
4400 Features 4400 Features All 4400 functions described below are operable using a color LCD touch screen Touch screen function technology. Users may use a finger and/or a PDA stylus to apply pressure to the LCD screen to result in touch screen recognition. The touch screen display is also workable with lineman gloves on. - Page 27 CH 1/ Getting Started The 4400 can monitor the following power configurations: Monitoring capacity • Single Phase • 3 Phase 2-Watt Meter Delta • Split Phase • Generic • 3 Phase Delta • 2 1/2 Element without V • 3 Phase Wye •...
-
Page 28: Basic Operation
Basic Operation Basic Operation The normal power source for the 4400 is its internal battery pack. The AC Adapter/ Introduction Battery Charger is used to charge the battery. Always charge the battery fully before use. The 4400 will always operate on the charger and is designed to do so, regardless of the state of charge of the battery. -
Page 29: Power-On Sequence
CH 1/ Getting Started Follow these steps to turn on the 4400 and display the Home screen. Power on sequence Step Action Connect ac adapter/battery charger plug into the right side of 4400. Plug the ac adapter into an ac power source. Press the 4400 On/Off power button to turn the unit on. -
Page 30: Home Screen Icons
Basic Operation, continued Home screen contains the following icons used to access various 4400 functions: Home screen icons Scope - Scope mode shows real-time voltage and current waveforms of the signals on the measuring inputs. See Chapter 3 View Real Time Data - Section A Scope Mode. Meter - Meter mode displays voltage and current measurements, along with other calculated parameters. -
Page 31: Overview
C H A P T E R Voltage M easurem ent Cable and Current Probe Connections Overview This section describes how to connect the 4400 to make basic single phase voltage Introduction measurements. For multi-phase connection diagrams, refer to Appendix E. hapter. - Page 32 Overview, continued ADVERTENCIA Una conexión incorrecta de este instrumento puede producir la muerte, lesiones graves y riesgo de incendio. Lea y entienda este manual antes de conectar. Observe todas las instrucciones de instalación y operación durante el uso de este instrumento.
- Page 33 CH 2/ Voltage Measurement Cable and Current Probe Connections The following safety precautions must be followed whenever any type of voltage or Safety precautions current connection is being made to the 4400. • Wear proper Personal Protective Equipment, including safety glasses and insulated gloves when making connections to power circuits.
-
Page 34: Connecting Voltage Measurement Cables
Connecting Voltage Measurement Cables Connecting Voltage Measurement Cables Description: Voltage measurement cables are provided as standard accessories and are Measurement cable set stored in a cable pouch as part of the measurement cable set, P/N 116042-G3. Each cable set consists of a cable and alligator clip. Voltage Rating: Direct connection of all voltage measurement cables are rated at 600 Vrms max. - Page 35 Refer condition to a qualified technician. Contact Dranetz Customer Service for more information on the fused voltage adapter. Refer to Dranetz Information Sheet titled Model FVA - Fuse Voltage Adapter, P/N 899107. 1.800.561.8187 information@itm.com...
- Page 36 Connecting Voltage Measurement Cables, continued Follow these guidelines when making voltage connections. Connection guidelines • Refer to the measurement cable set figure for color coding of probes that connect to input channel connectors A, B, C, and D. • Each channel input has plus (+) and minus (-) differential inputs of 1 to 600 Vrms max.
- Page 37 CH 2/ Voltage Measurement Cable and Current Probe Connections The following figure shows a voltage connection using channel D as a differential input Example: Neutral to for measuring neutral to ground voltage. Connections are identical for split phase and ground wye configurations.
- Page 38 Connecting Voltage Measurement Cables, continued The following safety precautions apply to current probe connections in addition to Safety precautions those safety precautions stated on page 2-3. • DO NOT attempt to measure current in any circuit in which the circuit to ground voltage exceeds the insulation rating of the current probe (600 Vrms max).
-
Page 39: Connecting Current Probes
CH 2/ Voltage Measurement Cable and Current Probe Connections Connecting Current Probes Several Dranetz current probes can be used with the 4400. Typical current probes Current probes are illustrated on page 2-10. Refer to Appendix A for descriptions and part numbers of probes and adapter cables. - Page 40 Connecting Current Probes, continued Typical current probes 4300 TO LEMFLEX CURRENT PROBE A DA PTER CA BLE 116310-G1 PX5-14.vsd NOTE: Current probes TR2500 can be used interchangeably with TR2500A, TR2510 with TR2510A, and TR2520 with TR2520A. Continued on next page 2-10 1.800.561.8187 information@itm.com...
- Page 41 CH 2/ Voltage Measurement Cable and Current Probe Connections Actual photos of TR series probes and part numbers are shown below to aid users in Typical current probes probe identification. Contact Dranetz Customer Service Department for more (continued) information on current probes, pricing and availability. P/N TR-2500...
- Page 42 Connecting Current Probes, continued The following figure shows how to connect a current probe to channel A for current Single phase current probe monitoring of a single phase line. connection example The current probe may be connected to the return line if desired to measure the return current when checking for load current leakage, loop current relationships, etc.
-
Page 43: Chapter 3 - View Real Time Data
C H A P T E R View Real Time Data Overview The 4400 allows users to view power quality phenomena as it happens, when it Introduction happens. The instrument is able to capture and process data in real time, and allows users to view it in Scope mode, Meter mode, Harmonics, and Phasor display. -
Page 44: Section A -Scope Mode
Overview Section A Scope Mode Overview Scope mode allows you to view real-time voltage and current waveforms for up to Introduction eight channels simultaneously. The Scope mode screen can be displayed by pressing the Scope key on the Home Scope mode screen screen. -
Page 45: Turning Channels On/Off
CH 3/ View Real Time Data Turning Channels On/Off From the Scope mode screen, press Chan to turn Volts/Amps channel selection on/off. Select channels to display MARK202 Any of the following will turn channels on/off: • Press the desired Volts/Amps channel to turn it on/off. •... -
Page 46: Checking Input Range
Checking Input Range Checking Input Range The Input Range screen is displayed by pressing the CkRng key on the Scope mode Input range screen. Input Range shows the detected range for all channels. The number after the status shows the percentage of the input of the instrument’s full range. MARK205 The input range can only be viewed, not changed. -
Page 47: Section B -Meter Mode
CH 3/ View Real Time Data Section B Meter Mode Overview Meter mode allows you to view real-time meter data. The metered parameters available Introduction are logically separated into Standard and Distortion tabs. Meter screens are displayed in tabular form. NOTE: Meter mode operation does not interfere with any of 4400’s other monitoring or recording functions. -
Page 48: Standard Meter Tab
Standard Meter Tab Standard Meter Tab Meter mode can be displayed by pressing the Meter icon on the Home screen. At start- Standard meter list up, meter mode defaults in the Standard tab featuring the basic power quality parameters available. The standard metering properties include Voltage, Computed Basic, Power, Demand, Energy, Harmonics and Flicker as shown below. - Page 49 CH 3/ View Real Time Data Standard meter list (continued) Standard Tab Parameter Name Label Demand Active Power Demand Active Power Demand Apparent Power Demand Apparent Power Demand Reactive Power Demand Reactive Power Demand RMS Current Demand Phase A RMS Current Demand Ph A RMS Current Demand Phase B RMS Current Demand Ph B RMS Current Demand Phase C...
-
Page 50: Distortion Meter Tab
Distortion Meter Tab Distortion Meter Tab The 4400 is able to meter distortions or uncharacteristic changes in the waveform of Distortion meter list original signals. Distortion calculations measure the deviation of complex waveshapes from pure sine waves. Harmonics are measured in accordance with IEC 61000-4-7 Class I. - Page 51 CH 3/ View Real Time Data Distortion meter list (continued) Distortion Tab Parameter Name Label Voltage Telephone Influence Factor V TIF fund (for A, B, C, D) Fundamental Current Telephone Influence Factor I TIF fund Fundamental Voltage Telephone Influence Factor V TIF RMS Current Telephone Influence Factor I TIF RMS...
-
Page 52: Section C -Harmonics
Overview Section C Harmonics Overview The 4400 allows users to view voltage and current harmonics/interharmonics in Harmonics display graphical or in list form. Harmonics are waveform distortion, a steady-state deviation from an ideal power frequency sinusoid and is characterized by the spectral content of the waveform. -
Page 53: Harmonic Graph
CH 3/ View Real Time Data Harmonic Graph The harmonic graph can be displayed by pressing Harmonics on the Home screen. The Harmonic graph display screen defaults to a graphical spectrum display, although users have the option to choose between the graph and list form. The screen will show a spectral graph featuring the amplitude of the harmonics relative to the fundamental frequency. -
Page 54: Harmonic Detail
Harmonic Detail Harmonic Detail The 4400 allows users to determine the numbers or the range of harmonic frequencies to trend. A blue box showing the default zoomed area appears once the Detail button is pressed. Touch any side of the zoom box to activate the drag function. Touch and drag the sides of the zoom box to expand or narrow in on a select number of harmonic/ interharmonic graphs. -
Page 55: Harmonic Options
CH 3/ View Real Time Data Harmonic Options The voltage and current harmonics and/or interharmonics for each phase channel can Harmonic/ Interharmonic be trended using the Options button. The properties specified under Harmonic Options data plots apply when harmonic/interharmonic data is viewed in either graph or list form. Properties under Show Harmonics... - Page 56 Harmonic Options, continued Harmonic Computation for 60 Hz Harmonic/ Interharmonic data plots 3.0% (continued) 2.5% 2.0% 1.5% 1.0% 0.5% 0.0% … 160 165 170 175 180 185 190 195 200 205 210 215 220 225 230 235 240 245 250 …...
-
Page 57: Harmonic List
CH 3/ View Real Time Data Harmonic List To view the harmonics magnitude text display, press List from the Harmonic graph Harmonic text display screen on page 3-11. The harmonic parameters displayed on list include: (from leftmost column) the harmonic/interharmonic frequency in Hz, frequency in number, voltage rms or maximum load of current (depending on parameter selected), percent amplitude of harmonics, and harmonic phase angle value. -
Page 58: Section D -Voltage And Current Phasor
Overview Section D Voltage and Current Phasor Overview The phasor screen displays a graph that indicates the phase relations between the Phasor display voltage and current based upon the angles of the fundamentals, as determined by Fourier analysis. Phasor screen shows eight phasors autoscaled with zero degrees to the right (normally channel A voltage) for clockwise rotation and with synchronized channels. -
Page 59: Phasor Screen
CH 3/ View Real Time Data Phasor Screen The Phasor screen is displayed by pressing Phasor on the Home screen. Phasor screen display The Phasor screen shows eight phasors autoscaled with zero degree to the right for clockwise rotation and with synchronized channels. The left sidebar shows rms values for Volts/Amps for channels A, B, C and D;... -
Page 60: Phasor Rotation
Phasor Rotation Phasor Rotation Graphic illustration in the form of rotating phasors relative to the sine wave graph of a Animated phasor rotation four wire wye circuit is available by pressing the Demo button on the Phasor screen (see page 3-17). The Demo button will be replaced by Start/Stop once phasor rotation has been viewed. - Page 61 CH 3/ View Real Time Data The following diagrams describe the positive phase rotation of voltage and current Sample 3-Phase, three wire delta phasors (for Resistive, Inductive and Capacitive loads) for a three phase, three wire rotation delta connection. An arrow head on the line indicates direction pointing toward the (continued) load.
-
Page 62: Phasor Parameter/Channel Selection
Phasor Parameter/Channel Selection Phasor Parameter/Channel Selection The Parameter/Channel selection screen is displayed by pressing Chan on the phasor Parameter/ Channel display Demo screen. Depending on the phases being monitored, up to four channels may be displayed at any one time for either Volts or Amps, or a single channel for both Volts and Amps. -
Page 63: Overview
C H A P T E R Instrument Settings Overview This chapter describes the miscellaneous tasks that users can perform to keep the 4400 Introduction running efficiently. These are tasks that users might perform only occasionally. The following topics are covered in this chapter. In this chapter Topic See Page... -
Page 64: Access Instrument Settings Menu
Access Instrument Settings Menu Access Instrument Settings Menu All functions in this chapter are found under the Instrument Settings menu. Follow Preferences menu screen these steps to display the Instrument Settings menu screen. Action... Result... STEP 1: Press the 4400 On/Off power button to turn the unit on. -
Page 65: Time And Date Settings
CH 4/ Instrument Settings Time and Date Settings Users have the option not only to set the exact time and date, but also to select the Time and Date display format of how time and date will appear on screen. Action... - Page 66 Time and Date Settings, continued Time and Date Display Action... Result... (continued) STEP 2: Press the field representing hours, minutes, and seconds to change time settings. Use the numeric keypad to enter new time settings. Time should be entered in a 24-hour format (example: 14:00:00 for 2:00 PM).
-
Page 67: Select Language
CH 4/ Instrument Settings Select Language Select Language The 4400 menu screens appear in the English language by default. Users have the option to set screen display to any of the following languages: English, Swedish, German, French, Italian, Simplified Chinese, Traditional Chinese, Finnish, Japanese, or Korean. -
Page 68: Set Display Preferences
Set Display Preferences Set Display Preferences User programmable settings for the LCD screen include the backlight timer, contrast, LCD settings password protect, parameter/channel colors, and touch screen calibration. Action... Result... STEP 1: From the Instrument Settings Setup Menu screen, press Display Preferences. -
Page 69: Touch Screen Calibration
CH 4/ Instrument Settings Touch Screen Calibration The 4400 is able to perform calibration to ensure the proper operation of the unit’s Calibration procedure touch screen functionalities. The calibration procedure will correct the problem of out of tolerance touch screen malfunction. Note that errors corrected by this calibration procedure are specific only to touch screen operation. - Page 70 Touch Screen Calibration, continued Calibration procedure Action... Result... (continued) STEP 2: Once touch screen calibration is done, a message will appear to indicate Touch screen was successfully calibrated. • Press OK to continue on with calibration test verification. Proceed to Step 3. MARK167 STEP 3: Test if touch screen recognition operates properly by...
-
Page 71: Turn Threshold Beeper On/Off
CH 4/ Instrument Settings Turn Threshold Beeper On/Off When set to ON, the unit will beep when threshold limits are crossed and other event Audible alarm triggers occur. The beep that provides audible feedback to pressing touch screen key is not affected by this setting. -
Page 72: Communications
Press Change to modify the modem initialization string. The string must begin with “AT”. Dranetz recommends using the same brand and model of modem at both ends of the communications link. See Chapter 9 Downloading Events for instructions on modem connections. - Page 73 CH 4/ Instrument Settings Communication interface setup Action... Result... (continued) STEP 2: Entering the correct IP address settings will enable the 4400 to communicate with the network. Prior to entering the IP setttings, make sure that the 4400 is connected to the computer network via the Fiber optic to Ethernet Adapter (P/N COMM- OEA).
-
Page 74: Data Card
Data Card Data Card The Memory Card screen displays information on the card inserted in the data card slot, Format/View data card including the amount of total space, available space, and used space in card. The Memory Card screen also prompts users to set filename and format card in preparation for monitoring and writing of data. - Page 75 CH 4/ Instrument Settings Format/View data card Action... Result... (continued) STEP 2: All data and setups stored in data card will be lost when you format the card. • A confirmation message verifies whether you want to continue with data card format or not.
-
Page 76: Reset To Factory Configurations
Reset to Factory Configuration Reset to Factory Configuration Factory configurations are the default settings of all programmable features of the 4400 Definition as it left the factory. Follow these steps to reset the 4400 to its factory configuration. Procedure Action... Result... - Page 77 CH 4/ Instrument Settings Dranetz has set the default values for the various parameters of the 4400. Factory default settings Current Probes: TR2500/TR2500A for A, B, C; TR2510/TR2510A for D Scale Factors: 1:1 for V and I, channels A, B, C, D...
- Page 78 4-16 1.800.561.8187 information@itm.com www. .com...
-
Page 79: Chapter 5 - Start Menu
C H A P T E R Start Menu Overview The Start Menu allows users to perform the following: set up the 4400 for monitoring Start menu options of an electrical system, load previously saved setups from card, and load data from card. - Page 80 Overview, continued Follow these steps to display the Start Menu. Displaying Start Menu Action... Result... STEP 1: Press the 4400 On/Off power button to turn the unit on. The Home screen will be displayed. MARK001b STEP 2: Press Start/Setup. The Start Menu will be displayed.
-
Page 81: Section A -Automatic Setup
CH 5/ Start Menu Section A Automatic Setup Overview Automatic Setup is a one-stop process using pre-defined settings to set the unit Automatic Setup procedure automatically. Users have the option to view the list of parameter settings, change probe types if current will be monitored, and/or proceed directly with data monitoring. Follow these steps to perform Automatic Setup. - Page 82 Overview, continued Automatic Setup Action... Result... procedure (continued) STEP 3: Summary displays the list of auto-configured parameter settings for Smart Start. The setup summary is available for review before, during and after monitoring. • Press Up/Down arrow keys to scroll the page up or down by one line.
- Page 83 CH 5/ Start Menu Automatic Setup Action... Result... procedure (continued) STEP 5: Select your desired probe type. NOTE: Use the same probes for the following: TR2500 for TR2500A, TR2510 for TR2510A, TR2520 for TR2520A. • If the current probe that you are using is not on the list, select Other.
-
Page 84: Section B -Wizard Setup
Overview Section B Wizard Setup Overview Wizard Setup guides the user through the circuit setup step-by-step, via a series of Introduction screens prompting for information about the circuit to be monitored. The unit automatically turns on the correct channels, sets the parameter thresholds and waveform capture settings depending on the detected circuit type, nominal voltage and current values, and monitoring mode specified by the user. - Page 85 It is also designed to be left unattended in the field, recording statistically representative data for long-term analysis. Using the Dranetz lockable portable case option or other available enclosures, power quality studies can be carried out in harsh weather environments.
-
Page 86: Current Probe Selection
Current Probe Selection Current Probe Selection Follow these steps to monitor current and select probe type. Selecting current probe Action... Result... STEP 1: From the Start Menu, press Setup new circuit. • If current will not be monitored, press Next. Go to page 5-10. - Page 87 Refer to Appendix A for descriptions and part numbers of probes and adapter cables. Refer to Appendix B for Dranetz current probes technical specifications. 1.800.561.8187 information@itm.com www.
-
Page 88: Scale Factor Setup
Scale factors must be entered for the following conditions: When to use • A Dranetz current probe is connected to a permanently installed CT. • The current connections are made using a Dranetz ISO box. • The voltage connections are made using a PT. - Page 89 CH 5/ Start Menu After setting up current probe configurations, the Scale Factor screen is displayed. Scale factor setup screen Action... Result... STEP 1: From the Current Probe Selection screen, press Next to display the Scale Factor Setup. • If voltage and current connections are made without using any current or potential transformer devices, the scale...
-
Page 90: Circuit Type Selection
Circuit Type Selection Circuit Type Selection The 4400 is able to display wiring diagrams from which users can select the circuit type Circuit setup appropriate to their application. The instrument will display the detected circuit configuration and compare the detected voltages, currents, and phase sequence (if applicable) to the selected circuit type. - Page 91 CH 5/ Start Menu Circuit Setup (continued) Action... Result... STEP 2: Scope mode allows users to verify if waveforms look correct for the specified wiring setup. • To check input range, press CkRng. The Input Range screen displays the detected range for voltage and current channels A, B, C, and D.
-
Page 92: Nominal Values
Nominal Values Nominal Values The Nominal Values screen allows users to enter values for frequency nominal line Frequency, voltage and voltage and current, or use the computed nominal values displayed on screen. current settings Action... Result... STEP 1: Nominal Values screen appears as users prepare the instrument to record data. - Page 93 CH 5/ Start Menu Frequency, voltage and Action... Result... current settings (continued) STEP 3: Tracking allows users to set parameters to monitor changes in frequency. Voltage Class: Check to select the power system that define the voltage range of distribution of the monitored system.
- Page 94 Nominal Values, continued Normal frequency synchronization (sync) of the 4400 analog signal processing circuits Frequency synchronization is controlled by analyzing the external AC voltage signal input on channel A. Loss of external sync causes the 4400 to poll other valid voltage channels (A, B, or C) for an alternate external sync.
-
Page 95: Mode Of Operation
CH 5/ Start Menu Mode of Operation After entering the correct nominal values for circuit monitoring, users have the option Basic meter setup to set the instrument to record data or use the instrument as a meter. Action... Result... STEP 1: From the Frequency Tracking screen, press Next to display the Mode of Operation. -
Page 96: Monitoring Mode
Monitoring Mode Monitoring Mode The 4400 provides six monitoring modes of operation from which to monitor and Choose a monitoring capture data relevant to user application. mode Action... Result... STEP 1: From the Basic Meter screen, press Next to display the different Monitoring Mode setups. -
Page 97: Advanced Options
CH 5/ Start Menu Advanced Options After selecting a monitoring mode, the system is now ready to begin monitoring and to Advanced setup options record data in card. Prior to actual monitoring, users have the option to accept the default threshold settings and proceed with monitoring, or to review and/or modify monitoring settings. -
Page 98: Site Name/Memory Card
Slot 1 or Slot 2 in order to record data. NOTE: Although 4400 is able to detect availability of data card in either slot, Dranetz strongly recommends the use of only one card slot (one data card) at a time. - Page 99 CH 5/ Start Menu Data card status Status Message Description messages Fragmented A fragmented FAT was detected. Monitoring cannot proceed with (continued) a fragmented data card. Either change the data card or format to continue. Unformatted Data card is not formatted. Format the data card or replace with a different card to continue.
- Page 100 Site Name/Memory Card, continued Data card operation Action... Result... (continued) STEP 2: Enter a new site/file name using the onscreen keyboard. Press OK to accept the new site/file name. • Press Shift to enter a character in uppercase. • Press CAPS to enter all characters in uppercase.
- Page 101 CH 5/ Start Menu The 4400 treats the Compact Flash card like a hard disk storing files in DOS format. Guidelines on file data transfer For successful card data transfer, keep the following points in mind: • 4400 supports a maximum DOS directory size of 128MB. Minimum required Compact Flash data card size is 32MB.
-
Page 102: Section C -Monitor Same Circuit
Overview Section C Monitor Same Circuit Overview Menu options for monitoring become available only after setting up the instrument or Introduction from reading a setup template from the data card. Users can monitor the same circuit, and configure combinations of setups unique to their task applications. Users have the option to begin monitoring immediately or at a specified time and date. -
Page 103: Turning Monitoring On/Off
CH 5/ Start Menu Turning Monitoring On/Off Follow these steps to start and end monitoring. Start/Stop monitoring Action... Result... STEP 1: From the Automatic Setup screen, press OK to start monitoring (see page 5-3). The Monitoring Menu screen will be displayed. - Page 104 Turning Monitoring On/Off, continued Start/Stop Action... Result... monitoring (continued) STEP 2: While the instrument is actively monitoring data, the message MONITORING STATUS: ON appears on the top section of the Home screen (see NOTE). Users cannot change the time and date nor perform data card operations while the instrument is actively monitoring data.
- Page 105 CH 5/ Start Menu Start/Stop monitoring Action... Result... (continued) STEP 4: When monitoring ends, the message MONITORING STATUS: DONE appears on screen (see NOTES). • To capture a new set of data or to edit threshold settings, press Start. The Start Menu screen will be displayed.
-
Page 106: Monitoring At A Specified Time And Date
Monitoring at a Specified Time and Date Monitoring at a Specified Time and Date Follow these steps to set monitoring at a specified time and date. Schedule monitoring Action... Result... STEP 1: From the Automatic Setup screen, press OK to start monitoring (see page 5-3). - Page 107 CH 5/ Start Menu You can specify the date and time when the unit will begin and end monitoring. Monitoring using start & end time Action... Result... STEP 1: When monitoring using the Start & End time schedule, the current date and time (set to the next full hour) are displayed on screen.
- Page 108 Monitoring at a Specified Time and Date, continued Monitoring using start & Action... Result... end time (continued) STEP 2 (continued): • Press Time to enter desired hour-minute-second to start/ end monitoring. Press to select the hour/minute/second field to display the numeric keypad. Use the keypad to enter time settings.
- Page 109 CH 5/ Start Menu Monitoring using start & Action... Result... end time (continued) STEP 3: The screen will display the new settings once the monitoring Start time/date and End time/date have been set. • Press the time and date function keys when you want to change time/date monitoring settings.
- Page 110 Monitoring at a Specified Time and Date, continued Monitoring at You can specify the date and time when the unit will begin monitoring, and choose scheduled from the following interval cycles when the unit will end recording and start a new file: intervals daily, weekly, bi-weekly, or a customized number of days.
-
Page 111: Modify Trigger Parameters And Intervals
CH 5/ Start Menu Modify Trigger Parameters and Intervals Advanced setups The Modify Trigger Parameters and Intervals screen allows users to turn on any available parameters and enter new threshold limits. Advanced Setup provides users wider control over all setup functions. Action... -
Page 112: Section D -Load Setup Template From Card
Overview Section D Load Setup Template from Card Overview The 4400 enables users to load saved setup template files (.set) from the data card. Introduction NOTE: Loading a setup template from the card will overwrite your existing setup. Loading saved Action... -
Page 113: Section E -Load Data From Card
CH 5/ Start Menu Section E Load Data from Card Overview Data files (.ddb) consist of events that are saved to the data card while monitoring is on. Introduction The 4400 allows users to load stored data directly from card. The following topics are covered in this section. -
Page 114: Card Error Messages
Card Error Messages Card Error Messages The following error messages may be displayed. Error messages Error Message Description Card not inserted No data card inserted or inserted improperly. Card not ready The Compact Flash data card controller is not ready. Try reinserting the data card. -
Page 115: Overview
C H A P T E R Advanced Setup Options Overview This chapter describes the options available to users with applications that require Introduction advanced setups. Although the 4400 is designed to capture data no matter what the setup is, users are able to configure combinations of setups unique to their task applications. -
Page 116: Advanced Options Menu
Advanced Options Menu Advanced Options Menu Advanced Options lists the threshold parameters available for review or modification. Advanced menu settings The 4400 allows users to customize threshold settings according to their task applications. Action... Result... STEP 1: From the Choose The following screen will appear if the selected Monitoring Mode screen (see monitoring mode is non-EN50160:... -
Page 117: Transient Limit
CH 6/ Advanced Setup Options Transient Limit Dranetz instruments label rms voltage or current variations as either sags (voltage Transient detection or current decreases below low limit) or swells (voltage or current increases above high limit) as per IEEE 1159. Voltage disturbances which are shorter in duration than typical sags and swells are classified as transients. - Page 118 Transient Limit, continued The 4400 uses three different algorithms to detect and record transients: Procedure to record transient • Peak or Instantaneous trigger magnitude disturbance • Waveshape threshold duration or window • Waveshape threshold magnitude or tolerance Action... Result... STEP 1: From the Advanced Options screen, press Transient Limit.
- Page 119 CH 6/ Advanced Setup Options Procedure to record transient Action... Result... disturbance (continued) STEP 2: 4400 shows the “floating window” algorithm used for waveshape fault detection. • Press limit field under Threshold to change limit. Use the keypad to enter the threshold limit or tolerance.
- Page 120 Transient Limit, continued Procedure to record transient Action... Result... disturbance (continued) STEP 3: 4400 allows users to set rms distortion waveshape limit. • Press the limit field to change limit. Use the keypad to enter the treshold limit beyond which rms voltage variations occur.
- Page 121 CH 6/ Advanced Setup Options Procedure to record transient Action... Result... disturbance (continued) STEP 4: Select how you want to specify the number of waveform cycles to record before (Pre-) and after (Post-) the trigger cycle. • Enable Use Default if you want to use the default waveform trigger cycle counts for transient events (Pre-trigger...
-
Page 122: Rms Variation Limit
RMS Variation Limit RMS Variation Limit RMS stands for root mean square, a mathematical formula used to compute the RMS variation setup properties equivalent value of the voltage and current. Voltage and current changes are measured and checked against the programmed limits. Thresholds are set as high limits (threshold above the programmed limit) and low limits (threshold below the programmed limit). - Page 123 CH 6/ Advanced Setup Options The following parameters are required to define how an rms variation is triggered: Procedure to record rms • Low Limit variation • High Limit • Cycles in range to end event Action... Result... STEP 1: From the Advanced Options screen, press RMS Variation Limit.
- Page 124 RMS Variation Limit, continued Procedure to record rms Action... Result... variation (continued) STEP 2: Press the High limit, Low Limit, and/or Very Low Limit field to display the numeric keypad used to set threshold values. Use the keypad to enter limits for the corresponding phase in the High limit, Low Limit, and Very Low Limit fields.
- Page 125 CH 6/ Advanced Setup Options Procedure to record rms Action... Result... variation (continued) STEP 3: Users can define the number of rms summary and waveform cycles to be saved before the start (pre-), after the start (post-start), and after the end (post-end) of the event.
- Page 126 RMS Variation Limit, continued Procedure to record rms Action... Result... variation (continued) STEP 3 (continued): Screen below shows sample changes in cycle Waveform Capture (Cycles): settings: These values can also be used for transient waveform capture. • Press Pre-Trigger to set the number of cycles for Pre-event start waveform cycles.
-
Page 127: Waveform Capture
CH 6/ Advanced Setup Options Waveform Capture The 4400 allows users to set the trigger channels/parameters for waveform capture. Trigger channel setup Action... Result... STEP 1: The checked fields show the channels that will have waveforms recorded should a trigger occur. This cross-trigger function prevents recording of meaningless data from unused (disabled) channels. -
Page 128: Characterizer Options
Characterizer Options Characterizer Options Events will be characterized according to the measurement standard selected under the Event characterizer characterizer mode. setup Action... Result... STEP 1: From the Advanced Options screen, press Characterizer Options. The 4400 measures event data in compliance with the criteria set by IEEE 1159 or IEC 61000-4-30 Class A. -
Page 129: Journal Limit
CH 6/ Advanced Setup Options Journal Limit The 4400 allows power parameters to be trended using periodic readings that are stored Journal entry settings in a journal. Statistical information is always captured regardless of the limit settings, so users will never be without a trend even if he/she did not set the limits correctly. The system collects data even when no disturbances occur by recording periodical statistical data (By Time). - Page 130 Journal Limit, continued Sample journal parameter setup Action... Result... STEP 1: From the Advanced Options screen, press Journal Limit. The Journal Categories screen will be displayed. Press a category to display journal parameters and the limit setup menu. For example, press Standard List to display the parameters under it.
- Page 131 CH 6/ Advanced Setup Options The following parameters are available for trending under the Journal Limit Setup. Journal Parameter List Refer to Appendix B Technical Specifications - Computed Parameters for the definition of parameters. Standard List Basic Computed Power Demand Energy Harmonics Flicker Basic Vector...
-
Page 132: Journal Interval For Timed Readings
Journal Interval for Timed Readings Journal Interval for Timed Readings The Journal Interval screen allows users to define how often the 4400 saves data Introduction periodically, regardless of power quality disturbances and journal limits. Power Values Definitions Power Values Interval - Power parameter values are based upon all cycles during a one second interval. - Page 133 CH 6/ Advanced Setup Options The intervals for timed readings are user programmable. Timed settings menu Action... Result... STEP 1: From the Advanced Options screen, press Journal Interval. The Journal Interval menu will be displayed. Press the parameter that you want to change.
-
Page 134: En50160 Power Quality (For Strict En50160 Monitoring Only)
EN50160 Power Quality EN50160 Power Quality (for strict EN50160 monitoring only) EN50160 is a statistical analysis of power quality data based on the EN standard. The Advanced setup options for statistical package called Quality of Supply (QOS) is built into the 4400, with EN50160 monitoring and setup protocols set to determine voltage measurement compliance required for EN50160 monitoring. - Page 135 CH 6/ Advanced Setup Options EN50160 Action... Result... optional settings (continued) STEP 2: EN50160 Options allow you to define up to five frequency signals set in 5 Hz resolution. Mains signalling compliance or non-compliance is determined by calculating/adding the status of each of the defined frequencies.
- Page 136 6-22 1.800.561.8187 information@itm.com www. .com...
-
Page 137: Chapter 7 - View Event Data
C H A P T E R View Event Data Overview The 4400 offers a graphical, information-packed, and easy to navigate display of event Types of data display data. The firmware architecture of the 4400 is designed to engage in various stages of acquisition, characterization, communication, and visualization of event data and journalled data. - Page 138 See Chapter 9 - Downloading Events for more information on NodeLink and DranView applications. ® ® NodeLink and DranView are owned and distributed by Dranetz. For pricing and ® ® availability, contact Dranetz Customer Service Department at (732) 287-3680 or 1-800-372-6832. 1.800.561.8187 information@itm.com www. .com...
- Page 139 CH 7/ View Event Data Follow these steps to display event data. View data using Events, Trend Action... Result... STEP 1: Events and Trend are accessible from the Home screen. Note that event data will be available for display while monitoring or upon reading a stored file from the data card.
-
Page 140: Section A -Events
Overview Section A Events Overview The event screen displays actual voltage or current waveforms that occurred when a What is displayed? certain threshold parameter was crossed. Event activity graphs, event list, waveform display, rms display, and time plots are visually interfaced showing event patterns and behaviors over threshold limits and time. -
Page 141: Event Data Display
CH 7/ View Event Data Event Data Display The event screen will display an event activity graph, waveform detail, and buttons like Event screen Detail magnification, Options to change and/or add parameters/channels to trend, buttons to view previous/next event, and RMS/Waveform toggle. From the Home screen, press Events. -
Page 142: Event Activity Graph
Event Activity Graph Event Activity Graph The event graph is located on the top section of the event screen (see page 7-5). Four Event graph description timelines represent all events recorded from the time monitoring started. Events for voltage channels are displayed above the grid and current channels are displayed below the grid. -
Page 143: Event List
CH 7/ View Event Data Event List Event list presents a summary of all captured events in the order that they occurred. Event list description Each event contains a general heading indicating the time and date when the disturbance occured, the disturbance category, disturbance classification, and number of cycles of duration. - Page 144 Event List, continued Follow these steps to access the event list. Note that event data is displayed only while View event list (continued) monitoring or upon reading a file from the data card. Action... Result... STEP 2: The highlighted field indicates that the particular event entry has been selected.
-
Page 145: Event Detail
CH 7/ View Event Data Event Detail The 4400 allows users to view events in graphic waveform/rms display. The Detail Event details screen features zoom buttons to magnify event cycles, and a zoom box that users can resize via touch and drag. The Detail screen also allows viewing of events alternately in rms or waveform. - Page 146 Event Detail View event detail Action... Result... (continued) STEP 2: Once the magnify button is pressed, a blue box showing the default zoomed area appears. The touch screen zoom functionality allows users to select the number of waveform/rms cycles that they can zoom in.
- Page 147 CH 7/ View Event Data View event detail Action... Result... (continued) STEP 3: The magnify buttons serve as zoom function keys, each of which feature a plus sign or a minus sign within. • Press Zoom+ to display the zoomed area and view the event cycles in greater detail.
- Page 148 Event Detail, continued The 4400 firmware V2.0 and higher is equipped with the algorithm that determines the Event text detail: Sag origin of a 3-phase voltage sag event. The sag origin or directivity can be Upstream or Directivity Downstream from the monitoring point. The direction is displayed in the Event Text Detail screen.
- Page 149 CH 7/ View Event Data In addition to determining directivity, the new algorithm in 4400 firmware V2.0 is also Event text detail: able to detect if 3-phase voltage and current waveforms experience a capacitor Capacitor switching event. The result of the analysis is displayed in the Event Text Detail screen. Switch Analysis Action...
-
Page 150: Event Options
Event Options Event Options A time plot is a graph of the value of one parameter and channel over time. The 4400 is Voltage and Current able to display time plots for individual Voltage and Current channels (Va, Vb, Vc, Vd, channels to plot Ia, Ib, Ic, Id) or phase-to-phase Voltage channels (Vab, Vbc, Vca), depending on the available channels for Voltage and the selected circuit type. - Page 151 CH 7/ View Event Data Follow these steps to access event Options. View event options Action... Result... STEP 1: From the event screen, press Options. Plot #s appear on the left side of the screen. Users have the option to enable/disable channels for any of the Plot #.
- Page 152 Event Options, continued View event options Action... Result... (continued) STEP 2: Check the channels that you want to enable, uncheck those you want to disable. For example, check to enable Channel A-B Volts, in addition to Channel A Volts for Plot #1. •...
-
Page 153: Section B -Trend
CH 7/ View Event Data Section B Trend Overview Trend categories The 4400 is able to display statistical trends or plots for the following parameter categories: Standard: Parameters include basic volts and amps, displacement power factor, residual and net current, energy, harmonics, standard demand, and standard flicker. These power parameters are measured more accurately using a one (1) second interval, summarized by min, max and avg at the end of the interval. -
Page 154: Trend Display
Trend Display Trend Display A trend consists of the timed and threshold waveforms for the parameter on display. What is displayed on a trend? Users have the option to enable/disable a trend or plot display, wherein display area will resize according to the number of plots enabled for display. In addition, users have the option to enable/disable channels to trend in a select parameter. -
Page 155: Trend Setup
CH 7/ View Event Data Trend Setup Follow these steps to view data trends. The same procedure applies even when you Trend settings select different journal categories to plot. Action... Result... STEP 1: From the Home screen, press Trend. • The default number of plots displayed in the trend screen is two. - Page 156 Trend Setup, continued Trend settings (continued) Action... Result... STEP 3: The Journal Categories allow users to select parameters/ channels to trend for display. • Press Disable to clear the parameter display in Plot #2 (from Example in Step 2). Proceed to Step 4. •...
- Page 157 CH 7/ View Event Data The 4400 provides setup options to measure rms data per cycle or per second. RMS settings The RMS Voltage and RMS Current parameters are available under Journal Categories - Standard List. MARK436 MARK514 Cyclic RMS: RMS values are computed over 1 power frequency cycle (16.67 msec @ 60 Hz) in 1/2 cycle steps (every 8.33 msec).
- Page 158 7-22 1.800.561.8187 information@itm.com www. .com...
-
Page 159: Chapter 8 - Reports
C H A P T E R Reports Overview Users have the option to view QOS compliance reports in two ways: via EN50160 or Report types Status. Each report has their own method of presenting compliance data. Each also differs on the length of evaluation period to monitor compliance. From the Home screen, press Reports. -
Page 160: Section A -En50160
Overview Section A EN50160 Overview EN50160 is a European standard that stipulates the voltage characteristics that can be What is EN50160? expected in public distribution networks. The QOS functionality is equipped with monitoring and setup protocols to meet the measurements required for EN50160 monitoring. -
Page 161: En50160 Measurement Parameters
CH 8/ Reports EN50160 Measurement Parameters Statistical data is calculated based on the parameters required by EN50160 for EN50160 parameters determining QOS compliance. The 4400 displays the parameters in the form of a Compliance Statistical Bar Chart. From the Reports screen, press EN50160. MARK471 The bar chart indicates the percentage of the intervals passing the specified compliance criteria. - Page 162 EN50160 Measurement Parameters, continued pumps, compressors, etc.) is used. Flickers display a cluster of bars, one for each phase. EN50160 parameters The color of each bar indicates the compliance status for each phase. A green bar (continued) indicates that the parameter is within compliance. A red bar indicates that the parameter does not comply with EN50160.
-
Page 163: En50160 Compliance Limits
CH 8/ Reports EN50160 Compliance Limits The table below indicates the limit numbers or range of values required for each Compliance limits parameter to pass QOS compliance and satisfy EN50160 standard. Parameter Limits for QOS Compliance to Pass Un = Low Voltage (LV) Supply nominal voltage, upper limit 1kV Uc = Medium Voltage (MV) Supply Characteristics - declared voltage, range 1kV to 35kV Power frequency with Mean value over 10 seconds... - Page 164 EN50160 Compliance Limits, continued The table below indicates the limit numbers or range of values required for each Compliance limits parameter to pass QOS compliance and satisfy EN50160 standard. (continued) Parameter Limits for QOS Compliance to Pass Un = Low Voltage (LV) Supply nominal voltage, upper limit 1kV Uc = Medium Voltage (MV) Supply Characteristics - declared voltage, range 1kV to 35kV Harmonic voltage 10 minute mean rms values...
- Page 165 CH 8/ Reports The general approach of EN50160 is to express all voltage characteristics by reference Interharmonic compliance limit to the nominal voltage or declared voltage, as appropriate. The table below indicates values the Interharmonic Compliance Limit values in relation to the nominal voltage. Interharmonic Group Number Limit DC-1...
-
Page 166: Compliance Statistical Bar Chart
Compliance Statistical Bar Chart Compliance Statistical Bar Chart The Compliance Statistical bar chart displays the seven parameters that are required for Chart description determining QOS compliance. See pages 8-3 to 8-4 for the description of each of the EN50160 parameters. The bar chart indicates the percentage of the interval passing the specified compliance criteria. - Page 167 CH 8/ Reports View Compliance Statistics bar Action... Result... chart STEP 1 (continued): (continued) • Press DISDIP to view the Event Statistics. Go to page 8-13. • Press Min/Max to view the min/max values for Power Frequency and RMS Voltage. Go to page 8-15.
- Page 168 Compliance Statistical Bar Chart, continued View Compliance Statistics bar Action... Result... chart STEP 4: The Interharmonic graph (continued) displays the status of each individual Interharmonic and TID for each phase. The bar chart indicates the percentage of intervals passing the specified compliance.
-
Page 169: Compliance History
CH 8/ Reports Compliance History EN50160 provides a historical summary of the QOS compliance evaluations made. The QOS Status Summary standard monitoring period is one week, usually beginning Sunday at 00:00 (midnight). Any compliance evaluation performed in less than one week will receive an Evaluation Status marked as Incomplete, and Compliance marked as Undetermined. - Page 170 Compliance History, continued Evaluation Period: Displays the date and time of the beginning of the evaluation period. Compliance History table Each evaluation period is independent of each other. The default length of evaluation (continued) period is a 7-day week period by which the unit calculates information in strict compliance with the EN50160 standard.
-
Page 171: Event Satistics
CH 8/ Reports Event Satistics The EN50160 DISDIP (distribution of dips) table is based upon the event statistics EN50160 DISDIP calculated by EN50160. It includes the UNIPEDE DISDIP Statistics and the table for Transient Overvoltages. UNIPEDE DISDIP data is collected and saved on a weekly basis with the counts reset as the final save occurs. - Page 172 Event Statistics, continued The DISDIP table also includes those events of Transient type. Scroll down the next UNIPEDE DISDIP page of the UNIPEDE DISDIP Statistics table to display data for Transient Statistics table Overvoltage as shown below. (continued) MARK474 Display table for RMS Display DISDIP 3D Events (p.
-
Page 173: Min/Max Table For Power Frequency And Rms Voltage
CH 8/ Reports Min/Max Table for Power Frequency and RMS Voltage The Min/Max table displays the minimum and maximum values for Power Frequency Min/Max table and RMS Voltage along with the time and date of occurrence. Maximum phase values of Rapid Voltage Change, Flicker, Supply Voltage Unbalance, and Harmonic are also displayed along with time and date of occurrence. -
Page 174: Section B -Status Report In Annunciator Panel
Overview Section B Status Report in Annunciator Panel Overview Status summary for three report types - Standard PQ, EN50160, and Motor Quality - Annunciator panel can be displayed via the annunciator panel. Real time data, event count, or user- specified calculated data is available in the matrix display of the annunciator panel. When monitoring is on, the annunciator panel displays the status of a parameter using a color scheme. -
Page 175: Panel Setup Options
CH 8/ Reports Panel Setup Options Press Options to select the Preset parameters and/or Panel Size to display. Setup options Presets provide a set of default parameters that will be displayed in the annunciator panel. The screen matrix size can also be customized (Small, Medium or Large) according to user application. - Page 176 Panel Setup Options, continued Preset The table below shows the default parameters on display in the annunciator panel. Note parameters however that you can edit and change the parameter settings using the Edit Panel function described on page 8-22 Setup Parameters Standard RMS Voltage...
-
Page 177: Panel Operation
CH 8/ Reports Panel Operation The annunciator panel displays metered data for the selected parameter. The metered Annunciator panel color data is updated once per second. This is the same data that appears in the meter screen, scheme and used in calculating journals. If the selected parameter is not journalled, the rms event or transient event count can be selected to appear in the panel instead of journalled data. - Page 178 Panel Operation, continued The following procedure describes how to view parameter details in the annunciator Parameter data plot panel. Action... Result... STEP 1: From the Home screen press Reports. Select Status to display the summary report via the annunciator panel. FOR EXAMPLE: The summary report type described here is for Motor...
- Page 179 CH 8/ Reports Parameter data plot (continued) Action... Result... FOR EXAMPLE: Once View Graph is selected, coordinates for V RMS Imbalance event are displayed on screen. NOTE: Imbalance is the rms deviation calculation per channel if the instrument is in Standard PQ Mode.
- Page 180 Panel Operation, continued Parameter data plot (continued) Action... Result... Once View Limits is selected, threshold values crossed that cause the V RMS Imbalance event are displayed on screen. MARK612 Once Edit panel is selected, the window where you can select Metered Data journal categories to plot is displayed.
-
Page 181: Overview
C H A P T E R Downloading Events Overview In this chapter The 4400 allows users to download, archive and view event data in a computer This section discusses the external communications device and software applications necessary to transfer and store 4400 data files to a computer. Topic See Page External Communication Interface... -
Page 182: External Communication Interface
External Communication Interface External Communication Interface To download events from the 4400 through the optical port, you must have the Isolated Communications following: a personal computer or laptop with Windows operating system with either ® Module RS232 serial port or network adapter, NodeLink , and the appropriate Isolated ®... -
Page 183: Connection Setup Via Rs232
DC power input is not required. Otherwise, COMM-RS232 requires that an external power source be connected. For external power supply, use the optional accessory Battery Charger/UPS (P/N XBC-PX5) available from Dranetz. Connect the DC plug from the battery charger/UPS to the 12V, 3W max input jack on the RS232 adapter. -
Page 184: Connection Setup Via Usb
External Communication Interface, continued The following procedure and diagram describe how to connect the 4400 to a computer Connection setup via USB via USB. Once the physical connection is done, see Chapter 4 Instrument Settings - Communications on page 4-10 for instructions on how to enable the 4400 settings to communicate with external devices. -
Page 185: Connection Setup Via Ethernet
230V AC for Euro, UK or Australia type plug. NOTE: For battery backup operation, replace the AC adapter with the optional accessory Battery Charger/UPS (P/N XBC-PX5) available from Dranetz. 4. Set the IP configuration of the Ethernet Communication Module. Consult your IT Department for the appropriate setting of your local area network. - Page 186 External Communication Interface, continued When configuring both the 4400 and NodeLink for modem communications, keep in Connection ® setup via mind that the 4400 uses a fiber optic serial port in order to maintain electrical isolation. Modem This means that there are no control signals available to a modem to use for handshaking and flow control.
-
Page 187: Connection Setup Via Modem
CH 9/ Downloading Events NodeLink uses Windows TAPI when accessing modem communications resources. Connection ® ® setup via The assumption is that the Windows modem to be used for 4400 communications has ® Modem been properly installed prior to executing this procedure. (continued) If the modem is not on, or was not on when Windows was started, it may be necessary... - Page 188 External Communication Interface, continued Back at the 4400, the last step in configuring the modem communications is to modify Connection setup via the modem initialization string to match the modems and chipsets being used. The goal Modem is to configure for the following: (continued) •...
- Page 189 CH 9/ Downloading Events The following is the AT initialization string for a modem using the Agere (Lucent) Modem initialization chipset: string command (continued) AT&F;S0=2;&K0;%E0;S30=6 Where AT is the modem attention command. &F instructs the modem to restore factory configuration. S0=2 turns auto-answer on and sets the number of rings to answer to two.
-
Page 190: Downloading Events Via Nodelink
Users are strongly advised to always keep their NodeLink and 4400 programs current ® with the latest version released by Dranetz. NodeLink V2.6 or higher is required to download events from PowerGuide 4400 firmware V1.10 or higher. Log on to the Dranetz website, www.dranetz.com, to download the latest 4400 firmware version. -
Page 191: Viewing Events Via Dranview
DranView ® Users are strongly advised to always keep their DranView and 4400 programs current ® with the latest version released by Dranetz. DranView is available in soft key version (without HASP) and in hard key version ® (with HASP). -
Page 192: Dranview With Hasp
® DranView with HASP DranView with HASP ® The minimum system specifications for proper installation and operation of DranView DranView ® ® system are shown below. Users are strongly advised to follow the recommended requirements specifications for optimal DranView operation. The recommended specifications are ®... - Page 193 Keep the HASP in the port while using the DranView application. ® The HASP is programmed to allow DranView V5.x to work with a specific Dranetz ® product. The table below lists the HASP ID labels that go with the corresponding Dranetz product.
- Page 194 DranView with HASP, continued Installation procedure Supports the following ID Label (continued) Dranetz products HASP for USB Port DRAN-VIEW ENTERPRISE PQDIF (Sig), Comtrade, TEXT DVE-PQDIF PQDIF (Sig), Comtrade, TEXT, 4400, PX5, PX5-400 DVE-PX PQDIF (Sig), Comtrade, TEXT, 4300, PP1, 658...
- Page 195 As part of our continuing quality development effort, and in the event of finding serious bugs, Dranetz may occassionally post a self-installing upgrade patch which users can download for free. The patch may be found at the Dranetz website www.dranetz.com under “Software Packages and Updates”. The upgrades are available to users who are registered owners of DranView .
- Page 196 9-16 1.800.561.8187 information@itm.com www. .com...
-
Page 197: Appendix A - Optional Accessories
Optional Accessories Overview This appendix lists the optional accessories for 4400. It covers the hardware accessories Introduction available for use with the 4400 and the Dranetz software applications used to download and view event data in a computer. Topic See Page Hardware Accessories List &... -
Page 198: Hardware Accessories List & Descriptions
Hardware Accessories List and Descriptions Hardware Accessories List & Descriptions Hardware Accessories List Accessory Part Number Current Probes Current Probe Assembly, 10 to 500 A RMS TR-2500 Current Probe, 10 to 500 A TR-2500A Current Probe Assembly, 0.1 to 10 A RMS TR-2510 Current Probe, 1 to 10 A TR-2510A... - Page 199 APPENDIX A/ Optional Accessories Hardware Accessories List Accessory Part Number (continued) AC/DC Current Probes AC/DC Current Probe, 150A, Without AC Adapter PR150/SP1 AC/DC Current Probe, 150A, Battery Powered PR150/SP2 AC/DC Current Probe, 1500A, Without AC Adapter PR1500/SP7 AC/DC Current Probe, 1500A, Battery Powered PR1500/SP8 Current Probe Adapter Cables Adapter Cable, 658 Current Probe to 4300...
- Page 200 External Battery Charger with LEMFLEX Adapter Cables LF-PSP External Battery Charger with DRANFLEX Probe Power DF-PSP Adapter Isolated Current Transformer 0.1A to 5A ISO-65X-5 Dranetz Reference Publications Field Handbook for Electrical Energy Management HB114415 Field Handbook for Power Quality Analysis HB114414-S 1.800.561.8187 information@itm.com www.
- Page 201 They plug directly into any of the current inputs on the rear panel. These probes are not recommended for measuring medium or high frequency transients. TR2021, TR2019B, TR2022, TR2023: These four probes are made for the Dranetz model 658 but can be used with the 4400 by using an adapter cable (part number CA-4300).
- Page 202 Appendix C Battery Specifications and Replacement Procedure. External Battery Charger: The XBC-PX5 charges a battery pack while the instrument is in use and may be used to power specified Dranetz probes. Isolated Current Transformer: Allows the connection of other industry-standard 0.1A to 5A output current transformers to Dranetz equipment.
- Page 203 APPENDIX A/ Optional Accessories Field Handbook for Electrical Energy Management: This reference handbook provides Dranetz reference a comprehensive guide for information related to conducting a thorough energy audit, publications power distribution analysis, and methods of remedying inefficiencies of energy management.
-
Page 204: Software Accessories List
V5.x or higher with PX5 and 4400 driver ® 5PK-DV5DRANTOPX [5-User Package] DVPXHASP supports PX5, PX5-400, 4400 5PK-DVPXHASP [5-User Package] supports all Dranetz products including PX5 and DVPXALLHASP 4400 with Math and PQDIF driver 5PK-DVPXALLHASP [5-User Package] DVDRANHASP supports PX5, 4400, 658, PP1 and PP4300 5PK-DVDRANHASP... - Page 205 . Dranetz strongly advises ® users to always keep their 4400 program current with the latest firmware version released by Dranetz. Log on to the Dranetz website, www.dranetz.com, to download the latest 4400 firmware upgrade version. DranView is a Windows -based program that is used to archive, view and analyze ®...
- Page 206 A-10 1.800.561.8187 information@itm.com www. .com...
-
Page 207: Overview
A P P E N D I X Technical Specifications Overview In this appendix The following specifications are covered in this appendix. Topic See Page General Interfaces Measured Parameters Computed Parameters Parameter Settings in Each Monitoring Mode TR2500 Current Probe B-11 TR2510 Current Probe B-12... - Page 208 General General Size: 12” Width x 2.5” Height x 8” Depth (30 x 6.4 x 20.3 cm) Dimensions Weight: 3.8 pounds Operating: 0 to 50 °C (32 to 122 °F) Environmental Storage: -20 to 55 °C (4 to 131 °F) Humidity: 0 to 95% non-condensing;...
- Page 209 APPENDIX B/ Technical Specifications Interfaces Mains supply: Installation Category II, Pollution Degree 2 Installation Categories Measurement inputs: Installation Category III, Pollution Degree 2 Type: 1/4 VGA color graphic, touch screen Liquid Crystal Display (LCD) with Display compact fluorescent (CCFL) backlighting. Programmable backlight time-out to reduce power consumption.
- Page 210 CMRR: -80 db typical Type: 4 full differential, DC coupled. Current Channels A, B, C, D Input Range: 10 - 200% of Rated Probe Input (Dranetz probes) RMS Accuracy: ±0.1% of Reading ±0.05% Full Scale plus Probe Accuracy, 3KHz bandwidth (1 second rms readings) Each voltage/current pair (i.e.
- Page 211 APPENDIX B/ Technical Specifications Computed Parameters The computations below apply to single channel parameters. Single Channel Parameters Note that 0 = Phase Angle of Voltage, while 0 = Phase Angle of Current. Average of the instantaneous power samples taken as the product of voltage and current True Average Power samples.
- Page 212 Computed Parameters, continued Calculated using the True Average Power divided by the Apparent Power. See Note True Power Factor below for sign information. WATT Calculated using cosine of the phase angle between the fundamental frequency Displacement Power Factor components of voltage with respect to current (0 = 0 ).
- Page 213 APPENDIX B/ Technical Specifications The computations below apply to three phase wye configuration. Totals Totals for split phase can be determined by eliminating phase C (i.e. split phase WATT = WATT + WATT Power Total WATT WATT WATT WATT Fundamental Power Total WATT WATT...
- Page 214 Computed Parameters, continued See Note on page B-7 for sign information. True Power Factor, Arithmetic Total WATT Arithmetic Tot Arithmetic Tot See Note on page B-7 for sign information. True Power Factor, Vector Total WATT Vector-Tot Vector Tot See Note on page B-7 for sign information. Displacement Power Factor, Arithmetic Total...
- Page 215 APPENDIX B/ Technical Specifications Parameter Settings in Each Monitoring Mode The following table lists the default settings for the threshold parameters in each Setup parameters monitoring mode. Standard Current Fault Long-term Continuous EN50160 Parameters Power Inrush Recorder Timed Data Quality Recording Logging RMS Variation...
- Page 216 Parameter Settings in Each Monitoring Mode, continued The following table lists the default settings for the threshold parameters in each Setup parameters monitoring mode. (continued) Standard Current Fault Long-term Continuous EN50160 Parameters Power Inrush Recorder Timed Data Quality Recording Logging Waveform Capture Trigger Response When Volts All Active...
-
Page 217: Tr2500 Current Probe
APPENDIX B/ Technical Specifications TR2500 Current Probe To achieve the rated accuracies, follow these guidelines: Guidelines • The conductor must be at a right angle to the probe. • The conductor must be centered in the probe core. • The jaw contact surfaces must be clean and properly aligned. Range: 1 to 500 Arms Specifications Accuracy:... -
Page 218: Tr2510 Current Probe
TR2510 Current Probe TR2510 Current Probe To achieve the rated accuracies, follow these guidelines: Guidelines • The conductor must be at a right angle to the probe. • The conductor must be centered in the probe core. • The jaw contact surfaces must be clean and properly aligned. Range: 0.1 to 10 Arms Specifications Accuracy (at 60 Hz): 0.1 to 10A, ±1% reading ±0.01A... -
Page 219: Appendix C - Battery Specifications And Replacement Procedure
A P P E N D I X Battery Specifications and Replacement Procedure Overview The internal battery pack used in the 4400 functions as the primary power source and Introduction UPS. Always charge the battery fully before using the unit. The 4400 will fully charge its internal battery in six (6) hours. - Page 220 Battery Specifications Battery Specifications Type: Sealed, rechargeable NiMH (Nickel Metal Hydride) cells. Battery pack Location: Battery compartment on the rear of the unit. Number of batteries in pack: 6 Voltage: 7.2 V dc Capacity: 2.7 Ah Charging: A depleted battery pack can be recharged in approximately six (6) hours. Length of operation: More than two (2) hours when fully charged and with backlight on.
- Page 221 La 4400 esta equipada con un circuito interno cargador de baterÌas. No intente cargar las baterÌas con un cargador externo que no sea el cargador de baterias Dranetz, puesto que la carga indebida podrÌa hacer que explote la bateria.
-
Page 222: External Battery Charger
The XBC-PX5 External Battery Charger allows the charging of a battery pack(s) that Description can be used for Dranetz models PowerXplorer PX5, PowerGuide 4400, and Power Platform 4300. It is especially useful when monitoring for short durations where no standard 115 or 230 VAC power is available. Having multiple charged battery packs can provide unit power for several hours, allowing users to perform monitoring analysis of AC power quality issues in remote locations. - Page 223 APPENDIX C/ Battery Specifications and Replacement Procedure The following procedure describes the basic operation of the XBC-PX5 battery charger Charger operation and its applications. 1. Insert the BP-PX5 battery pack with the proper polarity into the XBC-PX5 battery charger. 2. If connecting DranFlex or LemFlex current probes, refer to the applicable Information Sheets and User’s Guide on how to connect current probes and follow the proper safety procedures before proceeding.
-
Page 224: Battery Pack Replacement
Battery Pack Replacement The 4400 contains an easily replaceable internal battery pack. See Appendix D for Introduction ordering information. Replace with Dranetz NiMH battery pack BP-PX5 only. WARNING ADVERTENCIA Reemplace con batería Dranetz NiMH BP-PX5 solamente. AVERTISSEMENT Remplacer par la batterie Dranetz NiMH BP-PX5 exclusivement. - Page 225 APPENDIX C/ Battery Specifications and Replacement Procedure Battery removal diagram 1.800.561.8187 information@itm.com www. .com...
- Page 226 1.800.561.8187 information@itm.com www. .com...
- Page 227 The following parts are easily replaced by the operator and do not require special tools Introduction or access to the interior of the unit. Call Dranetz Customer Service at (732) 287-3680 or 1-800-372-6832 to order any To order parts of the following parts.
- Page 228 1.800.561.8187 information@itm.com www. .com...
-
Page 229: Appendix E - Common Circuit Connections
A P P E N D I X Common Circuit Connections Overview If you are making power measurements, follow these diagrams so that your ABC Who should read this section values are calculated correctly. WARNING Death, serious injury, or fire hazard could result from improper connection of this instrument. - Page 230 Overview, continued AVERTISSEMENT Si l'instrument est mal connecté, la mort, des blessures graves, ou un danger d'incendie peuvent s'en suivre. Lisez attentivement ce manuel avant de connecter l'instrument. Lorsque vous utilisez l'instrument, suivez toutes les instructions d'installation et de service. Cet instrument doit être connecté...
- Page 231 APPENDIX E/ Common Circuit Connections To avoid the risk of electric shock or burns, always connect the safety (or earth) WARNING ground before making any other connections. To reduce the risk of fire, electrical shock, or physical injury it is strongly WARNING recommended to fuse the voltage measurement inputs.
- Page 232 Overview, continued This section contains diagrams of both voltage and current probe connections that are Voltage and current required when power measurements are to be made. connections Voltage: Voltage probes are connected to the individual source or load line and are referenced to the return (common) line voltage probe connection for greatest accuracy.
-
Page 233: Verifying Voltage And Current Connections
APPENDIX E/ Common Circuit Connections Verifying Voltage and Current Connections Correct voltage and current connection of single phase, split phase, or polyphase Introduction connections can be verified using phasor diagrams. Phasor diagrams are graphic representations that show the magnitude and angular relationship of voltage and current for each phase of a monitored connection. - Page 234 Verifying Voltage and Current Connections, continued Phasor displays that show incorrect current probe connection can be corrected by Incorrect current phasor reconnecting the probe so that the arrow on the probe handle points toward the load. diagram The 4400 is able to display diagrams of the various wiring configurations to assist users in the selection of circuit type appropriate for their application (see Chapter 5 Start Menu - Circuit Type Selection on page 5-11).
-
Page 235: Single Phase
APPENDIX E/ Common Circuit Connections Single Phase When making voltage connections to a single phase circuit use channel A differential Introduction inputs as shown below. The figure also shows voltage connection using channel D as a differential input for measuring neutral to ground voltage. Neutral to ground measurements are important but optional. -
Page 236: Split Phase
Split Phase Split Phase When making split phase measurements, use both channels A and B for voltage and Introduction current connections. The neutral is chosen as the reference for measurement purposes. The figure also shows voltage connection using channel D as a differential input for measuring neutral to ground voltage. -
Page 237: Phase, Four Wire Wye
APPENDIX E/ Common Circuit Connections 3 Phase, Four Wire Wye Channels A, B, and C are connected to voltage and current probes. The neutral is Introduction connected to common and is the reference for the three channels. The figure also shows voltage connection using channel D as a differential input for measuring neutral to ground voltage. -
Page 238: Phase (Floating Or Grounded) Delta
3 Phase (Floating or Grounded) Delta 3 Phase (Floating or Grounded) Delta In this power connection, the 4400 uses voltage channels A, B, and C as differential Introduction inputs with channel A using source voltage A-B, channel B using B-C, and channel C using C-A as the reference. -
Page 239: Phase 2-Watt Delta
APPENDIX E/ Common Circuit Connections 3 Phase 2-Watt Delta The figure below shows the 3 Phase 2-Watt delta connection using phase channels A- Introduction B-C. Current probes are connected to channels A and B. Neutral to ground measurements are important but optional. Connection diagram PX5-905... -
Page 240: Generic Circuit
Generic Circuit Generic Circuit In the Generic circuit connection, the 4400 uses voltage channels A, B, C, and D as Introduction differential inputs. Current probes are connected to channels A, B, C, and D. Connection diagram PX5-906 E-12 1.800.561.8187 information@itm.com www. -
Page 241: 1/2 Element Without Voltage Channel B
APPENDIX E/ Common Circuit Connections 2 1/2 Element Without Voltage Channel B Channels A and C are connected to voltage. Current probes are connected to channels Introduction A, B and C. The neutral is connected to common and is the reference for the three channels. -
Page 242: 1/2 Element Without Voltage Channel C
2 1/2 Element Without Voltage Channel C 2 1/2 Element Without Voltage Channel C Channels A and B are connected to voltage. Current probes are connected to channels Introduction A, B and C. The neutral is connected to common and is the reference for the three channels. -
Page 243: Connecting To A Potential Transformer (Pt
Follow the safety precautions listed on page E-3 when making all potential transformer Safety Precautions connections. Potential Transformers are not manufactured by Dranetz and are discussed here NOTE for informational purposes only. A potential transformer (PT), also referred to as a voltage instrument transformer,... - Page 244 Connecting to a Potential Transformer Procedure Follow these steps to connect voltage probes to a potential transformer. Step Action Turn off power to the PT. Connect the colored voltage probes to the channel inputs on the 4400 top panel. Connect the colored voltage probes to the PT’s connections in accordance with the manufacturer’s instructions.
-
Page 245: Connecting To A Current Transformer (Ct
WARNUNG Sie bitte den Anleitungen des Herstellers (siehe Stromumwandler). Die Grenzwerte des Herstellers sollten nicht überschritten werden. Current Transformers are not manufactured by Dranetz and are discussed here for NOTE informational purposes only. Current transformers, also known as instrument transformers, reduce high level Description currents to low level currents so they can be safely monitored. -
Page 246: Connecting To An Isolated Current Transformer (Iso
Low current monitoring devices made by Dranetz are called isolated current Introduction transformers or ISO boxes. The Dranetz ISO box has a 5 A current range. The following safety precautions apply to ISO box connections in addition to those Safety precautions safety precautions stated on page E-3. - Page 247 • connecting them to the secondary of CTs for metering by the 4400. • inserting them in series with the load current to measure low current values. • connecting them to a non-Dranetz clamp-on current transformer and using that CT to monitor current with the 4400.
- Page 248 Connecting to an Isolated Current Transformer, continued DO NOT exceed current limits of the ISO box. CAUTION PRECAUCION NO exceda los límites de corriente de la caja del ISO. NE PAS dépasser les limites d’intensité du transformateur ISO. ATTENTION Die aktuellen Grenzwerte für den ISO-Kasten sollten NICHT überschritten VORSICHT werden.
-
Page 249: Appendix F - Event Classification
Events characterization implemented in the 4400 adheres to the IEEE 1159 and IEC Variations as per 61000-4-30 Class A measurement standards. The range of variations as per IEEE and IEEE, IEC, and IEC standards are featured below, along with quality test measurements developed by Dranetz Dranetz. IEEE 1159 IEC 61000-4-30 Dranetz... - Page 250 Event Classification, continued Range of Variations as per IEEE, IEC, and IEEE 1159 IEC 61000-4-30 Dranetz Dranetz (deviations from IEEE (continued) 1159 only are noted) Transients Impulsive no more than one IEC classification for Peak - absolute transition in each...
- Page 251 APPENDIX G/ Event Classification Range of Variations as per IEEE, IEC, and IEEE 1159 IEC 61000-4-30 Dranetz Dranetz (deviations from IEEE (continued) 1159 only are noted) Waveform Distortion (measured as steady state values from 10/12 cycle calculations) DC Offset frequency range magnitude 0 - 0.1%...
- Page 252 1.800.561.8187 information@itm.com www. .com...
- Page 253 A P P E N D I X PG4400 Menu Structure The 4400 menu screen maps are shown in the following pages. Use the Level number Menu structure description and Heading as guide to navigate through the different menu screens. Each screen contains touch screen buttons which lead to related functions.
-
Page 254: Home Screen
LEVEL 001 Home Screen To Level 300 To Level 220 MARK301pg MARK221 To Level 200 To Level 240 MARK201 MARK241 MARK124bpg MARK151 MARK431 To Level 150 To Level 430 MARK505pg MARK100 MARK491bpg To Level 100/1 To Level 400 To Level 470 1.800.561.8187 information@itm.com www. -
Page 255: Start Menu - Automatic Setup
LEVEL 100/1 Start Menu - Automatic Setup MARK100 To Level 001 MARK123bpg MARK101a MARK104 MARK104a MARK103a 1.800.561.8187 information@itm.com www. .com... - Page 256 LEVEL 100/2(a) MARK100 Start Menu - Wizard Setup To Level 001 MARK101 MARK104 MARK105 MARK105b MARK102 MARK107 MARK108 MARK103 MARK110 To Level 108 G-4/a 1.800.561.8187 information@itm.com cont. next page www. .com...
- Page 257 LEVEL 100/2(b) Start Menu - Wizard Setup MARK109 MARK111 MARK111b MARK112b MARK112 To Level 112 MARK114pg MARK113pg MARK115pg G-4/b 1.800.561.8187 information@itm.com www. .com...
-
Page 258: Start Menu - Monitor Same Circuit G-5/A
LEVEL 100/3 MARK100 Start Menu - Monitor Same Circuit MARK121 MARK122pg MARK141pg MARK125b MARK123 MARK131b MARK126 MARK136 MARK132pg MARK127 MARK123bpg monitoring turns on upon start time (see screen below) MARK122pg MARK129 MARK124bpg 1.800.561.8187 information@itm.com www. .com... - Page 259 LEVEL 100/4 Load Setup Template from Card MARK100 MARK138pg MARK139pg LEVEL 100/5 Load Data from Card MARK100 MARK140pg 1.800.561.8187 information@itm.com www. .com...
-
Page 260: Instrument Settings
LEVEL 150 MARK151 Instrument Settings MARK152 MARK157 MARK155 MARK159 MARK156 MARK160 MARK158 1.800.561.8187 information@itm.com www. .com... -
Page 261: Circuit Type Selection
LEVEL 108 Circuit Type Selection MARK108 MARK108a See Level 100/1 MARK201 MARK108b To Level 200 MARK108c MARK241 MARK108d To Level 240 MARK108e 1.800.561.8187 information@itm.com www. .com... -
Page 262: Scope Mode
LEVEL 200 Scope Mode MARK201 MARK202 MARK205 1.800.561.8187 information@itm.com www. .com... -
Page 263: Meter Mode - Standard
LEVEL 300/1 Meter Mode - Standard MARK301PG MARK302PG MARK307PG MARK303PG MARK306PG MARK304PG MARK305PG G-10 1.800.561.8187 information@itm.com www. .com... -
Page 264: Meter Mode - Distortion
LEVEL 300/2 Meter Mode - Distortion MARK311PG MARK312PG MARK316PG MARK313PG MARK315PG MARK314PG G-11 1.800.561.8187 information@itm.com www. .com... -
Page 265: Harmonics
LEVEL 220 Harmonics MARK221 toggle between graphical switch harmonics and list of harmonics channel display MARK224 switch to V, I, or W set vertical scale display to 10%, 20%, 50%, 100%, 200%, 500% or 1000% MARK225 MARK226 toggle between Normalized and UnNormalized phase values G-12 1.800.561.8187... -
Page 266: Phasor Display
LEVEL 240 Phasor Display MARK241 run demo to show rotating phasor relative to sine wave graph of 4 Wire Wye MARK242 switch demo between Resistive, Inductive and Capacitive load effects MARK245 MARK243 Start/Stop demo plot waveforms as rotate phasors switch demo between Resistive, Inductive and Capacitive load effects MARK244 G-13... -
Page 267: Advanced Options - Transient Limit
LEVEL 112_101 MARK112 Advanced Options - MARK112_101 Transient Limit MARK112_102 MARK112_104 MARK112_105 MARK112_107 MARK112_106 G-14 1.800.561.8187 information@itm.com www. .com... -
Page 268: Advanced Options - Rms Variation Limit
MARK112 LEVEL 112_201 Advanced Options - MARK112_201 RMS Variation Limit MARK112_202 MARK112_209 MARK112_203 MARK112_204 MARK112_205 MARK112_206 G-15 1.800.561.8187 information@itm.com www. .com... -
Page 269: Advanced Options - Waveform Capture
LEVEL 112_301 Advanced Options - MARK112 Waveform Capture MARK112_207 MARK112_208 LEVEL 112_401 Advanced Options - Characterizer Options MARK112 MARK112_214 G-16 1.800.561.8187 information@itm.com www. .com... -
Page 270: Advanced Options - Journal Limit
LEVEL 112_501 MARK112 MARK112_301pg Advanced Options - Journal Limit MARK112_302b MARK112_311 MARK112_331 MARK112_312 MARK112_332 MARK112_313 MARK112_333 MARK112_314 MARK112_334 MARK112_315 MARK112_335 MARK112_316 MARK112_336 G-17 1.800.561.8187 information@itm.com www. .com... -
Page 271: Advanced Options - Journal Interval
Level 112_601 Advanced Options - Journal Interval MARK112 MARK112_401 MARK112_402 MARK112_403 MARK112_404 MARK112_405 G-18 1.800.561.8187 information@itm.com www. .com... -
Page 272: Advanced Options - En50160
LEVEL 112_701 Advanced Options - EN50160 Options MARK112b MARK112c G-19 1.800.561.8187 information@itm.com www. .com... -
Page 273: Events
MARK124bpg LEVEL 400 Events MARK505 MARK506bpg MARK505bpg MARK502b toggle between MARK506cpg waveform and rms display TO LEVEL 401 use scroll bar or up/down arrow keys to sort through event list, then press to select (highlight) desired event entry MARK507pg MARK519b MARK503 touch/drag blue zoom box to desired proportion... - Page 274 LEVEL 401 Event Options MARK500 MARK511 MARK512 press Clear to reset press Cancel to all checkboxes ignore changes and return to original plot MARK513 G-21 1.800.561.8187 information@itm.com www. .com...
- Page 275 LEVEL 430 MARK431 Trend MARK432 MARK433PG MARK436 MARK434 MARK439 MARK435 MARK437 MARK440 MARK438 MARK437b MARK441 G-22 1.800.561.8187 information@itm.com www. .com...
- Page 276 LEVEL 470(a) MARK491bpg2 Reports - EN50160 To Level 470(b) MARK471 MARK472 MARK478 MARK473 MARK479 return to Home screen MARK476 MARK480 MARK474 MARK477 MARK475 G-23/a until Harm #25 1.800.561.8187 information@itm.com www. .com...
- Page 277 LEVEL 470(b) MARK608 Reports - Status return to MARK602 MARK609 Home screen MARK610 MARK603 MARK611 MARK612 MARK614 MARK613 MARK615 G-23/b 1.800.561.8187 information@itm.com www. .com...
Need help?
Do you have a question about the PowerGuide 4400 and is the answer not in the manual?
Questions and answers