Table of Contents
Advertisement
Advertisement
Table of Contents

Related Manuals for Douwe Egberts Cafitesse Excellence Compact


Summary of Contents for Douwe Egberts Cafitesse Excellence Compact
- Page 1 Cafitesse Excellence Compact USER MANUAL ENGLISH (US)
-
Page 2: Table Of Contents
Cafitesse Excellence Compact Operator Manual Safety Part overview description Technical data Machine start up & storage Hygiene and pack handling Daily operations Brewing a cup of coffee / hot water / pot of coffee Ingredient pack replacement Filling ingredient canister... -
Page 3: Operator Manual
Safety Symbols that can be found in this manual The following symbols are used throughout this manual in combination with a statement to emphasize important and critical information. Observe the statements to ensure safety and prevent injury and product damage. Note: Gives additional information which may be helpful during the dispenser operation. - Page 4 The liquids delivered by the dispenser are hot! Avoid scalding! Keep hands and other body parts away from the dispenser while drinks are being dispensed and during the rinsing program. Do not place cups, pots, or containers filled with hot liquids on top of the dispenser. There is the risk of being scalded, in case the cups/pots/containers fall down.
-
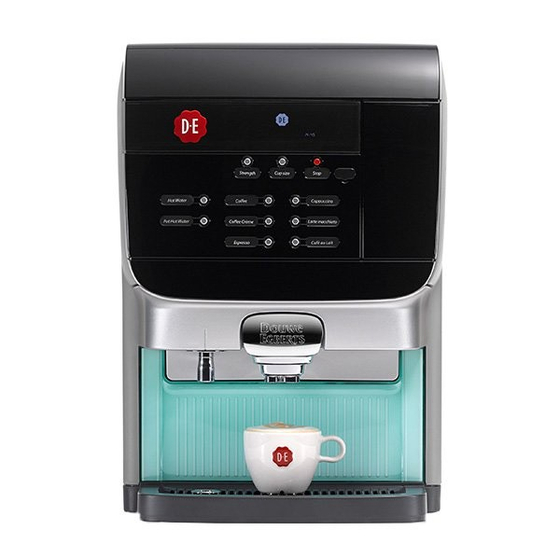
Page 5: Part Overview Description
Part Overview Description 1. Drink buttons 2. Drink outlets 3. Hot water outlet 4. Cup tray 5. Drip tray 6. Dispenser door 7. Cooling compartment 8. WJM top tray 9. Fluid treatment panel 10. Stand by/lock dispenser button 11. Ingredient canister * 12. - Page 6 18. Display 19. Pre-selection buttons 20. STOP button 21. Port for USB key 22. Operator Mode: (up) 23. Operator Mode: (down) 24. Operator Mode: (enter) 25. Operator/service mode 36. Descaling od the dispenser is needed 26. The energy saving mode is active 37.
-
Page 7: Technical Data
Technical data Dimensions (H) 560mm x (W) 380mm x (D) 406mm (H) 22 inch x (W) 15 inch x (D) 16 inch Weight empty empty 22 kg / 48.5 lbs operational 24 kg / 52.9 lbs **27 kg / 59.2 lbs (with water tank option) volume Factory setting = 125 ml / 4.2 fl oz adjustable ±10% dispensing time... -
Page 8: Machine Start Up & Storage
Dispenser start up Dispenser start up Place the machine on a flat horizontal surface that will support the weight of the machine. Connect the water inlet hose A to A. And then open the water tap Connect the power cord B to B, and insert the power plug C in the wall socket, the machine will start automaticlly and fill up and heat the boiler and cooling down the cooling compartment. -
Page 9: Hygiene And Pack Handling
Hygiene and pack handling Always observe basic and personal hygiene. Use only food-grade cleaning agents for the coffee dispenser. Clean the dispenser exterior parts with a clean, damp cloth. If your coffee machine features a water tank: refresh the water inside the tank if the machine is not often used with fresh drinking water. - Page 10 Slide the dosing tube over the blue ring on the carton. The red ring must cover the circle printed on the carton. Ensure that the dosing tube is correctly placed, i.e. over the carton box Turn the pack upside down and place inside the machine.
-
Page 11: Daily Operations
Daily operations Brewing a cup of coffee / hot water / pot of coffee Pot of Coffee Cup of coffee or hot water Place a pot under the middle (coffee) outlet and Place a cup on the drip grid under the middle outlet press the pot button. - Page 12 Drink delivery with preselections Your dispenser supports preselection options. The service technician may activate preselection options during installation. When the preselection button is pressed, the following pre-selections can be activated Strenght (mild, normal or strong drinks) Volume (small, normal or large drinks) ...
-
Page 13: Ingredient Pack Replacement
Ingredient pack replacement The display shows an icon when a pack is empty (or almost empty) at the left / right side or at both sides (in this case the right pack is empty) Please follow the instruction to replace a pack information about pack handling here Caution: Never use a frozen or damaged product pack. -
Page 14: Filling Ingredient Canister
Filling ingredient canister Only for machines fitted with instant option. 1. Open the door, rotate and keep the outlet of canister is upward. 2.Take out the canister from the dispenser. 3. Fill the canister with desired ingredient. 4. Put the canister back into the dispenser, rotate the canister outlet back so it points towards the mixer bowl, close the door and the machien is ready to use. -
Page 15: Filling Water Tank
Filling water tank Only for machines fitted with water tank option. The display shows an icon when the internal water tank is empty (A). In this state the machine will also be blocked from dispensing drinks (B), it will be unlocked once the tank is refilled. Please follow the instruction to refill the water tank. -
Page 16: Cleaning
Cleaning Navigation buttons In operator and cleaning mode, 4 UI buttons are used to enter cleaning mode and navigate the menus. A STOP = back B Drink button top right = UP C Drink button middle right = DOWN D Drink button bottom right = ENTER Cleaning procedures There are two different cleaning programs: •... - Page 17 Flush Note: You can flush the dispenser at any time by using the procedure described below. 1. Press STOP and then ENTER button, hold them pressed simultaneously for 2-3 seconds to enter the cleaning mode. 2. The display will show FLUSHING, press ENTER button to continue.
- Page 18 Cleaning 1. Press STOP and then ENTER button, hold them pressed simultaneously for 2-3 seconds to enter the cleaning mode. 2. The display will show FLUSHING, press UP or DOWN button until display shows CLEANING, press ENTER to continue. Follow the instruction on the display: REMOVE PRODUCT PACKS 3.
- Page 19 9. Separate the top lid from the base by simply lifting it straight up. 10. Place both parts of the mixing tray in a bin with food grade cleaning agent and hot water and let it soak for approximately 15 minutes. Note: Comply with the safety instructions and cleaning instructions on the cleaning agent packaging.
- Page 20 b. turn the mounting plate level anticlockwise into the correct position. c. Remove the mixer bowl by pulling it straight out. d. Use the included tool to remove the whipper. Place the tool behind the whipper (1). Gently press in the handle towards the machine until the whipper is loose (2).
- Page 21 f. Remove the steam trap filter and its cover. g. Place all the mixer parts in a bin with food grade cleaning agent and hot water and let it soak for approximately 15 minutes. Note: Comply with the safety instructions and cleaning instructions on the cleaning agent packaging.
- Page 22 j. Turn the mounting plate clockwise until the holes are in position 9 and 3. Align the guide hooks on the mixer bowl and then push it all the way into position. Finally lock the mixer bowl by turning the mounting plate clockwise until complete stop.
- Page 23 12. Display will show: REINSTALL WATER TREATMENT PANEL 13. Display will now show: PLACE BACK PRODUCT PACKS Place the product packs back if they have not passed the expiry date. Else, place new product packs. 14. When both packs have been placed the display will automatically continue and show: PLACE BIN MIN 1L PRESS ENTER TO CONFIRM 15.
- Page 24 2. Use your fingers to unhook the rib out of it's slot on the back side, press it down about 1 cm. (1) Unhook the front by pressing out the walls around the outlets. (2) 3. Once both back and front is unhooked you can simply pull the cover straight up until it's removed.
- Page 25 6. Once the tubes are in position, slide back the cover all the way down until the hooks "CLICKS" in at both front and back side. Check the tips of the outlet tubes so they are aligned properly and not deformed in any way. 7.
- Page 26 2. Rinse the air filter and cover with warm water to remove any accumulated dust. Squeeze excess water out of the foam air filter and dry the cover with a towel to prevent water getting into the air inlet. 3. Replace the air filter and ventilation cover and reinstall the fixing screw.
- Page 27 3. Rinse the water tank thoroughly with clean water, 20- 40°C / 68-104°F. 4. Refill the water tank to the MAX level with fresh, clean water and replace it in the dispenser.
-
Page 28: User Programming
User programming Starting the operator mode Remove the cover and insert the supplied operator USB key. This immediately starts the operator mode. The first menu item (COUNTERS) is displayed. The following menus are available: • COUNTERS - read counters • VOLUME - change cup volume •... - Page 29 COUNTERS In the COUNTERS menu, you have various possibilities to read out the drink counters: • Total number of drinks dispensed • Subtotals per drink button • Subtotals VOLUME per drink button • Total number of HOT drinks Drink counters 1.
- Page 30 STRENGTH In the STRENGTH menu, you can change the drink strenth for all available drinks at once in the range of +10% to -10%. 1. Select the VOLUME menu by using ↑ or ↓ and press ← to access it. The following message appears on the display: Strength + 8 %...
- Page 31 Set days for "Cleaning" 1. Use ↑ or ↓ to select the CLEAN submenu. The icon indicates the active weekday(s) for cleaning: SUN MON TUE WED THU FRI SAT CLEAN 2. Press ← to enter the submenu. The icon is displayed, it is positioned under SUN (Sunday): SUN MON TUE WED THU FRI SAT CL.
- Page 32 Enable/disable ECO mode 1. Use ↑ or ↓ to select the ECO ENABLE/DISABLE submenu and press ← to access it. The status is flashing on the display. 2. Use ↑ or ↓ to select ENABLED or DISABLED. 3. Press ← to confirm the selected status. 4.
- Page 33 TELEPHONE# You can set the telephone numbers of operator and service in this menu. You can also select whether the numbers should be displayed in case: • cleaning is required (operator) • a product pack is empty (operator) • a malfunction is detected (service) Select the TELEPHONE # menu by using ↑...
-
Page 34: Troubleshooting
Troubleshooting You may encounter the following symbols (and messages) in the display. Symbol Cause Action Replace the right ingredient pack Empty ingredient pack (right hand side) Replace the left ingredient pack Empty ingredient pack (left hand side) 1. Replace the empty product packs. The product packs 2. - Page 35 Press the standby/Clear-Error The drink delivery is button again to unlock the blocked because the dispenser. Standby/Clear-Error button on the dispenser was pressed. Start the cleaning program on the The dispenser must same day.Call the operator if the be cleaned.
- Page 36 The ECO mode will end The drink delivery is automatically at the set time. blocked because the (option) Press a drink button. The energy saving mode boiler will start to heat up, once is switched on. normal temperature is reached you may dispense a drink.
- Page 37 Check if the mixing tray is in Mixing tray not correct place or missing. detected Contact service if the error remains. Remove the drip tray and empty Drip tray is full of it of water. water Remove the internal water tank Internal water tank is and fill it with fresh tap water, empty...
Need help?
Do you have a question about the Cafitesse Excellence Compact and is the answer not in the manual?
Questions and answers