Table of Contents
Advertisement
Quick Links
Advertisement
Table of Contents

Related Manuals for Siemens VS04G188GB


Summary of Contents for Siemens VS04G188GB
- Page 1 Instructions for use VS04G188GB...
-
Page 2: Table Of Contents
Your vacuum cleaner ..........3 Intended use . -
Page 3: Your Vacuum Cleaner
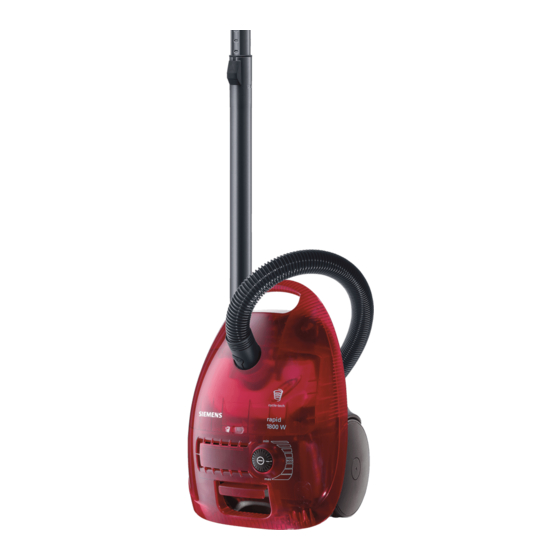
Your vacuum cleaner 12 11 1 Adjustable floor tool* 10 Parking aid 2 Suction pipe * 11 Hepa filter 3 Telescopic tube * 12 Storage aid (on underside of unit) 4 Sliding switch/sliding sleeve * 13 Dust collector 5 Handle * 14 Cover 6 Suction hose 15 Carrying handle... -
Page 4: Intended Use
Please keep this instruction manual Safety information When passing the vacuum cleaner on to a third party, please also pass on this This vacuum cleaner complies with the instruction manual. recognised rules of technology and the relevant safety regulations. We confirm that it complies with the following Intended use European directives: 89/336/EEC... -
Page 5: Disposal Information
To prevent you from being exposed to Disposal information risks, vacuum cleaner repairs and the fitting of replacement parts must only Packaging be carried out by the authorised after- The packaging is designed to protect sales service. the vacuum cleaner from being The vacuum cleaner should be damaged during transport. -
Page 6: Getting Your Vacuum Cleaner Ready
Getting your vacuum cleaner ready Before using for the first time Push the handle onto the flexible tube and until it engages. CLICK! * Depending on model equipment Push the flexible tube adapter into the opening on the vacuum cleaner until it engages. Connect the handle and suction hose/telescopic tube together. - Page 7 Getting your vacuum cleaner ready Connect the suction pipes together. * Depending on model equipment Unlock the telescopic tube to adjust its length by moving the sliding sleeve in the direction of the arrow. * Depending on model equipment Holding the power cord by the plug, pull out the required length and plug the plug into the mains socket.
-
Page 8: Vacuuming
Getting your vacuum cleaner ready Adjust the suction by turning the on/off button in the direction of the arrow. Vacuuming Adjusting the floor tool: Rugs and carpets => hard floors => Remove upholstery nozzle and crevice nozzle from the accessories holder and separate. - Page 9 Vacuuming Attach the nozzles to the suction pipe or handle as required: Upholstery nozzle for vacuuming upholstered furniture, curtains, etc. Crevice nozzle for vacuuming crevices and corners, etc. (only attaches to the handle). After use, attach the two nozzles together and clip into the accessories holder.
- Page 10 Vacuuming You can use the parking aid on the back of the vacuum cleaner if you wish to stop vacuuming for a short time. Slide the catch on the floor tool into the groove at the rear of the appliance. The appliance can also be carried using the two handles when vacuuming steps, for example.
-
Page 11: When The Work Is Done
When the work is done Unplug the vacuum cleaner. Tug the power cord briefly and let go. The cable then rewinds automatically. To store or transport the vacuum cleaner, use the parking aid on the underside of the vacuum cleaner. Stand the vacuum cleaner upright. -
Page 12: Using The Dust Collector
Using the dust collector Set the power setting to maximum for the best results when vacuuming. We recommend that you reduce the setting only when vacuuming very delicate materials. Attention: The dust bag change indicator only functions correctly in conjunction with a dust bag. - Page 13 Using the dust collector If the base is very dirty (thick dirt), clean this first, e.g. by vacuuming it with the crevice nozzle. To do so, be sure to insert a dust bag in the vacuum cleaner. Close the base.
-
Page 14: Cleaning The Permanent Filters And Microfilters
Using the dust collector Refit the dust collector to the vacuum cleaner, push in the carrying handle and close the lid. Attention: After repeated vacuuming, the dust collector can become scratched on the inside and appear milky. This does not, however, affect the performance of the vacuum cleaner in any way, i.e. -
Page 15: Blockages
Cleaning the permanent filters and microfilters Remove the microfilter and permanent filter and wash them by hand. Attention: Both the permanent filter and the white fleece filter must be allowed to dry for 24 hours after handwashing, before being refitted. Blockages Removing a blockage in the dust collector. - Page 16 Blockages Loosen the blockage, e.g. with a screwdriver, and tap or vacuum it out. Be sure to fit a dust bag in the vacuum cleaner if you are going to vacuum it out. Put the dust collector lid back on and push in the direction of the arrow until you hear the 4 latches lock into place.
-
Page 17: Using Dust Bags
Using dust bags You have purchased a floor vacuum cleaner which can be used to vacuum up every kind of dry dirt, even using a dust bag. Part number on the spare filter packaging: VZ52AFG1 Open the vacuum cleaner lid. Remove the dust collector and insert a dust bag. -
Page 18: Replacing The Dust Bag
Replacing the dust bag If the dust bag change indicator is completely yellow when the floor tool is lifted from the floor and the highest suction power is selected, the dust bag must be changed, even though it may not yet be full. In this case, a bag change is necessary due to the type of material being collected. -
Page 19: Looking After Your Vacuum Cleaner
Replacing the dust bag Replacing the Hepa filter If your vacuum cleaner is equipped with a Hepa filter, this should be replaced once a year. Open the vacuum cleaner lid. Remove the Hepa filter from the guide. Insert the new Hepa filter into the vacuum cleaner and close the lid. - Page 20 Special accessories Replacement filter pack VZ52AFG1 Type G Contents: 5 dust bags with closure 1 micro-hygiene filter Textile filters (permanent filters) VZ 10TFG Reusable bag with Velcro(R) fastener. HEPA filter VZ 54000 Additional filter for cleaner exhaust air. Recommended for allergy sufferers. Replace once a year.
-
Page 21: Optional Accessories / Replacement Parts
Special accessories ACCUMATIC brush VE 27A00 ® All in one brushing and vacuuming of short-pile pile rugs and carpets and all hard floor coverings. Plumps and cares for carpet pile. Especially suitable for pick- ing up pet hair. No separate electrical connection is needed. Hard-floor brush VZ122HD For vacuuming hard floors (parquet flooring, tiles, ter- racotta, etc.) - Page 22 Sinimäentie 8, PL 66 Cemal Sahir Sok. No. 26-28 02630 Espoo NL Netherlands 80470 Mecidiyeköy - Istanbul +358 (9) 52595130 Siemens Nederland N.V. +90 212 275 47 75 +358 (9) 52595131 Afdeling Consumentenprodukten +90 212 275 55 04 www.siemens-kodinkoneet.com Postbus 16068, 2500 BB d.Haag www.siemensevaletleri.com...
- Page 23 Conditions of guarantee For this appliance the guarantee conditions as set out by our representatives in the country of sale apply. Details regarding same may be obtained from the dealer from whom the appliance was purchased. For claims under guarantee the sales receipt must be produced.
Need help?
Do you have a question about the VS04G188GB and is the answer not in the manual?
Questions and answers