Table of Contents
Advertisement
Quick Links
Installation and Operation Manual
SPAR FOOD MACHINERY MFG, CO., LTD.
Instruction Manual for SP-502A Desktop Mixer
NO. 145, 11
Mixer
METOS SP-502A-B
SPAR FOOD MACHINERY MFG. CO., LTD.
th
Industry Rd. Ta Li City, Taichung Hsien, Taiwan, 412 R.O.C.
Tel:(886)4‐2491‐7585 Fax:(886)4‐2491‐7565
http://www.sparmixers.com
e‐mail:spar@tcts.seed.net.tw
10.10.2013
4025000
CONTENTS
Serial
#:________________
Advertisement
Table of Contents

Related Manuals for Metos SP-502A-B


Summary of Contents for Metos SP-502A-B
-
Page 1: Installation And Operation Manual
Mixer METOS SP-502A-B Installation and Operation Manual Serial #:________________ SPAR FOOD MACHINERY MFG, CO., LTD. Instruction Manual for SP-502A Desktop Mixer SPAR FOOD MACHINERY MFG. CO., LTD. NO. 145, 11 Industry Rd. Ta Li City, Taichung Hsien, Taiwan, 412 R.O.C. Tel:(886)4‐2491‐7585 Fax:(886)4‐2491‐7565 http://www.sparmixers.com e‐mail:spar@tcts.seed.net.tw 10.10.2013 4025000 CONTENTS ... - Page 2 CAUTION Read before you operate the machine It is important to read this manual and following the instructions before operate the machines. This mixer is designed as a safe and efficient food processing product as long as the machine is used in accordance with the instructions in this manual and is properly maintained. User has taken following precautions in order to operate the mixer safely. All operators should be at least 18 years old and are adequately trained and supervised. Also, have fully read and understood this manual. Owner should not let customer, visitor or other unauthorized people come in contact with this machine. Do not wear loose clothes or ring while operating, and keep hands, hair and clothing away the moving parts. NEVER use an extension cord to connect electrical power. Make sure the safety guard is installed and bowl is lifted to right position before operating. NEVER reach into the bowl when the mixer is running. NEVER place your hand or any kitchen utensil in the bowl whilst the mixer is in operation. When mixing product always follow the recommends agitator and speed setting according to the capacity chart. STOP the mixer before removing or installing attachments into the hub. NEVER put your hand and finger into the feed chute when using any mixer attachment. ...
-
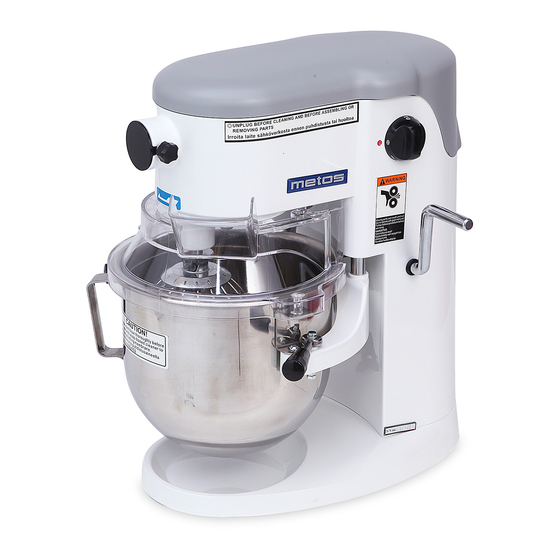
Page 3: Overall View Of The Mixer
Overall View of the Mixer (A) On/Off/Speed Selector Button (B) Bowl Lift Handle (C) Bowl Cradle (D) Hub Attachment (E) Planetary Shaft (F) Bowl Guard (G) Stainless Steel Bowl SPECIFICATION Model SP-502A Hub Attachment 60-308 (rpm) Bowl Size 5 Liters Noise Value 77.1 dB(A) Dimensions (cm) 38 x 31 x 45.5 Motor 750 W (LxWxH) 47 x 37 x 52 carton Gross 16 kg 200/240V 50/60Hz 1PH... -
Page 4: Installation Instructions
Installation Instructions INSTALLATION ‐ The machine is supplied factory lubricated and ready to run. It should be positioned on any solid, level and non‐skid work surface that is nonflammable. Install in work area with adequate light and space. ‐ You may place the mixer on bench which is capable of supporting a load of 25kg. For operation stability, please punch four holes on the table and fix SP‐502A onto the table by four screws. Please see Figure 1. ‐ DO NOT attempt to lift the mixer alone. This machine is 15 kg. The transportation should require two people, please see Figure 2 ‐ Clean the mixer before use. It is normal for the factory to apply a generous amount of grease in and on the machine before initial use. ‐ During the transportation or fitting, please do not lean over 35 degree to avoid the gear oil Figure 2 leaking from the gear oil container. Figure 1 ELECTRICAL CONNECTION CAUTION: NEVER USE EXTENSION CORD. Low amp supply could damage the mixer or cause a fire. Before connecting this machine to the electrical supply, check that the details on the rating plate (located ... -
Page 5: Before Using The Mixer
Installation Instructions ‐ The minimum requirement for all electrical equipment is correct operation between air temperature of +5℃ and +40℃. ‐ Electrical equipment is capable of operating correctly when the relative humidity does not exceeding 95% at a maximum temperature of +40℃. ‐ Electrical equipment is capable of operating correctly at altitude up to 1000m. ‐ Electrical equipment is designed to withstand to protected against the effects of transportation, and storage temperature within a range of ‐25℃ to +55℃ and for short periods not exceeding 24h at up to +70℃. Operating Instructions BEFORE USING THE MIXER Before using the mixer, ensure that all users are familiar with the correct operation of the machine. In particular, care should be taken to ensure that the bowl and mixing tools are correctly fitted and that the bowl guard is in position prior to starting the machine. SAFETY AT WORK ‐ NEVER place your hand or any kitchen utensil in the bowl whilst the mixer is in operation. ‐ Keep hands, hair and clothing away from moving parts. ‐ Isolate the machine from the electrical supply by removing the plug from the socket before cleaning, servicing or adjusting any parts or attachments. ‐ Do not use the machine with any cover or guard removed. ‐ Certain operator notice advising about the safe use of this mixer is attached to the machine. OFFICE, SHOPS AND RAILWAY PREMISES ACT, 1963 The above Act requires that this machine and attachments shall be operated only by a properly ... -
Page 6: Tool Selection
Operating Instructions TOOL SELECTION Beater: Firm mixes such as light pastry, cakes biscuits, icings The beater, whisk and spiral dough hook are tools fillings and mashed vegetables. for the work implied by their names. Do not use the beater for dough making or the whisk for anything other Spiral Dough Hook: Heavy mixes than whisking, aerating or mixing light mixtures. such as dough, pie pastry. . The Table 1 shows the typical uses for each of the tools. Whisk: Light mixes such as whipped cream, mayonnaise, NOTE: Always wash agitator with mild soap and apply egg whites, pancakes and light quantity of mineral oil to planetary shaft after soufflés. cleaning. Pastry knife FITTING THE BOWL Table 1 With the bowl cradle lowered, place the chosen mixing tool in the bowl and position the bowl on the cradle. There are three location points when fitting the bowl. Please refer to Figure 3: (1) The locking pin at the rear of the bowl should locate in the hole of the cradle. (2) The two holes in the bowl handles must engage on the pins located on ... -
Page 7: Speed Selection
Operating Instructions CONTROLS A: Speed Selector Knob B: Position 0: OFF C: Position 1‐2: Low speeds (Spiral Hook) D: Position 4‐7: Medium speeds (Beater) E: Position 7‐10: High speeds (Whip) CAPACITY Please refer to Page 10. The table shows the recommended capacities of finished weights of regular mixes. Although the machine may be capable of mixing larger quantities, it will lead to excessive and premature wear and possible failure. Overloading also results in lengthy processes and unsatisfactory results. ℃ NOTE: Reduce batch size by 10%, if chilled flour, water below 20 , ice, or high gluten flour is being used. NOTE: Overloading or not following the chart will damage the mixer and void the warranty. SPEED SELECTION Select the appropriate speed setting by rotating the speed selector knob clockwise starting from 0. To increase mixer speed, continue turning the selector button clockwise to desired speed. Recommended speed while mixing: Speed Agitator Product Type/Ingredients ... - Page 8 Operating Instructions THERMAL OVERLOAD PROTECTION (Automatically Reset) The thermal overload protection (circuit breaker) will shut off and stop the machine automatically. If this occurs, please turn the ON/OFF speed selector button to 0‐OFF position and reduce the size of batch. After waiting 1‐2 minutes machine shut off, turn the ON/OFF speed selector or button to ON position. The circuit breaker may be different base on mixer’s voltage.* Figure 6 shows the position of circuit breaker. Figure 6 NOTE: *Circuit breaker must be manually reseted. For heavier loads, the mixer should not run longer than 15 minutes without pausing for a cool down period of at last 15 minutes or more before resuming mixer. For lighter loads the mixer should not run longer than 30 minutes without pausing for a cool down period of at last 30 minutes or more before resuming mixer. ATTACHMENTS NOTE: Attachments are optional. The ranges of attachments that can be operated from the Attachment Hub are listed below. When using an attachment, lubricate the Drive Stud (D) using a food quality grease or oil. To fix to the mixer refer to Figure 8. Release the Thumbscrew (G) and slide the shaft of the attachment into the hub ensuring that the Drive Stud (D) engages in the socket within the hub. Rotate the attachment to line up the Location Peg (E) with its mating hole in the hub and push firmly home. Tighten thumbscrew to secure. CAUTION: Only fit attachments when the mixer is stationary and never when it is operating. Do not use attachments when mixing. Figure 8 NOTE: Make sure the bowl is up and the bowl guard is installed, otherwise the mixer will not function. ...
-
Page 9: Cleaning Instructions
Cleaning Instructions CARE OF YOUR MIXER CAUTION: ALWAYS DISCONNECT OR UNPLUG THE ELECTRICAL POWER FROM THE MIXER BEFORE CLEANING. The mixer is designed for simple maintenance carried out by operators. It may be necessary from time to time to apply a little Vaseline and oil to the rods on which the bowl cradle slides. If so, use a little food quality lubricant, ensuring that there is no excess oil that could contaminate the food mix. Clean the mixer thoroughly after use. After isolating the machine from the electricity supply, the body should be wiped down with a damp cloth. Do not spray the machine with or immerse it in water. Do not forget to clean the rear of the machine and do not allow the rear vents to become blocked as this may result in overheating. Pay particular attention to the bowl pins and any surrounding areas of the cradle to prevent the accumulation of mix, as this could prevent correct location of the bowl. For the same reason ensure that the beater shaft and each of the sockets on the tools are cleaned thoroughly. The bowl and tools should be washed in hot soapy water, rinsed and dried before being put into storage. Do not wash the agitator s in a dishwasher, as the polished finish will be adversely affected by the dishwashing chemicals. Maintenance ‐ It is recommended that any servicing or maintenance work must be carried out by a trained technician or electrician. CAUTION: ‐ ALWAYS DISCONNECT OR UNPLUG THE ELECTRICAL POWER FROM THE MIXER BEFORE DOING MAINTENANCE. Regular maintenance is necessary on all machines if they are to remain in good working condition. It is strongly recommended that all maintenance must be carried out by trained technicians from an appointed distributor. ON A REGULAR BASIS Clean the machine thoroughly after use and lubricate the rods with Vaseline or lubrication oil which the bowl cradle slides. After cleaning the beater shaft, please wipe and lightly lubricate the beater shaft with Vaseline to prevent rusting. (SEE CARE ON YOUR MIXER) ON AN ANNUAL BASIS* ... -
Page 10: Troubleshooting
Troubleshooting FAULT FINDING FAULT CHECK POSSIBLE REASON AND ACTION REQUIRED No power to mixer Check plug socket Mixer not plugged into a live socket or not switched on Check wiring in plug Plug incorrectly wired – rewire correctly Check fuse in plug Possible faulty fuse – replace fuse Check or change cable Cable damaged or split – replace cable Check microswitch Limit switch damaged or faulty – replace switch Check circuit breaker Circuit breaker shut off or constantly short – reset over load or short or replace the circuit breaker (automatically reset). Mixer falls to operate 1. Check bowl guard/lift Machine will not operate with guards open Check transmission belt Belt damaged or broken‐replace belt Check gear change lever Machine will not operate if out of gear‐put in gear Mixer becomes noisy Check bowl and tools Ensure that bowl and tool are correctly seated. Check work surface Uneven surfaces create excessive resonance. Check bearing for wear Worn bearings – replace bearings Check gearbox Damaged or faulty gearbox – replace gearbox Check planetary unit Reapply high‐pressure grease thought grease ... -
Page 11: Capacity Chart Table
Capacity Chart Table Maximum Product Agitator Purpose Butter Liquids Sugar Eggs Speed Capacity Flour Egg Whites Whip 10 0.35 ltr 100% Whipped Cream Whip 10 2 ltr 100% Batter Beater 8 2 ltr 38% 5% 49% 8% ...
Need help?
Do you have a question about the SP-502A-B and is the answer not in the manual?
Questions and answers