
Related Manuals for Sun Oracle BLADE T6320


Summary of Contents for Sun Oracle BLADE T6320
- Page 1 Sun Blade T6320 Server Module Installation Guide Part No. 820-2384-11 April 2010, Revision A...
- Page 2 Copyright © 2007, 2010, Oracle and/or its affiliates. All rights reserved. This software and related documentation are provided under a license agreement containing restrictions on use and disclosure and are protected by intellectual property laws. Except as expressly permitted in your license agreement or allowed by law, you may not use, copy, reproduce, translate, broadcast, modify, license, transmit, distribute, exhibit, perform, publish, or display any part, in any form, or by any means.
- Page 3 Ce logiciel ou matériel et la documentation qui l’accompagne peuvent fournir des informations ou des liens donnant accès à des contenus, des produits et des services émanant de tiers. Oracle Corporation et ses affiliés déclinent toute responsabilité ou garantie expresse quant aux contenus, produits ou services émanant de tiers.
-
Page 5: Table Of Contents
Physical Specifications 2 Environmental Requirements 2 Front Panel Features 3 Preinstalled Software 4 Managing Your Sun Blade T6320 Server Module With ILOM 4 Service Processors 4 Chassis Management Module 5 ILOM on the Server Module SP and CMM 5 Establishing Communication With ILOM 5... - Page 6 To Power on Main Power for All Server Components 27 ▼ To Shut Down Main Power Mode Installing the Solaris Operating System on a Hard Drive 28 JumpStart Server Installation 28 JumpStart Server Configuration 29 Sun Blade T6320 Server Module Installation Guide • April 2010...
-
Page 7: Preface
Before You Read This Document This document is intended for experienced system administrators. Before installing a Sun Blade T6320 server module, you must have thorough knowledge of the topics discussed in these documents: Sun Blade T6320 Server Module Product Notes ■... -
Page 8: Related Documentation
Related Documentation Documentation for the Sun Blade T6320 server module is available at: http://docs.sun.com/app/docs/prod/blade.t6320 #hic Additional Sun documentation is available at: http://docs.sun.com Application Title Part Number Late-breaking news Sun Blade T6320 G2 and Sun Blade 820-2383 T6320 Server Modules Product Notes... -
Page 9: Documentation Feedback
Training http://www.sun.com/training/ Documentation Feedback Submit comments about this document by clicking the Feedback[+] link at http://docs.sun.com. Include the title and part number of your document with your feedback: Sun Blade T6320 Server Module Installation Guide, part number 820-2384-11. Preface... - Page 10 Sun Blade T6320 Server Module Installation Guide • April 2010...
-
Page 11: Before You Begin The Installation
C H A P T E R Before You Begin the Installation This chapter includes general information to help you become familiar with the hardware and software features of the Sun Blade T6320 server module from Oracle ® This chapter contains the following topics: “Hardware Overview”... -
Page 12: Physical Specifications
Physical Specifications The Sun Blade T6320 server module is approximately 12.9 x 20.1 x 1.7 inches in a 1U form factor. The server module plugs in to a Sun Blade modular system, or chassis, which provides power to each module, as well as cooling through fans. In addition to the main power, the chassis provides AUX power to each module to power the local FRU ID EEPROM. -
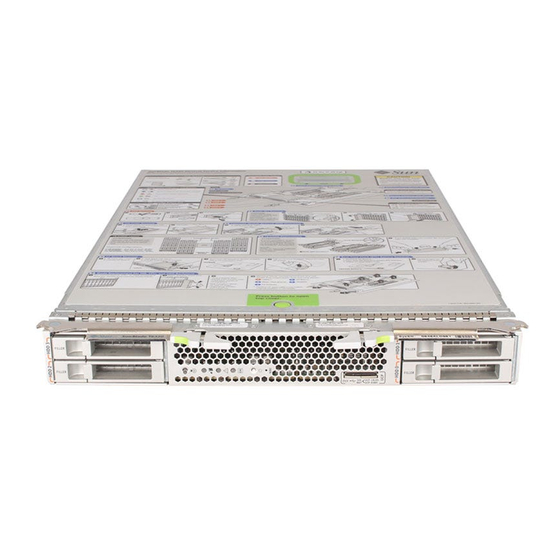
Page 13: Front Panel Features
Front Panel Features illustrates the front panel, with descriptions of its features. FIGURE 1-1 Sun Blade T6320 Server Module Front Panel FIGURE 1-1 White – Locator LED (Press to reset the LED.) Blue – Ready to Remove LED Amber – Service Action Required LED Green –... -
Page 14: Preinstalled Software
Preinstalled Software You can order the Sun Blade T6320 server module with one or more hard disk drives assembled to order. In that case, Solaris Operating System software and other software is preinstalled on the root hard drive. For information about preinstalled software, refer to this site: http://www.sun.com/software/preinstall... -
Page 15: Chassis Management Module
(CMM). CMM ILOM is a modified version of ILOM firmware that is preinstalled on the CMM. Before installing the Sun Blade T6320 server module, you should have already installed and configured your Sun Blade modular system, including the CMM ILOM. -
Page 16: Attaching A Serial Console To The Server Module
(EMC) compliance and are not to be used during normal system operation. You can order an optional dongle cable with the Sun Blade T6320 server module, or you can use the dongle cable that shipped with your Sun Blade modular system. - Page 17 Dongle Cable Connectors FIGURE 1-2 Four-connector dongle cable (UCP-4) USB 2.0 (two connectors) DB-9 serial, male (TTYA) VGA 15-pin, female RJ-45 (Do not use this connector) Three-connector dongle cable (UCP-3) USB 2.0 (two connectors) RJ-45 serial VGA 15-pin, female Chapter 1 Before You Begin the Installation...
- Page 18 Sun Blade T6320 Server Module Installation Guide • April 2010...
-
Page 19: Installation And Configuration
C H A P T E R Installation and Configuration After you have familiarized yourself with the features and components of the Sun Blade T6320 server module, use the instructions in this chapter to install the server into the chassis. This chapter contains the following topics: “Handling the Server Module”... -
Page 20: Handling The Server Module
Electronic equipment is susceptible to damage by static electricity. Use a grounded antistatic wriststrap, footstrap, or equivalent safety equipment to prevent electrostatic damage (ESD) when you install the Sun Blade T6320 server module. Caution – To protect electronic components from electrostatic damage, which can... - Page 21 6. Position the server module vertically so that the ejectors are on the right. shows the server module being inserted into the chassis. See box 1. FIGURE 2-1 Sun Blade T6320 Inserting the Server Module Into the Sun Blade Modular...
-
Page 22: Setting Up The Ilom Software
Before you continue installing the server module, you must ensure that you can connect to the SP. Connection Overview shows the connections to the server module SP and ILOM software. FIGURE 2-2 CMM and Server Module Connection Options FIGURE 2-2 Sun Blade T6320 Server Module Installation Guide • April 2010... -
Page 23: Connecting To The Server Module Ilom
Connecting to the Server Module ILOM This section describes how to connect to the server module SP using one of the methods listed below and described in the corresponding sections: Connect to the CMM through the Ethernet port. This method supports access ■... - Page 24 The web interface is displayed. 4. To log out of the web interface, click the Log Out button at the top right of the screen. The log out screen is displayed. Sun Blade T6320 Server Module Installation Guide • April 2010...
-
Page 25: Connecting To The Server Module Sp Through The Chassis Cmm Serial Connector
Connecting to the Server Module SP Through the Chassis CMM Serial Connector You can access the CMM ILOM by connecting a terminal or a terminal emulator to the RJ-45 serial port on the chassis. Once the server module is installed in the modular system chassis, you can connect to the server module SP by using the CLI on the CMM ILOM software. - Page 26 8. Enter y to continue or n to cancel. After you enter y, the ILOM software running on the server module SP prompts for the password specific to that server module SP. Sun Blade T6320 Server Module Installation Guide • April 2010...
-
Page 27: Connecting To The Server Module Sp Using A Dongle Cable
Note – The CMM ILOM logs on to the server module ILOM using the user name in the user target under /CH/BLn/SP/cli (where n is the server module number). 9. Enter the password when prompted. The default password is changeme. The server module ILOM prompt is displayed. -
Page 28: Configuring And Viewing The Ip Address For A Server Module Sp
Through the CMM” on page By connecting directly to the T6320 server module SP. ■ Refer to “Configuring and Viewing the IP Address for a Server Module SP Through the UCP” on page Sun Blade T6320 Server Module Installation Guide • April 2010... -
Page 29: Configuring And Viewing The Ip Address For A Server Module Sp Through The Cmm
Configuring and Viewing the IP Address for a Server Module SP Through the CMM You can attach to the CMM on the modular system chassis through a serial port or an Ethernet port: CMM serial port – You can attach a terminal device. Refer to “Connecting to the ■... -
Page 30: To View Or Configure The Ip Address For The Server Module Sp Using Static Ip Addresses - Through The Cmm
To see only the IP address, type: ■ -> show /CH/BLn/SP/network ipaddress 3. Navigate to /CH/BLn/SP/network by typing the following command: -> cd /CH/BLn/SP/network 4. Type the following commands: To configure a static Ethernet configuration: ■ Sun Blade T6320 Server Module Installation Guide • April 2010... - Page 31 -> set pendingipdiscovery=static -> set pendingipaddress=xxx.xxx.xx.xx -> set pendingipnetmask=yyy.yyy.yyy.y -> set pendingipgateway=zzz.zzz.zz.zzz -> set commitpending=true Where xxx.xxx.xx.xx, yyy.yyy.yyy.y and zzz.zzz.zz.zzz are the IP address, netmask, and gateway for your ILOM and network configuration. To determine these addresses, contact your system administrator. To revert to a dynamic Ethernet configuration: ■...
- Page 32 = (Cannot show property) ipaddress = 10.6.42.191 ipdiscovery = dhcp ipgateway = 10.6.42.1 ipnetmask = 255.255.255.0 macaddress = 00:14:4F:3A:26:74 pendingipaddress = 10.6.42.191 pendingipdiscovery = dhcp pendingipgateway = 10.6.42.1 pendingipnetmask = 255.255.255.0 Commands: show Sun Blade T6320 Server Module Installation Guide • April 2010...
-
Page 33: Configuring And Viewing The Ip Address For A Server Module Sp Through The Ucp
Configuring and Viewing the IP Address for a Server Module SP Through the UCP You can connect to the server module SP by one of these methods: Through the front-panel universal connector port (UCP) using a dongle cable. ■ Through the SP Ethernet port. You must already know the IP address to use this ■... -
Page 34: To View Or Configure The Ip Address For The Server Module Sp Using Static Ip Addresses - Through The Ucp
CMM ILOM. If you connected to the ILOM using SSH, you will be disconnected ■ automatically, because you logged in under a different IP address. Sun Blade T6320 Server Module Installation Guide • April 2010... -
Page 35: Changing The Ilom Password And Powering On The Host
Changing the ILOM Password and Powering On the Host ▼ To Change the ILOM Password 1. At the initial login prompt on the server module SP, you logged in using the default administrator user name and password. hostname login: root Password: changeme 2. -
Page 36: Powering On And Powering Off The Server Module
SP is working. See for the LED location. FIGURE 1-1 Note – At this point, standby power is supplied only to the Graphics Redirect and Service Processor board and power supply fans. Sun Blade T6320 Server Module Installation Guide • April 2010... -
Page 37: To Power On Main Power For All Server Components
2. Continue with initial software setup tasks. Refer to “Setting Up the ILOM Software” on page ▼ To Power on Main Power for All Server Components 1. Verify that standby power is on. In standby power mode, the OK LED on the front panel flashes. See FIGURE 1-1 2. -
Page 38: Installing The Solaris Operating System On A Hard Drive
Installing the Solaris Operating System on a Hard Drive The basic configuration of Oracle’s Sun Blade T6320 server module ships with or without hard drives. If you ordered an optional hard drive with preinstalled software, refer to “Preinstalled Software” on page... -
Page 39: Jumpstart Server Configuration
JumpStart Server Configuration Specific instructions on how to configure a JumpStart server are out of the scope of this document. However, configuring the JumpStart server consists of the following tasks: 1. Load the Solaris OS. 2. Create the configuration server. 3. - Page 40 Sun Blade T6320 Server Module Installation Guide • April 2010...
Need help?
Do you have a question about the BLADE T6320 and is the answer not in the manual?
Questions and answers