dji Inspire 1 User Manual
Hide thumbs
Also See for Inspire 1:
- User manual (65 pages) ,
- Operation manual (51 pages) ,
- Quick start manual (11 pages)
Table of Contents
Advertisement
Quick Links
Download this manual
See also:
Operating Manual
Advertisement
Table of Contents

Related Manuals for dji Inspire 1


Summary of Contents for dji Inspire 1
- Page 1 INSPIRE User Manual V1.0 2016.03...
- Page 2 Reader to read this document, press Ctrl+F on Windows or Command+F on Mac to begin a search. Navigating to a Topic View a complete list of topics in the table of contents. Click on a topic to navigate to that section. Printing this Document This document supports high resolution printing. © 2016 DJI. All Rights Reserved.
-
Page 3: Using This Manual
Important Hints and Tips Reference Before Flight The following tutorials and manuals have been produced to ensure you to make full use of your Inspire 1 RAW. 1. In the Box 2. Safety Guidelines and Disclaimer 3. Quick Start Guide 4. -
Page 4: Table Of Contents
Contents Using this manual Legends Before Flight Watch the Video Tutorials Download the DJI GO app Product Profile Introduction Feature Highlights Assemble the Aircraft Installing the Gimbal and Camera Aircraft Diagram Remote Controller Diagram Aircraft Flight Controller Flight Mode Flight Status Indicator... - Page 5 Flight Flight Environment Requirements Flight Limits and Flight Restriction Area Preflight Checklist Calibrating the Compass Auto Take-off and Auto Landing Starting/Stopping the Motors Flight Test Appendix Specifications Intelligent Flight How to Update Firmware FCC Compliance © 2016 DJI. All Rights Reserved.
-
Page 6: Product Profile
Product Profile This chapter describes the features of Inspire 1 RAW, instructs you to assemble the aircraft and explains the components on the aircraft and remote controllers. © 2016 DJI. All Rights Reserved. -
Page 7: Introduction
Product Profile Introduction The Inspire 1 RAW is brand new quadcopter capable of capturing 4K video and transmitting an HD video signal (up to 5 km) to multiple devices straight out of the box. Equipped with retractable landing gear, it can capture an unobstructed 360 degree view from its camera. -
Page 8: Installing The Gimbal And Camera
(e.g. carpet) before switching between the travel modes and landing mode. Installing the Gimbal and Camera The following steps use the DJI MFT 15mm f/1.7 ASPH as illustration of how to mount the camera lens to the camera body. Be sure to power off the battery before installation. - Page 9 2. While holding down the Lens Release Button, rotate the camera lens counterclockwise to detach it. Lens Release Button It is recommended to wrap a dust cover around the lens to prevent contamination. DJI produces dedicated dust covers for the DJI MFT 15mm f/1.7 ASPH and the Panasonic Lumix G Leica DG Summilux 15mm f/1.7 ASPH.
- Page 10 Filters must have a weigh 7 - 11 g, with those weighing 10 - 11 g performing the best. Outside this range, the filter will decrease gimbal performance. DJI MFT 15mm f/1.7 ASPH supports filters have a size of 46mm. The Balancing Ring must be installed on the camera lens when a filter is not used.
- Page 11 2. Connect your mobile device to the remote controller with a USB cable. 3. Plug one end of the cable into your mobile device, and the other end into the USB port on the back of the remote controller. © 2016 DJI. All Rights Reserved.
-
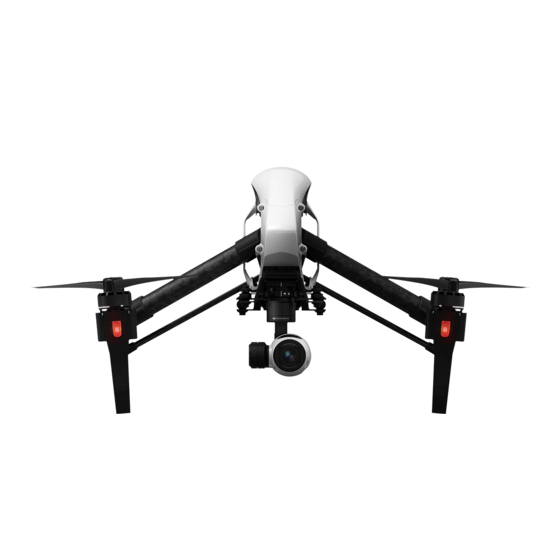
Page 12: Aircraft Diagram
[4] Return Home (RTH) Button (P31) Press and hold the button to initiate Return to Home (RTH). [5] Transformation Switch (P30) Toggle the switch up or down to raise or lower the landing gear. © 2016 DJI. All Rights Reserved. - Page 13 Circular LED around the RTH button displays RTH status. [16] [17] [18] [19] [10] Camera Settings Dial Turn the dial to adjust camera settings. Only functions when the remote controller is connected to a mobile device running the DJI GO app. [15] [10] [11]...
-
Page 14: Aircraft
Aircraft This chapter describes the features of the Flight Controller, Vision Positioning System and the Intelligent Flight Battery. © 2016 DJI. All Rights Reserved. -
Page 15: Flight Controller
Use the Flight Controller mode switch to change the flight mode of the aircraft, refer to the “Flight Mode Switch” on P30 for more information. Flight Status Indicator The Inspire 1 RAW comes with the Front LED, Rear LED and Aircraft Status Indicator. The positions of these LEDs are shown in the figure below: Aircraft Status Indicator... -
Page 16: Return To Home (Rth)
Using the RTH button on the remote controller (refer to “RTH button” on P31 for more information) or the RTH button in the DJI GO app when GPS is available to enables smart RTH. The aircraft return to the latest recorded Home Point, you may control the aircraft's orientation to avoid collision during the Smart RTH. - Page 17 Low Battery RTH The low battery level failsafe is triggered when the DJI Intelligent Flight Battery is depleted to a point that may affect the safe return of the aircraft. Users are advised to return home or land the aircraft immediately when these warnings are shown.
-
Page 18: Dynamic Home Point
(65 feet) radius of the Home Point. Aircraft cannot avoid obstruction during the Failsafe RTH, therefore it is important to set an reasonable Failsafe altitude before each flight. Launch the DJI GO app and enter “Camera” view and select “MODE” to set the Failsafe altitude. -
Page 19: Vision Positioning System
DJI Vision Positioning is a positioning system that uses ultrasonic and image data to help the aircraft identify its current position. With the help of Vision Positioning, your Inspire 1 RAW can hover in place more precisely and fly indoors or in other environments where there is no GPS signal available. The main components of DJI Vision Positioning are located on the bottom of your Inspire 1 RAW, including [1] two sonar sensors and [2] one monocular camera. - Page 20 2. Place the Inspire 1 RAW on a flat surface. Notice that the Vision Positioning system cannot work properly on surfaces without pattern variations. 3. Power on the Inspire 1 RAW. The aircraft status indicator will flash twice in green light, which indicates the Vision Positioning system is ready. Gently push the throttle up to lift off, and the Inspire 1 RAW will hover in place.
-
Page 21: Flight Recorder
ONLY use original DJI propellers for a better and safer flight experience. DJI Intelligent Flight Battery The DJI Intelligent Flight Battery has a capacity of 4500mAh, voltage of 22.2V, and smart charge- discharge functionality. It can only be charged with an appropriate DJI approved charger. - Page 22 9. Short Circuit Protection: Automatically cuts the power supply when a short circuit is detected. 10. Battery Cell Damages Protection: DJI GO app shows warning message when damaged battery cell is detected. 11. Battery Information History: Show the last 32 entries of battery information records that include warning messages and so on.
- Page 23 5℃ before using it in the low temperature environment. 5. When using the Inspire 1 RAW in a low temperature environment, begin by allowing the aircraft to hover at a low altitude, for approximately one minute, to heat the battery.
- Page 24 Do not charge the Intelligent Flight Battery and remote controller with standard charger (model: A14-100P1A) at the same time, otherwise the charger may overheat. Always turn off the battery before inserting it or removing it from the Inspire 1 RAW. Never insert or remove a battery when it is powered on.
- Page 25 Leave it on until there is less than 5% of power left, or until the battery can no longer be turned on. Launch the DJI GO app to check battery level. Rapid: Fly the Inspire 1 RAW outdoors until there is less than 5% of power left, or until the battery can no longer be turned on.
-
Page 26: Remote Controllers
Remote Controllers This chapter describes the features of the remote controller that includes aircraft and remote controller operations and dual remote controller mode. © 2016 DJI. All Rights Reserved. -
Page 27: Remote Controller Profile
Powering On And Off The Remote Controller The Inspire 1 RAW remote controller is powered by a 2S rechargeable battery with a capacity of 6000mAh. The battery level is indicated by the Battery Level LEDs on the front panel. Follow the steps below to power on your remote controller: 1. - Page 28 Press once to start recording video, then press again to stop recording. Controlling Aircraft This section explains how to use the various features of the remote controller. The Remote Controller is set to Mode 2 by default. © 2016 DJI. All Rights Reserved.
- Page 29 Moving the right stick control left and right changes the aircraft’s left and right pitch. Push left to fly left and right to fly right. The Inspire 1 RAW will hover in place if the stick is centered. Push the stick further away from the center position for a larger pitch angle and faster flight.
- Page 30 IOC, refer to the IOC in Appendix. The Flight Mode Switch is locked in P mode by default. To unlock the switch, launch the DJI GO app, enter the "Camera" page, tap "MODE", and then activate "Multiple Flight Mode" .
- Page 31 Then connect your mobile device to the remote controller with a USB cable. Plug one end of the cable into your mobile device, and the other end into the USB port on the back of the remote controller. © 2016 DJI. All Rights Reserved.
-
Page 32: Dual Remote Controllers Mode
“slave” remote controller can view the live feed video from the aircraft and set the camera parameters, but they cannot control the gimbal. Master Remote Slave Remote Controller Controller © 2016 DJI. All Rights Reserved. - Page 33 DJI GO app. Follow the steps below for setup: “Master” Remote Controller: 1. Connect the remote controller to your mobile device and launch the DJI GO app. 2. Go to the Camera page, and tap to enter the remote controller settings window.
-
Page 34: Remote Controller Status Led
“Slave” remote controller cannot control the orientation of the aircraft. Reset the remote controller to “Master” in DJI GO app if you wish to link the remote controller to the aircraft. 2. Search the “Master” remote controller in the surrounding area in the “Request Control” section. -
Page 35: Linking The Remote Controller
The remote controller is linked to your aircraft before delivery. Linking is only required when using a new remote controller for the first time. Follow these steps to link a new remote controller: 1. Power on the remote controller and connect to the mobile device. Launch DJI GO app. 2. Power on the Intelligent Flight Battery. - Page 36 “Slave” remote controller cannot control the orientation of the aircraft. Reset the remote controller to “Master” in DJI GO app if you wish to link the remote controller to the aircraft. Remote controller will disconnect from the linked aircraft if a new remote controller is linked to the same aircraft.
-
Page 37: Used With The Dji Focus
To allow communication between the two devices, connect the communication port on the Focus remote controller to the CAN Bus port on the Inspire 1 remote controller using the dedicated CAN Bus cable. Ensure that the Zenmuse X5R camera is set in AF mode. -
Page 38: Gimbal And Camera
Gimbal and Camera This chapter provides the technical specifications of the camera and explains the working mode of the gimbal. © 2016 DJI. All Rights Reserved. -
Page 39: Gimbal And Camera Overview
DJI MFT 15mm f/1.7 ASPH (30mm in 35mm format) with a 72-degrees field of view. When mounted on the Inspire 1 series, the 3-axis gimbal provides a stable platform for the camera to get clear shots even during maneuvers. The gimbal tilts the camera across a -90° to +30° pitch angle and pans ±320°... -
Page 40: Read The Information Below Before Setting Up Your Zenmuse X5R
The following table shows the recommended DJI Balancing Ring and filter and lens hood requirement for each lens model. Attach either a DJI Balancing Ring or filter only. Attach a lens hood only if required. The listed Balancing Rings can be purchased on the DJI Store. -
Page 41: Installing The Camera Lens
Note that its operating temperature is 32° to 158° F (0° to 70° C). Installing the Camera Lens The following steps use the DJI MFT 15mm f/1.7 ASPH as illustration of how to mount the camera lens to the camera body. Be sure to power off the battery before installation. - Page 42 1. While holding down the Lens Release Button, rotate the Lens Lock clockwise to unlock it. 2. While holding down the Lens Release Button, rotate the camera lens counterclockwise to detach it. Lens Release Button © 2016 DJI. All Rights Reserved.
- Page 43 INSPIRE User Manual It is recommended to wrap a dust cover around the lens to prevent contamination. DJI produces dedicated dust covers for the DJI MFT 15mm f/1.7 ASPH and the Panasonic Lumix G Leica DG Summilux 15mm f/1.7 ASPH. Other lenses may require you to purchase a third-party dust cover.
- Page 44 Follow the instructions below to use the gimbal dial to control the pan movement of the gimbal: 1. Power on the aircraft and remote control, launch DJI GO app and enter “Camera” page. 2. Tap “RC Control Settings” icon and select either C1 or C2 customizable button as the gimbal pitch/ yaw switching button.
- Page 45 Three Gimbal operation modes are available. Switch between the different operation modes on the Camera page of the DJI GO App. Note that your mobile device must be connected to the remote controller for changes to take effect. Refer to the table below for details: Pitch ©...
- Page 46 Gimbal has received an excessive external force, e.g. a collision. Please take off from flat, open ground and protect the gimbal after powering up. Flying in heavy fog or cloud may make the gimbal wet, leading to a temporary failure. The gimbal will recover when it dries out. © 2016 DJI. All Rights Reserved.
-
Page 47: Camera Panel
[3] Shutter/Record Button [4] Playback [5] Settings Always set the camera lens to AF mode. The focus and aperture will be controlled by the DJI GO app digitally. Basic Shooting Ensure the Micro SD card is inserted to enable camera operations. Photos are saved on the Micro SD card, while videos are saved on both the Micro SD card and X5R SSD. -
Page 48: Advanced Settings
2. Sunny / Cloudy / Incandescent / Neon Choose one of these modes if natural-looking colors cannot be achieved through photo styles. 3. Custom (2000K~10000K) Set a value between 2000K and 10000K to compensate for a specific light source. © 2016 DJI. All Rights Reserved. - Page 49 Off, Grid Line, Grid + Diagonal, Center Point File Index Mode Reset, Continuous Histograms, Video Captions, Over Exposure Warning, AF Assisted Focus, MF Others Assisted Focus, Lens Profile, Calibration, Reset Settings, Format SD Card, Format © 2016 DJI. All Rights Reserved.
-
Page 50: Managing Your Photos And Videos
Managing your Photos and Videos Playback in the DJI GO app or press the Playback Button on the remote controller to review photos and videos that you have captured. Press the same button again to return to capturing images. You can view and delete files on the Micro SD card. -
Page 51: Dji Cinelight
DJI CineLight Use DJI CineLight to post-process X5R SSD files © 2016 DJI. All Rights Reserved. -
Page 52: Installing Dji Cinelight
2. Connect the X5R Reader to your computer with a USB cable. 3. Select the “DJI” device. 4. Click to mount “DjiCineLight.dmg” in Finder. 5. Drag “CineLight.app” to /Applications/. You will be prompted if an update is available when DJI CineLight launches. © 2016 DJI. All Rights Reserved. -
Page 53: Accessing Your Files
Post-Processing with DJI CineLight Using DJI CineLight, you can import Adobe DNG files on the X5R SSD or your computer, add effects and enhancements, and then export them as a DNG sequence or high quality QuickTime video. [13]... - Page 54 Movie Clips Displays all the contents in the current library (includes the name, thumbnail, and total time). Movie clips are saved as DNG sequences but DJI CineLight offers video playback. : Right click to “Export” or “Remove” the movie clip.
- Page 55 B. The Selection Tool allows users to select and export a section of the movie clip. Set the starting point Start Selection Here Set the ending point End Selection Here Export the entire move clip Export Shot... Export a section of the movie clip Export Selected Range... © 2016 DJI. All Rights Reserved.
- Page 56 [13] Share Share image with friends, move to folder or send by email. [14] Layout : Show/hide the left, right or timeline panes. [15] Properties A. RGB Histogram B. Hover Pixel Color C. Image Infomration © 2016 DJI. All Rights Reserved.
- Page 57 Adjust the denoise and sharpening values. D. Color Management Select the output color space. E. Image Information Detailed information of the movie clip. F. Camera setting parameters when shooting. [17] Analysis A. Vector Scope B. RGB and YCbCr Parades © 2016 DJI. All Rights Reserved.
-
Page 58: Dji Go App
DJI GO App This chapter describes the four main GUI of the DJI GO app. © 2016 DJI. All Rights Reserved. -
Page 59: Equipment
DJI GO App Use the DJI GO app to configure your aircraft. If using a gimbal or camera, you can also control the gimbal or camera in the app. The Library, Explore, and Me sections in the app allow you to share your content with friends. - Page 60 : Tap this button to take a single photo. Press and hold this button to switch between Single Shot, Triple Shot and Timed Shot modes. Record : Tap once to start recording video, then tap again to stop recording. You can also press the Video Recording Button on the remote controller. © 2016 DJI. All Rights Reserved.
- Page 61 : This icon displays the Intelligent Flight Mode settings when the aircraft has entered F-mode. Tap to select one of the Intelligent Flight Modes. [13] Return-to-Home (RTH) : Initiate RTH home procedure. Tap to have the aircraft return to the latest Home Point. © 2016 DJI. All Rights Reserved.
- Page 62 INSPIRE User Manual [14] Gimbal Operation Mode This icon will be displayed when using a DJI gimbal (or camera). Tap to select a mode or re-align the gimbal. The gimbal’s orientation is aligned with the aircraft’s nose. One user Follow Mode alone can control the pitch motion of the gimbal, but a second operator is required to control the yaw motion using a second remote controller.
-
Page 63: Editor
Find out about our latest events, featured products and trending Skypixel uploads in the Explore page. If you already have a DJI account, you will be able to participate in forum discussions, earn Credits in the DJI Store, and share your artwork with the community. -
Page 64: Flight
Flight This chapter describes the flight safety and flight restrictions. © 2016 DJI. All Rights Reserved. -
Page 65: Flight Environment Requirements
Max Height & Radius limit flying height and distance, and the user may change these settings in the DJI GO App. Once complete, your Inspire 1 RAW will fly in a restricted cylinder that is determined by these settings. The tables below show the details of these limits. - Page 66 If you fly out of the limit, you can still control the Inspire 1 RAW, but cannot fly it further. If the Inspire 1 RAW flies out of the max radius in Ready to Fly (non-GPS) mode, it will fly back within range automatically.
- Page 67 The value of R varies depending on the definition of the Restricted Area. (3) A “warning zone” has been set around each Restricted Area. When the aircraft is within 0.6 miles (1 km) of this zone, a warning message will appear in the DJI GO app. Restricted Areas...
- Page 68 For safety reasons, please do not fly close to airports, highways, railway stations, railway lines, city centers and other special areas. Try to ensure the aircraft is visible. © 2016 DJI. All Rights Reserved.
-
Page 69: Preflight Checklist
6. DJI GO app connected to the aircraft. Calibrating the Compass Only calibrate the compass when the DJI GO app or the status indicator prompt you to do so. Observe the following rules when calibrating your compass: DO NOT calibrate your compass where there is a chance of strong magnetic interference, such as magnetite, parking structures, and steel reinforcements underground. -
Page 70: Auto Take-Off And Auto Landing
2. When the mechanical structure of the Inspire 1 RAW has changed, i.e. changed mounting position of the compass. 3. When severe drifting occurs in flight, i.e. the Inspire 1 RAW does not fly in straight lines. Auto Take-off and Auto Landing... -
Page 71: Starting/Stopping The Motors
Stopping Motors There are two methods to stop the motors. Method 1: When the Inspire 1 RAW has landed, push the throttle down , then conduct CSC . Motors will stop immediately. Release both sticks once motors stop. Method 2: When the aircraft has landed, push the throttle down and hold. The motors will stop after 3 seconds. - Page 72 Video Suggestions and Tips 1. Work through the checklist before each flight. 2. Select desired gimbal working mode in the DJI GO app. 3. Aim to shoot when flying in P mode only. 4. Always fly in good weather, such as sunny or windless days.
-
Page 73: Faq
© 2016 DJI. All Rights Reserved. - Page 74 6. Do you have an LCD monitor available for the Inspire 1 RAW? No, DJI does not sell LCD or HD monitors for the Inspire 1 RAW. However, you can output the live streaming video to a compatible monitor or mobile device of your own.
- Page 75 14. What flight controller does the Inspire 1 RAW use? The Inspire 1 RAW uses its own new flight controller. 15. Which motors and propellers does the Inspire 1 RAW come with? The Inspire 1 RAW uses 3510H motors and 1345T propellers. 16. Aircraft frame arm joints appear loosen, is that normal? The space of the joins shown in the below figure is normal and it will not affect the performance of aircraft, do not adjust the position of the screws on your own.
-
Page 76: Appendix
Appendix © 2016 DJI. All Rights Reserved. -
Page 77: Specifications
Camera Replaceable lens Lens M43 mount supporting auto-focus DJI MFT 15mm f/1.7 ASPH Panasonic Lumix G Leica DG Summilux 15mm f/1.7 ASPH Supported Lenses Olympus M.Zuiko Digital ED 12mm f/2.0 Olympus M.Zuiko 17mm f/1.8 (Balancing ring will be available on the... - Page 78 ISO Range Photo: 100-25600; Video: 100-6400 Electronic Shutter Speed Photo: 8s-1/800s; Video: 1/25s-1/8000s Field of View DJI MFT 15mm f/1.7 ASPH 72° Single shot Burst shooting:3/5/7 frames Still Photography Modes Auto Exposure Bracketing (AEB):3/5 bracketed frames at 0.7EV bias Timelapse (3/5/7/10/20/30/60 sec); HDR UHD: 4K (4096×2160) 24/25p, 4K (3840×2160) 24/25/30p, 2.7K...
- Page 79 Less than 3 months: -4° to 113° F (-20° to 45° C) Storage Temperature More than 3 months: 72° to 82° F (22° to 28° C) Charging Temperature 32° to 104° F (0° to 40° C) Max Charging Power 180 W © 2016 DJI. All Rights Reserved.
- Page 80 Remote Controller Signal Lost Slow Red Flashing Low Battery Warning Fast Red Flashing Critical Low Battery Warning Red Flashing Alternatively IMU Error — Solid Red Critical Error Red and Yellow Flash Alternatively Compass Calibration Required © 2016 DJI. All Rights Reserved.
-
Page 81: Intelligent Flight
The flight path can be saved and re-apply in the future. Enable Multiple Flight Mode by launching the DJI GO app > Camera View > > Advanced Settings > Multiple Flight Mode before using the Intelligent Flight Mode for the first time. - Page 82 Ensure the DJI GO app has been updated to v1.2.0 before updating the remote controller. The System Status bar in Camera View of the DJI GO App will flash several times if a firmware update is available. Follow these steps to update the firmware via the DJI GO App.
-
Page 83: Fcc Compliance
However, there is no guarantee that interference will not occur in a particular installation. If this equipment does cause harmful interference to radio or television reception, © 2016 DJI. All Rights Reserved. - Page 84 KCC Warning Message “해당무선설비는 운용 중 전파혼신 가능성이 있으므로 인명안전과 관련된 서비스는 할 수 없습니다 .” “해당 무선설비는 운용 중 전파혼신 가능성이 있음” NCC Warning Message 低功率電波輻射性電機管理辦法 第十二條經型式認證合格之低功率射頻電機,非經許可,公司、商號或使用者均不得擅自變更頻率、加 大功率或變更原設計之特性及功能。 第十四條低功率射頻電機之使用不得影響飛航安全及干擾合法通信;經發現有干擾現象時,應改善至無 干擾時方得繼續使用。前項合法通信,指依電信法規定作業之無線電通信。低功率射頻電機須忍受合法 通信或工業、科學及醫療用電波輻射性電機設備之干擾。 © 2016 DJI. All Rights Reserved.
-
Page 85: 2016 Dji. All Rights Reserved
This content is subject to change. Download the latest version from www.dji.com/product/inspire-1-pro-and-raw If you have any questions about this document, please contact DJI by sending a message to DocSupport@dji.com. © 2016 DJI. All Rights Reserved.
Need help?
Do you have a question about the Inspire 1 and is the answer not in the manual?
Questions and answers