dji Matrice 100 User Manual
Hide thumbs
Also See for Matrice 100:
- User manual (80 pages) ,
- Safety manual (20 pages) ,
- Safety instruction (4 pages)
Table of Contents
Advertisement
Quick Links
Download this manual
See also:
User Manual
Advertisement
Table of Contents

Related Manuals for dji Matrice 100


Summary of Contents for dji Matrice 100
- Page 1 DJI MATRICE 100 User Manual V1.6 2016.03...
- Page 2 Searching for Keywords Search for keywords such as “battery” and “install” to find a topic. If you are using Adobe Acrobat Reader to read this document, press Ctrl+F on Windows or Command+F on Mac to begin a search. Navigating to a Topic View a complete list of topics in the table of contents.
-
Page 3: Using This Manual
4. DJI Matrice 100 User Manual Check to see that you have all of the components listed in the DJI Matrice 100 In the Box manual. Before assembly, read the DJI Matrice 100 Disclaimer and Safety Guidelines . Complete the assembly with the help of this manual and the video tutorial on the DJI website (http://www.dji.com/product/matrice100). -
Page 4: Warnings
6. Maintain a safe distance from people, buildings, high voltage power lines, tall trees, water, and other hazards when flying the aircraft. 7. Use only DJI TB47D/TB48D Intelligent Flight Batteries as the power supply. 8. Do NOT overload the system. -
Page 5: Table Of Contents
Mounting the Expansion Bay Mounting the GPS Module Reserved Ports Description Attaching the Propellers Mounting the Gimbal (Optional) Using the DJI Intelligent Flight Battery Introduction DJI Intelligent Flight Battery Functions Using the Battery Using the Remote Controller Remote Controller Profile... - Page 6 DJI MATRICE 100 User Manual Return-to-Home (RTH) and Dynamic Home Point Return-to-Home (RTH) Dynamic Home Point DJI GO App Equipment Library Explore Using the PC Assistant Basic Setup Simulator Firmware Upgrade Using the SDK Flight Flight Environment Flight Limits and No Fly Zones...
-
Page 7: Product Profile
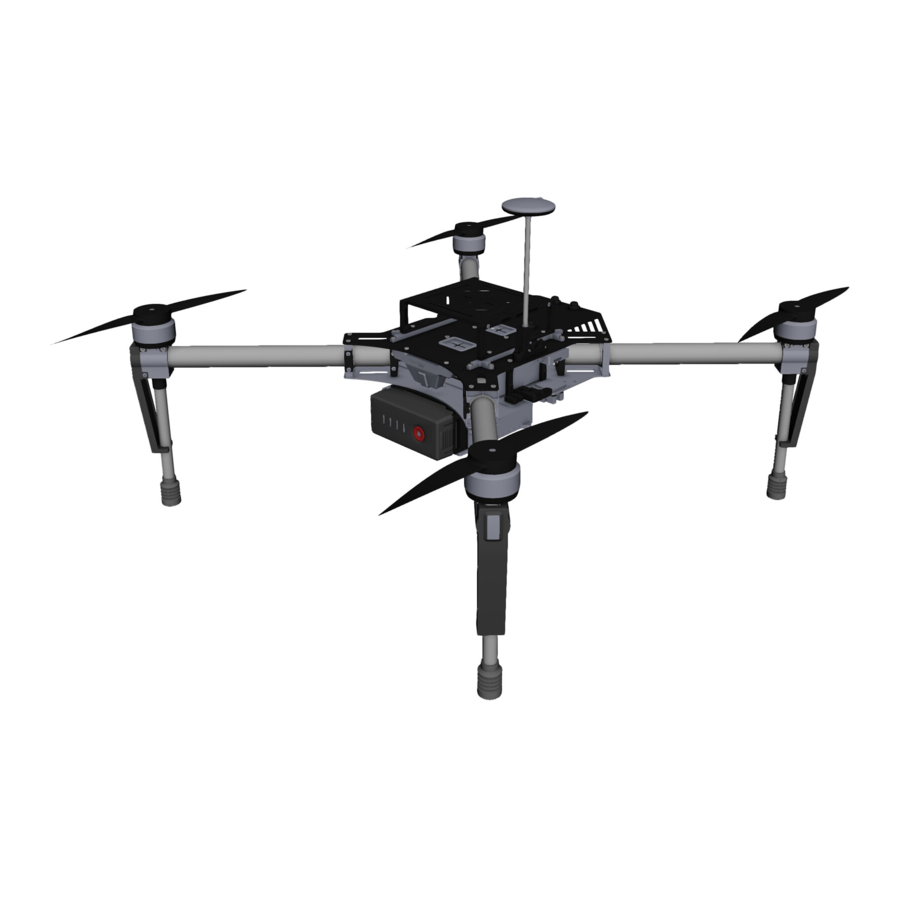
Product Profile The DJI Matrice 100 is a stable, flexible, and powerful flying platform. Its open platform and highly customizable design makes it suitable for a wide range of applications in the areas of research, business, and recreation. The Matrice 100’s expandable center frame makes it easy to mount additional components and devices to achieve greater functionality and results. -
Page 8: Mounting The Frame Arms
2. Arm Fasteners are used to secure the frame arms. There are three types of fasteners that come with the Matrice 100. The curved fasteners and the 3° fasteners are preinstalled on the arm slots. 3° Fastener Curved Fastener 0°... - Page 9 DJI MATRICE 100 User Manual Curved Fastener: Fix on the inner arm slot. 0° Fastener: Fix on the outer arm slot so that the propeller rotation plane is perfectly horizontal. 3° Fastener: Fix on the outer arm slot so that the propeller rotation plane is at a 3° incline. It is recommended to use the 3°...
- Page 10 DJI MATRICE 100 User Manual 3. Connect the three motor cables of each motor (M1 - M4) to the ports of its corresponding ESC. Be sure to match the color of the cables and ports. 4. Connect the LED cable of each frame arm to the port of its corresponding ESC.
-
Page 11: Mounting The Battery Compartment
(with its tail facing you). Then mount the mounting rails, and tighten the 8 screws (M2.5x8). If you are using the DJI Zenmuse X3 Gimbal and Camera, install the gimbal before mounting the upper plate. Refer to Mounting the Gimbal (P20) for more details. - Page 12 DJI MATRICE 100 User Manual M2.5x8 M2.5x5 Aircraft's Tail Notch 3. Re-mount the Aircraft Status Indicator, and tighten the two screws (M3x8 self-tapping). Do not overtighten the screws to avoid damaging the threads. M3x8 self-tapping Aircraft Status Indicator 4. Mount the battery compartment (with the metal terminals facing the tail of the aircraft) onto the mounting rails on the lower plate of the center frame.
- Page 13 (with its tail facing you). Then mount the mounting rails and tighten the 8 screws (M2.5x8). If you are using the DJI Zenmuse X3 Gimbal and Camera, install the gimbal before mounting the upper plate. Refer to Mounting the Gimbal (P20) for more details.
- Page 14 DJI MATRICE 100 User Manual 3. Re-mount the Aircraft Status Indicator and tighten the two screws (M3x8 self-tapping). Do not overtighten the screws to avoid damaging the threads. M3x8 self-tapping Aircraft Status Indicator 4. Mount the battery compartment (with the metal terminals facing the tail of the aircraft) onto the mounting rails on the upper plate of the center frame.
- Page 15 DJI MATRICE 100 User Manual 2. Connect the Aircraft Status Indicator cable to the 6-pin port. 3. Connect the power cable of the flight controller to the 4-pin port. 4. Connect the signal cable of the flight controller to the 6-pin port.
-
Page 16: Mounting An Extra Battery Compartment
Mounting the Expansion Bay Extend the center frame of the Matrice 100 with the expansion bay to mount DJI modules such as the Guidance system or other products if necessary. Depending on your configuration, the expansion bay can be positioned on the top or bottom of the center frame, and mounted onto the mounting rails or the battery compartment. -
Page 17: Mounting The Gps Module
DJI MATRICE 100 User Manual 2. Mount the expansion bay onto the mounting rails and tighten the four screws (M2.5x5). Alternatively, mount the expansion bay onto the battery compartment and tighten the four screws (M3x5). The two mounting methods are illustrated in the figures below. -
Page 18: Reserved Ports Description
DJI MATRICE 100 User Manual 3. Mount the CAN HUB of the GPS module onto the upper or lower plate of the center frame. 4. Connect the GPS cable to the GPS CAN port on the center frame. GPS CAN Port... - Page 19 Only use the provided UART cable to connect your own device to the UART port, as other cables can cause the flight controller or your device to be damaged from high voltage. DJI accepts no liability for damage or injury incurred from using third party cables.
-
Page 20: Attaching The Propellers
7. The propellers, securing springs, and mounting plates have an approximate lifespan of 200 flights. Inspect them regularly to determine if they need replacement. 8. Only use official DJI propellers for a safer and better flying experience. 9. Handle the propellers with care. -
Page 21: Mounting The Gimbal (Optional)
Mounting the Gimbal (Optional) The Matrice 100 and N1 Flight Controller is only compatible with the DJI Zenmuse X3, X5 series or XT Gimbal and Camera. Other gimbal systems will require custom configuration. The following procedures apply to the DJI Zenmuse X3 and XT. For details on mounting the Zenmuse X5 series, refer to the DJI M100-Zenmuse X5 Series Gimbal Installation Kit Installation Guide. - Page 22 DJI MATRICE 100 User Manual 2. Remove the 16 screws (M2.5x5) on the upper plate of the center frame, and the eight screws (M2.5x8) on the mounting rails. Then remove the mounting rails and the upper plate. M2.5x8 M2.5x5 3. Connect one end of the 10-pin gimbal cable and 8-pin gimbal cable to the flight controller.
- Page 23 DJI MATRICE 100 User Manual 5. Re-mount the upper plate of the center frame, and tighten the 16 screws (M2.5x5). Orientate the upper plate so that the notch faces the left of the aircraft (with its tail facing you). Then place the mounting rails and tighten the 8 screws (M2.5x8).
- Page 24 DJI MATRICE 100 User Manual The quick-release mount of the DJI Zenmuse X3 Gimbal and Camera allows you to attach and detach the camera with ease. Follow the instructions below: Mounting the Gimbal and Camera: 1. Remove the Gimbal Cover.
-
Page 25: Using The Dji Intelligent Flight Battery
9. Short Circuit Protection: Automatically cuts the power supply when a short circuit is detected. 10. Battery Cell Damage Detection: The DJI GO app shows a warning message if a damaged battery cell is detected. 11. Battery Log: Show the last 32 entries of battery information including the warning messages. -
Page 26: Using The Battery
Insert the Intelligent Flight Battery into the battery compartment as shown below. Never insert the Intelligent Flight Battery into or remove it from the battery compartment of the Matrice 100 when it is powered on. Powering On/Off the Battery Power Button (Built-in LED) - Page 27 It is not recommended to fly under such conditions. 4. If the DJI GO app displays the Low Battery Level warning, stop flying and land the aircraft immediately. You will still be able to control the aircraft’s movement when this warning is triggered.
- Page 28 20% When the battery life reaches 0%, it can no longer be used. For more information about the battery, launch the DJI GO app and go to the Battery tab. Charging the Intelligent Flight Battery 1. Connect the battery charger to a suitable power supply (100-240V 50/60Hz).
- Page 29 5% battery level, or until it can no longer be turned on. Check the battery level in the DJI GO app. Fast: Fly the Matrice 100 outdoors until there is less than 5% battery level, or until the battery can no longer be turned on.
-
Page 30: Using The Remote Controller
Compliance Version: The remote controller is compliant with both CE and FCC regulations. Operating Mode: Control can be set to Mode 1, Mode 2, or a custom mode in the DJI GO app. Mode 1: The right stick serves as the throttle. -
Page 31: Remote Controller Diagram
DJI MATRICE 100 User Manual Tilt the Mobile Device Holder to the desired position and then adjust the antenna as shown. Follow the instructions below to connect your mobile device to the remote controller: 1. Press the button on the side of the Mobile Device Holder to release the clamp. - Page 32 [18] USB Port Play back the captured images or videos. Connects to your mobile device to [11] Shutter Button access all of the DJI GO app controls Press to take a photo. If in burst mode, the and features. [19] GPS Module...
-
Page 33: Remote Controller Operation
Powering On and Off the Remote Controller The Matrice 100 remote controller is powered by a 2S rechargeable battery with a capacity of 6000mAh. The battery level is indicated by the Battery Level LEDs on the front panel. Follow the steps below to power on/off your remote controller: 1. - Page 34 DJI MATRICE 100 User Manual Controlling the Camera Shoot videos or images and adjust the camera settings via the Shutter Button, Camera Settings Dial, Playback Button and Video Recording Button on the remote controller. [1] Camera Settings Dial Turn the dial to quickly adjust camera settings such as ISO and shutter speed without letting go of the remote controller.
- Page 35 DJI MATRICE 100 User Manual Remote Controller Aircraft ( indicates nose direction) Function (Mode 2) Moving the Left Stick up/down changes the aircraft’s elevation. Push it up to ascend and down to descend. Use this stick to take off when the motors are spinning at idle speed.
- Page 36 Refer to the IOC (P64) section in the Appendix and Basic Page in Using the PC Assistant (P49) for more information. The Flight Mode Switch is locked in P-Mode by default. To enable other flight modes, go to the DJI GO app > Camera View >...
-
Page 37: Dual Remote Controllers Mode
More than one remote controller can be connected to the same aircraft in the Dual Remote Controllers mode. When using the DJI Zenmuse X3 Gimbal and Camera in the Dual Remote Controllers mode, the Master remote controller controls the movement of the aircraft, while the Slave remote controller controls the movement of the gimbal and camera. -
Page 38: Setting Up Dual Remote Controllers Mode
Master Remote Controller through the DJI GO app. Follow the steps below for setup: Master Remote Controller: 1. Connect the remote controller to your mobile device and launch the DJI GO app. 2. Go to the Camera View, and tap to enter the remote controller settings window. - Page 39 DJI MATRICE 100 User Manual RC Settings RC Control Settings Master and Slave Set RC Status Master Slave RC Name T12254 Connection Password 1234 Slave RC List 4. Enter the connection password for the Slave remote controller. Slave Remote Controller: 1.
-
Page 40: Remote Controller Status Led
The remote controller cannot link to the aircraft or control aircraft movement if it is set to Slave. Slave RC List Set the remote controller as Master in the DJI GO app if you want to link the remote controller to the aircraft. -
Page 41: Linking The Remote Controller
1. Power on the remote controller and connect it to your mobile device. 2. Power on the Intelligent Flight Battery. 3. Launch the DJI GO app. Go to the DJI GO app > Camera View > > RC Control Settings >... -
Page 42: Remote Controller Compliance
The remote controller cannot link to the aircraft or control aircraft movement if it is set to Slave. Set the remote controller as Master in the DJI GO app if you want to link the remote controller to the aircraft. -
Page 43: Return-To-Home (Rth) And Dynamic Home Point
Use the RTH button on the remote controller (see RTH Button on P35 for more details) or the RTH button in the DJI GO app when GPS is available to enable Smart RTH. With Smart RTH, you may control the aircraft’s orientation to avoid collision when it is returning to the Home Point. Press the Smart RTH button once to start the RTH procedure, then press the Smart RTH button again to exit Smart RTH and regain control of the aircraft. - Page 44 DJI MATRICE 100 User Manual Aircraft Status Flight Battery Level Description DJI GO App Indicator Instructions Tap Go-Home to make the Fly the aircraft aircraft return to Home Point back and land Aircraft Status and land automatically, or Low Battery...
-
Page 45: Dynamic Home Point
Ensure the space above the GPS module (shown above) is not obstructed when using Dynamic Home Point. Follow the instructions below to use Dynamic Home Point: 1. Connect your mobile device to the remote controller and go to the DJI GO app > Camera View. 2. Tap >... -
Page 46: Dji Go App
On the Equipment page, you can enter Camera View, visit the Academy or view your flight records. Camera View [18] Safe to Fly (GPS) P-GPS ISO 100 1/320 4821 JPEG EV 0 [17] [16] [15] [10] [14] [13] [11] [12] © 2016 DJI. All Rights Reserved. - Page 47 Tap this icon to configure the MC (Main Controller) Settings, to change the flight limits and set the gain values. When using the DJI GO app for the first time, the aircraft is in Beginner Mode. In this mode, the flight altitude and flight distance are set to 30 m. Tap to exit Beginner Mode.
- Page 48 DJI MATRICE 100 User Manual Record : Tap once to start recording video, then tap again to stop recording. You can also press the Video Recording Button on the remote controller. Playback : Tap this icon to play back photos and videos after they are captured.
-
Page 49: Library
Find out about our latest events, featured products and trending Skypixel uploads in the Explore page. If you already have a DJI account, you will be able to participate in forum discussions, earn Credits in the DJI Store, and share your artwork with the community. -
Page 50: Using The Pc Assistant
DJI Assistant 2 supports Windows 7 (or later) or Mac OS X 10.9 (or later). 4. Launch DJI Assistant 2. 5. Connect the Matrice 100 to your PC with a Micro USB cable. Turn on the remote controller and the aircraft. Do not disconnect the cable until configuration is complete. -
Page 51: Simulator
DJI MATRICE 100 User Manual Inaccurate coordinates or a wrong axis polarity may cause the aircraft to vibrate during flight. If this happens, double check the configuration parameters. The label on the GPS module should face upwards, and the arrow should point to the nose of the aircraft. -
Page 52: Firmware Upgrade
It is normal for the aircraft to make sounds or its LEDs to flash during the firmware upgrade. If you are using the DJI Zenmuse X3 or X5 series gimbal and camera or the DJI N1 Video Encoder, upgrade all firmware using the firmware update package. Refer to Upgrading the Firmware (P63) for details. -
Page 53: Using The Sdk
Using the SDK DJI Mobile API and Onboard API are supported by the Matrice 100. Users can use these APIs to develop their own applications to monitor and control their aircraft. Visit the DJI SDK page on the DJI Developer website (https://developer.dji.com) for information on using these APIs. - Page 54 Max Radius No limit If you fly out of bounds, you can still control the Matrice 100, but cannot fly it further. If the Matrice 100 loses GPS signal and flies out of the max radius but regains GPS signal afterwards, it will fly back within range automatically.
- Page 55 DJI MATRICE 100 User Manual 3. From R1 to R1+1 miles around the airport, the flight altitude is limited at a 15 degree incline, starting at 66 feet (20 meters) from the edge of airport and radiating outwards. The flight altitude is limited to 1640 feet (500 meters) at R1+1 miles.
-
Page 56: Pre-Flight Checklist
1. The remote controller, Intelligent Flight Battery, and your mobile device are fully charged. 2. Propellers are mounted correctly and firmly. 3. Motors start properly and are functioning as normal. 4. The DJI GO app is connected to the aircraft. © 2016 DJI. All Rights Reserved. -
Page 57: Flight Status Indicator
DJI MATRICE 100 User Manual Flight Status Indicator The Matrice 100 comes with Front LEDs, Rear LEDs and an Aircraft Status Indicator. The positions of these LEDs are shown in the figure below: Aircraft Status Indicator Front LEDs Rear LEDs The Front and Rear LEDs show the orientation of the aircraft. -
Page 58: Calibrating The Compass
If the Aircraft Status Indicator flashes red and yellow alternatively after compass calibration, move your aircraft to a different location to carry out the calibration. Calibrate the compass after you launch the DJI GO app if you are prompted to do so. When to Recalibrate 1. -
Page 59: Auto Takeoff And Auto Landing
DJI MATRICE 100 User Manual 2. Flying in a new location, or a location that is different from your last flight. 3. The mechanical structure of the Matrice 100 is changed, i.e. the mounting position of the GPS module is changed. -
Page 60: Flight Test
2. Power on the remote controller and your mobile device, and then the Intelligent Flight Battery. 3. Launch the DJI GO app and enter Camera View. 4. Wait until the Aircraft Status Indicator flashes green. This means the Home Point is recorded and it is safe to fly. -
Page 61: Appendix
Hovering Time (with TB48D battery and Zenmuse X3) No payload: 23 min * The hovering time is based on flying at 10m above sea level in a no-wind environment and landing with 10% battery level. © 2016 DJI. All Rights Reserved. - Page 62 DJI MATRICE 100 User Manual Propulsion System Motor Model DJI 3510 Propeller Model DJI 1345s ESC Model DJI E SERIES 620D Flight Control System Model Other Operating Temperature -10 to 40 ℃ Remote Controller Name 5.725~5.825 GHz Operating Frequency 922.7MHz~927.7 MHz (Japan) 2.400~2.483 GHz (Lightbridge)
-
Page 63: Aircraft Status Indicator Description
Safe to Fly (P-Mode with GPS) Flashing Yellow Slowly Safe to Fly (No GPS) Safe to Fly (P-Mode with the DJI Guidance system ×2 Flashing Green Twice at a Time but without GPS) The Obstacle Sensing Mode of the DJI Guidance... -
Page 64: Intelligent Orientation Control (Ioc)
IOC allows users to lock the orientation of aircraft in different fashions. It has three working modes you can choose in the DJI GO app. IOC only works in F-Mode, and users must toggle the flight mode switch to F-Mode to activate IOC. The three work modes are: Lock the current nose direction as the aircraft’s forward direction. -
Page 65: How To Upgrade The Firmware
If you are NOT using the DJI Zenmuse X3 or X5 Series gimbal and camera: Method 1 – Using the DJI Assistant 2 Connect the aircraft to DJI Assistant 2 to upgrade the firmware. For details, refer to “Using the PC Assistant (P50)” in the DJI Matrice 100 User Manual. - Page 66 Storage devices must be formatted with the FAT32 or exFAT file system. Upgrading the Remote Controller Firmware The System Status bar in the DJI GO app (center top of the camera view screen) will flash several times if a firmware upgrade is available.
-
Page 67: Component Dimensions
DJI MATRICE 100 User Manual Component Dimensions Use the dimensions below to help you customize your Matrice 100 platform (all units in mm). Aircraft © 2016 DJI. All Rights Reserved. - Page 68 DJI MATRICE 100 User Manual Remote Controller © 2016 DJI. All Rights Reserved.
- Page 69 DJI MATRICE 100 User Manual Mounting Rails Expansion Bay Base Plate 59.40 25.46 1.50 2.50 © 2016 DJI. All Rights Reserved.
-
Page 70: Dji Zenmuse X3 Gimbal And Camera
It features a 1/2.3” Sony EXMOR CMOS image sensor. Preview of the camera’s POV in the DJI GO app before shooting images and video. Have extra options to shoot stills in burst mode or self-timer mode, and export video in either MOV or MP4 format. - Page 71 DJI MATRICE 100 User Manual Camera Data Port Power on the Matrice 100 and then connect a USB cable to the Camera Data Port to download photos or videos from the camera to your PC. Power on the aircraft before downloading the files.
- Page 72 Single Remote Controller mode. Enable the Master-and-Slave mode in the DJI GO app and set a second remote controller to Slave if you wish to tilt and pan the camera together.
- Page 73 DJI MATRICE 100 User Manual Gimbal Operation Modes Switch between the three operation modes in Camera View in the DJI GO app. Note that your mobile device must be connected to the remote controller for changes to take effect. Refer to the table below...
- Page 74 DJI MATRICE 100 User Manual Specifications Gimbal Model Zenmuse X3 Power Output (Camera Attached) Static: 9 W; In Motion: 11 W Operating Current Static: 750 mA; In Motion: 900 mA Angular Vibration ±0.03° Mounting Detachable Controllable Range Pitch: -90° to +30°; Yaw: ±320°...
-
Page 75: Dji N1 Video Encoder
The AV or HDMI port on the encoder receives video input from the non-DJI camera to generate a live HD video feed in the DJI GO app. In addition, users may utilise the Micro USB port on the encoder to upgrade the firmware of various modules on the Matrice 100. -
Page 76: Compliance Information
This equipment complies with IC RF radiation exposure limits set forth for an uncontrolled environment. This transmitter must not be co-located or operating in conjunction with any other antenna or transmitter. This equipment should be installed and operated with minimum distance 20cm between the radiator & your body. © 2016 DJI. All Rights Reserved. - Page 77 “해당 무선설비는 운용 중 전파혼신 가능성이 있음” 인증받은자의 상호 : SZ DJI TECHNOLOGY CO., LTD 제품명 / 모델명 : 특정소출력무선기기 ( 무선데이터통신시스템용무선기기 )/M100 제조자 및 제조국가 : SZ DJI TECHNOLOGY CO., LTD 제조년월 : 2016.05 인증번호 : MSIP-CRM-dji-TP1406 해당 무선설비는 전파혼신 가능 성이 있으므로 인명안전과 관련된 서비스는 할 수 없음...
- Page 78 This content is subject to change. Download the latest version from http://www.dji.com/product/matrice100 If you have any questions about this document, please contact DJI by sending a message to DocSupport@dji.com. © 2016 DJI. All Rights Reserved.
Need help?
Do you have a question about the Matrice 100 and is the answer not in the manual?
Questions and answers