AJA kona lhi Installation And Operation Manual
Hide thumbs
Also See for kona lhi:
- Installation and operation manual (74 pages) ,
- Installation & operation manual (105 pages) ,
- Installation & operation manual (97 pages)

Related Manuals for AJA kona lhi


Summary of Contents for AJA kona lhi
- Page 1 Published: 5/4/11 Installation and Operation Guide B e c a u s e m a t t e r s .
-
Page 2: Notice
All other trademarks are the property of their respective holders. Notice Copyright © 2011 AJA Video, Inc. All rights reserved. All information in this manual is subject to change without notice. No part of the document may be reproduced or transmitted in any form, or by any means, electronic or mechanical, including photocopying or recording, without the express written permission of AJA Inc. -
Page 3: Limited Warranty
If a product proves to be defective during this warranty period, AJA Video, at its option, will either repair the defective product without charge for parts and labor, or will provide a replacement in exchange for the defective product. -
Page 5: Table Of Contents
AJA KONA LHi and Fibre Channel RAID (Xserve or other) ....... - Page 6 Easy Setups For Use With KONA LHi ........
-
Page 7: Chapter 1: Introduction
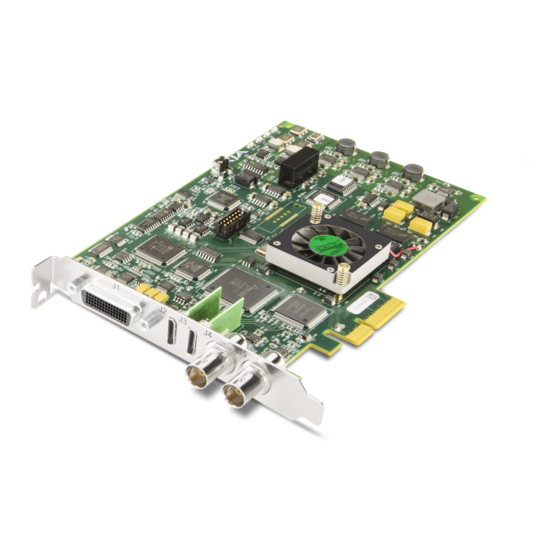
The AJA KONA LHi brings the highest quality 3G/HD/SD-SDI and analog video/audio to an Apple Mac Pro running Final Cut Pro software. KONA LHi offers high quality digital and analog interfaces with support for 8 and 10 bit uncompressed video. DVCPRO HD, HDV, and Apple RT Extreme are also supported—and even accelerated by onboard hardware. -
Page 8: Features
Features The KONA LHi card offers a large number of unique features for optimum quality, ease of use, and support for a wide variety of workflows and environments. KONA LHi provides flexible standard definition and high definition capture and playback, a hardware downconverter for working in mixed SD/HD environments—and it supports both analog... -
Page 9: Software
LHi and the documentation. • Registration Sheet—allows you to register your card by mail or online (details provided). Please save all packaging for shipping the KONA LHi should you wish to do so when moving or sending it in for service. - Page 10 Balanced Audio Analog Audio Channel 1 Input Analog Audio Channel 2 Input Analog Audio Channel 1 Output Analog Audio Channel 2 Output Digital AES Input Channels 1 & 2 Digital AES Output Channels 1 & 2 KONA LHi Shipping Box Contents...
-
Page 11: System Requirements
Mac via qualified host bus adapter that follows later in this Chapter Understanding Disk The KONA LHi card, a MacPro, and Final Cut Pro, together offer an unprecedented level of features and performance for audio/video post production applications. However, to ensure Storage Methods performance and quality, the disk storage system used with the Apple computer must be able to meet the demands of the media. -
Page 12: About Raids
AJA KONA LHi and Fibre Channel RAID (Xserve or other) For the optimum in disk storage with Final Cut Pro and AJA KONA LHi, we recommend a Fibre Channel or SATA RAID array. Apple’s Xserve RAID, for example, holds up to 14 hot-swap Apple Drive Modules—5.6TB of storage—in a rack-optimized 3U enclosure. -
Page 13: Storage Capacity
KONA LHi Installation and Operation Manual — System Requirements Storage capacity No matter which storage system you choose, pick one that can scale to meet your needs over time. Ideally, you should be able to increase storage capacity or switch to a RAID level offering increased data protection in the future. -
Page 14: Cable Connections
Cable Connections KONA LHi offers unsurpassed cable connectivity for a video/audio capture card. Connections are made via a supplied breakout cable, plus two BNCs and two HDMI connectors on the KONA LHi Card endplate. Using the Breakout The breakout cable supports: Cable and 3 BNCs •... -
Page 15: Using Klhi-Box
KONA LHi Installation and Operation Manual — Cable Connections Using KLHi-box The KLHi-box attaches to the KONA LHi card via cables that attach to the back of the box. These cables are supplied with the KLHi-Box. When you purchase the optional box, you get two- channel unbalanced audio output (2 RCA Jacks)—not available with the standard cable. -
Page 16: Connector Descriptions-Cables And Klhi-Box
Cables & KLHi-Box 3G/HD/SD SDI Input and Output BNC connectors are provided on the KONA LHi card endplate for one 3G/HD/SD-SDI input and one 3G/HD/SD-SDI output. The input and output support video and embedded 24-bit digital audio. Use SDI wherever possible for the best quality 10-bit uncompressed video input, capture and output. -
Page 17: Reference Video And Ltc Input
Component video signals are generally higher quality than composite, but not as high quality as serial digital (SDI). A Note About RGB —Although RGB is used less in today’s video systems, KONA LHi supports it. However, because the KONA LHi (and SMPTE SDI) native format is YPbPr, AJA recommends the use of YPbPr whenever possible for analog monitoring. -
Page 19: Chapter 2: Getting Started-Workflow
This chapter hopes to show how Final Cut Pro and KONA LHi can help fit into whatever workflow you currently have and make it more efficient. -
Page 20: Understanding Typical Workflows
Understanding Typical Workflows KONA LHi and Final Cut Pro allow more workflow flexibility than ever before. Users can independently select different formats for capture and storage media, while also outputting to an array of analog and digital uncompressed formats—with all outputs active simultaneously. -
Page 21: Hdv
Quality: Excellent KONA LHi supports and accelerates the Final Cut Pro HDV Codec. You can use KONA LHi to convert HDV projects to uncompressed—in real time—for monitoring and/or output. KONA LHi can capture uncompressed from any input, directly to HDV media. The KONA LHi advanced scaling engine takes the native frame (long GOP 1440 HD) and outputs it via hardware—in real time. -
Page 22: Uncompressed 8-Bit
Using uncompressed maintains a higher quality in your project from capture all the way through effects rendering. Final Cut Pro supports RT with uncompressed media using RT Extreme. KONA LHi supports capture of uncompressed through any of its inputs, and uncompressed projects are output to all of its outputs simultaneously. -
Page 23: Mixing And Matching Formats In Final Cut
Therefore, it makes sense to capture media into your system at the highest quality you’ll expect to use to eliminate rerendering and ensure best results. KONA LHi is ideal for this since it has the connections necessary to bring in a variety of media for capture into Final Cut. -
Page 25: Installation Overview
Chapter 3: Installation & Configuration Installation Overview The installation and set up of a KONA LHi is very simple. All of the steps of installation and configuration are documented in this chapter, summarized as follows: 1. Unpack the shipping box 2. - Page 26 AJA will repair or replace damaged items. If you find shipping damage, contact your AJA dealer or distributor for details on how to have your KONA LHi repaired or replaced.
-
Page 27: Installing The Kona Lhi Card In A Mac Pro
Phillips screwdriver (it is held in place by two captive phillips screws). 7. Carefully insert the KONA LHi card by rocking it slowly into the desired PCIe slot. Ensure the card edge aligns properly with the Mac Pro’s rear panel opening (where the card edge locking plate was just removed) and that it is fully seated in the slot. -
Page 28: Installing The Kona Lhi Card In A G5
4-lane PCI-Express slot, so any of the available slots will work correctly. 6. Remove the card edge access cover from the desired slot where you will be inserting the KONA LHi card. The card edge cover is secured by a phillips screw; save this screw for use in installing KONA LHi. -
Page 29: Cabling The System
KONA LHi Installation and Operation Manual — Cabling the System Cabling the System System Video/ When installing your system, you’ll make video and audio input/output connections. These connectors are explained individually in chapter 2. Here, system interconnection is shown and Audio Cable described. -
Page 30: Typical System
4. Connect two SDI cables between KONA LHi (BNCs are on the card endplate) and your digital VTR (Digital Betacam etc.): one from KONA LHi SDI In to the VTR SDI Out, and one from KONA LHi SDI Out to the VTR SDI In. The KONA LHi SDI connections have embedded audio so the VTR must be configured accordingly. -
Page 31: Installing Kona Lhi Software
First ensure that Final Cut Pro is installed as detailed in its user documentation. Final Cut Pro must be installed and have been run at least once prior to installing AJA KONA LHi software. Next, use the CD-ROM supplied with the KONA LHi system to install necessary software drivers and KONA LHi control panel. - Page 32 8. The installer will launch and you’ll see a series of installer screens. Initial Installer Screen 9. Click Continue to begin installation. 10.The next screen lets you know that the installer will check your Mac to ensure it has the hardware and software resources required (see Minimum Requirements in Chapter 1).
- Page 33 KONA LHi Installation and Operation Manual — Installing KONA LHi KONA LHi Software License Agreement Screen 12.The next screen shows all the available drives on the Mac Pro. Click on the drive that contains your system files (Apple default is “Macintosh HD”). A green arrow will point to the drive you’ve selected.
-
Page 34: Genlock And Your System
KONA LHi due to excellent freerun accuracy. To connect genlock, use a black burst generator output looped through the system. On the KONA LHi cables and optional KLHi-Box breakout box, house sync is connected to “Ref Loop” . -
Page 35: Final Cut Pro
After you install the KONA LHi software on your Mac Pro, all you need to do to begin using it is to become familiar with the KONA LHi Control Panel and how Final Cut Pro works with KONA LHi. - Page 36 Text Color—Colored text in the block diagram provides an indication of signal type and what the KONA LHi is doing. Text in blue shows the values automatically selected, while text in black shows values that have been manually selected. Text in red shows that the KONA is not detecting a signal or cannot negotiate with the attached device (even if it can’t detect an output device, it still shows the signal it is outputting).
- Page 37 It is important to realize that inside the Macintosh many applications can use the KONA LHi (as you switch from window to window) and it may not always be obvious which is currently controlling it. The AJA Control Panel displays the name of the application controlling the card in red text on the Format and Control tabs of the interface.
- Page 38 Yellow: reference video (black burst or other reference source) Green: indicates that KONA LHi is performing some kind of active change to the video, to make it different from the Primary Format (e.g., up/down/cross convert, SD-SD...
- Page 39 KONA LHi Installation and Operation Manual — Using The KONA LHi Control Control Tab Screen The KONA LHi can be controlled by various software applications running on a host Mac as well as be used as a Macintosh Desktop extension. The Control Tab is where you select how the card directs video and is used by application software.
- Page 40 Note: The graphic file will not be scaled to fit. If it's smaller than the current frame buffer format, KONA LHi will center it in the frame. If it's larger than the current frame buffer format, it will be cropped on the right and bottom. Also some graphics formats and bit depths may not be supported.
-
Page 41: Formats Screen
KONA LHi Installation and Operation Manual — Using The KONA LHi Control Formats Tab Screen The Formats screen shows the video format currently in use by the KONA LHi framebuffer (called the Primary Format) and allows you to change it. All throughout the Control Panel, choices are always presented based on what KONA LHi can do with the signals available and the inputs/ outputs selected. -
Page 42: Format Screen Settings
Secondary Format area (if present). If you select an alternate value in the Primary Format using the pull-down, it will change the format used by the KONA LHi framebuffer. When a change is made via the Video Format pull-down or by clicking an icon (widget) and selecting a new format via a contextual menu, the block diagram will change to reflect the new format. - Page 43 Component (SMPTE/EBU N10) Component (Beta) Audio Input—This pulldown menu allows you to pick where the audio comes from. KONA LHi supports up to 8 channels of embedded digital audio, so you can choose out of the 16 channels that can be embedded in SDI, and pick which to bring in (from the group 1-8 or 9- 16).
-
Page 44: Digital Out Screen
The Digital Out screen shows the current settings for the SDI output. If an input/output has no video, it will be indicated on the block diagram (“No Video”). KONA LHi Control Panel, Digital Out Tab SDI Output Screen Settings Information that can appear includes the following items. You can view the current setting or click on another to change to it: Primary—when selected, this indicates that the SDI output is set to the same format as the... - Page 45 KONA LHi Installation and Operation Manual — Using The KONA LHi Control HDMI Tab Screen The KONA LHi’s HDMI input and output are shown and configured at this tab screen. The HDMI input pane shows if an HDMI input source has been detected and locked on, showing the format found.
-
Page 46: Analog Out Screen
Analog Out Screen KONA LHi provides a high-quality analog component or composite output, generally used for monitoring. This screen shows the current settings for that analog output, and allows you to re-configure it when desired. KONA LHi Control Panel, Analog Out Tab Analog Out Screen Settings Select—Primary or Secondary (conversion) -
Page 47: Setup Screen
50Hz unchecked if they work solely in a 60Hz editorial environment. Note: If a prompt occurs in Final Cut Pro stating that the AJA output device is missing, this simply may be due to the QuickTime Video Output Display Filter for a given parameter being unchecked for the format selected in the application. - Page 48 When not set, this checkbox tells the KONA card to get the audio gain setting from Final Cut Pro. Analog Audio Monitor Level—when a KLHi-Box is connected to KONA LHi, the button selected determines the audio level that will appear at the Analog Audio Output RCA connector pair (“FSD”...
- Page 49 KONA LHi Installation and Operation Manual — Using The KONA LHi Control Conversion Tab This Tabbed screen is used to set conversion options. Screen KONA LHi Control Panel, ConversionTab Conversion Tab Screen Settings Pause On—these two choices determine what happens when Final Cut Pro is paused in stop mode: Full Frame: both fields are displayed resulting in some jitter while paused.
- Page 50 Final Cut Pro. When checked, there will be a new “Custom LUT” menu item under the Windows menu in Final Cut. Selecting that item brings up the KONA LHi Control Panel “Custom LUTs” dialog shown below. Defining a LUT applies it to the KONA LHi output.
- Page 51 KONA LHi Installation and Operation Manual — Using The KONA LHi Control DS Keyer Screen The KONA LHi has a hardware-based downstream keyer that is ideal for putting logos, “bugs” or other video material with an alpha channel on top of video being played out or printed to tape.
- Page 52 Matte Color: only available when the pulldown “Frame Buffer over Matte” or “Graphic over Matte” are selected-pressing this button brings up a color selection dialog. The dialog provides a variety of ways to select a matte color including a color wheel, color picker (choose from a location anywhere on the computer screen), numeric sliders, swatches, “crayons”, and spectrums.
-
Page 53: Timecode Screen
User Bits—For monitoring variable framerate (VFR) timecode (such as Varicam), you may wish to monitor the user bits embedded in the timecode. If you set this checkbox, KONA LHi will detect and interpret the user bits and display them next to the checkbox. -
Page 54: Timelapse Screen
Equipment manufacturers can use the meta data for different purposes. Timelapse Tab This Tabbed screen is used for the KONA LHi timelapse feature. To use the timelapse capability, choose the "Enable Timelapse Capture" checkbox. This functionality is enabled for all QuickTime Screen capture applications (Final Cut Pro, VTR Xchange, etc.) Set the "Capture"... -
Page 55: Info Screen
KONA LHi Installation and Operation Manual — Using The KONA LHi Control Info Screen This Tabbed screen shows the KONA LHi software files that have been installed on your system. This information may be needed if you talk to an AJA Customer Service representative to determine if files are missing or need updating. -
Page 56: Saving Your Control Panel Presets
3. KONA LHi Control Panel By “Master” , we mean a process that can control and change what the KONA LHi is doing and the Primary and Secondary formats that it uses (as set in the Control Panel “Formats” tab... -
Page 57: Quicktime Application-1St Priority
To illustrate such possible confusion, consider this multiple application scenario: 1. Open Final Cut Pro, select KONA LHi as the A/V device. FCP takes control of the board and tells it what Primary format to use. If one of the FCP windows covers up the KONA Control Panel application (which typically happens), you won't be able to see the “Kona card is in... -
Page 58: Kona Control Panel-3Rd Priority
Desktop, then the KONA LHi Control Panel gets control of the board. Control Recommendations To avoid surprises, run the KONA LHi Control Panel, keep it visible on the desktop—and stay consistent in your settings within all QuickTime applications when working on a project. For example, if you’re working in a particular format (e.g. -
Page 59: Using Multiple Aja Products
Example: select a KONA 3 as the targeted product in the AJA Control Panel application. Launch Final Cut Pro. Final Cut Pro is now using the KONA 3 for its input/output. Go back to the AJA Control Panel application and select a KONA LHi as the "targeted" product. Launch the AJA TV application. -
Page 60: Easy Setups For Typical Uses
A large set of Easy Setups are supplied with KONA LHi and installed along with the KONA LHi software. At installation you can choose exactly which sets of Easy Setups you want. These canned choices can be used directly or as the basis for making your own customized Easy Setups unique to your system. - Page 61 Setups stored on the system. If you wish to see all of the Easy Setups, factory and user-defined, then ensure the “Show All” checkbox is marked at the right side of the dialog. By default, all AJA Easy Setups will be checked.
-
Page 62: Easy Setups For Use With Kona Lhi
The factory default Easy Setups currently shipped with KONA LHi are updated regularly by AJA and posted on the relevant support web page for your model of KONA. In addition to this, there are additional easy setups available on your KONA Software CD... -
Page 63: To Create A New Easy Setup
KONA LHi Installation and Operation Manual — Easy Setups for Typical Uses To Create A New Easy Setup If you have a group of presets that you’d like to use continually, then you can create a new Easy Setup by modifying the settings of the Easy Setup currently selected (pick one most like the one you want to create) and then saving it under a new name: 1. -
Page 64: The Sequence Presets Window
The Sequence Presets Window Audio/Video Settings, Sequence Presets Window This window allows you to select an editing timebase for the current sequence. Once you add a clip to the sequence this cannot be changed. For example, once you’ve selected uncompressed 10-bit NTSC 48 kHz, you then have to stay in that timebase and can’t switch to another. -
Page 65: The Capture Presets Window
KONA LHi Installation and Operation Manual — Easy Setups for Typical Uses Audio/Video Settings, Sequence Presets Editor Window The Capture Presets Window Audio/Video Settings, Capture Presets Window This window lets you choose a preset format for incoming source video and audio media you’ll... -
Page 66: Capture Presets Editing
Factory AJA presets are easily identified by “AJA” at the beginning of their name. Since Capture Presets will be used frequently as you bring media into KONA LHi, we’ll discuss the edit screen next. -
Page 67: The Device Control Presets Window
For specific audio input selection use the KONA LHi Control Panel. The Rate pull-down selects a sample rate; it should always be set to 48 kHz for KONA LHi. By clicking on the Advanced button, a new screen will be displayed where you can select between 8- and 16-bit sampling—AJA recommends 16-bit for optimum sound quality. - Page 68 • Auto Record and PTV KONA LHi ships with VTR Device Control Presets for Sony and Panasonic VTRs. Select a Device Control Preset for the desired frame rate. Presets for both Sony and Panasonic VTRs are provided with these frame rates: 23.98, 24, 25, 29.97, and 59.94.
-
Page 69: The A/V Devices Window
You may wish to use a different KONA LHi output for final Print-to-tape from Final Cut. You can select that in this window by clicking the checkbox “Different Output for Edit to Tape/Print to Video.”... -
Page 70: Checking The System With A Simple Test Project Of Bars And Tone
Checking the System with a Simple Test Project of Bars and Tone To test that you’ve installed the KONA LHi drivers and have audio and video monitoring correctly configured, try creating a simple Final Cut Pro project with bars and tone. - Page 71 KONA LHi Installation and Operation Manual — Checking the System with a Click Filmstrip Button in Viewer Window ...Then select “Bars and Tone” Finally, click in the viewer window and drag the “bars” to the Sequence window. Click and Drag Bars and Tone From Viewer Window To Sequence...
- Page 72 Bars and Tone In Sequence Window Click “Play” to Test the System Sequence Window Showing Bars and Tone Clip Dragged from Viewer If everything works properly, go ahead and try capturing audio and video media from your VTR.
-
Page 73: Using 8-Bit Versus 10-Bit Video
KONA LHi Installation and Operation Manual — Using 8-bit Versus 10-bit Using 8-bit Versus 10-bit Video While both 8- and 10-bit uncompressed video are capable of providing excellent quality broadcast video, 10-bit represents a significantly higher quality and is preferable in many situations. -
Page 75: Chapter 5: Troubleshooting
(disable it). 3. Scratch drive not set to the RAID. Media is not being captured from desired Check the settings in the Input tab of the KONA LHi external device. Control Panel application. Also check equipment cables. Dropped frames during playback Look for scroll bars in the viewer or canvas as a warning sign that the zoom setting exceeds the fit-t-window. -
Page 76: Updating Software
Even if you cannot find the cause of the problem, having this information at hand will help when you call Apple or AJA Customer Support for help. If the problem is unknown or you need general help, first contact the dealer where you purchased the product. -
Page 77: Apple Resources
KONA LHi Installation and Operation Manual — Support If the problem is an AJA Video KONA LHi issue, then contact AJA Video Customer Support using one of the methods listed below: Contacting by Mail Address: 443 Crown Point Circle, Grass Valley, CA. 95945 USA Telephone: 1.800.251.4224 or 1.530.274.2048... -
Page 79: Video Input
Appendix A: Specifications Formats 525i 29.97 625i 25 720p 50 720p 59.94 720p 60 1080i 25 1080i 29.97 1080i 30 1080PsF 23.98 1080PsF 24 1080P 23.98 1080P 24 1080P 25 1080P 29.97 1080P 30 1080P 50 1080P 59.94 1080P 60 Video Input Digital: 8 or 10 bit 3G/HD/SD SDI, SMPTE-259/292/296/424, 1BNC HDMI v1.3, 30 bits/pixel, RGB or YUV, 2.25Gbps, SD, HD, 1080p50/60... -
Page 80: Audio Input
.5% 2T pulse response < 1% Diff Phase < 1% Diff Gain SD Component: SMPTE/EBU N10, Betacam 525 line, Betacam 525J, RGB 12 bit D/A, 8x oversampling +/- .2 db to 5.5 MHz Y Frequency Response +/- .2 db to 2.5 MHz C Frequency Response .5% 2T pulse response <1 ns Y/C delay inequity Analog SD and HD Output, 12-bits, BNC:... - Page 81 DVCProHD hardware acceleration HDV hardware acceleration Dynamic RT Extreme hardware acceleration Machine Control RS-422, Sony-style DE-9 connector provided on KONA LHi breakout cable and on optional KLHi- Box. The 9-pin DE-9 connector pinout is as follows: 1 GND 2 RX-...
- Page 83 Analog Out Screen Settings connectors Anamorphic Control Panel Basics anamorphic SD to full frame SD Control Panel Presets Apple Support Control Panel, AJA Software aspect ratio Control Panel, Tabbed Screens 2, 38 aspect ratio conversion Control Screen Audio Control Screen Settings...
- Page 84 Installing Software 21, 22 Installing 54, 55 Easy Setups Easy Setups For Use With KONA 3 Easy Setups Menu EBU N10 KONA Control Panel editing timebase KONA Software embedded audio Letterbox Factory Easy Setups Lock Input Audio Gain To Unity features Log On Authenticate Prompt Field dominance...
- Page 85 KONA LH/LHe Installation and Operation Manual — Index QuickTime Video Settings sync generator synchronize program video synchronizing other video equipment RAID system configuration, Control Panel RCA connector pair, K-Box configuration System Connections read/write system interconnections rear panel System software Recommended System Requirements Ref In Tabbed Windows Ref Loop...
- Page 86 Yellow YPbPr Zoom 14 9 38 Zoom Letterbox Zoom Wide...
Need help?
Do you have a question about the kona lhi and is the answer not in the manual?
Questions and answers