
Related Manuals for AJA KONA LH


Summary of Contents for AJA KONA LH
- Page 1 KONA LH Capture, Display, Convert Installation and Operation Guide Version 15.0 Published November 9, 2018...
-
Page 2: Notices
AJA® and Because it matters.® are registered trademarks of AJA Video Systems, Inc. for use with most AJA products. AJA™ is a trademark of AJA Video Systems, Inc. for use with recorder, router, software and camera products. Because it matters.™ is a trademark of AJA Video Systems, Inc. -
Page 3: Table Of Contents
Copyright ..........2 Contacting AJA Support ........2 Chapter 1 –... - Page 4 Who is Controlling KONA? ....... . . 47 Using Multiple AJA Products ....... 48 Notes on Using Multiple AJA Products: .
-
Page 5: Chapter 1 - Introduction
Chapter 1 – Introduction Overview The AJA KONA series brings the highest quality 2K, HD, and SD video and audio to computers running Mac, Windows or Linux Operating Systems. KONA Models Covered in this Manual This manual covers the installation and operation of these models: •... -
Page 6: System Requirements
AJA provided plugins for popular 3rd-party Professional Video Applications from Adobe, Avid, Apple, Telestream, and others. System Requirements AJA Video recommends that your system meet minimum hardware and software requirements to achieve a satisfactory level of performance. Updates to system requirements are subject to change. -
Page 7: Disk Storage Methods
NOTE: For large scale installations with shared storage, or for very high performance requirements, AJA recommends consultation with an experienced a system integrator. A consultant will be able to assist with many important variables. -
Page 8: Kona Lhe Plus Features
• Two independent SDI/HD-SDI outputs Conversion • Broadcast quality hardware-based 10-bit down-conversion Audio I/O • 2-channel analog balanced XLR audio I/O • 2-channel AES XLR audio I/O • 8-channel SDI embedded audio I/O KONA LH Capture, Display, Convert v15.0 www.aja.com... -
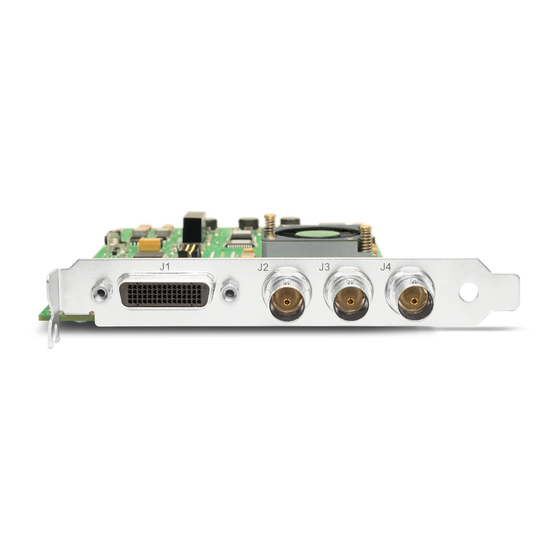
Page 9: Cable Connections
• Component/Composite/S Video Output (3x BNC) • AES In (2x XLR) • AES Out (2x XLR) • Balanced Audio In (2x XLR) • Balanced Audio Out (2x XLR) • RS-422 Machine Control (9-pin) KONA LH Capture, Display, Convert v15.0 www.aja.com... -
Page 10: Using Breakout Boxes
KLHi-Box for KONA LHi The KLHi-Box offers the same connections as the KL-Box except a single connector is provided for the following: SDI input, SDI output, HDMI v1.3a input, and HDMI v1.3a output. KONA LH Capture, Display, Convert v15.0 www.aja.com... -
Page 11: Kl-Box For Kona Lhe Plus
SD-SDI or HD-SDI input. The LHe Plus has two, and LHi has one SDI output (format independent of the input). The SDI input and outputs support video and embedded 24-bit digital audio. Use SDI wherever possible for the best quality 10- KONA LH Capture, Display, Convert v15.0 www.aja.com... -
Page 12: Lhi Only Connectors
HDCP are not supported. The HDMI input is designed to support long cable runs—up to 100 ft. when using 22 or 24AWG HDMI cable, or up to 50 ft. using 28 or 30AWG HDMI cable. The HDMI output supports standard HDMI cables only. KONA LH Capture, Display, Convert v15.0 www.aja.com... -
Page 13: Chapter 2 - Installation
AJA website: https://www.aja.com/en/support/kona-pc-system-configuration/ AJA System Test Application AJA System Test is a utility for measuring system performance with AJA KONA Video Capture cards. It is installed with the KONA Driver. The application includes: • System Disk Test • AJA Device Test •... -
Page 14: Installing The Kona Card
2. Touch the outside of the chassis to discharge any body static. 3. Remove the power cable from the back of the chassis. 4. Open the chassis. 5. Locate a recommended PCIe slot (see the AJA website for slot selection instructions). 6. Remove the backplate and screw from the PCIe slot. -
Page 15: Cabling The System
Windows 7 External Storage Also see Figure 1 on page 10 for KONA LH cable connector identification. Typical System Figure 5 on page 15 shows typical system interconnections for a system with digital A/V sources. Your system may differ depending on VTRs, audio monitoring, and video monitoring. -
Page 16: Kona Lhe Plus Cable Connections
HBA for connection of external storage RAID storage Figure 1 on page 10 for KONA LH cable connector identification. Typical System Figure 6 on page 16 shows typical system interconnections for KONA LHe Plus with digital A/V sources. Your system may differ depending on VTRs, audio monitoring, and video monitoring. -
Page 17: Installing Kona Lh Software
KONA LH with a third-party application until the application has been installed and run at least once on your workstation. Next, install the AJA software package. If you add KONA LH supported applications at a later date and have not previously installed the appropriate drivers, you must run the install program again selecting the appropriate application support software to be installed. - Page 18 Figure 7. Update Completed Messages 6. Click Shutdown to power down the computer. 7. Restart the computer. 8. Open AJA Control Panel. The AJA hardware with the updated firmware should be recognized by the Control Panel application. KONA LH Capture, Display, Convert v15.0...
-
Page 19: Chapter 3 - Operation
Chapter 3 – Operation Using KONA with Professional Video /Audio Software After you install the AJA software package on your computer, you’re ready to begin capturing and playing back video and audio using your choice of third- party software. You can go here for AJA software and documentation: https://www.aja.com/en/support/downloads/... -
Page 20: Aja Control Panel User Interface
Figure 9. Context Sensitive Menu Color Meanings All items in the AJA Control Panel block diagram are color-coded to show what is happening in real time. This applies to both icons and text. These colors indicate: KONA LH Capture, Display, Convert v15.0... - Page 21 It is the format that the third-party application software will either receive from the AJA hardware, or is sending to the hardware. All icons in blue are the same as the Primary Format used by the framebuffer. Also any text descriptions in the block diagram that appear in blue indicate that something is in the primary format.
-
Page 22: Controlling Application
Controlling Application It is important to understand that the computer can contain many applications that can use the AJA device (as you switch from window to window) and it may not always be obvious which currently controls it. Figure 12. Control Panel In Use Message (in red) In the top right corner, the Control Panel displays the name of the application controlling the unit. -
Page 23: Default Preferences
• Local Preference - A preference stored from the last AJA device's Control Panel settings to be used on next startup of AJA Control Panel. This occurs on next restoration of the default state (triggered by start up of host CPU, startup of the AJA device, or when a third-party application releases the AJA device). -
Page 24: Function Screens
"com.aja.devicesettings file" described above to this location. NOTE: The "AJA" folder needs to be created manually at this location before moving the preference file into it. On Windows there are three possible shared locations depending on your system: •... -
Page 25: Control Panel Operation
For example, if you need to dub an SD source tape needs to be HD, the signal can be routed from the SD VTR to the KONA card configured for up- conversion in the AJA Control Panel and then passed through to the HD VTR for recording. (Note: LHe Plus performs down-conversion only.) KONA LH Capture, Display, Convert v15.0... - Page 26 Graphic file names are only “remembered” in the menu until the AJA Control Panel application closed. Hold Last App This selection directs KONA to hold and output the last frame of video from the last application to control KONA.
-
Page 27: Format Screen
IMPORTANT: Do not confuse this Format function screen conversion, which uses AJA hardware and operates on either Mac or PC, with the separate Conversion function screen, which uses QuickTime for conversion and is only available on Mac. - Page 28 The RGB Range pulldown menu allows you to select either Full-range (0-1023) or SMPTE range (typically 64-940) for RGB color output. NOTE: The AJA Control Panel software uses the abbreviation “sf” instead of “PsF” when referring to “progressive segmented frame” formats. In the manual and in other literature you may see either of these acronyms used interchangeably.
-
Page 29: Input Select Screen
• V Crop: will transform SD letterbox material to an anamorphic image Input Select Screen Figure 15. AJA Control Panel, Input Select Screen On the Input Select Screen, you can view the currently selected video and audio input sources and map audio sources to the channels supported by your editing application. -
Page 30: Sdi Output Screen
SDI Output Screen Figure 16. AJA Control Panel, SDI Output Screen The SDI Out Screen shows the current settings for the SDI output(s). Because the outputs can be configured independently, one output may be the Primary format and the other output may be the Secondary format. -
Page 31: Hdmi Screen (Lhi Only)
Select SDI Output 2 (KONA LHe Plus only) Same as SDI Output 1. HDMI Screen (LHi Only) Figure 17. AJA Control Panel, HDMI Screen Select HDMI Output The Select pulldown menu allows you to select either the primary video format (framebuffer) or a secondary one (up/down/cross-conversion). - Page 32 RGB range (SMPTE or FULL) as above. Audio Ch You can select any two embedded channel pairs from those supplied for stereo output (if applicable). Select from: • 2 Ch 1-2 through 7-8 • 8 Ch 1-8 KONA LH Capture, Display, Convert v15.0 www.aja.com...
-
Page 33: Analog Out Screen
Analog Out Screen Figure 18. AJA Control Panel, Analog Out Screen KONA provides a high-quality analog component or composite + Y/C output, generally used for monitoring. This screen shows the current settings for that analog output, and allows you to re-configure it when desired (format and black- level). -
Page 34: Video Setup Screen
Video Setup Screen Figure 19. AJA Control Panel, Video Setup Screen The Video Setup screen shows various other settings which will affect how video inputs and outputs behave, and how KONA interacts with some software applications. Video Setup Progressive Pref Radio buttons allow you to choose between PsF (progressive segmented frames) and p (progressive frames) non-interlaced output. -
Page 35: Audio Setup Screen
FCP7, AJA TV, VTR Exchange, and older versions of After Effects. Boxes that are checked will define what framerate and resolution types will appear in the list of available formats in the AJA hardware. For example, if 25/50 is unchecked, then all resolution/framerate combinations with 25 or 50 fps will not appear in the list of capabilities for the installed AJA hardware, when using software that relies on the QuickTime VOut filter. -
Page 36: Conversion Screen (Mac Os Only)
Conversion Screen (Mac OS only) Figure 21. AJA Control Panel, Conversion Screen In the Mac OS version of the AJA Control Panel, this screen offers controls that determine how the card behaves with 3rd-party applications. IMPORTANT: Do not confuse this Conversion function screen, which uses QuickTime for conversion and is only available on Mac, with the Format function screen which uses AJA hardware for conversion and operates on either Mac or PC. - Page 37 Figure 22. AJA Control Panel, Codec Screen, Frame-padding Pattern Choices Pause On These two choices determine what happens when the editing application is paused in stop mode: • Full Frame: both fields are displayed resulting in some jitter while paused •...
-
Page 38: Downstream Keyer Screen
Settings in the DS Keyer Screen provide control over how the keyer operates and whether it’s turned on or off. NOTE: Different controls are available, depending on KONA LH model. For example, Graphic capabilities are available on KONA LHi, but not on KONA LHe plus. - Page 39 (pixel x pixel count) should match the primary format in the frame buffer or the secondary format if upconverting. Example: you wish to key a logo on top of your 1920x1080 footage, the still image with alpha channel that you load should be 1920x1080. KONA LH Capture, Display, Convert v15.0 www.aja.com...
-
Page 40: Lut Screen
"look" on a specific display. Users can also specify their own custom LUTs by creating a LUT file and uploading it to an AJA Video Device using the LUT (lookup table) screen in the Control Panel. Custom LUT Controls The LUT Transfer Function screen displays an approximate representation of the effect of the current LUT settings. - Page 41 LUT file. You can create a custom LUT file using most text editors or spread sheets, provided the data is arranged according to the LUT File Format Specification that follows (see "LUT File Format Specification" on page 42). KONA LH Capture, Display, Convert v15.0 www.aja.com...
- Page 42 Once the LUT file is created, you can upload it with the following steps: 1. Before loading a LUT, make sure you are using an RGB/RGBA frame buffer format, and that you have a AJA Video Device that supports LUTs. 2. Open AJA Control Panel and select the “LUT” pane.
-
Page 43: Timecode Screen
The Timecode Screen selects the timecode stream read for applications that use it (for example, when the timecode source is set to “Use control panel setting,” AJA Control Room will read the selected stream). It is also used for monitoring the RP- 188 timecode embedded in the digital data stream, and can be used for selecting a timecode offset (if required). -
Page 44: Presets Screen
Timecode Output Settings Use QT Timecode (Mac OS Only) This feature is for Final Cut Pro 7 (or earlier), AJA Control Room, and AJA TV only. When checked, it directs KONA to output timecode from the QuickTime timecode track. Timecode Burn-in This pulldown selects whether the timecode value is displayed in a “burned-in”... - Page 45 After configuring the AJA Control Panel screens, you can then save all your settings as a snapshot for later recall, called a preset. In this way, you can organize presets for all your typical tasks, eliminating manual reconfiguration. Saving, Loading and Deleting Presets To save a preset, simply go to the Presets screen and click “Save Preset”.
-
Page 46: Firmware Screen
You will be required to power-cycle your computer to finish the changeover. "Firmware Update Procedure" on page 17 for details. Info Screen Figure 30. AJA Control Panel, Information Screen (Standard Mode) KONA LH Capture, Display, Convert v15.0 www.aja.com... -
Page 47: Who Is Controlling Kona
“In use” application. If no in-use message is displayed, the AJA Control Panel is in control of KONA. If no QuickTime applications are running, the board’s state is determined by the AJA Control Panel application’s settings. -
Page 48: Using Multiple Aja Products
Io Express as the “targeted” product. Launch the AJA TV application. AJA TV will now use the Io Express for its output. If you switch back to the Adobe application, you will see that it is still using KONA for its input/output. -
Page 49: Using 8-Bit Versus 10-Bit Video
Industry standard professional mastering formats—Sony Digital Betacam for Standard Definition and Panasonic D5 for High Definition—are both true 10-bit formats. KONA LH Capture, Display, Convert v15.0 www.aja.com... -
Page 50: Appendix A - Specifications
• Single Link 4:2:2 or 4:4:4 (1x BNC) • HDMI v1.3 30 bits/pixel, RGB or YUV, 2.25 Gbps, SD, HD, 1080p 50/60 (1 x mini- HDMI) Video Output Analog • Composite/S-Video (Y/C) (1x BNC/2x BNC+Adapter) KONA LH Capture, Display, Convert v15.0 www.aja.com... - Page 51 • Zoom Letterbox: results in image zoomed to fill full screen • Zoom Wide: results in a combination of zoom and horizontal stretch to fill a 16:9 screen; this setting can introduce a small aspect ratio change KONA LH Capture, Display, Convert v15.0 www.aja.com...
- Page 52 9 GND Shell GND Size (w x d x h) • .75" x 8.25" x 5.0" (19.05mm x 209.55mm x 127mm) Weight • 0.7 lb (0.4 kg) Power • 13W typical, 15W maximum KONA LH Capture, Display, Convert v15.0 www.aja.com...
-
Page 53: Kona Lhe Plus Tech Specs
• SMPTE/EBU N10, Betacam 525 line, Betacam 525J, RGB • 12-bit D/A, 8x oversampling • +/- .2 dB to 5.0 MHz Y Frequency Response • +/- .2 dB to 1 MHz C Frequency Response KONA LH Capture, Display, Convert v15.0 www.aja.com... - Page 54 • Crop: image is cropped to fit new screen size Reference Input • Analog Color Black (1V) or Composite Sync (2 or 4V) • Looping • 75 ohms on optional KL-Box, terminated on supplied breakout cable Electrical Interface • 4-lane PCIe 1.0 KONA LH Capture, Display, Convert v15.0 www.aja.com...
- Page 55 • Safe Operating Temperature: 0 to 40 degrees C (32 to 104 degrees F) • Safe Storage Temperature (Power OFF): -40 to 60 degrees C (-40 to 140 degrees F) • Operating Relative Humidity: 10-90% noncondensing • Operating Altitude: <3,000 meters (<10,000 feet) KONA LH Capture, Display, Convert v15.0 www.aja.com...
-
Page 56: Appendix B - Safety & Compliance
AUSTRIA, BELGIUM, BULGARIA, CYPRUS, CZECH REPUBLIC, DENMARK, ESTONIA, FINLAND, FRANCE, GERMANY, GREECE, HUNGARY, IRELAND, ITALY, LATVIA, LITHUANIA, LUXEMBOURG, MALTA, NETHERLANDS, POLAND, PORTUGAL, ROMANIA, SLOVAKIA, SLOVENIA, SPAIN, SWEDEN, UNITED KINGDOM, ICELAND, LICHTENSTEIN, NORWAY, SWITZERLAND KONA LH Capture, Display, Convert v15.0 www.aja.com... - Page 57 As an electromagnetic wave equipment for home use (Class B), (Broadcasting Communication this equipment is intended to use mainly for home use and may Equipment for Home Use) be used in all areas. KONA LH Capture, Display, Convert v15.0 www.aja.com...
- Page 58 Aviso! Leia e siga todos os avisos e instruções assinalados no produto ou incluídos na documentação. Avviso! Leggere e seguire tutti gli avvisi e le istruzioni presenti sul prodotto o inclusi nella documentazione. KONA LH Capture, Display, Convert v15.0 www.aja.com...
- Page 59 Aviso! Desconecte este dispositivo da tomada durante trovoadas ou quando não é utilizado durante longos períodos de tempo. Avviso! Utilizzare soltanto i collegamenti e gli accessori specificati e/o venduti dal produttore, quali il treppiedi e l'esoscheletro. KONA LH Capture, Display, Convert v15.0 www.aja.com...
- Page 60 è stato rovesciato del liquido è stato rovesciato o qualche oggetto è caduto nel dispositivo, il dispositivo è stato esposto a pioggia o umidità, non funziona correttamente o è caduto KONA LH Capture, Display, Convert v15.0 www.aja.com...
- Page 61 Aviso! Dado que a ficha principal é utilizada como a desconexão para o dispositivo, esta deve manter-se prontamente acessível e funcional. Avviso! Poiché il cavo di alimentazione viene usato come dispositivo di sconnessione, deve rimane prontamente accessibile e operabile. KONA LH Capture, Display, Convert v15.0 www.aja.com...
- Page 62 CA tipo brick. Advertência! Remova os cabos CA de alimentação brick da rede elétrica ao mover a unidade. Avvertenza! Scollegare il cavo dell’alimentatore quando si sposta l’unità. KONA LH Capture, Display, Convert v15.0 www.aja.com...
-
Page 63: Warranty And Liability Information
AJA Video, with shipping charges prepaid. AJA Video shall pay to return the product to Customer but only if to a location within the country in which the AJA Video service center is located. -
Page 64: Limitation Of Liability
No amendment to or modification of this warranty will be binding unless in writing and signed by AJA Video. The laws of the State of California, USA will govern this warranty and any dispute arising from it. Any translation of this... -
Page 65: Index
Input Passthrough 25 QuickTime Format Selection 47 Control Panel Control Message 47 Input Select Screen Control Room 6 Control Screen Installation Reset to Default 45 Standard Mode 25 KONA Card 14 RGB Range 28, 32 KONA LH Capture, Display, Convert v15.0 www.aja.com... - Page 66 Transferring Saved Presets 45 Up Conversion 28 Uploading Custom User LUT file 42 User Bits 43 Utilities 5 VANC Checkbox 34 Video Format (Primary and Secondary 27 Video Input 29 Video+Key 31 Video Setup Screen KONA LH Capture, Display, Convert v15.0 www.aja.com...
Need help?
Do you have a question about the KONA LH and is the answer not in the manual?
Questions and answers