Table of Contents
Advertisement
Quick Links
Advertisement
Table of Contents

Related Manuals for AJA KONA LHe


Summary of Contents for AJA KONA LHe
- Page 1 Models: LHe and LH Installation Operation Guide September 25, 2007...
-
Page 2: Notice
All other trademarks are the property of their respective holders. Notice Copyright © 2007 AJA Video, Inc. All rights reserved. All information in this manual is subject to change without notice. No part of the document may be reproduced or transmitted in any form, or by any means, electronic or mechanical, including photocopying or recording, without the express written permission of AJA Inc. -
Page 3: Limited Warranty
AJA Video, with shipping charges prepaid. AJA Video shall pay for the return of the product to the Customer if the shipment is to a location within the country in which the AJA Video service center is located. -
Page 5: Table Of Contents
AJA KONA LH and Xserve RAID ........ - Page 6 Installing the KONA LHe Card ........
- Page 7 KONA LH/LHe Installation and Operation Manual — Table of Contents Chapter 5: Troubleshooting If You Run Into Problems ............81 Updating Software .
-
Page 9: Chapter 1: Introduction
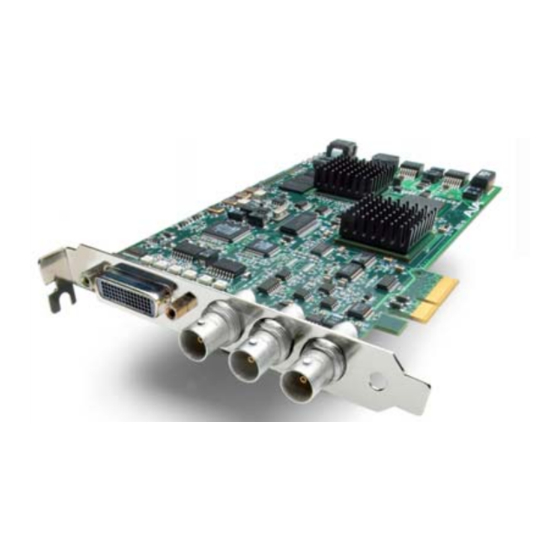
Edge Shot Photo Here Overview The AJA KONA LHe and LH bring the highest quality HD, SD and analog video/ audio to an Apple G5 Power Mac running Final Cut Pro 5 software. (For readability this manual refers throughout to the LHe and LH as “LH”.) KONA LH digital and analog interfaces are very high quality. -
Page 10: Features
This manual covers the installation and operation of both KONA LHe and LH models and discusses using them with Final Cut Pro and other applications. Instructions for installing the KL-Box are shipped with the KL-Box. Features For ease of discussion, the text in this manual refers to both the LH and LHe models as “KONA LH”, except where differences are specifically noted. -
Page 11: Software
Support for After Effects, Combustion, Motion, and Other Applications (application software not included). AJA’s KONA LH software and hardware were developed for use with Final Cut Pro for powerful integrated video/audio capture, editing, and video production. With an Apple G5, FCP, and KONA LH, you have an ideal high-quality cost- effective system for standard definition, high definition, and analog video... - Page 12 Registration Sheet—allows you to register your card by mail or online (details provided). Please save all packaging for shipping the KONA LH should you wish to do so when moving or sending it in for service. AJA KONA LH or LHe Card (KONA LH shown) Installation Software CD...
-
Page 13: System Requirements
KONA LH/LHe Installation and Operation Manual — System Requirements System Requirements AJA Video recommends that your system meet minimum hardware and software requirements to achieve a satisfactory level of performance when operating it. Here, we provide minimum and recommended requirements and then discuss disk storage issues that should be understood for proper system configuration. -
Page 14: Understanding Disk Storage Methods
Understanding The KONA LH card, an Apple Power Mac, and Final Cut Pro, together offer an Disk Storage unprecedented level of features and performance for all Video/Audio production applications. However, to ensure performance and quality, the disk storage system Methods used with the Apple Power Mac must be able to meet the demands of storing realtime uncompressed media. -
Page 15: About Raids
KONA LH/LHe Installation and Operation Manual — System Requirements LHe or LH Disk Storage Solutions—External ATA/IDE or SCSI RAID About RAIDs Redundant Array of Independent Disks, or RAID, is a group of hard drives that appears to the host Power Mac as a single high-speed storage unit. RAID systems enable you to increase storage capacity and get the performance, reliability, and data protection needed for video production, but not possible from a single hard drive. -
Page 16: Software For Striping
AJA KONA LH and Xserve RAID For the optimum in disk storage with Final Cut Pro 5HD and AJA KONA LH, we recommend Apple’s Xserve RAID. Xserve RAID holds up to 14 hot-swap Apple Drive Modules—5.6TB of storage—in a rack-optimized 3U enclosure. Each 7200-... - Page 17 KONA LH/LHe Installation and Operation Manual — System Requirements Storage Hours of Storage Transfer Rate in FORMAT Requirement in Per Terabyte of MB/sec GB/Hour Disk 10 bit Uncompressed Standard Definition 8 bit Uncompressed 13.1 Standard Definition DV50 Standard Definition 43.4 DV25 Standard Definition 90.0 Photo JPEG...
-
Page 18: Cable Connections
Cable Connections KONA LH offers unsurpassed cable connectivity for a video/audio capture card. Connections are made via a supplied breakout cable and three BNCs on the KONA LH Card endplate. Using the The breakout cable supports: Breakout Cable • Reference Input (BNC) and 3 BNCs •... -
Page 19: Using Kl-Box
KONA LH/LHe. The KL-Box is also available for the KONA LS and LSe, but uses a different cable set when ordered for the LS card. Separate AJA part numbers exist for each configuration, so ensure your dealer supplies you with the correct one. -
Page 20: Connector Descriptions-Cables And Kl-Box
Connector Connectors on the standard cable set are labelled as to their function for easy Descriptions— installation and maintenance. Similarly, connectors on the optional KL-box are also labelled. Cables and KL- SDI Input and Outputs BNC connectors are provided on the KONA LH card endplate for one SD-SDI or HD-SDI input and two SDI outputs (independent of the input). -
Page 21: Reference Video
A Note About RGB supports it. However, because the KONA LH (and SMPTE SDI) native format is YPbPr, AJA recommends the use of YPbPr whenever possible for analog monitoring. Although component video monitors often have RGB inputs, it’s better to use YPbPr when the monitor supports it. The YPbPr format provides “headroom”... - Page 23 KONA LH/LHe Installation and Operation Manual — In This Manual...
-
Page 25: Kona Lh And Your Workflow
Chapter 2: Getting Started KONA LH And Your Workflow There are a lot of ways to think about the video/audio workflow you follow. Your setup might be categorized as corporate video, professional broadcast, or desktop video. Or the workflow might be categorized by the type of equipment used rather than the nature of work produced—many systems these days are a mixture of equipment from high-end professional to desktop video. -
Page 26: Understanding Typical Workflows
Desktop Video directly from a camcorder or deck. Corporate/Industrial Digital capture via Firewire with Output via AJA KONA LH is used for playing back On-site Editing KONA LH. The LH has Analog HD component in, captured media and editing/mastering... -
Page 27: Photojpeg
KONA LH/LHe Installation and Operation Manual — Understanding Typical PhotoJPEG Data rate: approximately 1-3 MB/second standard definition or high definition—supported by internal system drive Quality: Very Good The Apple PhotoJPEG codec offers an excellent compressed media choice for on-line quality at low data rates. PhotoJPEG can use the full-raster at 4:2:2 sampling. -
Page 28: Hdv
HDV media. The KONA LH advanced scaling engine takes the native frame (long GOP 1440 HD) and outputs it via hardware—in real time. Precision AJA circuitry re-sizes the video to proper 1920 x 1080, providing quick playback of HDV captured by Final Cut for monitoring and recording. -
Page 29: Uncompressed 10-Bit
IEEE1394. The one notable exception is the JVC BR-HD50 HDV deck which has a remote serial port for RS422 protocol and device control. Check the KONA LH/ LHe support area on the AJA website for a whitepaper on HDV, which gives details on using KONA LH/LHe with various HDV equipment. -
Page 30: Uncompressed 8-Bit
Uncompressed Data rate: 21 MB/second standard definition, or 100-124 MB/second high 8-bit definition (see later “Storage Capacity” chart in Chapter 1 for the various transfer rates per format)—requires SCSI, Fibre Channel, or ATA drive array Quality: Excellent Uncompressed media is KONA LH’s native storage format, offering the highest quality available. -
Page 31: Installation Overview
Chapter 3: Installation & Configuration Installation Overview The installation and set up of a KONA LHe/LH is very simple. All of the steps of installation and configuration are documented in this chapter, summarized as follows: 1. Unpack the shipping box 2. -
Page 32: Unpacking
If you find any damage, immediately notify the shipping service and supply them with a complete description of the damage. AJA will repair or replace damaged items. If you find shipping damage, contact your AJA dealer or distributor for details on how to have your KONA LH repaired or replaced. -
Page 33: Installing The Kona Lhe Card
Express slot, so any of the available slots will work correctly. 6. Remove the card edge access cover from the desired slot where you will be inserting the KONA LHe card. The card edge cover is secured by a phillips screw; save this screw for use in installing KONA LHe. - Page 34 PCI-Express Slots PowerMac G5, PCI-Express Slots: use any available slot for KONA LHe Note: After you install the KONA LHe card, you may notice that in the MacOSX Network preferences there is a message stating “You have a new network port named KONA LHe —be sure to check the settings...”. There is no need to take any action;...
-
Page 35: Installing The Kona Lh Card
KONA LH/LHe Installation and Operation Manual — Installing the KONA LH Installing the KONA LH Card 1. Place the G5 in a well-lit convenient area, where you will have easy access to the chassis access door. 2. Using your hand, touch the outside of the G5 to discharge any static electricity you have. - Page 36 PCI Slots Locate the PCI Slots Inside Your PowerMac PowerMac G5 PCI Slot Detail Note: After you install the KONA LH card, you may notice that in the MacOSX Network preferences there is a message stating “You have a new network port named KONA LH —be sure to check the settings...”.
-
Page 37: Cabling The System
Installs in PCI-Express Slot in G5 KONA LH Installs in PCI-X slot in G5 Standard Breakout Cable 60-pin connector To KONA LHe SDI Input BNC SD-SDI/HD-SDI SDI Output 1 BNC Video/Audio SDI Output 2 BNC Reference Input BNC Analog Video green... -
Page 38: Typical System
External Reference Component Reference Connect to Video KL-Box Using Cables and Instructions Supplied With it Computer Monitor Installed Inside G5 AJA KONA LH Card POWER CMPTR • • • • • • • • • • • • • •... -
Page 39: Installing Kona Lh Software
First ensure that Final Cut Pro 5 is installed as detailed in its user documentation. Final Cut Pro 5 must be installed and have been run at least once prior to installing AJA KONA LH software. Next, use the CD-ROM supplied with the KONA LH system to install necessary software drivers and KONA LH control panel. - Page 40 Log On Authenticate Prompt 7. Click on the OK button after entering a valid user and password. 8. The installer will launch and you’ll see a series of installer screens. Initial Installer Screen 9. Click Continue to begin installation. 10. The next screen lets you know that the installer will check your PowerMac to ensure it has the hardware and software resources required (see Minimum Requirements in Chapter 1).
- Page 41 KONA LH/LHe Installation and Operation Manual — Installing KONA LH System Check Installer Screen 11. Read and agree to the Software License Agreement. KONA LH Software License Agreement Screen 12. The next screen shows all the available drives on the Power Mac. Click on the drive that contains your system files (Apple default is “Macintosh HD”).
- Page 42 Select a Destination Drive For the KONA LH Software 13. At the next screen, click the Install button to place the software on the drive you previously selected. Easy Install, Installer Screen...
- Page 43 KONA LH/LHe Installation and Operation Manual — Installing KONA LH 14. A system prompt will pop up with a reminder that OS X must be restarted after installation. Click the Continue Installation button to proceed. Restart OS X Reminder Prompt 15.
-
Page 44: Genlock And Your System
Final Installation Screen Genlock and Your System For video stability and proper system operation, it’s always best to genlock all equipment to house sync. Although genlock is not absolutely required for KONA LH or your system, better quality and repeatable operation will be experienced by doing so. - Page 45 KONA LH/LHe Installation and Operation Manual — Genlock and Your System...
-
Page 47: Final Cut Pro
With Final Cut Pro you’ll choose the proper setups from the canned ones provided by AJA. These canned setups are called “Easy Setups” in Final Cut Pro and are available to use and edit under Audio/Video Settings in the “Final Cut Pro” menu (next to the apple menu). -
Page 48: Control Panel Basics
Control Panel Although the KONA LH card auto-configures depending on the inputs present, Basics and the Control Panel intuitively shows at a glance much about what the card is doing, there is even more information presented that may not be obvious. To ensure you make the most of the software, run the KONA LH application and look at its display. - Page 49 KONA LH/LHe Installation and Operation Manual — Using The KONA LH Framebuffer—The framebuffer is the “engine” in the KONA LH card where active video operations take place using Final Cut Pro, other 3rd-party applications, or even KONA LH itself. The framebuffer has a format (called the “Primary Format”...
- Page 50 Color Meanings—All items in the KONA LH Control Panel block diagram are color-coded to show what is happening in realtime. This applies to both icons and text. These colors have the following corresponding meanings: Blue: video is same format as the Primary Format (framebuffer) Red: the selected operation cannot be performed Yellow: reference video (black burst or other reference source) Green: indicates that KONA LH is performing some kind of active change to...
-
Page 51: Input Screen
KONA LH/LHe Installation and Operation Manual — Using The KONA LH Input Screen Click a Tab to Select a Screen. Click Arrows to View Left or Right Tabs Click to Select an Input KONA LH Control Panel, Inputs Tab On the Inputs screen you can view the currently selected video and audio input sources and map audio sources to the channels supported by Final Cut Pro (more on this later). -
Page 52: Proc Amp Screen
When a KONA LH has a KL-Box attached, there are two ways to connect AES/ EBU inputs: XLR or BNC connectors. The Audio Input pulldown allows you to select which of the two connector groups will be used. Proc Amp Screen The Proc Amp screen settings affect the analog proc amplifier built into the KONA LH. -
Page 53: Formats Screen
KONA LH/LHe Installation and Operation Manual — Using The KONA LH Formats Screen The Formats screen shows the video format currently in use by the KONA LH framebuffer (called the Primary Format) and allows you to change it. All throughout the Control Panel, choices are always presented based on what KONA LH can do with the signals available and the inputs/outputs selected. -
Page 54: Format Screen Settings
1080i 30 1080sf 23.98 1080sf 24 Note: The AJA Control Panel software uses the abbreviation "sf" instead of "psf" when referring to "progressive segmented frame". In the manual and in other literature you may see either of these acronyms used interchangeably. -
Page 55: Digital Out Screen
KONA LH/LHe Installation and Operation Manual — Using The KONA LH the aspect ratio preserved Crop: image is cropped horizontally to fit new screen size Digital Out Screen The Digital Out screen shows the current settings for both the SDI outputs. If an input/output has no video, it will be indicated on the block diagram (“No Video”). - Page 56 Control-clicking on an output icon brings up a contextual menu allowing you see the current format and make changes if desired. KONA LH Control Panel, Digital Out Tab If Video+Key has been selected as an output, the block diagram will indicate the SDI outputs with video in blue and the key in red.
-
Page 57: Analog Out Screen
KONA LH/LHe Installation and Operation Manual — Using The KONA LH Analog Out Screen KONA LH provides a high-quality analog component or composite output, generally used for monitoring. This screen shows the current settings for that analog output, and allows you to re-configure it when desired. KONA LH Control Panel, Analog Out Tab Analog Out Screen Settings Analog Format—choices in the Analog Format pulldown menu vary depending upon... -
Page 58: Control Screen
Control Screen The KONA LH can be controlled by various software applications running on a host PowerMac as well as act as a Macintosh Desktop extension. The Control Screen is where you select how the KONA LH directs video and is used by application software. - Page 59 KONA LH/LHe Installation and Operation Manual — Using The KONA LH KONA LH Control Panel, Control Tab, Default Kona Output Pulldown Menu Choices available and their meaning are: Macintosh Desktop: when selected, this selection causes the KONA LH program video output (digital and analog) to be an extension of the Macintosh desktop. MacOS windows and applications can appear (when applicable) on the KONA outputs.
-
Page 60: Playback Timing (Greyed-Out When In Input Passthrough)
Control Panel. This works regardless of the setting of “Default Kona Output.” Test Pattern—This selection directs KONA LHe/LH to output a choice of preset patterns—when no other QuickTime application is using the KONA board. In addition to the preset test pattern choices, a “Load File...” selection at the bottom of the menu allows you to load any standard Mac RGB graphics file (.tif, .psd, etc.) into the frame buffer for display. -
Page 61: Ds Keyer
KONA LH/LHe Installation and Operation Manual — Using The KONA LH DS Keyer The KONA LH has a hardware-based downstream keyer that is ideal for putting logos, “bugs” or other video material on top of video being played out or printed to tape. - Page 62 Matte Color: only available when the pulldown “Frame Buffer over Matte” is selected—pressing this button brings up a color selection dialog. The dialog provides a variety of ways to select a matte color including a color wheel, color picker (choose from a location anywhere on the computer screen), numeric sliders, swatches, “crayons”, and spectrums.
-
Page 63: Setup Screen
KONA LH/LHe Installation and Operation Manual — Using The KONA LH Setup Screen KONA LH provides a high-quality analog component or composite output, generally used for monitoring. This screen shows the current settings for that analog output, and allows you to re-configure it when desired. KONA LH Control Panel, Setup Tab Setup Screen Settings Analog Black Level—choices in the black Level pulldown menu are only available for... -
Page 64: Codec Screen
Codec Screen This screen offers a variety of controls that determine how the card behaves under Final Cut Pro. KONA LH Control Panel, Codec Tab Codec Screen Settings Pause On—these two choices determine what happens when Final Cut Pro is paused in stop mode: Full Frame: both fields are displayed resulting in some jitter while paused. - Page 65 KONA LH/LHe Installation and Operation Manual — Using The KONA LH YUV-RGB Conversion: These pulldowns select industry standard color space and gamma transfer functions for the YUV-RGB conversion, or allow you to direct the KONA card to automatically determine it for you. Colorspace—choose from: Rec 601 Rec 709...
-
Page 66: Timecode Screen
Timecode Screen The timecode is used for both monitoring the RP-188 timecode embedded in the digital data stream and for selecting a timecode offset (if required) for the attached VTR (connected to KONA LH’s RS-422 port)—and sent during assemble-edit mode. KONA LH Control Panel, Timecode Tab Timecode Screen Settings RP-188 Timecode <n>—in RP-188 timecode there can be multiple timecode values... -
Page 67: Info Screen
Info Screen This Tabbed screen shows the KONA LH software files that have been installed on your system. This information may be needed if you talk to an AJA Customer Service representative to determine if files are missing or need updating. -
Page 68: Saving Your Control Panel Presets
Saving Your After configuring the KONA LH Control Panel via the Tabbed screens, you can Control Panel then save all your settings as a snapshot for later recall—called a preset. In this way, you can organize the presets for all your typical tasks, saving time by not having to Presets manually reconfigure each time. -
Page 69: Quicktime Application-1St Priority
KONA LH/LHe Installation and Operation Manual — Using The KONA LH QuickTime Application—1st Priority If a running QuickTime application uses KONA LH for capture or output, it controls the Primary format via its own menus and settings. For example, when Final Cut Pro is active (it’s the topmost application) and has KONA LH as its “A/V Device”, then the KONA LH'S Primary format is determined by Final Cut's “Video Playback”... -
Page 70: Mac Desktop Video-2Nd Priority
Mac Desktop Video—2nd Priority If you choose “Macintosh Desktop” as your KONA Default Video Output (Control Tab), then the Mac Finder uses the KONA LH board as a second (or third, or fourth...) graphics “desktop” output—as long as there isn't a QuickTime application running. -
Page 71: Kona Control Panel-3Rd Priority
KONA LH/LHe Installation and Operation Manual — Easy Setups for Typical Control Recommendations To avoid surprises, run the KONA LH Control Panel, keep it visible on the desktop— and stay consistent in your settings within all QuickTime applications when working on a project. - Page 72 Easy Setups stored on the system. If you wish to see all of the Easy Setups, factory and user-defined, then ensure the “Show All” checkbox is marked at the right side of the dialog. By default, all AJA Easy Setups will be checked. A large set...
-
Page 73: Easy Setups Menu
Easy Setups For Use With KONA LH The factory default Easy Setups currently shipped with KONA LH are shown below. Your list may differ as AJA is continually improving and adding functionality. Easy Setup (as listed in FCP Pulldown) Description/Usage AJA KONA LH- 720p 23.98 8-bit Varicam... -
Page 74: Audio/Video Settings Menu
Device Control Preset—select the AJA Video KONA LH device (NTSC or PAL as desired). This tells Final Cut that the KONA LH will control the VTR attached to KONA LH or KL-Box. -
Page 75: Easy Setups For Use With Kona Lh
KONA LH/LHe Installation and Operation Manual — Easy Setups for Typical Audio/Video Settings, Summary Window To Create A New Easy Setup If you have a group of presets that you’d like to use continually, then you can create a new Easy Setup by modifying the settings of the Easy Setup currently selected (pick one most like the one you want to create) and then saving it under a new name: 1. - Page 76 At any point in the above procedure you can go to the other tabbed windows and make additional changes. For example, in the Sequence Presets, Capture Presets, and Device Control Presets windows you can select a preset and click on an Edit button to change specific aspects of the preset.
- Page 77 KONA LH/LHe Installation and Operation Manual — Easy Setups for Typical The Sequence Presets Window Audio/Video Settings, Sequence Presets Window This window allows you to select an editing timebase for the current sequence. Once you add a clip to the sequence this cannot be changed. For example, once you’ve selected uncompressed 10-bit NTSC 48 kHz, you then have to stay in that timebase and can’t switch to another.
-
Page 78: The Sequence Presets Window
Audio/Video Settings, Sequence Presets Editor Window The Capture Presets Window Audio/Video Settings, Capture Presets Window... - Page 79 (it will create the copy for you when you try to edit). Factory AJA presets are easily identified by “AJA” at the beginning of their name. Since Capture Presets will be used frequently as you bring media into KONA LH, we’ll discuss the edit screen next.
- Page 80 QuickTime Audio Settings—these settings select an audio input source and affect how it’s processed by Final Cut Pro. The Device pull-down should be set to AJA Kona. The Input pull-down selects that KONA LH (AJA Kona) will be used for capturing audio—it does not select the specific inputs.
- Page 81 KONA LH/LHe Installation and Operation Manual — Easy Setups for Typical machine control settings and parameters for the VTR attached. For KONA LH presets this means the VTR attached at the RS422 port on KONA LH. For non- KONA LH presets, this means camcorder/VTRs attached directly at the FireWire port or via some other interface.
- Page 82 Since Final Cut currently only supports 2 channels of audio, AJA recommends you leave all of these settings as set in the factory defaults. You may wish to use a different KONA LH output for final Print-to-tape from Final Cut.
- Page 83 KONA LH/LHe Installation and Operation Manual — Checking the System with Checking the System with a Simple Test Project of Bars and Tone To test that you’ve installed the KONA LH drivers and have audio and video monitoring correctly configured, try creating a simple Final Cut Pro project with bars and tone.
- Page 84 Click Filmstrip Button in Viewer Window ...Then select “Bars and Tone” Finally, click in the viewer window and drag the “bars” to the Sequence window. Click and Drag Bars and Tone From Viewer Window To Sequence...
-
Page 85: Checking The System With A Simple Test Project Of Bars And Tone
KONA LH/LHe Installation and Operation Manual — Checking the System with Bars and Tone In Sequence Window Click “Play” to Test the System Sequence Window Showing Bars and Tone Clip Dragged from Viewer If everything works properly, go ahead and try capturing audio and video media from your VTR. -
Page 86: Using 8-Bit Versus 10-Bit Video
Using 8-bit Versus 10-bit Video While both 8- and 10-bit uncompressed video are capable of providing excellent quality broadcast video, 10-bit represents a significantly higher quality and is preferable in many situations. Because 10-bit video has four times the numerical precision when compared to 8- bit, it has a signal-to-noise ratio 12 db higher than 8-bit video. -
Page 87: Chapter 5: Troubleshooting
Chapter 5: Troubleshooting If You Run Into Problems One useful way to find the source of problems is to isolate your system to the smallest size where the problem still occurs and then note all the symptoms. This serves to eliminate areas not involved in the problem and makes finding the problem easier. -
Page 88: Updating Software
The sequence setting does not match the clip setting. clip on a sequence. Updating Software Check on the AJA Video website (www.aja.com/support_kona.html) for software updates. If any are available, download the file and read any associated instructions prior to installing the software. -
Page 89: Support
Final Cut presets and Easy Setups match what you are trying to do. Even if you cannot find the cause of the problem, having this information at hand will help when you call Apple or AJA Customer Support for help. -
Page 91: Video Input
Appendix A: Specifications Formats 525i 29.97 625i 25 720p 59.94 720p 60 1080i 25 1080i 29.97 1080i 50 1080psf 23.98 1080psf 24 Video Input Digital: 8 or 10 bit HD-SDI/SDI, SMPTE-259/292/296, Dual-rate Analog: Composite/S-Video (Y/C): NTSC, NTSCJ, PAL 12 bit A/D, 2x oversampling 3 line adaptive comb filter decoding +/- .25 db to 5.0 MHz Y Frequency Response +/- .25 db to 1 MHz C Frequency Response... -
Page 92: Audio Input
Analog SD and HD Output, 12-bits, BNC: YPbPr, RGB YPbPr, RGB (component mode) Composite/YC (composite mode) Audio Input Digital: 2-channel 24 bit AES/EBU, 48KHz sample rate Synchronous or Non-synchronous (Internal sample rate conversion) 24 bit SMPTE-259 SDI embedded audio, 8-ch, 48kHz synchronous Analog: 2-channel balanced input +24dbu Full Scale Digital 24 bit A/D, 48 KHz sample rate... - Page 93 KONA LH/LHe Installation and Operation Manual — Machine Control Machine Control RS-422, Sony 9-pin protocol Connector provided on KONA LH breakout cable and on optional KL- Box. 9-pin D-connector pinout is as follows: 1..... GND 2..... RX- 3..... TX+ 4..... GND 5.....
-
Page 95: Index
Audio/Video Settings Menu 68 connectors 29 Control Panel Basics 40 Control Panel Presets 60 Balanced 12 Control Panel, AJA Software 3 Bars and Tone, sample FCP project 77 Control Panel, KONA 2 39 Betacam 13 Control Panel, Tabbed Screens 42... - Page 96 Frame Rate 75 data protection 8 Frame Size 73 DB9 12, 30 Frame size 71 Default Kona Output 50 Framebuffer 41 Device Control Preset 68 Freerun 52 Digital Out Screen 47 Digital Out Screen Settings 47 G4 5 Digital System 30 G5 28 Disk Storage Solutions 6 Genlock 52...
- Page 97 Log On Authenticate Prompt 32 LTC 75 QuickTime Audio Settings 74 LUT 57 QuickTime video 71 QuickTime Video Settings 74 QuickTime™ Drivers, AJA KONA 2 3 Machine Control 12 machine control parameters 75 Machine Control, pinout 3 RAID 6, 7, 8 Macintosh Desktop 51...
- Page 98 Sequence Preset 68 Timecode Offset 59 Sequence window 77 Timecode Screen 58 set up 23 Timecode Screen Settings 58 Settings 65 Timing adjustment, Control Panel 52 shipping 24 Transfer Rate 9 Shipping Box Contents 4 Transfer Rate Table 9 Slot Detail 28 Troubleshooting 81 SMPTE protocol 12 troubleshooting 81...
- Page 99 KONA LH/LHe Installation and Operation Manual — Index Xserve RAID 6, 8 Y/R-Y/B-Y 13 Yellow 42 YPbPr 13 YUV 13...
Need help?
Do you have a question about the KONA LHe and is the answer not in the manual?
Questions and answers