Table of Contents
Advertisement
Available languages
Available languages
Quick Links
Owner's Manual
Commercial Combination Oven
(Microwave and Convection)
Keep these instructions for future
reference. If the equipment changes
ownership, be sure this manual
accompanies equipment.
Original Instruction
FOR COMMERCIAL USE ONLY
This manual covers model:
Contents
Model Identification ................................... 2
Grounding Instructions .............................. 3
Installation ................................................. 3
Display and Features ................................ 4
Programming ............................................. 7
Convection Cooking .................................. 8
(microwave and convection) .................. 9
User Options ............................................11
User Maintenance ................................... 13
Service Codes ......................................... 13
Care and Cleaning .................................. 14
Before Calling Service ............................. 15
JET*
Advertisement
Chapters
Table of Contents

Related Manuals for ACP JET Series


Summary of Contents for ACP JET Series
-
Page 1: Table Of Contents
JET* This manual covers model: Owner’s Manual FOR COMMERCIAL USE ONLY Contents Model Identification ........2 Grounding Instructions ......3 Installation ..........3 Display and Features ........ 4 Programming ..........7 Convection Cooking ........8 Combination Cooking (microwave and convection) ....9 Commercial Combination Oven Microwave Cooking (microwave only)..10 User Options ..........11... -
Page 2: Model Identification
Model Identification When contacting ACP, provide product information. Product information is located on oven serial plate. Record the following information: – Inside the U.S.A. or Canada, call toll-free at 866-426-2621. Model Number: _____________________________ – Outside the U.S.A. and Canada, call 319-368-8120. -
Page 3: Grounding Instructions
Installation Unpacking Oven • Inspect oven for damage such as dents in door or inside oven cavity. • Report any dents or breakage to source of purchase immediately. Do not attempt to use oven if damaged. To avoid risk of electrical shock •... -
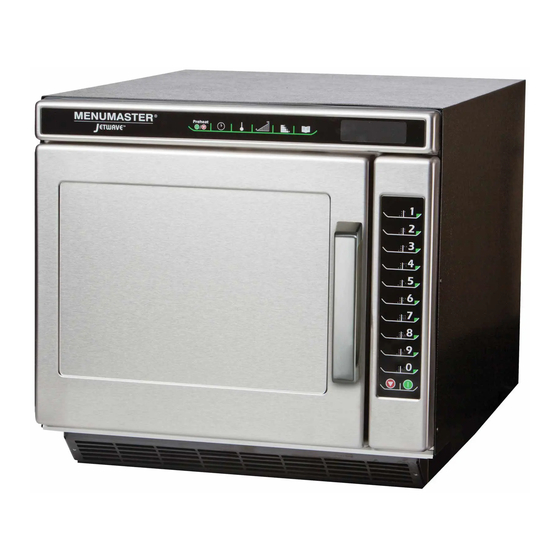
Page 4: Display And Features
Display and Features A—Oven Door Handle D—Side Control Panel B—Top Control Panel E—Magnetic Intake Air Filter C—Display F—Grease Tray Oven Features Standby shows in display after Standby oven door has been opened and closed, or after turning oven OFF Or Press Preheat with the Preheat On/Off pad. - Page 5 Display and Features (cont’d) Ready and set temperature Ready displays after pressing Preheat On/Off pad. Ready indicates 475°F or 250°C the oven is up to temperature. (example of 475°F shown) Indicates oven is in a preprogrammed cooking program Cooking information shows in Item-05 Stage:1 display after pressing a single (or...
- Page 6 Display and Features (cont’d) Cooking Display Start pad DISPLAYS DESCRIPTION The Start pad is used Oven Preheating 475°F or 250°C displays to begin a manual time when oven is turned on and is warming up to the entry cooking cycle. selected preheat temperature.
-
Page 7: Programming
Programming Programming Pads Programming Oven is shipped from the factory for single digit programming. To change Preheat Setting the oven default to double digit programming, see User Option section. To The convection temperature setting program the amount of time, power level, or temperature setting for a pad: can be set between 150°F to 475°F (65°C to 250°C). -
Page 8: Convection Cooking
Convection Cooking CAUTION To avoid risk of burns, handle utensils, rack, and door with care. Allow oven, utensils, and rack to cool before cleaning. Oven, utensils, and rack, become hot during operation. To operate the oven for convection cooking only, you can use preprogrammed pads or manual time entry. The following instructions are for convection cooking only. -
Page 9: Combination Cooking (Microwave And Convection)
Combination Cooking (microwave and convection) CAUTION To avoid risk of burns, handle utensils, rack, and door with care. Allow oven, utensils, and rack to cool before cleaning. Oven, utensils, and rack, become hot during operation. To operate the oven for combination cooking, you can use preprogrammed pads or manual time entry. The following instructions are for combination cooking only. -
Page 10: Microwave Cooking (Microwave Only)
Microwave Cooking (microwave only) CAUTION To avoid risk of burns, handle utensils, rack, and door with care. Allow oven, utensils, and rack to cool before cleaning. Oven, utensils, and rack, become hot during operation. To operate the oven for microwave cooking, you can use preprogrammed pads or manual time entry. The following instructions are for microwave cooking only. -
Page 11: User Options
User Options HIDDEN PAD POWER LEVEL PROGRAM SAVE TIME ENTRY HIDDEN ON/OFF STAGE TEMP ENTRY Changing user options Options such as single or double digit programming, beep volume, and maximum cooking time can be changed to suit individual preferences. Didn’t like an option? Factory settings are marked in bold. -
Page 12: Usb Flash Drive Operating Instructions
USB Flash Drive Operating Instructions TURN PREHEAT OFF PROGRAM SAVE USB Port To program the oven using the USB Flash Drive: Oven must be in Standby mode (Preheat must be OFF) Note: A standard USB flash drive is compatible with oven. 1. -
Page 13: User Maintenance
• If code does not reappear, continue normal use with the oven. 2. If service code reappears, write down the service code displayed and contact the nearest authorized ACP Servicer. • Do not use oven until contacting the ACP Servicer. -
Page 14: Care And Cleaning
FOR A NEW OVEN: before using it the first time, spray damp towel with ACP Oven Shield and wipe all interior surfaces. Do not remove Oven Shield Oven Protectant (Item#SH10). Turn oven on and pre-heat to start cooking. -
Page 15: Before Calling For Service
Oven fan turns on while oven is Normal operation. not preheating or cooking. 2014 ACP, Inc or full product documentation visit: Part No. 20000606 225 49th Avenue Drive Printed in U.S.A. Rev 3/14 www.acpsolutions.com... - Page 16 JET* Dieses Handbuch gilt für Modell: Bedienungsanleitung NUR FÜR GEWERBLICHE ZWECKE Inhalt Modellbezeichnung ........2 Erdung ............3 Installation ..........3 Display und Funktionen ......4 Programmierung ........7 Heißluftgaren ..........8 Kombiniertes Garen (Mikrowelle und Heißluft) ....... 9 Kommerzieller Kombi-Ofen Mikrowellengaren (nur Mikrowelle) ..
- Page 17 Modellkennzeichnung Halten Sie bei einem Anruf bei ACP bitte die Produktinformationen bereit. Die Produktinformationen finden Sie auf dem Schild mit der Seriennummer des Ofens. Notieren Sie folgende Informationen: – Innerhalb der USA oder Kanada gebührenfrei unter 866-426-2621. Modellnummer: _____________________________ – Außerhalb der U.S.A. und Kanada unter 319-368- Seriennummer (oder S/N): ____________________ 8120.
-
Page 18: Erdung
Installation Auspacken des Ofens WARNUNG • Überprüfen Sie den Ofen auf Beschädigungen, wie Beulen an der Tür oder im Garraum. Um die Gefahr von • Melden Sie dem Händler unverzüglich alle Dellen und Bruchschäden. Stromschlägen oder Tod zu Benutzen Sie den Ofen nicht, wenn er beschädigt ist. vermeiden, muss dieser Ofen •... -
Page 19: Display Und Funktionen
Display und Funktionen A—Türgriff E—Seitliches Bedienfeld B—Oberes Bedienfeld E—Magnetisches Luftansaugfilter C—Display F—Fettpfanne Ofenfunktionen Nach dem Öffnen und Schließen Standby der Ofentür oder nach dem Ausschalten des Ofens über die Or Press Preheat Vorheiz-Taste wird "Standby" angezeigt. Nach dem Drücken der Vorheiz- Oven Preheating Taste erscheint im Display "Oven Preheating"... - Page 20 Display und Funktionen (Fortsetzung) Nach Drücken der Vorheiz-Taste Ready wird "Ready" (Bereit) und die eingestellte Temperatur angezeigt. 475°F or 250°C "Ready" (Bereit) zeigt an, dass der Ofen die Temperatur erreicht hat. (im Beispiel 475°F) Zeigt an, dass sich der Ofen in einem vorprogrammierten Garprogramm befindet.
- Page 21 Display und Funktionen (Fortsetzung) Garanzeige ANZEIGEN BESCHREIBUNG Start-Taste Über die Start-Taste Oven Preheating 475°F or 250°C wird angezeigt, wird ein manuell wenn der Ofen eingeschaltet und auf die eingestellte Temperatur vorgeheizt wird. Oven Preheating blinkt, eingegebener Garzyklus O V E N P R E H E A T I N G wenn ein Garprogramm gestartet oder programmiert 475°F gestartet.
- Page 22 Programmieren Programmiertasten Programmieren der Der Ofen ist werkseitig auf einstellige Programmnummern eingestellt. Vorheizeinstellungen Wie Sie den Ofen standardmäßig auf zweistellige Programmnummern Die Heißlufttemperatur kann von umstellen, erfahren Sie im Abschnitt Benutzeroptionen. Programmierung 65°C bis 250°C (150 ° F bis 475° von Dauer, Leistung und Temperatur für eine Taste: F) eingestellt werden.
-
Page 23: Programmierung
Heißluftgaren ACHTUNG Um die Gefahr von Verbrennungen zu vermeiden, handhaben Sie Geschirr, Rost und Tür mit Vorsicht. Lassen Sie Ofen, Geschirr und Rost vor dem Reinigen abkühlen. Ofen, Geschirr und Rost werden beim Betrieb heiß. Über vorprogrammierte Tasten oder manuelle Zeiteingaben können Sie den Ofen auch nur zum Heißluftgaren verwenden. -
Page 24: (Mikrowelle Und Heißluft)
Kombi-Garen (Mikrowelle und Heißluft) ACHTUNG Um die Gefahr von Verbrennungen zu vermeiden, handhaben Sie Geschirr, Rost und Tür mit Vorsicht. Lassen Sie Ofen, Geschirr und Rost vor dem Reinigen abkühlen. Ofen, Geschirr und Rost werden beim Betrieb heiß. Über vorprogrammierte Tasten oder manuelle Zeiteingaben können Sie den Ofen im Kombi-Programm verwenden. Folgende Anweisungen gelten nur für Kombi-Garen. -
Page 25: Mikrowellengaren (Nur Mikrowelle)
Mikrowellengaren (nur Mikrowelle) ACHTUNG Um die Gefahr von Verbrennungen zu vermeiden, handhaben Sie Geschirr, Rost und Tür mit Vorsicht. Lassen Sie Ofen, Geschirr und Rost vor dem Reinigen abkühlen. Ofen, Geschirr und Rost werden beim Betrieb heiß. Über vorprogrammierte Tasten oder manuelle Zeiteingaben können Sie den Ofen zum Mikrowellengaren verwenden. -
Page 26: Benutzeroptionen
Benutzeroptionen VERSTECKTE LEISTUNGSSTUFE PROGRAMM ZEITEINGA TASTE SPEICHERN HIDDEN EIN/AUS TEMP. EINGA- STUFE Ändern der Benutzeroptionen Falls Ihnen eine Option nicht gefällt Einstellungen wie ein- oder zweistellige Programmnummern, Lautstärke des Pieptons und maximale Garzeit können benutzerspezifisch angepasst werden. Die Werkseinstellungen sind fett Optionen können nur geändert werden, wenn am Ofen STANDBY angezeigt wird: gedruckt. -
Page 27: Betrieb Über Usb-Flash-Laufwerk
Betrieb über USB-Flash-Laufwerk VORHEIZEN AUS PROGRAMM SPEI- CHERN USB-Anschluss Programmieren des Ofens über das USB-Flash-Laufwerk: Der Ofen muss sich im Standby-Modus befinden (Vorheizen AUS) Hinweis: Der Ofen ist kompatibel mit standardmäßigen USB-Flash-Laufwerken. 1. Entfernen Sie die Schutzabdeckung unten am vertikalen Tastenfeld. 2. -
Page 28: Wartung Durch Den Benutzer
• Wenn der Code nicht mehr angezeigt wird, fahren Sie mit dem normalen Ofenbetrieb fort. 2. Wenn Service-Code wieder erscheint, notieren Sie ihn und wenden Sie sich an den nächsten autorisierten ACP-Servicefachmann. • Verwenden Sie den Ofen erst nach Kontaktaufnahme zum ACP- Servicefachmann. -
Page 29: Pflege Und Reinigung
Sie den Ofen reinigen. BEI EINEM NEUEN OFEN: bevor Sie den Ofen das erste Mal verwenden, sprühen Sie ACP Ofenschutzspray auf ein feuchtes Tuch und reiben Sie alle Innenflächen damit ab. Entfernen Sie den Ofenschutzfilm (Artikel Nr. SH10) nicht. Schalten Sie den Ofen ein und heizen Sie ihn vor, um den Garprozess zu starten. - Page 30 Das Gebläse schaltet sich ein, obwohl sich der Ofen nicht Normaler Betrieb. im Vorheiz- oder Garmodus befindet. Vollständige Produktunterlagen 2013 ACP, Inc Teil Nr. 20000606 225 49th Avenue Drive finden Sie unter: Gedruckt in den U.S.A. Rev 9/13 Cedar Rapids, IA 52404 www.acpsolutions.com...
- Page 31 JET* Ce guide porte sur le modèle: Manuel de l'utilisateur POUR UTILISATION COMMERCIALE UNIQUEMENT Table des matières Identification du modèle ......2 Instructions de mise à la terre ....3 Installation ..........3 Affichage et caractéristiques ..... 4 Programmation .......... 7 Cuisson par convection ......
-
Page 32: Identification Du Modèle
Identification du modèle Lorsque vous contactez ACP, veuillez fournir les informations relatives au produit. Vous trouverez ces informations – Aux États-Unis ou au Canada, appelez le numéro sur la plaque signalétique du four. gratuit 866-426-2621. Prenez note des informations suivantes : –... -
Page 33: Instructions De Mise À La Terre
Installation Déballage du four AVERTISSEMENT • Inspectez le four pour détecter tout dommage, tel que des bosses sur la porte ou dans la cavité du four. Pour éviter tout risque de choc • Signalez immédiatement toute bosse ou dommage à la source de électrique voire la mort, ce four l'achat. -
Page 34: Affichage Et Caractéristiques
Affichage et caractéristiques A—Poignée de la porte du four D—Panneau de commande latéral B—Panneau de commande supérieur E—Filtre d'admission d'air magnétique C—Affichage F—Plateau à graisse Caractéristiques du four Le message de veille s'affiche Standby lorsque la porte est ouverte et fermée ou après avoir arrêté... - Page 35 Affichage et caractéristiques (suite) Le message indiquant que le four est prêt Ready (Prêt) (Ready) et la température réglée s'affiche après avoir appuyé sur la touche de marche/ 250°C ou 475°F arrêt du préchauffage. Le message Ready indique que le four a atteint la température réglée.
- Page 36 Affichage et caractéristiques (suite) Affichage de la cuisson AFFICHAGES DESCRIPTION Touche Start La touche Start permet Oven Preheating 475°F ou 250°C s'affiche de lancer un cycle de lorsque le four est mis en marche et chauffe à la température de préchauffage sélectionnée. Oven PRÉCHAUFFAGE cuisson avec saisie Preheating clignote également lorsqu'un mode de...
-
Page 37: Programmation
Programmation Programmation des touches Programmation Le four est expédié de l'usine pour une programmation à un seul chiffre. du réglage du Pour changer la valeur par défaut du four et passer à une programmation préchauffage à deux touches, voir la section Options de l'utilisateur. Pour programmer la durée, le niveau de puissance ou la température sur une touche : En mode convection, la température Le four doit être en marche. -
Page 38: Cuisson Par Convection
Cuisson par convection MISE EN GARDE CAUTION Pour éviter tout risque de brûlures, prenez toutes les précautions nécessaires lorsque vous manipulez des ustensiles, les grilles et la porte. Attendez que le four, les ustensiles et la grille aient refroidi avant de procéder au nettoyage. Le four, les ustensiles et la grille chauffent pendant le fonctionnement. -
Page 39: Cuisson Mixte (Micro-Ondes Et Convection)
Cuisson mixte (micro-ondes et convection) MISE EN GARDE CAUTION Pour éviter tout risque de brûlures, prenez toutes les précautions nécessaires lorsque vous manipulez des ustensiles, les grilles et la porte. Attendez que le four, les ustensiles et la grille aient refroidi avant de procéder au nettoyage. -
Page 40: Cuisson Au Micro-Ondes (Uniquement)
Cuisson au micro-ondes (uniquement) MISE EN GARDE CAUTION Pour éviter tout risque de brûlures, prenez toutes les précautions nécessaires lorsque vous manipulez des ustensiles, les grilles et la porte. Attendez que le four, les ustensiles et la grille aient refroidi avant de procéder au nettoyage. Le four, les ustensiles et la grille chauffent pendant le fonctionnement. -
Page 41: Options De L'utilisateur
Options utilisateur TOUCHE MASQUÉE SAISIE DURÉE NIVEAU DE LA PUISSANCE ENREGISTREMENT DU PROGRAMME HIDDEN MARCHE/ARRÊT SAISIE TEMP ÉTAPE Modification des options utilisateur Vous n'aimez pas une Les options, telles que la programmation avec une touche simple ou double, le volume du option ? bip et la durée maximum de cuisson peuvent être adaptées aux préférences personnelles. -
Page 42: Instructions D'utilisation De La Clé Usb
Instructions d'utilisation de la clé USB ÉTEINDRE LE PRÉCHAUFFAGE ENREGISTREMENT DU PROGRAMME Port USB Pour programmer le four à l'aide de la clé USB: Le four doit être en mode Standby (le préchauffage doit être éteint) Remarque: Une clé USB standard est compatible avec le four. 1. -
Page 43: L'utilisateur
• Si le code ne s'affiche pas, vous pouvez utiliser le four. 2. Si le code de service réapparait, prenez-en note et contacter le centre de service agréé ACP. • Ne pas utiliser le four tant que le service ACP n'a pas été contacté. -
Page 44: Entretien Et Nettoyage
POUR UN NOUVEAU FOUR: avant d’utiliser le four pour la première fois, pulvérisez de l’ACP Oven Shield sur une une serviette mouillée imbibée et nettoyez toutes les surfaces à l’intérieur. Ne pas enlever le produit Oven Shield Oven Protectant (réf. - Page 45 Fonctionnement normal. en cours de préchauffage ou de cuisson. Pour une documentation complète, visitez le site : 2013 ACP, Inc Réf. 20000606 225 49th Avenue Drive www.acpsolutions.com Imprimé aux États-Unis Rév 9/13 Cedar Rapids, IA 52404 U.S.A.
- Page 46 JET* Este manual corresponde al modelo: Manual del usuario PARA USO COMERCIAL ÚNICAMENTE Índice Identificación del modelo ......2 Instrucciones de conexión a tierra .... 3 Instalación ..........3 Pantalla y características ......4 Programación ..........7 Cocción por convección ......8 Cocción combinada (microondas y convección) Cocción por microondas Horno comercial de combinación...
-
Page 47: Identificación Del Modelo
Identificación del modelo Cuando se ponga en contacto con ACP, debe presentar la información del producto. La información del producto se encuentra en la placa del número de serie del horno. Registre la siguiente información: Número de modelo: __________________________ gratis al 866-426-2621. -
Page 48: Instrucciones De Conexión A Tierra
Instalación Desempaque del horno ADVERTENCIA • Revise que el horno no presente daños, como por ejemplo abolladuras en la puerta o en el interior del horno. Para evitar el riesgo de descarga • Informe de inmediato sobre cualquier abolladura o rotura al proveedor eléctrica o muerte, el horno debe del horno. -
Page 49: Pantalla Y Características
Pantalla y funciones D—Panel de control lateral A—Manija de puerta de horno E—Filtro magnético de aire de entrada B—Panel de control superior F—Bandeja para grase C—Pantalla Funciones del horno Standby (En espera) aparece Standby en la pantalla después de que la puerta del horno se ha abierto Or Press Preheat y cerrado, o después de apagar... - Page 50 Pantalla y funciones (continuación) Ready (Listo) y la temperatura Ready elegida aparecen después de presionar la tecla Precalentar 475°F or 250°C Encender/Apagar. Ready indica que el horno ha llegado a la temperatura. (el ejemplo muestra 475°F) Indica que el horno está en un programa de cocción preprogramado La información de cocción aparece...
- Page 51 Pantalla y funciones (continuación) Pantalla de cocción Tecla Comenzar PANTALLAS DESCRIPCIÓN La tecla Comenzar se Aparece Oven Preheating 475°F or 250°C cuando utiliza para comenzar el horno se enciende y se está calentando hasta la un ciclo de cocción de temperatura de precalentamiento seleccionada.
-
Page 52: Programación
Programación Teclas de programación Programación de El horno se envía de fábrica para programación con un solo número. Para cambiar los Ajustes de el estado predeterminado del horno a programación de doble número, vea la Precalentamiento sección Opciones del usuario. Para programar la cantidad de tiempo, nivel de energía o ajuste de temperatura de una tecla: La temperatura de convección puede El horno debe estar ENCENDIDO. -
Page 53: Cocción Por Convección
Cocción de convección PRECAUCIÓN Para evitar el riesgo de quemaduras, manipule los utensilios, la bandeja y la puerta con cuidado. Permita que el horno, los utensilios y la bandeja se enfríen antes de limpiarlas. El horno, los utensilios y la bandeja se calientan durante la operación. - Page 54 Cocción de combinación (microondas y convección) PRECAUCIÓN Para evitar el riesgo de quemaduras, manipule los utensilios, la bandeja y la puerta con cuidado. Permita que el horno, los utensilios y la bandeja se enfríen antes de limpiarlas. El horno, los utensilios y la bandeja se calientan durante la operación.
-
Page 55: Cocción Combinada (Microondas Y Convección) Cocción Por Microondas (Solo Microondas)
Cocción por microondas (solo microondas) PRECAUCIÓN Para evitar el riesgo de quemaduras, manipule los utensilios, la bandeja y la puerta con cuidado. Permita que el horno, los utensilios y la bandeja se enfríen antes de limpiarlas. El horno, los utensilios y la bandeja se calientan durante la operación. Para operar el horno para cocción de microondas, puede utilizar teclas preprogramadas o selección manual del tiempo . -
Page 56: Opciones Del Usuario
Opciones del usuario TECLA OCULTA SELECCIONAR TIEMPO NIVEL DE POTENCIA GUARDAR PROGRAMA HIDDEN ENCENDIDO/APAGADO SELECCIONAR TEMPERATURA ETAPA Cambio de las opciones del usuario Pueden cambiarse opciones tales como la programación de una cifra o de dos cifras, el volumen ¿No le gustó una opción? del bip y el tiempo máximo de cocción para que se ajusten a las preferencias individuales. -
Page 57: Instrucciones De Uso Para El Disco De Llavero Usb
Instrucciones de uso para el disco de llavero USB APAGAR PRECALENTAMIENTO GUARDAR PROGRAMA Puerto USB Para programar el horno utilizando la memoria Flash para USB: El horno debe estar en modo en Espera (Precalentar debe estar APAGADO) Nota: Una unidad de memoria Flash USB estándar será compatible con el horno. 1. -
Page 58: Mantenimiento Por El Usuario
2. Si el código de servicio vuelve a aparecer, escriba el código de servicio que aparece en la pantalla y póngase en contacto con el proveedor del servicio autorizado ACP. • No utilice el horno hasta haberse puesto en contacto con el proveedor... -
Page 59: Cuidado Y Limpieza
Artículos de limpieza recomendados: toalla húmeda, estropajo plástico, limpiador para hornos Oven Cleaner ACP (artículo # CL10) y protector para hornos ACP Oven Shield Oven Protectant (Ítem# SH10). Evite rociar limpiadores cáusticos o que contengan amoníaco, fosfatos, cloro, sodio o hidróxido de potasio (lejía), directamente sobre las superficies del horno. -
Page 60: Antes De Llamar Al Servicio
Operación normal. precalentando ni cocinando. Para la documentación completa del Part No. 20000606 2013 ACP, Inc Printed in U.S.A. Rev 9/13 225 49th Avenue Drive producto, visite: Cedar Rapids, IA 52404 www.acpsolutions.com Estados Unidos...
Need help?
Do you have a question about the JET Series and is the answer not in the manual?
Questions and answers