Table of Contents
Advertisement
Available languages
Available languages
Advertisement
Table of Contents

Subscribe to Our Youtube Channel
Related Manuals for Clas Ohlson WS2068HL+WT450H


Summary of Contents for Clas Ohlson WS2068HL+WT450H
- Page 1 36-2384 Weather Station Sääasema Model/Malli: WS2068HL+WT450H www.clasohlson.com...
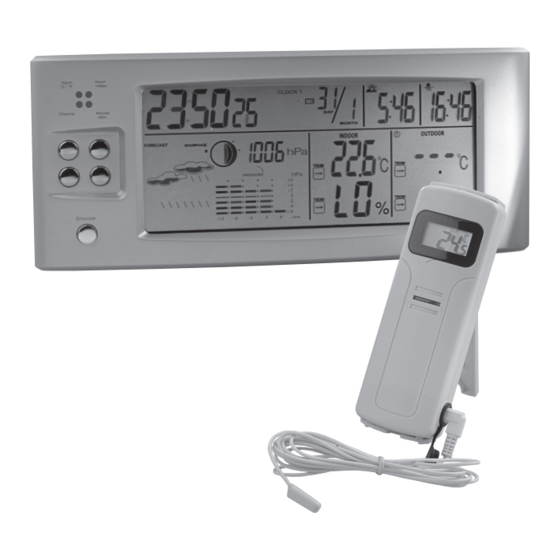
- Page 3 Weather Station Article number: 36-2384, model: WS2068HL+WT450H The weather station has lots of functions for different weather information: WS2068HL The weather station display • Clock with 2 time displays • 2 alarms with weekly programmes • Calendar • Local temperature and humidity •...
- Page 4 WS2068HL + WT450H Wireless Weather Station with Weather Forecast WT450H sensor transmitter Channel Number (1 – 4) Temperature/humidity display LED indicator Date/Month Day of the week Clock (1 – 2) Alarm time (1 – 2) Sunrise time Time,year,day Sunset time Chosen channel for outdoor readings (1, 2, 3, 4) Outdoor temperature (°C / °F)
- Page 5 Starting Up Button placement 1. [Snooze] Activates the backgroud Light and “Snooze” function. 2. [Max/Min+] Displays the Max/Min temperature. Switches between “Clock 1”, “Clock 2” and “Alarm 1” and “Alarm 2”. Sets the clock, alarm, date, year, as well as the temperature and humidity alarm.
- Page 6 Starting Up First set the wireless sensor transmitter so that the weather station receives a radio signal from the sensor when it is activated. Step 1: Setting the wireless sensor transmitter 1. Remove the battery cover and insert 2x LR6 batteries (not included), according to the 3 5 7 markings on the battery compartment.
- Page 7 Programming the weather station (receiver/base unit) Automatic search function (searching for signals) 1. The memorisation function starts automatically when the batteries are inserted into the weather station and lasts 3 minutes. 2. During these three minutes the weather station (receiver) receives temperature and humidity signals from the sensor transmitter Note! The wireless transmission range is affected by the material of the building...
- Page 8 Settings Switch between different settings and setup modes by pressing [Mode]. 1. Setting the calendar, latitude and longitude Press and hold in [Mode] for 3 seconds (4) to enter the setup mode for time, day, month, year, latitude and longitude. 2. Setting the pressure altitude compensation Press [Mode] (4) directly after setting 1, set the pressure altitude compensation.
- Page 9 Switch between different settings and setup modes by pressing [Mode]. 1. Setting the time 1. Press and hold [Mode] (4) for 3 seconds. 2. Press [Max/Min+] to set the hours 3. Press [Select °C / °F/-] to confirm the setting and enter the minutes setting. 4. Press [Max/Min+] to set the minutes 5.
- Page 10 2. Setting the pressure altitude compensation When the weather station is moved to another height above sea level, the pressure reading needs to be adjusted to compensate for the new altitude if the correct pressure is to be read. Let the weather station adjust itself to the new altitude setting for 12 hours before expecting accurate readings.
- Page 11 4. Setting the indoor humidity alarm Press [Mode] three times directly after setting 1. 1. “Set value” will flash next to “Indoor”. 2. Press and hold [Snooze] to change between different settings: High humidity alarm ( ), low humidity alarm ( ) or deactivated alarm ( ). 3.
- Page 12 6. Setting the outdoor humidity alarm Press [Mode] five times directly after setting 1. 1. “Set value” will flash next to “Indoor”. 2. Press [Alarm / Channel] to select the desired channel (1 – 4). 3. Press and hold [Snooze] to change between different settings: High humidity alarm ( ), low humidity alarm ( ) or deactivated alarm ( ). 4.
- Page 13 Setting Clock 2 (alternative time) 1. Press [Mode] to enter the setup mode for “Clock 2”. 2. Press [Select °C / °F/-] or [Max/Min+] to set the desired hour (only the hours will be changed, the other settings will be the same as for “Clock1”). Setting the alarm Setting Alarm1 or Alarm 2 1.
- Page 14 Moon phase display New Moon Third Quarter Moon, First Quarter Moon, waning (appears after waxing (appears midnight) before midnight) Full Moon Indoor temperature and humidity display 1. Indoor temperature display. 2. Indoor humidity display. 3. Outdoor temperature display (channel 1-4) 4.
- Page 15 Display of Min/Max temperature 1. Press [Mode] to enter the setup mode for “Clock 1”. 2. Press [Max/Min+] to change between “Min”, “Max” and current display. Note! The Min/Max memory resets automatically every midnight. Explanation of “Hi” and “Lo” on the display “Hi”...
- Page 16 Weather Forecasts Weather forecast symbols The weather station records changes in the air pressure and by using them together with the temperature and humidity measurements is able to forecast the weather for the coming 12 to 24 hours over a radius of 30-50 km. Sunny Cloudy Rain...
-
Page 17: Altitude Setting
Actual Pressure Display The weather station displays the current pressure in hPa: A pressure of over 1015 hPa is regarded as high pressure (good weather) and under 1015 hPa is regarded as low pressure. Pressure is given at sea level so that it can be compared with that at different altitudes, it is therefore possible that the official pressure does not agree with the pressure your weather station indicates. - Page 18 Pressure Display The weather station displays the indicated pressure for the past 12 hours. The animated symbols showing the weather forecast are governed by earlier pressure Pressure Trend readings, by following the pressure trend bar graph it is possible to predict the accuracy of the forecast.
- Page 19 Range • Place the sensor transmitter within a range of 40 m from the weather station. The range depends on the material and layout of the building where the weather station and transmitter are placed, metal and concrete walls can reduce the range.
-
Page 20: Safety Instructions
Safety Instructions Warning It is extremely dangerous to swallow batteries. Batteries and battery operated products should therefore be kept out of children’s reach. The sensor transmitter is drip proof but should be mounted where it is not exposed to rain or direct sunlight. Do not use abrasive or strong cleaning agents on the transmitter or weather station, its exterior could be damaged and electronic components could rust. Do not expose the sensor transmitter to too low a temperature;... -
Page 21: Specifications
Specifications Weather Station WS2029LH Batteries: 3x LR6 (AA) Temperature measuring range: -5°C to 50°C Accuracy: ± 1°C (within the measuring range 0°C to + 40°C) Humidity measuring range: 15% to 95% RH Accuracy: ± 5 % Resolution: Sensor transmitter WT450H Batteries: 2x LR6 (AA) Temperature measuring range: -30°C to 70°C Humidity measuring range:... - Page 22 Map of Norway Map of Finland Map of Sweden 16° 22' E 48° 16° 4° 21' E 51° 4° 68° 9' W 17° 68° 23° 20' E 43° 23° 14° 25' E 50° 14° 12° 33' E 56° 13° 24° 57' E 60°...
- Page 23 Latitude and longitude table Note! The sunrise/ sunset function does not work all the way up to latitude 64˚ because of the large difference between sunrise and sunset during the year, or midnight sun and perpetual sun. AUSTRIA Vienna 48° 15' N 16° 22' E 48° 16° BELGIUM Brussels 50° 48' N 4° 21' E 51°...
- Page 24 Sääasema Tuotenumero: 36-2384, malli WS2068HL+WT450H Sääasemassa on monia toimintoja ja säätietoja: WS2068HL Sääaseman näyttö • Kello, jossa 2 eri aikanäyttöä • 2 hälytystä viikko-ohjelmalla • Kalenteri • Paikallinen lämpötila ja ilmankosteus. • Ilmanpainenäyttö: hPa • Ottaa vastaan lämpötilan ja ilmanpaineen neljästä erillisestä langattomasta anturista 433 MHz radiotaajuudella.
- Page 25 WS2068HL + WT450H Langaton sääasema, jossa sääennustus Lähetin WT450H Kanavanumero (1-4) Lämpötilan/ilmankosteuden näyttö Merkkivalo led Päivämäärä/Kuukausi Viikonpäivä Kello (1 – 2) Hälytysaika (1 – 2) Auringon nousuaika Kello, vuosi, päiväys Auringon laskuaika Valittu kanava ulkomittauksiin (1, 2, 3, 4) Ulkolämpötila (°C / °F) Ilmankosteus ulkona (%) Sääennustuksen symbolit Kuun liikkeet...
- Page 26 Käytön aloittaminen Painikkeiden sijainti 1. [Snooze] Aktivoi taustavalaistus ja ”Snooze”-toiminto. 2. [Max/Min+] Näyttää Maks./Min. lämpötilat. Näytöt vaihtuvat ”Clock 1”, ”Clock 2” ja ”Alarm 1” ja ”Alarm 2” välillä. Asetukset: Kello, hälytys, päiväys , vuosi, lämpötila ja ilmankosteushälytys. 3. [Select °C / °F/-] Vaihtaa °C / °F välillä, käytetään myös lämpötilan ja ilmankosteushälytysten asetuksessa.
- Page 27 Käytön aloittaminen Kytke ensin langaton lähetin, jotta sääasema (vastaanotin) saa radiosignaalin lähettimen käynnistyessä. Vaihe 1 Langattoman lähettimen asennus 1. Ota paristolokeron kansi pois ja aseta 2 3 5 7 kpl LR6-paristoa (ei sisälly) paristolokeron merkintöjen mukaisesti. 2. Talo-koodin (01H) tulee vilkkua 8 sekuntia. 3.
- Page 28 Sääaseman (vastaanottimen) asennus Automaattinen opetustoiminto (signaalin etsintä) 1. Opetustoiminto käynnistyy automaattisesti, kun paristot asetetaan sääasemaan ja jatkuu n. 3 minuuttia. 2. Näiden 3 minuutin aikana tulee sääaseman (vastaanottimen) ottaa vastaan lämpötila- ja kosteussignaalit anturilta (lähettimeltä). Huom.! Langattoman signaalinsiirron kantamaan vaikuttavat lähettimen ja vastaa- nottimen välissä...
- Page 29 Asetukset Vaihda eri asetusten ja asetustilojen välillä painamalla [Mode]. 1. Ajan asettaminen Paina ja pidä painettuna [Mode] 3 sekunnin ajan (4) ja saat asetettua ajan, päivän, kuukauden, vuoden sekä leveys- ja pituusasteet. 2. Aseta ilmanpaineen korkeusasemakorjaus Paina [Mode] (4) suoraan asetuksen jälkeen, aseta korkeusasemakorjaus ilmanpaineelle.
- Page 30 Vaihda eri asetusten ja asetustilojen välillä painamalla [Mode]. 1. Ajan asettaminen 1. Paina ja pidä painettuna [Mode] (4) 3 sekuntia. 2. Paina [Max/Min+] ja aseta tunnit. 3. Paina [Select °C / °F/-] ja vahvista asetus sekä aloita minuuttien asennus. 4. Paina [Max/Min+] ja aseta minuutit. 5. Paina [Select °C / °F/-] ja vahvista asetus sekä aloita päivien asennus.
- Page 31 2. Aseta ilmanpaineen korkeusasemakorjaus Jos sääasemaa käytetään muualla, kuin merenpinnan korkeudella, on sille annettava korkeuden mukainen ilmanpainekorjaus. Anna sääaseman olla käyttöpaikassaan 12 tuntia, jotta se ehtii sopeutua ympärillä olevaan ilmanpaineeseen. Paina [Snooze] ja voit vaihtaa näytön auringon noususta/laskusta 1 tunnilla sopimaan kesäaikaan.
- Page 32 4. Aseta sisäkosteushälytys Paina [Mode] kolme kertaa heti säädön 1 jälkeen. 1. ”Asetettu arvo” vilkkuu ”Indoor” kanssa. 2. Paina ja pidä painettuna [Snooze] ja voit vaihdella eri asetusten välillä: Hälytys korkealle ilmankosteudelle ( ), matalalle ilmankosteudelle ( ) tai suljettu hälytys ( ).
- Page 33 6. Aseta ulkokosteushälytys Paina [Mode] viisi kertaa heti säädön 1 jälkeen. 1. ”Asetettu arvo” vilkkuu ”Indoor” kanssa. 2. Paina [Alarm / Channel] ja voit valita halutun kanavan (1 – 4) 3. Paina ja pidä painettuna [Snooze] ja voit vaihdella eri asetusten välillä: Hälytys korkealle ilmankosteudelle ( ...
- Page 34 Kello 2:n asetus (vaihtoehtoinen aika) 1. Paina [Mode] ja saat auki asetukset ”Clock 2”:lle. 2. Paina [Select °C / °F/-] tai [Max/Min+] ja voit asettaa halutun tunnin (vain tunteja voi muuttaa, muut asetukset ovat kuten kohdassa ”Clock 1”. Herätyksen asetus Aseta Alarm 1 tai Alarm 2. 1.
- Page 35 Kuunvaiheen näyttö Uusikuu Kasvava puolikuu Supistuva puolikuu (näkyy ennen (näkyy keskiyön keskiyötä) jälkeen) Täysikuu Lämpötilan/ilmankosteuden näyttö 1. Sisälämpötilan esitys näytöllä. 2. Sisäilmankosteuden esitys näytöllä. 3. Ulkolämpötilan esitys näytöllä (kanavat 1-4) 4. Ulkoilmankosteuden esitys näytöllä (kanavat 1-4) Pressure Trend 5. Paina [Alarm / Channel] ja voit vaihtaa kanavien lukua 1, 2, 3 tai 4 ulkotiloissa.
- Page 36 Min/maks. lämpötilojen näyttö 1. Paina [Mode] ja saat auki asetukset ”Clock 1”:lle. 2. Paina [Max/Min+] ja voit vaihdella ”Min”, ”Maks.” ja tämän hetkisen tilanteen välillä. Huom.! Muisti Min/Maks. arvoille nollautuu automaattisesti päivittäin kello 00.00. ”Hi” ja ”Lo” esitys näytöllä ”Hi” ja ”Lo” näkyy näytöllä, jos luettava arvo on sääaseman mittausalueen ulkopuolella.
- Page 37 Sääennuste Sääennustuksen symbolit Sääasema rekisteröi ilmanpaineen muutokset ja voi yhdessä lämpötilan ja ilmankosteuden arvojen perusteella tehdä sääennusteen n. 30-50 km säteelle tulevalle 12-24 tunnille. Lumi- Pakkas- Myrsky- Aurinkoista Pilvistä Sadetta sadetta varoitus varoitusl Myrskyvaroitus Myrskyvaroituksen symboli vilkkuu ja varoittaa salamoinnista. Lumisade ja pakkasvaroitus Lumisateen symboli vilkkuu ja varoittaa lumisateesta.
- Page 38 Hetkellisen ilmanpaineen näyttö Sääasema näyttää sen hetkisen ilmanpaineen hPa: Yli 1015hPa lasketaan korkeapaineeksi (kaunis sää) ja alle 1015hPa lasketaan matalapaineeksi. Ilmanpaine annetaan merenpinnantasolta, jotta sitä voidaan verrata eri korkeuksiin. Tämän takia viralliset ilmanpainearvot eivät välttämättä täsmää sääaseman antamien arvojen kanssa. +/- 5hPa muutos aiheuttaa muutoksen kehityssuuntaan.
- Page 39 Viimeisen 12 tunnin ilmanpaineen näyttö Sääennustetta kuvaavat kuvakeikonit ohjautuvat aiemmin ilmoitetun ilmanpaineen mukaisesti. Aikaisempien palkkien korkeutta katsomalla voit arvioida ennusteen paikkansapitävyyttä. Ilmanpaineen kehityssuunta Jos esim. ilmanpaine on noussut tasaisesti viimeisten 12 tunnin aikana ja sitten laskenut heikosti seuraavat kolme tuntia, sääennuste lupaa sadetta, mutta sateen todennäköisyys Sisälämpötilan kehityssuunta on heikko.
- Page 40 Kantama • Aseta lähetin korkeintaan 40 metrin päähän sääasemasta. Kantavuuteen vaikuttavat rakenteet lähettimen ja sääaseman välillä. Erityisesti metallit ja betoni pienentävät kantomatkaa. • Älä aseta lähetintä tai sääasemaa lähelle lattiaa tai kattoa, koska se pienentää kantomatkaa. • Kantavuus pienenee merkittävästi, jos lähetin tai sääasema altistetaan kylmälle ilmalle, koska paristojen teho vähenee kylmässä.
- Page 41 Turvallisuusohjeet Varoitus Paristot ovat nieltynä erittäin vaarallisia. Pidä tämän vuoksi paristot ja paristokäyttöiset laitteet poissa lasten ulottuvilta. Anturi on roisketiivis, mutta sijoita se kuitenkin suojaan sateelta ja auringonvalolta. Älä käytä hiovia tai voimakkaita puhdistusaineita sääaseman tai anturien puhdistukseen. Pinnat voivat vahingoittua ja elektroniikkakomponentit hapettua. Älä altista anturia liian korkeille tai matalille lämpötiloille. Pattereiden kapasiteetti saattaa laskea ja kantomatka pienentyä.
- Page 42 Tekniset tiedot Sääasema WS2068HL Paristot 3x R6 (AA) Lämpötilan mittausalue: -5°C … + 50°C Tarkkuus: ± 1°C (mitta-alueen sisällä 0°C … + 40°C) Ilmankosteuden mittausalue: 15 % … 95 % RH Tarkkuus: ± 5 % Erotuskyky: Anturi (lähetin) WT450H: Paristot 2x R6 (AA) Lämpötilan mittausalue: -30°C …...
- Page 43 Suomen kartta Norjan kartta Ruotsin kartta AUSTRIA Vienna 48° 15' N 16° 22' E 48° 16° BELGIUM Brussels 50° 48' N 4° 21' E 51° 4° BOLIVIA La Paz 16° 30' S 68° 9' W 17° 68° BULGARIA Sofia 42° 42' N 23°...
- Page 44 Leveys- ja pituuspiirien asteikko Huom.! Auringon nousu- ja laskutoiminto ei toimi yli 64° leveyspiireillä, koska vuodenaikojen väliset nousu- ja laskuaikojen väliset erot ovat liian suuria ja kesäöinä aurinko ei laske lainkaan. AUSTRIA Vienna 48° 15' N 16° 22' E 48° 16° BELGIUM Brussels 50°...
-
Page 45: Declaration Of Conformity
Declaration of Conformity Hereby, Clas Ohlson AB, declares that following product(s): Weather Station 36-2384 WS2068HL, WT450H is in compliance with the essential requirements and other relevant provisions of Directive 1999/5/EC. Article 3.1b (EMC): EN 301489-1 EN 301489-3 Article 3.2 (Radio): EN 300220-1... - Page 48 NORGE KUNDESENTEr Tlf.: 23 21 40 00 Faks: 23 21 40 80 E-post: kundesenter@clasohlson.no INTErNETT www.clasohlson.no POST Clas Ohlson AS, Postboks 485 Sentrum, 0105 OSLO SUOMI ASIAKASPALVELU Puh: 020 111 2222 Faksi: 020 111 2221 Sähköposti: info@clasohlson.fi INTErNET www.clasohlson.fi OSOITE Clas Ohlson Oy, Yrjönkatu 23 A, 00100 HELSINKI...
Need help?
Do you have a question about the WS2068HL+WT450H and is the answer not in the manual?
Questions and answers