
Subscribe to Our Youtube Channel
Related Manuals for Sencor SWS 135


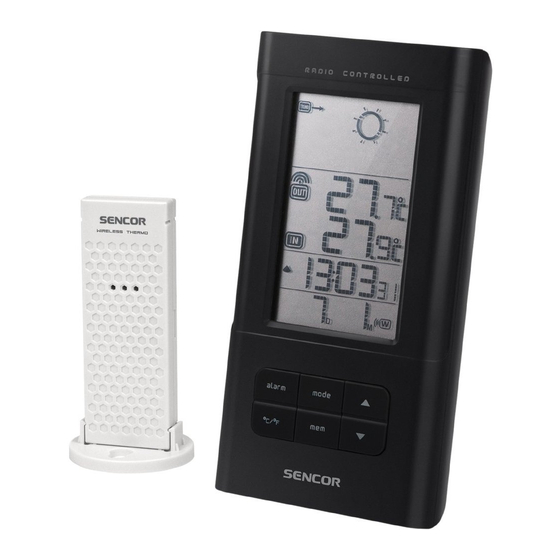
Summary of Contents for Sencor SWS 135
- Page 1 SWS 135 WEATHER STATION WITH CABLE USER’S MANUAL FREE IN-OUT THERMOMETER AND RADIO CONTROLLED CLOCK...
- Page 2 1. INTRODUCTION The basic package comes with a main unit, which is the weather forecast station and, a remote unit, the thermo sensor. The main unit is capable of keeping track of the maximum and minimum temperature of different sites. And no wire installation is required and operates at radio frequency 433 MHz.
-
Page 3: Alarm Button
DISPLAY Facilitates easy reading of remote and indoors temperatures and calendar clock °C/°F BUTTON Toggle for setting temperature display unit °C or °F MEMORY [MEM] BUTTON Recalls the maximum or minimum temperature of main and remote unit MODE BUTTON Toggles the display modes and confi rms entry while setting the values for display ALARM BUTTON Displays the alarm time or sets the alarm status... -
Page 4: Getting Started
MAIN FEATURES: REMOTE UNIT BATTERY COMPARTMENT Accommodates two AAA-size batteries WALL-MOUNT RECESSED HOLE Supports the remote until in wall-mounting 2. GETTING STARTED 2a) BEFORE YOU BEGIN For best operation, Insert batteries for remote units before doing so for the main unit. Position the remote unit and main unit within effective transmission range, which, in usual circumstances, is 20 to 30 meters. - Page 5 Note that the effective range is vastly affected by the building materials and where the main and remote units are positioned. Try various set-ups for best result. Though the remote units are weather proof, they should be placed away from direct sunlight, rain or snow.
-
Page 6: Weather Forecast
2e) GETTING STARTED Once batteries are in place for the remote unit, they will start transmitting temperature readings at around 45 seconds intervals. The main unit will also start searching for signals for about two minutes once batteries are installed. Upon successful reception, the outdoors temperatures will be displayed .The main unit will automatically update its readings at about 45-second intervals. - Page 7 NOTE: It is not necessary and not possible to adjust the altitude of the weather station. After the initial start-up of the weather station, a fi rst forecast will be made within the fi rst 24 hours of operation. In periods of long stable weather conditions, it becomes diffi...
- Page 8 4. THERMOMETER 4a) HOW TO CHECK REMOTE AND INDOOR TEMPERATURES The wave display on the outdoors temperature indicates the reception of the remote unit is in good order. If no readings are received from the remote unit for more than two minutes, blanks " "...
- Page 9 4c) MAXIMUM AND MINIMUM TEMPERATURES The maximum and minimum recorded indoor temperature, outdoor temperatures will be automatically stored in memory. To display them, Press [MEM] once to display the maximum readings and again the minimum readings. The respective indicators, [MAX] or [MIN] will be displayed. To clear the memory, hold down [MEM] for two seconds.
- Page 10 4e) TRANSMISSION COLLISION Signals from other household devices, such as doorbells, home security systems and entry controls, may interfere with those of this product and cause temporarily reception failure. This is normal and does not affect the general performance of the product. The transmission and reception of temperature readings will resume once the interference recedes.
- Page 11 5b) HOW TO SET THE CLOCK MANUALLY To set the clock manually, hold MODE for two seconds it will show the year. Use [▼] or [▲] to change it. Press MODE to confi rm. Repeat the same procedure to set the month, date, date-month format, 12/24, hour, minute, display language, zone time offset.
- Page 12 5d) HOW TO SET THE TIME ZONE To set the zone time, Press [MODE] until at zone time display mode, Hold [MODE] for two seconds, the zone time offset will be displayed. Enter the offset using [▼] or [▲]. Press [MODE] to exit. The alarm "...
- Page 13 6b) ALARM FEATURE ✻ Weekday Alarm The alarm sound will be activated and the icon will be fl ashed on weekday when it is armed and the alarm time is reach. ✻ Single Alarm The alarm sound will be activated and the icon will be fl...
-
Page 14: Specifications
SPECIFICATIONS Temperature Measurement Main unit Indoor Temperature measurement Proposed operating range : 0 °C to + 50 °C Temperature resolution : 0.1 °C 0.2 °F Remote unit Proposed operating range : -20 °C to + 60 °C Temperature resolution : 0.1 °C 0.2 °F RF Transmission Frequency : 433 MHz RF Transmission Range... - Page 15 PRECAUTIONS This product is engineered to give you years of satisfactory service if you handle it carefully. Here are a few precautions: Do not immerse the unit in water. Do not clean the unit with abrasive or corrosive materials. They may scratch the plastic parts and corrode the electronic circuit.
-
Page 16: Instructions And Information Regarding The Disposal Of Used Packaging Materials
INSTRUCTIONS AND INFORMATION REGARDING THE DISPOSAL OF USED PACKAGING MATERIALS Dispose of packaging material at a public waste disposal site. DISPOSAL OF USED ELECTRICAL AND ELECTRONIC APPLIANCES The meaning of the symbol on the product, its accessory or packaging indicates that this product shall not be treated as household waste. - Page 17 Changes to the text, design and technical specifi cations may occur without prior notice and we reserve the right to make these changes. Fast ČR, a.s. declares that the SWS 135 conforms to the basic requirements and other relevant provisions of the directive 1999/5/ES.
- Page 18 EN Warranty conditions Warranty card is not a part of the device packaging. This product is warranted for the period of 24 months from the date of purchase to the end-user. Warranty is limited to the following conditions. Warranty is referred only to the customer goods using for common domestic use.
- Page 19 This warranty is void especially if apply as follows: Defects which were put on sale. Wear-out or damage caused by common use. The product was damaged by unprofessional or wrong installation, used in contrary to the applicable instruction manual, used in contrary to legal enactment and common process of use or used for another purpose which has been designed for.
- Page 20 Authorized service centers Visit www.sencor.eu for detailed information about authorized service centers.
Need help?
Do you have a question about the SWS 135 and is the answer not in the manual?
Questions and answers