Table of Contents
Advertisement
Quick Links
Advertisement
Table of Contents

Related Manuals for Stanley TLM 220


Summary of Contents for Stanley TLM 220
- Page 1 77-116...
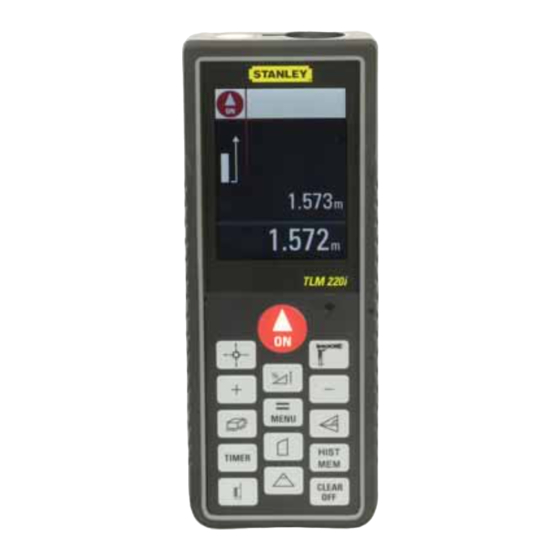
- Page 2 Stanley TLM 220i...
-
Page 4: Table Of Contents
English Symbols used The symbols used in the Safety Instructions have the following meanings: Congratulations on the purchase of your Stanley TLM 220i. Carefully read the Safety Instructions and the User WARNING: Indicates a potentially hazardous situation or an unintended use Manual before using this product. -
Page 5: Limits Of Use
Stanley Europe, Egide Walschaertsstraat 14-16, 2800 Mechelen, Belgium (for short Stanley). Make sure the Stanley TLM optics are kept clean and that there is no Stanley is responsible for supplying the product, including the User Manual mechanical damage to the bumpers. -
Page 6: Safety Instructions
Yet, the possibility of it causing Integrated distancemeter interference in other devices cannot be totally excluded. The Stanley TLM produces a visible laser beam which emerges from the CAUTION: front of the instrument. Never attempt to repair the product yourself. In case of damage, It is a Class 2 laser product in accordance with: contact the local dealership. -
Page 7: Start-Up
See figure {D}. A built-in sensor automatically detects the orientation of the positioning Position of the product label see last page! bracket and adjusts the zero point of the instrument accordingly. Start-up Stanley TLM 220i 773938a en... - Page 8 1x, 2x or up to 4x zoom view. rements. Three lines are provided for this. A horizontal line separates the The brightness of the camera can be adjusted through 5 levels using the Start-up Stanley TLM 220i 773938a en...
-
Page 9: General Description
See drawing {G}. The menu contains following items: Units of measurement (distance) Units of measurement (angle) Beep Digital Pointfinder image in black/white Reset Calibrate tilt sensor Level in status field (in °) Menu functions Stanley TLM 220i 773938a en... - Page 10 0.0000 m requires a measurement from the actual mounting grommit versus the 0.000 m² 0.000 m³ 0.000 m front or back of the Stanley TLM. To do this select the symbol in this 0.00 m 0.000 m² 0.000 m³ menu item. You can switch the reference on the tripod on or off. The 0.00 ft²...
-
Page 11: Operation
The device Press this button for longer the front reference is set permanently. confirms the measurement with Press this button, the rear reference is set again. The tilt sensor is calibrated. Operation Stanley TLM 220i 773938a en... -
Page 12: Measuring
Every distance further press of the key releases a distance measurement. Triangular area measure- Press the key and keep it pressed to switch the device and Laser ment continuous operation off. Staking out function Measuring Stanley TLM 220i 773938a en... - Page 13 Press this button to take the first length measurement (e.g. length). Press this button to take the second length measurement (e.g. width). Press this button to take the third length measurement (e.g. height). The result is shown in the summary row. Functions Stanley TLM 220i 773938a en...
- Page 14 . The defined value (b) on the setting. is confirmed with the button. Press to measure the inclination and the distance. See figure {L}. Pressing the button starts the laser measurement. The display shows Functions Stanley TLM 220i 773938a en...
-
Page 15: Triangular Area
(first a and then b) and the instrument (rear reference). • All target points must be in a horizontal or vertical plane. If the Stanley TLM is then moved slowly along the stake out line the • The best results are achieved when the instrument is rotated about a displayed distance decreases. - Page 16 Press this button and trigger the measurement . After the first measurement the value is adopted. Triggers the measurement . After the second measurement the Functions Stanley TLM 220i 773938a en...
-
Page 17: Appendix
Laser beam interrupted Repeat measurement Error Cause Remedy Error Hardware error Switch on/off the device several times. If the symbol still appears, then your instrument is defec- tive. Please call your dealer for assistance. Appendix Stanley TLM 220i 773938a en... -
Page 18: Technical Data
Aiming at high gloss surfaces may deflect the laser beam and lead to measu- Display illumination rement errors. Multifunctional endpiece Against non-reflective and dark surfaces the measuring time may increase. Timer (self-triggering) Save constant value Appendix Stanley TLM 220i 773938a en... - Page 19 Do not use aggressive cleaning agents or solutions. Handle the inst- rument as you would a telescope or camera. Warranty The Stanley TLM 220i comes with a two year warranty from Stanley. More detailed information can be found at: www.stanleyworks.com All illustrations, descriptions and technical specifications may be subject to change without prior notice.
- Page 20 EXIT max.
- Page 21 Stanley TLM 220i...
Need help?
Do you have a question about the TLM 220 and is the answer not in the manual?
Questions and answers