Table of Contents
Advertisement
Advertisement
Table of Contents

Subscribe to Our Youtube Channel
Related Manuals for Fuego FELG21C


Summary of Contents for Fuego FELG21C
- Page 1 Element Gas Grill Use And Care Manual...
- Page 3 User Guide for models: F21C & F21S Please retain this manual for future reference. DANGER AND WARNINGS You Must Read This Owner’s Guide Before Operating Your Gas Grill. DANGER 1.If you smell gas: 2.Shut off gas to the appliance. 3.Extinguish any open flames. 4.Open lid.
- Page 4 Francisco. He is famous for challenging the status quo with designs that are fresh and unexpected. His Fuego Element Grills are no exception. The award-winning Fuego Element presents a new aesthetic in backyard grilling. Designed for social connectedness, the host now entertains from the center of the party while his friends gather around the grill.
- Page 5 DANGER AND WARNINGS You Must Read This Owner’s Guide Before Operating Your Gas Grill. WARNING: Leaking gas may cause a fire or explosion, which can cause serious bodily injury or death, or damage to property. WARNING: Follow all leak-check procedures carefully in this manual prior to barbecue operation.
-
Page 6: General Instructions
CALIFORNIA PROPOSITION 65 WARNING: The burning of gas cooking fuel generates some by-products which are on the list of substances known by the State of California to cause cancer and reproductive harm. California law requires businesses to warn customers of potential exposure to such substances. To minimize exposure to these substances always operate this unit according to this grill manual, ensuring you provide good ventilation when cooking with gas. - Page 7 Do not use with charcoal fuel. • The areas around the LP cylinder must be free and clear from debris. • If it’s evident there is excessive abrasion or wear, or the hose is cut, it must be • replaced prior to the outdoor cooking appliance being put into operation. Replacement pressure regulators and hose assemblies must be those specified by the manufacturer.
- Page 8 Storage And / Or Non Use The gas must be turned off at the liquid propane cylinder when the gas barbecue is • not in use. When the gas barbecue is stored indoors, the gas supply must be DISCONNECTED • and the LP cylinder stored outdoors in a well-ventilated space.
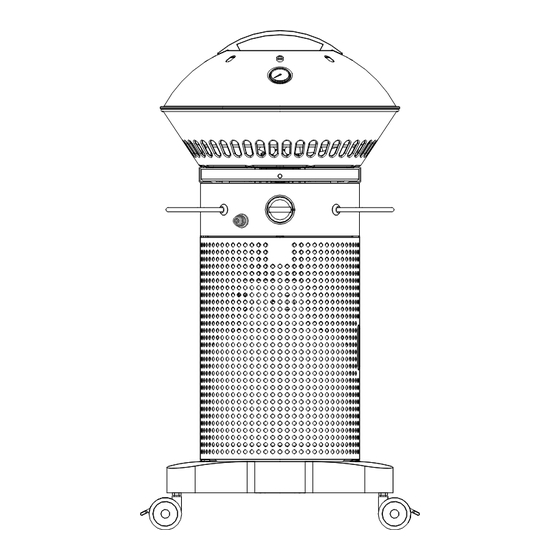
- Page 9 Product View...
- Page 10 Exploded View...
- Page 11 Parts List Description FELG21C FELG21S Lid Handle Temperature Gauge Grill Lid Electrode Assembly Lid Heat Shield Cast Iron Grate Diffuser Panel Dual-Zone Burner Ring Fire-Bowl Assembly Residue Tray Rubber Spacer Residue Tray Handle Locking Casters Non-Locking Casters Grill Base Rear Door Panel...
- Page 12 Parts Included Tank Hook x1 M5 Screws x8 (A) M6 Screws x6 (B) Ignition Rod Lid Chain Temperature Gauge AA Battery Control Knob Tools Needed (Not Included) Utility Knife / Box Cutter Phillips Head Screw Driver...
- Page 13 Quick Set-up Guide Step 1 A: Fasten rear panel grill base with four screws (M5) B: Assemble tank hook to marked label with two screws (M6) *Note: Install all screws loose before tightening any screw completely. x2 (M6) x4 (M5)
- Page 14 Step 2 Insert the control knob onto the control valve. Insert the AA battery into the battery pack with the + end facing the battery pack cap.
- Page 15 Step 3 Place control assembly upside down on the floor or low flat surface. Place assembled rear door and grill base onto the control assembly with four screws (M5) *Note: Install all screws loose before tightening any screw completely. x4 (M5)
- Page 16 Step 4 A: Slide support spine onto control assembly. B: Insert support spine to firebox support top. C: Fasten two screws (M6) to the upper support spine. (A) D: Fasten two screws (M6) to grill base. (B) E: Now the grill can be flipped onto its wheels. x4 (M6)
- Page 17 Step 5 Install front panel: insert bottom hinge first, then use your finger to depress top spring-hinge and release once aligned into position.
- Page 18 Step 6 Install the temperature gauge into the cooking lid.
- Page 19 Step 7 A: Place diffuser panel, cast iron grate, and grill lid in place. Please note that the grill grate should be positioned with the “FACE DOWN” writing as the bottom side of the grate. B: Slide residue tray into place in the space between the burner knob and below the fire-bowl.
- Page 20 Step 8 You can hook the grill lid onto the handle when not in use in either the hanging or windbreak position.
- Page 21 Step 9 Gas hook up (LP gas is Standard). Open the front door, install a standard 20lb LP cylinder (Type 1) into the opening of the grill base (Note: the tank must be hanging from the tank hook) and connect the LP gas hose with regulator assembly to the LP cylinder.
- Page 22 Step 10 Attach lid chain and lighting rod onto body by two screws (M6). A: Use existing upper support spine screws to attach lid chain and lighting rod chain to body of grill. B: Use chain hook to secure the grill lid by looping and locking the chain hook.
- Page 23 Lighting Instruction Manual Warning: Before Lighting, please make sure that the control knob is in the off position and the regulator assembly is in good condition. Control Knob. IMPORTANT Do not leave items on or against the barbecue. Keep flammable product and sprays away. For outdoor use only.
- Page 24 DUAL ZONE BURNERS Element’s patented dual zone burners, offer a whole new level of control. Zone 1 is for indirect cooking, 15,000 BTU/HR. Zone 2 engages both burners and is used for direct cooking at 21,000 BTU/ Cooking with Zone 1 The outer burner can be turned on to cook the food through indirect cooking.
-
Page 25: Lp Tank Requirements
LP Gas Hook-Up for Type 1 or QCC1 Regulator The Element by Fuego grill is orificed for use with LP gas and comes equipped with a high capacity hose and regulator assembly for connection to a standard 20lb. LP cylinder (Type 1). The LP tank is not included. -
Page 26: Leak Testing
If you cannot stop a gas leak, turn off the gas supply and call your local gas utility or Fuego customer service at 888-88FUEGO (38346). Only those parts recommended by the manufacturer should be used on the grill. Substitution can void the warranty. - Page 27 Maintenance WARNING: IMPORTANT! Before lighting, inspect the gas supply piping or hose prior to turning the gas “on”. If there is evidence of cuts, wear or abrasion, it must be replaced prior to use. Grill Burner: Remove grill lid, diffuser panel, grate, and burner. Remove the screws holding burner to grill body by unscrewing counter-clockwise.
- Page 28 Orifice Cleaning: With burner removed remove the orifice and shine a flashlight through the opening to ensure there is no blockage. Use a needle to clear any debris. Be extremely careful not to enlarge the hole or break off the needle.
- Page 29 Igniter Tip Cleaning: If lighting the burners is difficult you may need to clean and adjust the igniter tip located near the burner edge. To ensure that the igniter lights properly, clean off any cooking residue that builds up on igniter tip and burner.
-
Page 30: Recommended Cooking Times
Recommended Cooking Times: Type of Meat Thickness Doneness Grilling Time* Safe Internal Temperature* *approx *data from USDA Beef Med Rare Boneless Rib Eye 1 in 14-18 145°F / 62.8°C or Tenderloin 18-22 Med Rare Boneless 1 in 14-18 145°F / 62.8°C Sirloin Steak 18-22... -
Page 31: Limited Warranty Information
Any claim for damages incurred during shipment by the carrier of the goods are insured and handled directly with the carrier. Any damages due to manufacture defects will be handled directly with Fuego Living LLC, subject to the limited warranty. - Page 32 Length of Warranty: One (1) Year comprehensive parts on the entire product / Three (3) Years limited parts warranty covering the stainless burner. For replacement parts, troubleshooting, and general inquiries please email or call us at: Phone: 1.888.883.8346 1.888.88.FUEGO Email: support@fuegoliving.com Web: www.support.fuegoliving.com Recycling tip: Most of the packaging materials are recyclable.
Need help?
Do you have a question about the FELG21C and is the answer not in the manual?
Questions and answers