Table of Contents
Advertisement
Quick Links
MODEL: FM20AMG (Modular)
PLEASE RETAIN THIS MANUAL FOR FUTURE REFERENCE.
•
Do not operate the grill under unprotected combustible construction. Use only in well
ventilated areas. Do not use in buildings, garages, sheds, breezeways or other such
enclosed areas. This unit is for outdoor use only.
•
This outdoor cooking gas appliance is not intended to be installed in or on recreational
vehicles and/or boats.
WARNING:
1. Do not store or use gasoline, or other
µ ammable liquids or vapors in the
vicinity of this or any other appliance.
2. An LP cylinder not connected for use
shall not be stored in the vicinity of
this or any other appliance.
FUEGO North America
Roundhouse One
1500 Sansome Street, Suite 100
San Francisco, CA 94111
415.558.7151 (local)
1.888.88.FUEGO (toll free)
www.fuegoliving.com
APR09
DANGER
If you smell gas:
1. Shut off gas to the appliance.
2. Extinguish any open µ ame.
3. Open lid.
4. If odor continues, keep away from the
appliance and immediately call your
gas supplier or your ´ re department.
1
Advertisement
Table of Contents
Troubleshooting

Subscribe to Our Youtube Channel
Related Manuals for Fuego FM20AMG


Summary of Contents for Fuego FM20AMG
- Page 1 MODEL: FM20AMG (Modular) PLEASE RETAIN THIS MANUAL FOR FUTURE REFERENCE. • Do not operate the grill under unprotected combustible construction. Use only in well ventilated areas. Do not use in buildings, garages, sheds, breezeways or other such enclosed areas. This unit is for outdoor use only.
- Page 2 Safety Practices & Precautions Gas Requirements General LP Gas Leak Testing List of Included Materials 10 Dimensions Assembly Frame, Handles and Knobs 12 Modular Units 13 Light Unit and End Panels 14 Gas Connections 16 Drawer Installation and Grate Assembly 17 Battery Installation 18 Warming Drawer 19 Optional Charcoal Drawer...
- Page 3 IMPORTANT SAFETY NOTICE: Certain Liquid Propane dealers may ´ ll liquid propane cylinders for use with the grill beyond cylinder ´ lling capacity. This “Over´ lling” may create a dangerous condition. “Over´ lled” tanks can build up excess pressure. As a safety device, the tank’s pressure relief valve will vent propane gas vapor to relieve this excess pressure.
- Page 4 • Never lean over an open grill. When lighting a burner, always pay close attention to what you are doing. Be certain you are pushing the ignition button when you attempt to light the grill. • When using the grill, do not touch the grill burner grate or immediate surrounding area as these areas become extremely hot and could cause burns.
- Page 5 • Clean the grill with caution. Avoid steam burns; do not use a wet sponge or cloth to clean the grill while it is hot. Some cleaners produce noxious fumes or can ignite if applied to a hot surface. • Be sure all grill controls are turned off and the grill is cool before using any type of aerosol cleaner on or around the grill.
- Page 6 Verify the type of gas supply to be used, either natural or LP, and make sure the marking on the appliance rating plate agrees with that of the supply. The rating plate is located on the inside back wall of the grill. Never connect an unregulated gas line to the appliance. An installer supplied gas shutoff valve must be installed in an easily accessible location.
- Page 7 Locate the brass nozzle inside each burner unit with pre- Installation must conform with local attached NG gas ori´ ce. The ori´ ce is the small screw on the codes or with the National Fuel Gas end of the nozzle with a hole in the center. Unscrew the NG Code ANSI Z223.1 or the CAN/CGA- B149.2 Propane Installation Code gas ori´...
- Page 8 GENERAL: Although all gas connections on the grill are leak tested at the factory prior to shipment, a complete gas tightness check must be performed at the installation site due to possible mishandling in shipment, or excessive pressure unknowingly being applied to the unit. Periodically check the whole system for leaks, or immediately if the smell of gas is detected.
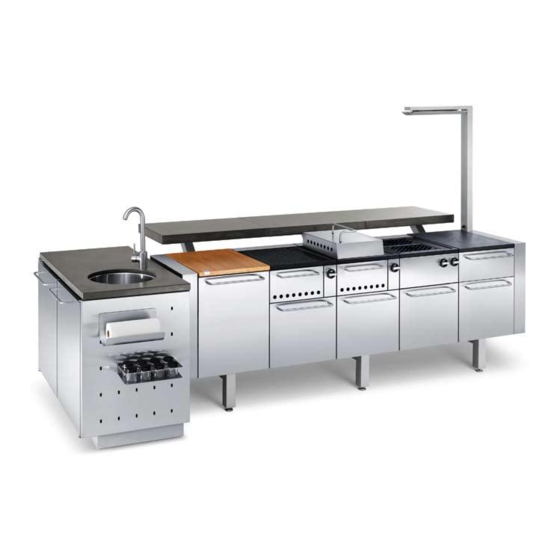
- Page 9 FM20AGU: GRILL UNIT FM20AIU: INFRARED UNIT FM20ACU: COOK UNIT FM20AWU: WARM UNIT FM20ASU: STORAGE UNIT w/ GAS DRAWER w/ INFRARED DRAWER 1 - Cook Unit Body 1 - Warming Unit Body 1 - Storage Unit Body 1 - Teak Top 1 - Grill Unit Body 1 - Grill Unit Body w/ 2 Burners...
- Page 10 INSTALLER FINAL CHECKLIST: Speci´ ed 12 clearances maintained to Residue pan in place properly and sliding combustibles. freely. Veri´ ed proper enclosure ventilation. Pressure regulator connected and set for 4.0 W.C. Natural, 11.2 W.C. LP gas. Drawers fully close. Manual shutoff valve installed and All internal packaging removed.
- Page 11 1. Assemble horizontal support beams to each support frame leg using (12) type M6x90 screws as shown in Fig. 05. Note the position of the angled corner on Beam 1 Beam 2. Assemble (6) leveling feet to bottom of the support frame legs. Adjust height of each leveling foot by turning Beam 2 clockwise.
- Page 12 Beginning in the center of the mounting frame, secure the ´ rst grill unit to the horizontal support beams I nstal l ati on Scr ew H ol es by using (2) type M6x12 screws. Fig. 07 Lift up the hinged back panel on H i nged B ack Panel the grill unit to gain access to the top installaion holes.
- Page 13 6. Secure light unit to right side of modular by using (2) M6x90 type screws. Fig. 09 Plug power cable Light Shroud into a 110v outlet. Power cable can be run through the horizontal support beam to hide it from view. Operate lights by using the rocker switch located on the bottom of the light shroud.
- Page 14 8. Connect the (3) metal gas hoses located in the back of each modular Cook/Grill Unit to the gas coupler on the opposite end, Fig.11. The right side of each hose is pre-connected at the factory. Tighten each ´ tting with a wrench to ensure a tight seal. coupler Fig.
- Page 15 LP Gas Installation (optional, not included) 9b. Purchase LP conversion kit FA20ALP. Using the provided LP gas hose, connect end without regulator to the ´ rst gas coupler located inside the left side storage unit, Fig.13-A. Run opposite end to LP tank and secure it to the gas outlet.
- Page 16 10. Install cooking drawers by sliding them into into each unit, Fig. 15-A. Lock each drawer in place by turning the lock at the back of the drawer counter-clockwise, Fig. 15-B and Fig. 16 Note: Turn to page 19 if using optional charcoal drawer instead of gas or infrared drawers.
- Page 17 12. Open bottom drawer of each grill and cook unit and locate the ignitor battery compartment on the right. Install (1) AA battery per compartment, Fig. 18. Fig. 18 Screw postive battery end into coil. Ensure firm contact is made before inserting into battery box. Warning: Lid may get extremely hot while cooking, always use a grill mitt for hand and arm protection.
- Page 18 The warming drawer consists of a top drawer with two dishes that can be used to store ice or other condiments and a bottom drawer with two cha´ ng dishes to keep your food warm. Remove protective ´ lm from all Chafing Dishes warming drawer components.
- Page 19 Optional Charcoal Drawer Model: FA20ACD Sold separately MESQUITE CHIP HOLDER CAUTION: Charcoal drawer should be inserted into position opposite the propane tank. If CHARCOAL using two charcoal drawers, make sure to TRAY remove propane tank and properly store it before cooking with charcoal. CHARCOAL CAUTION: Follow instructions located on back BASKET...
- Page 20 13. The Utility Unit Housing is shipped in three boxes and must be assembled, Fig. 21. Begin by attaching bottom panel A to the back panel using (2) type 5/32x 3/8" screws. Assemble leveling feet to each side panel. Secure the two side panels (B) to the back panel using (4) type 5/32”x 3/8”...
- Page 21 17. Following the dimensions in Fig.25 create counter-tops to be placed on the Modular Frame and Utility Unit. if you have purchased the counter-top package from Fuego, please follow the installation instructions enclosed with the set. Fig. 24 Fig. 25...
- Page 22 Dining Unit Counter-Top Finished dimensions. Please account for shrinkage depending on material used. 3/4" NOTE: THIS DIMENSION MAY VARY DEPENDING ON MATERIAL. RECESS SHOULD ALWAYS BE THE SAME TO ACCOMODATE 3/4" PLYWOOD. 1 1/2" 21 1/4" 1 1/2" SECTION A-A 99 23/32"...
- Page 23 Utility Unit Counter-Top Finished dimensions. Please account for shrinkage depending on material used. 3/4" 1 1/2" NOTE: UTILITY UNIT FRAME SERVES AS COUNTERTOP SUPPORT—NO NEED FOR PLYWOOD. 27 31/64" 1" TYP SECTION A-A 52 29/64" 1 1/2" THK R3 TYP ALL EDGES AND CORNERS INCLUDING SINK CUT-OUT...
- Page 24 REPLACEMENT OF REGULATORS AND HOSE: The pressure regulator and hose assembly supplied with the unit must be used. The replacement pressure regulators and hose assembly must be the type speci´ ed by the manufacturer, part number FA00AGC for natural gas or FA00ALP for LP. Do not use the grill if the odor of gas is present.
- Page 25 Most of the hot air is trapped and therefore greatly reduces food from drying out. An advantage of infrared cooking is high heat intensity. Fuego’s infrared burner can generate heat up to 1000 degrees, allowing searing to seal in the natural juices of various foods delivering full aroma and µ...
- Page 26 LOW SETTING ADJUSTMENTS: The valves on the grill feature an adjustable low setting. Due to µ uctuations in gas pressure, heating value or gas conversion, you may feel it necessary to increase or decrease gas µ ow in the low position. To adjust: 1.
- Page 27 GRILL BURNER: Remove grill grates, and burner drawer. Remove diffuser panel by lifting it up off the burner. Remove screw holding burner to drawer Fig. 27 by unscrewing counter- clockwise. Remove burner by lifting up, on the end, angle the burner downwards and remove from drawer. GRILL BURNER FLAME HEIGHT: The factory burners have been set for the correct air and gas mixture.
- Page 28 Wipe down stainless steel surface to remove any cooking residue with a clean cotton or micro´ ber cloth. Clean stainless steel surfaces with a stainless steel cleaner and apply a polish to keep your Fuego Modular looking its best. TEAK SURFACE: Clean surface using a soft sponge and a solution of mild soapy water.
- Page 29 Please read these helpful cooking and maintenance tips before cooking on the Fuego grill. COOKING OVERVIEW: It is important that the grill surface be heated up before cooking. Fuego’s grill grates are made out of cast iron with enamel coating. The cast iron material ensures maximum and uniform temperature transfer, as well as optimum heat retention for best cooking results.
- Page 30 COOKING TIMES...
- Page 31 PROBLEM: GRILL BURNERS WILL NOT LIGHT: Possible solutions: Attempt to light burner with match. If you are able to light the burner using a match, the issue must be with the igniter and not with the burner or the fuel source. If you are unable to light the burner using a match, the issue must be with the burner or fuel source.
- Page 32 3. Burners make any unusual sounds. Please refer to the User Manual for tips on the care and cleaning of the Fuego burner. Keeping your grill clean and the grease drip tray beneath the grill empty will aid in ensuring trouble free operation of your Fuego Grill.
- Page 33 OPTIONAL FUEGO MODULAR ACCESSORIES: FA20ADC Dining Unit Counter-top FA20AUC Utility Unit Counter-top FA20ASS Stainless Steel Sink FA20AUF Faucet FA20ACD Charcoal Drawer Option FA20AID Infrared Drawer Option FA20AGD Gas Drawer Option FA00ATH Paper Towel Holder FA00ACT Ceramic Tray Set FA00ASP Spice Accessory Jars (8)
- Page 34 Fuego to be defective. Replacement will be F.O.B. Fuego, and Fuego will not be liable for any transportation costs, labor costs, ar export duties. This warranty shall not apply, nor can we assume responsibility for...
Need help?
Do you have a question about the FM20AMG and is the answer not in the manual?
Questions and answers