Table of Contents
Advertisement
Quick Links
Advertisement
Table of Contents

Related Manuals for Fuego F36S-Pro-NG


Summary of Contents for Fuego F36S-Pro-NG
- Page 1 F36S-Pro F36S-Pro-NG Fuego F36S-Pro Use And Care Manual...
- Page 3 User Guide for models: F36S-Pro / F36S-Pro-NG Please retain this manual for future reference. DANGER AND WARNINGS You Must Read This Owner’s Guide Before Operating Your Gas Grill. DANGER If you smell gas: • Shut off gas to the appliance.
- Page 5 Thank you for your Fuego Gas Grill purchase. We are excited to present to you our new Fuego ALL 304 Stainless Steel Gas Grill. We set out to design a grill that eliminated all of the bulky features you see on most gas grills. We started with the shelves and recessed them into the side panels which creates a more compact footprint and stylish design when closed as wells as a fully functional shelf system when open.
-
Page 6: Danger And Warnings
DANGER AND WARNINGS You Must Read This Owner’s Guide Before Operating Your Gas Grill. WARNING: Leaking gas may cause a fire or explosion, which can cause serious bodily injury or death, or damage to property. WARNING: Follow all leak-check procedures carefully in this manual prior to barbecue operation. -
Page 7: Electrical Warnings
Use heat-resistant barbecue mitts or gloves when operating barbecue. Keep any electrical supply cord and fuel supply hose away from any heated surfaces. CALIFORNIA PROPOSITION 65 WARNING: The burning of gas cooking fuel generates some by-products which are on the list of substances known by the State of California to cause cancer and reproductive harm. -
Page 8: General Instructions
h) Never remove the grounding plug or use with an adapter of 2 prongs. i) Use only extension cords with a 3 prong grounding plug, rated for the power of the equipment, and approved outdoor use with a W-A marking. General Instructions Your Element barbecue is a portable outdoor cooking appliance. -
Page 9: For Installation In Canada
For Installation In Canada These instructions, while generally acceptable, do not necessarily comply with the Canadian Installation codes, particularly with piping above and below ground. In Canada the installation of this appliance must comply with local codes and/or Standard CSAB149.2 (Propane Storage and Handling Code) WARNING: Your gas barbecue is not intended to be installed in or on recreational vehicles and/or boats. - Page 10 Storage And / Or Non Use The gas must be turned off at the liquid propane cylinder when the gas barbecue is • not in use. When the gas barbecue is stored indoors, the gas supply must be DISCONNECTED • and the LP cylinder stored outdoors in a well-ventilated space.
- Page 11 F36S-Pro...
- Page 12 F36S-Pro...
- Page 13 F36S-Pro-NG...
- Page 14 F36S-Pro-NG...
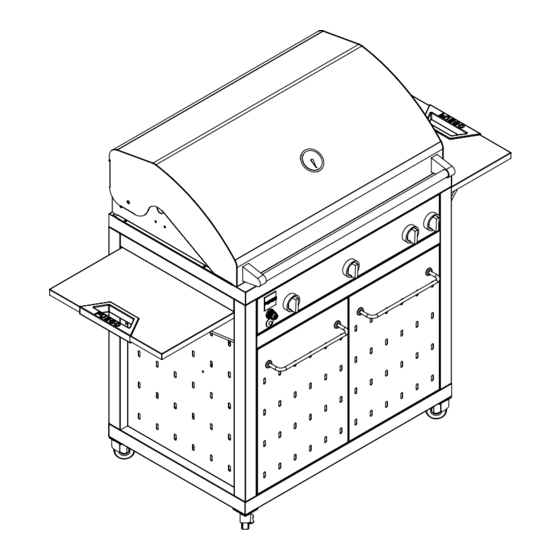
- Page 15 DESCRIPTION F36S-Pro F36S-Pro-NG Temperature Gauge 36" Hood Handle 36" Grill Hood Rubber Bupmer-01 U Shape Main Burner Burner Bracket Rubber Bupmer-02 36" Pro Grill Fire Box 36" Grill Gas Manifold ASM. LP / NG 36" Grill Pro Control Panel Logo Plate...
-
Page 16: Installation
Installation Items Needed (Not Included) Utility Knife / Box Cutter Scissors Two People AA Battery Stainless Steel Cleaner Non Abrasive Towel Quick Set-up Guide... - Page 17 Step 1 1A. Remove the outer carton from the pallet by lifting it vertically off the pallet*. 1B. Remove all of the foam, cardboard and plastic packing around the grill. *Please note that it is helpful to cut the tape on the top and open the flaps for easy removal.
- Page 18 Step 2 Lift the grill off of the pallet. Please lift from the designated support bar lifting areas as noted in the images below.* *This item should be lifted off the pallet by a team of 2 or more people. To lighten the load we recommend opening the lid and removing the internal grates and diffuser panels.
- Page 19 Step 3 Install the diffuser panels onto the placement pins inside the firebox*.
- Page 20 Step 4 Install the cooking grates into the the firebox*. The large grates should be installed with the flat edge towards the outside of the grill.
- Page 21 Step 5 Install the warming rack into the firebox by installing the rear legs first then rotating forward to set the front legs into place. Please note, the warming rack is to be removed when using the rear rotisserie burner.
- Page 22 Step 6 Install the AA battery. Please ensure that the + end of the battery faces out towards the battery cap. The cap button can be removed by unscrewing by rotating counterclockwise.
- Page 23 Step 7 Remove the grease tray and discard the protective packaging material. Re-install the grease tray before operation.
- Page 24 Step 8 Side shelf operation. The grill can be used with the side shelves in either the open or closed position. To open, pull the shelf upward from the black handle until the shelf support brackets lock into the slot. The shelf is now sitting horizontal for use. To close, lift up on the shelf support brackets to allow the shelf to fold back down into the side panel.
- Page 25 Step 9 Remove the laser film from the lid. Clean the entire grill surfaces with a stainless steel cleaner and non-abrasive towel.
- Page 26 Step 10 - F36S-Pro Propane Gas Hook Up A. Open the front door and install a standard 20lb propane cylinder (Type 1) into the opening of the grill base by inserting into the tank holding tray, then connect the LP gas hose with regulator assembly to the propane cylinder.
-
Page 27: Natural Gas Hook Up
Step 11 - F36S-Pro-NG Natural Gas Hook Up Open the front door and run the flexible gas hose through hole in the back panel. Proper procedures for gas leakage testing must be obeyed. Connect to existing house gas line. Please note the Gas Hook-Up, Danger, and Warnings pages for more information. -
Page 28: Lp Tank Requirements
LP Gas Hook-Up for Type 1 or QCC1 Regulator LP Tank Requirements: The Element by Fuego grill is orificed for use with LP gas and comes equipped with a high capacity hose and regulator assembly for connection to a standard 20lb. LP cylinder (Type 1). The LP tank is not included. -
Page 29: Leak Testing
Check all the gas connections at the base of the control valves where they screw into the manifold pipe. If you cannot stop a gas leak, turn off the gas supply and call your local gas utility or Fuego customer service at 888-88FUEGO (38346). -
Page 30: Shut Down Instructions
Lighting Instruction Manual Warning: Before Lighting, please make sure that the control knob is in the off position and the regulator assembly is in good condition. Control Knob. IMPORTANT Do not leave items on or against the barbecue. Keep flammable product and sprays away. For outdoor use only. - Page 31 Rear Infrared Burner Use The rear burner should only be used with approved rotisserie kit. For use, be sure to remove the warming rack. Please note, that use of the rear burner with warming rack in place can cause damage or warping of the warming rack.
- Page 32 Interior Halogen Light Use The provided power cord can be plugged into a 110V standard outlet. To turn on, press the power button located on the left side of the control panel.
-
Page 33: Maintenance
Maintenance WARNING: IMPORTANT! General Instructions: Before lighting, inspect the gas supply piping or hose prior to turning the gas “on”. If there is evidence of cuts, wear or abrasion, it must be replaced prior to use. Replacement pressure regulators and hose assemblies must be those specified by the outdoor cooking gas appliance manufacturer. - Page 34 Grill Burner Exterior Cleaning Clean the exterior of the burner with a wire brush. Clean stubborn scale with a metal scraper. Clear any clogged ports with a straightened paper clip. Never use a wooden toothpick as it may break off and clog the port.
- Page 35 WARNING: IT IS EXTREMELY IMPORTANT TO CENTER THE BURNER ON THE ORIFICE PROPERLY TO PREVENT A FIRE HAZARD OR EXPLOSION. PLEASE USE DRAWINGS BELOW FOR PROPER PLACEMENT REFERENCE. PLEASE NOTE THAT WHEN PROPERLY INSTALLED, BOTH SCREWS HOLDING THE BURNER IN PLACE WILL BE ABLE TO SCREW IN WITHOUT FORCE.
- Page 36 Residue Tray Cleaning: The residue tray can be washed by hand with standard dish soap and water. Please clean every 2-4 weeks depending upon use. Surface Cleaning: Grill should be covered when not in use to protect it from outdoor elements. Wipe down surface to remove any cooking residue with a clean cotton or microfiber cloth.
- Page 37 Recommended Cooking Times: Type of Meat Thickness Doneness Grilling Time* Safe Internal Temperature* *approx *data from USDA Beef Boneless Rib Eye 1 in Med Rare 14-18 145°F / 62.8°C or Tenderloin 18-22 Boneless 1 in Med Rare 14-18 145°F / 62.8°C Sirloin Steak 18-22 T-bone,...
-
Page 38: Limited Warranty Information
Any claim for damages incurred during shipment by the carrier of the goods are insured and handled directly with the carrier. Any damages due to manufacture defects will be handled directly with Fuego Living LLC, subject to the limited warranty. - Page 39 / one (1) years limited parts warranty covering the ignition system and light systems. Customer responsible for shipping and handling costs of replacement parts. For replacement parts, troubleshooting, and general inquiries please email or call us at: Phone: 1.888.883.8346 1.888.88.FUEGO Email: info@fuegoliving.com Web: www.fuegoliving.com...
Need help?
Do you have a question about the F36S-Pro-NG and is the answer not in the manual?
Questions and answers