
Subscribe to Our Youtube Channel
Related Manuals for Nauticam standard port base.


Summary of Contents for Nauticam standard port base.
- Page 1 ...
- Page 2 Thank you for your purchase of a NAUTICAM standard port base. At NAUTICAM, we pride ourselves on the ability to recognise the requirements of professional as well as amateur underwater photographers and fulfill them through the innovative designs of our products. We strive to achieve a high level of user‐friendliness by allowing stress‐free installation and easy operation of all important functions of the camera. Each product is individually inspected and water pressure tested to more than 75 metres to ensure optimum quality. Please read this manual carefully before using the port base, this will maximise its performance as well as its lifetime. Please take a moment to register with us at www.nauticam.com and receive a 15% discount for your first annual overhaul. ...
- Page 3 1. All NAUTICAM Products are warranted against any material and manufacturing defects for one year from the date of purchase for consumer use. 2. NAUTICAM accepts no liability for any damage to and defects in the standard port base caused by improper use and/or poor maintenance; it is the responsibility of the owner to carefully follow the instructions in this manual. 3. NAUTICAM does not hold responsibility for damage, of any nature, to any equipment used with and/or placed within the port base. 4. NAUTICAM accepts no liability for any loss of captured images or the inability to capture images even if it is due to the malfunctioning or leakage of the port base. 5. This warranty only applies to products purchased from authorised NAUTICAM dealers and does not extend beyond the original retail purchaser. 6. Unauthorised modifications and/or repairs of the port base will automatically invalidate this warranty. 7. To return products for service, please notify us by email and ship the product to NAUTICAM by registered mail, along with your contact details and a brief description of the defect. ...
- Page 4 1. This standard port base is designed to be used with a NAUTICAM housing and a NAUTICAM compact port, please do not use this product with housings or ports of other manufacturers. 2. A water‐tight test without the camera inside the housing is highly recommended when using the system for the first time and after the changing of port and O‐ring(s). 3. Do not use lubricants from other brands with the silicone rubber O‐ring on this product, only use the lubricant provided by NAUTICAM. 4. Discontinue use immediately should you notice any leakage. 5. Store the product in a robust, shock‐proof container during transportation. 6. Do not detach the product from the housing or the port in a wet or sandy environment. Protect the interior from moisture and debris in order to prevent malfunction or leakage. 7. Do not store the product in an environment of high humidity. 8. Do not expose the product to direct sunlight for prolonged periods. 9. Keep out of reach of children, failure to do so could result in injury. 10. Defective products should be shipped to NAUTICAM for service, unauthorized disassembling and/or modifications could result in malfunction or leakage. ...
-
Page 5: Specifications
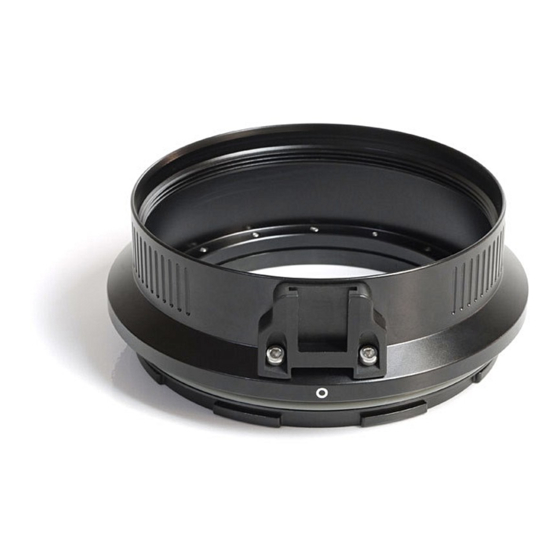
Specifications 4 Identification of Parts 5 Mounting the Port Base on the Housing 6 Care and Maintenance 8 Construction Main body: Aluminium alloy Surface treatment: Anodised Bayonet flange: Polycarbonate Dimensions Maximum diameter: 132 mm Length: 42.5 mm Features Target light mount: For mounting target light arm. ... - Page 6 1 2 3 1 Target light mount 2 Mounting mark 3 Silicone o‐ring ...
- Page 7 1. Remove the O‐ring from the port base, inspect for any damage and lightly coat it with the provided lubricant before placing it back into its groove. 2. Verify that the port opening of the housing is clean and free from foreign material. 3. Push the safety button of the port locking lever on the housing downwards. 4. Turn the port locking lever to the 5. Align the mounting marks of the port outward position. and the housing; the marks appear as white dots on both the port and the housing. 6. Gently push the port into the opening of the housing, until it cannot go in ...
- Page 8 y o the at the rm that tton of the ocking nd Please refer to the instruction manual of the housing for guidelines to install the camera and the lens into the housing and port system. ...
- Page 9 1. Soak the port base in fresh water after each salt water use to avoid the accumulation of salt residue; wipe the port base with a towel before detaching it from the housing or the port. 2. After each day of diving, it is advisable to have the O‐ring removed from its groove and inspected for damage, also check that the O‐ring retains its original circular shape; never stretch the O‐ring excessively or remove it with a sharp object. The O‐ring groove should be cleaned to ensure it is free from any salt deposit or foreign material; lightly coat the O‐ring with the provided lubricant before reinstalling it in the groove. A damaged O‐ring should be discarded immediately and replaced only with one that is provided by NAUTICAM. 3. Replace the O‐ring annually. ...
- Page 10 ...
Need help?
Do you have a question about the standard port base. and is the answer not in the manual?
Questions and answers