Table of Contents

Subscribe to Our Youtube Channel
Related Manuals for Royal Sovereign RSC-820CL


Summary of Contents for Royal Sovereign RSC-820CL
- Page 1 OWNER'S MANUAL RSC-820CL/CLS Laminator Read all instructions carefully before use. For any Customer Support needs please choose the Customer Support tab on www.royalsovereign.com Royal Sovereign International Inc. www.royalsovereign.com...
-
Page 2: Table Of Contents
TABLE OF CONTENTS TOPIC PAGE 1. Introduction ....................... 3 2. Safety Precautions .................... 3 3. Installation ......................4 4. Included with Laminator ..................5 5. Product Identification ..................6 6. Control Panel ..................... 7 7. Roller Nip Settings ..................... 8 8. Using Foot Pedal ....................9 9. -
Page 3: Introduction
RSC-820CL/CLS 1. INTRODUCTION Thank you for choosing a Royal Sovereign laminator. It has been designed and manufactured to provide years of continuous service. For complete operating and maintenance information please read this manual thoroughly. Upon receipt of your laminator, please inspect the box, the machine and all other contents for shipping damage. -
Page 4: Installation
(“OFF” position) when moving to a different location. ELECTRICAL REQUIREMENTS Royal Sovereign recommends that a licensed electrician ensures proper power installation to your laminator in accordance with electrical codes in your area. The laminator should have a dedicated power line. -
Page 5: Included With Laminator
RSC-820CL/CLS 4. INCLUDED WITH LAMINATOR Thoroughly inspect the parts and the unit. It is imperative that any missing parts are reported and a claim is filed with the reseller immediately upon receipt of shipment. Quantity Picture Part Name Laminator Owner's Manual 3´´... -
Page 6: Product Identification
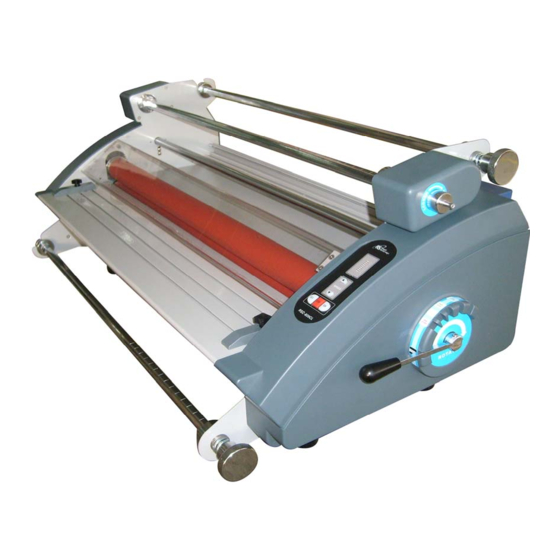
5. PRODUCT IDENTIFICATION PART NAME RSC-820CL/CLS SAFETY COVER FEED TABLE MAIN ROLLER FOOT PEDAL TENSION CONTROL KNOBS PRESSURE LEVER CONTROL PANEL UPPER IDLE BAR RELEASE LINER TAKE UP STAND... -
Page 7: Control Panel
RSC-820CL/CLS 6. CONTROL PANEL When the machine is initially turned on, the LED display window will show the speed at 1. Control Buttons 1. SPEED DISPLAY: Display’s current Speed. 2. SPEED BUTTON: Adjusting the speed of the rollers. To change the speed of the rollers, press the up or down arrow button. -
Page 8: Roller Nip Settings
7. ROLLER NIP SETTING It is important to adjust the roller nip settings to the appropriate thickness of the board being used. Use the guide below to adjust to the correct position. Metric Inches (mm) Laminating Laminating 0.12" 0.2" 0.27" OPEN OPEN NOTE: If you don't want to laminate,please place the pressure lever to the... -
Page 9: Using Foot Pedal
RSC-820CL/CLS 8. USING FOOT PEDAL USING FOOT PEDAL Place the foot pedal on the floor in front of the machine. Once all correct settings are displayed, you may use the foot pedal to operate the laminator for “Hands Free Operation.” To activate the machine, press the foot pedal once and then release. -
Page 10: Threading Film
10. THREADING FILM 10.1. Decaling 1. Turn the power switch on (“I” position). The Power switch is located on the rear left side of the unit. 2. Complete the steps as in the “LOADING FILM” section (see page 10). 3. Take off the Feed Table. 4. - Page 11 RSC-820CL/CLS 6. Thread the top film underneath the Upper Idle Bar. (Figure 2) 7. Tape the top film on to the Release Liner Take-Up. (Figure 2) Figure 2 8. Cut and separate the release liner and the film. (Figure 3) Figure 3 9.
-
Page 12: Decaling
11. Reinstall the Feed Table and close the Safety Cover. 12. Adjust the nip setting to appropriate gap. 13. Insert and push the leader board until they reach the front nip point. 14. Push the Run button. Figure 7 15. Push the leader board into the rollers. (Figure 7) 16. -
Page 13: Mounting
RSC-820CL/CLS 10.2 Mounting 1. Lay the decaled image face down on a flat surface. Carefully peel back and put a crease along the edge of the release liner (Approximately 1 inch or 25mm, Figure 1). Figure 1 2. With the image facing up, align the image onto the board. -
Page 14: Maintenance
11. MAINTENANCE Cleaning the Body of the laminator 1.To clean the machine body, dampen a cloth with water only and gently wipe the machine clean. Removing Adhesive Build Up 1. Remove the film from the laminator. 2. Use a damp (water only) cloth and a rubber gum eraser to remove the adhesive on the Teflon (metal) and silicone rollers. -
Page 15: Specifications
RSC-820CL/CLS 13. SPECIFICATIONS Description RSC-820CL/CLS Power supply AC 120V,220~230V 50/ 60Hz Power consumption 100W Max laminating width 820mm / 32" Film thickness 25~250 mic / 1~10mil Max laminating speed 2.5m/min / 8.2ft/min Driving motor DC geared Speed control 9 settings... -
Page 16: Warranty
Royal Sovereign International and cannot be modified or amended. Royal Sovereign’s sole and exclusive liability and the customer’s sole and exclusive remedy under this warranty shall be, at Royal Sovereign’s option, to repair or replace any such defective part or product. These remedies are only available if Royal Sovereign’s examination of the product discloses to Royal Sovereign’s satisfaction that such defects...
Need help?
Do you have a question about the RSC-820CL and is the answer not in the manual?
Questions and answers