Table of Contents
Advertisement
Quick Links
Advertisement
Table of Contents

Related Manuals for Royal Sovereign RSC-1401C Series


Summary of Contents for Royal Sovereign RSC-1401C Series
- Page 1 OWNER'S MANUAL RSC-1401C/H SERIES Laminators Read all instructions carefully before use. For any Customer Support needs please choose the Customer Support tab on www.royalsovereign.com Royal Sovereign International Inc. www.royalsovereign.com...
-
Page 2: Table Of Contents
TABLE OF CONTENTS TOPIC PAGE 1. Introduction ............................2 2. Safety Precautions ..........................2 3. Installation ............................3 4. Included with Laminator ........................4 5. Product Identification ..........................5 6. Control Panel ............................. 6 7. Roller Nip Settings ..........................7 8. Using Foot Pedal and Remote Control ....................7 9. -
Page 3: Introduction
RSC-1401C/H SERIES 1. INTRODUCTION Thank you for choosing a Royal Sovereign laminator. It has been designed and manufactured to provide years of continuous service. For complete operating and maintenance information please read this manual thoroughly. Upon receipt of your laminator, please inspect the box, the machine and all other contents for shipping damage. -
Page 4: Installation
Once the laminator is in place, lock the casters into position(“ON” position). Always unlock the casters (“OFF” position) when moving to a different location. ELECTRICAL REQUIREMENTS Royal Sovereign recommends that a licensed electrician ensures proper power installation to your laminator in accordance with electrical codes in your area. The laminator should have a dedicated power line. -
Page 5: Included With Laminator
RSC-1401C/H SERIES 4. INCLUDED WITH LAMINATOR Thoroughly inspect the parts and the unit. It is imperative that any missing parts are reported and a claim is filed with the reseller immediately upon receipt of shipment. Quantity Picture Part Name Laminator Owner's Manual 3´´... -
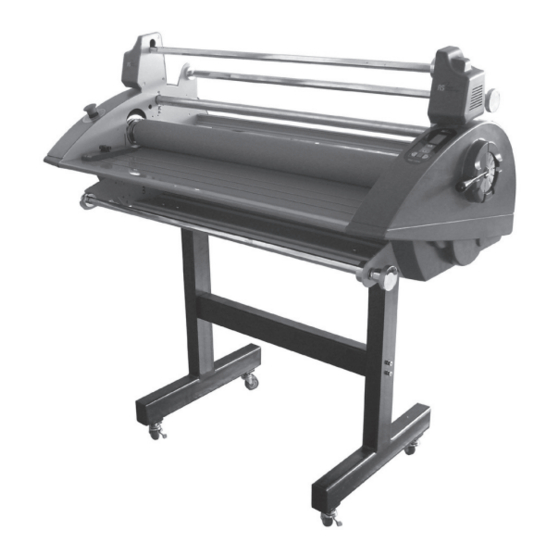
Page 6: Product Identification
5. PRODUCT IDENTIFICATION PART NAME EMERGENCY SWITCH FEED TABLE MAIN ROLLER ASSEMBLY STAND FOOT PEDAL TENSION CONTROL KNOBS PRESSURE LEVER CONTROL PANEL UPPER IDLE BAR RELEASE LINER TAKE UP LASER SYSTEM FOR SAFETY... -
Page 7: Control Panel
RSC-1401C/H SERIES 6. CONTROL PANEL When the machine is initially turned on, the LED display window will show the speed and temperature set at 1. RSC-H/LSH SERIES RSC-C/LS SERIES Control Buttons 1. TEMPERATURE DISPLAY: Display’s current temperature. 2. SPEED DISPLAY: Display’s current Speed. 3. -
Page 8: Roller Nip Settings
7. ROLLER NIP SETTING It is important to adjust the roller nip settings to the appropriate thickness of the board being used. Use the guide below to adjust to the correct position. Metric Inches (mm) Lamination Lamination 1/25˝ 3/6˝~1/4˝ 3/8˝~1/2˝ 10~13 3/5˝~ 18/25˝... -
Page 9: Using Cross Cutter
RSC-1401C/H SERIES 9. USING CROSS CUTTER The cross cutter is located on the rear exit table of the machine. 1. After lamination, move the cutter approximately to the center of the completed application at the desired point of detachment (Figure 1). Figure 1 2. -
Page 10: Loading Film
10. LOADING FILM Royal Sovereign films are wound with the adhesive side facing the inside of the roll (adhesive in). Loading films to upper and lower film shafts: (See page 5 for assistance with parts identification.) 1. Adjust the auto grip to fit to the film and tighten the auto grip screw (Figure 1). -
Page 11: Threading Film
RSC-1401C/H SERIES 11. THREADING FILM 11.1. Decaling 1. Turn the power switch on (“I” position). The Power switch is located on the rear left side of the unit. 2. Complete the steps as in the “LOADING FILM” section (see page 10). - Page 12 9. Cut and separate the release liner and the film. (Figure 3) Figure 3 10. Thread the craft paper behind the Lower Idle Bar to the top film that is resting on the main roller (do not use the Lower Idle Bar for Mounting).
-
Page 13: Mounting
RSC-1401C/H SERIES 11.2 Mounting 1. Lay the decaled image face down on a flat surface. Carefully peel back and put a crease along the edge of the release liner (Approximately 1 inch or 25mm, Figure 1). Figure 1 2. With the image facing up, align the image onto the board. Press firmly from the center out (Figure 2). -
Page 14: Installation Of The Front Feed And Rear Rewind Options
12. INSTALLATION OF FRONT FEEDER AND REAR REWINDER OPTIONS NOTE: Below options are to be installed by an authorized RS reseller. Installation of the Front Feeder Option (Includes 2 brackets, one spindle, and mounting hardware). 1. Install the Front Feeder to the inside of the front frames using four 1/4" (M6) Figure 1 hexagon bolts on each side (Figure 1). -
Page 15: Maintenance
RSC-1401C/H SERIES 13. MAINTENANCE Cleaning the Body of the laminator 1.To clean the machine body, dampen a cloth with water only and gently wipe the machine clean. Removing Adhesive Build Up 1. Remove the film from the laminator. 2. Use a damp (water only) cloth and a rubber gum eraser to remove the adhesive on the Teflon (metal) and silicone rollers. -
Page 16: Specifications
15. SPECIFICATIONS... -
Page 17: Warranty
Royal Sovereign’s sole and exclusive liability and the customer’s sole and exclusive remedy under this warranty shall be, at Royal Sovereign’s option, to repair or replace any such defective part or product. These remedies are only available if Royal Sovereign’s examination of the product discloses to Royal Sovereign’s satisfaction that such defects actually exist and were not caused by misuse,...
Need help?
Do you have a question about the RSC-1401C Series and is the answer not in the manual?
Questions and answers