Table of Contents
Advertisement
Installation Manual
INMARSAT MINI-C MES
FELCOM19
SAFETY INSTRUCTIONS ................................................................................................ i
SYSTEM CONFIGURATION ........................................................................................... ii
EQUIPMENT LISTS........................................................................................................ iii
1. MOUNTING..............................................................................................................1-1
1.1 Antenna Unit ......................................................................................................................1-1
1.2 Communication Unit...........................................................................................................1-2
1.3 Junction Box IC-318...........................................................................................................1-3
1.4 AC/DC Power Supply Unit PR-240 (option).......................................................................1-4
2. WIRING....................................................................................................................2-1
2.1 Antenna Cable Connector at the Communication Unit ......................................................2-2
2.2 Junction Box IC-318...........................................................................................................2-5
3. INITIAL SETTINGS..................................................................................................3-1
3.1 How to Install Software ......................................................................................................3-1
3.2 How to Set the IMN (INMARSAT MOBILE NO.)................................................................3-3
3.3 How to Select Position-fixing Equipment ...........................................................................3-4
3.4 PC Window Setup..............................................................................................................3-5
4. HOW TO INSTALL OPTIONAL EQUIPMENT ........................................................4-1
4.1 IPX2 Kit OP16-58 (cables)/Waterproofing Kit OP16-60 (for IC-318) .................................4-1
4.2 Waterproofing Kit OP16-61 (for IC-219) ............................................................................4-2
4.3 Waterproofing Kit OP16-68 (for IC-307) ............................................................................4-4
5. HOW TO CHANGE POWER SUPPLY SPECIFICATIONS.....................................5-1
APPENDIX 1 JIS CABLE GUIDE .............................................................................AP-1
PACKING LISTS ......................................................................................................... A-1
OUTLINE DRAWINGS ................................................................................................ D-1
INTERCONNECTION DIAGRAM ................................................................................ S-1
www.furuno.com
All brand and product names are trademarks, registered trademarks or service marks of their respective holders.
Advertisement
Table of Contents

Related Manuals for Furuno FELCOM 19


Summary of Contents for Furuno FELCOM 19
-
Page 1: Table Of Contents
5. HOW TO CHANGE POWER SUPPLY SPECIFICATIONS........5-1 APPENDIX 1 JIS CABLE GUIDE ................AP-1 PACKING LISTS ......................A-1 OUTLINE DRAWINGS ....................D-1 INTERCONNECTION DIAGRAM ................S-1 www.furuno.com All brand and product names are trademarks, registered trademarks or service marks of their respective holders. - Page 2 *00017651710* *00017651710* *00017651710* *00017651710*...
-
Page 3: Safety Instructions
SAFETY INSTRUCTIONS CAUTION WARNING Do not open the equipment Confirm that the power supply unless totally familiar with voltage is compatible with the electrical circuits and voltage rating of the equipment. service manual. Connection to the wrong power ELECTRICAL Only qualified personnel SHOCK supply can cause fire or equipment should work inside the... -
Page 4: System Configuration
SYSTEM CONFIGURATION ANTENNA UNIT IC-119 POWER SUPPLY 100-115/200-230 PRINTER AC/DC 1φ, 50/60 Hz Power Supply PR-240 POWER SUPPLY 24 VDC PERSONAL COMPUTER POWER SUPPLY (PC/AT compatible) 12-24 VDC COMMUNICATION UNIT IC-219 (with internal GPS receiver) JUNCTION BOX IC-318 CATEGORY OF UNITS Navigation Equipment Antenna Unit Exposed to Weather... -
Page 5: Equipment Lists
EQUIPMENT LISTS Standard supply Name Type Code No. Remarks Antenna Unit IC-119 Communication Unit IC-219 Junction Box IC-318 For SSAS only. SSAS Alert Unit IC-307 For SSAS only. Installation Materials CP16-02100 000-043-411 For Antenna Unit CP16-05301 001-179-990 For Communication unit CP16-05101 001-180-020 For Junction Box, SSAS only... - Page 6 EQUIPMENT LISTS This page is intentionally left blank.
-
Page 7: Mounting
MOUNTING NOTICE Do not apply paint, anti-corrosive sealant or contact spray to coating or plastic parts of the equipment. Those items contain organic solvents that can damage coating and plastic parts, especially plastic connectors. Antenna Unit 1.1.1 Mounting location Refer to IMO resolutions A663(16) and A.807(19), as amended. •... -
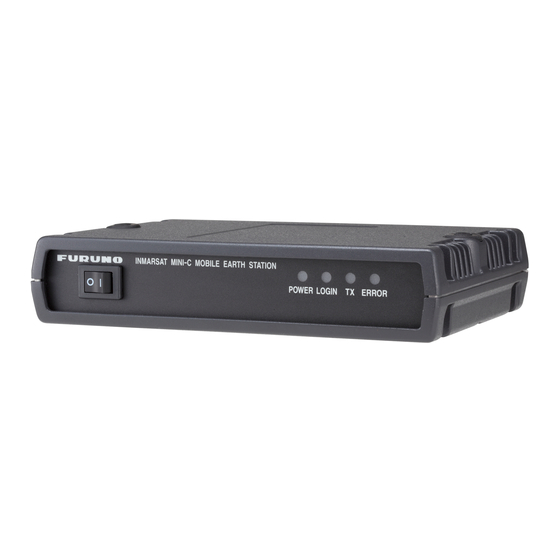
Page 8: Communication Unit
1. MOUNTING • Avoid the location near tunnels and stacks; smoke and soot on the radome can low- er signal level (leave 10 m or more in horizontal distance). • Separate the antenna unit 5 m from HF, VHF of 27 MHz antenna. 1.1.2 Mounting The antenna cable is available in lengths of 30 m, 50 m and 100 m (see table below). -
Page 9: Junction Box Ic-318
1. MOUNTING How to connect the LAN cable Use two binding screws (pre-attached) and the LAN cover to connect the LAN cable to the communication unit. Use the cable tie (supplied) to fix the cable. LAN cover Fix the cable here with a cable tie. Junction Box IC-318 The junction box IC-318 is connected to the communication unit by using the cable assy 16S0344 (2 m, attached to the junction box). -
Page 10: Ac/Dc Power Supply Unit Pr-240 (Option)
1. MOUNTING AC/DC Power Supply Unit PR-240 (option) Fix the unit on a table with four self-tapping screws. AC/DC power supply unit... -
Page 11: Wiring
WIRING For cable w/armor 0.34 m Ground wire Cable assy CAUTION RW-4747 TPA5FB0.4NJ5FBA-5DFB 0.4 m This unit is shipped with a 10 A fuse, which TP5FBAW-5DFB, 30 m 5D-FB-CV-NP, 30 m is for use with a 12 VDC power supply. For (No armor) 8D-FB-CV, 50 m 24 VDC power, replace the fuse with a 5A... -
Page 12: Antenna Cable Connector At The Communication Unit
2. WIRING Antenna Cable Connector at the Communication Unit 5D-FB-CV-NP (30 m) Outer Sheath Inner Sheath Braided Shield Armor Remove the outer sheath, armor and inner- sheath by the dimensions shown. Set the nut, washer, gasket, clamp onto Cover with heat-shrink tubing and heat. cable as shown. - Page 13 2. WIRING 8D-FB-CV (50 m) Dimensions in millimeters. Outer Sheath Remove outer sheath and armor by the Inner Sheath Armor Shield dimensions shown left. Expose inner sheath and shield by the dimensions shown left. Cover with heat-shrink tubing and heat. Remove insulator and core by 10 mm.
- Page 14 2. WIRING 12D-SFA-CV (100 m) Dimensions in millimeters. Outer Sheath Armor Shield Inner Sheath Remove outer sheath and armor by the dimensions shown left. Expose inner sheath and shield by the dimensions shown left. Cover with heat-shrink tubing and heat. Twist shield end.
-
Page 15: Junction Box Ic-318
2. WIRING Junction Box IC-318 Use the junction box IC-318 to connect the distress alert/received call unit IC-305 and other units (max. four units) to the communication unit. Unfasten four screws to re- move the units cover to connect cables. For connection, use the optional 5 pair cable CO-SPEVV-SB-C 0.2x5P, JIS cable (Ja- pan Industrial Standard) TTYCS-4(LA) or equivalent. - Page 16 2. WIRING This page is intentionally left blank.
-
Page 17: Initial Settings
INITIAL SETTINGS This chapter shows you how to setup the equipment. Some procedures require entry of job no. and password. Ask your dealer. How to Install Software After installing the equipment, install the FELCOM19 software (F19PC) in the PC as follows: 1. - Page 18 3. INITIAL SETTINGS 5. Enter your name and organization. 6. Click the Next button. 7. Click the Install button and the installation begins. When the installation is com- pleted, the FELCOM19 dialog box appears.
-
Page 19: How To Set The Imn (Inmarsat Mobile No.)
3. INITIAL SETTINGS 8. Click the Next button. 9. Click the Finish button. The FELCOM 19 PC application shortcut is created on the desktop. Note: To uninstall the F19 application from the PC, see the operator’s manual. How to Set the IMN (INMARSAT MOBILE NO.) Set your IMN (Inmarsat Mobile No.) using the PC as below. -
Page 20: How To Select Position-Fixing Equipment
3. INITIAL SETTINGS 5. Confirm that the [IMN] is selected, and then press the Enter key. An input box appears. 6. Key in your IMN. 7. Press the Enter key. 8. Press the Esc key to erase the input box. 9. -
Page 21: Pc Window Setup
3. INITIAL SETTINGS PC Window Setup The [Terminal Setup] menu provides for set up of the PC window. The set up includes selection of date display format, screen saver and window colors. 1. Press the F8 and 3 keys to show the [Terminal Setup] menu. Terminal Setup Connnection Detail... - Page 22 3. INITIAL SETTINGS 10. Select [Window Color] then press the Enter key. Window Color Select Preset Load Default - - - - - - - - - - - - - - - - - - - - - - - Edit Color Window [ Base Window...
- Page 23 3. INITIAL SETTINGS Preset Window Fore Color Back Color Base Window L-WHITE BLUE RCV Message Display WHITE BLACK EGC Message Display WHITE BLACK EDIT 1 BLACK GREEN EDIT 2 MAGENTA WHITE Function BLACK CYAN Sub Menu 1 BLACK WHITE Sub Menu 2 BLUE WHITE Sub Menu 3...
- Page 24 3. INITIAL SETTINGS EDIT BASE WINDOW File Edit Transmit Reports Logs Options Setup StopAlarm < [1] UNTITLED1 > MENU CAUTION MESSAGE 3) Select [Fore Color]. 4) Use key to select a color. 5) Select [Back Color]. 6) Use key to select a color. 7) To select colors for other windows repeat steps 2)-6).
-
Page 25: How To Install Optional Equipment
HOW TO INSTALL OPTIONAL EQUIPMENT The optional waterproofing kits OP16-58 and OP16-61 are used to protect the con- nectors on the communication unit from water splash. Note that these optional kits should be used as a couple. IPX2 Kit OP16-58 (cables)/Waterproofing Kit OP16-60 (for IC-318) OP16-58 Connect the waterproofed D-sub cables to the rear of the communication unit, instead... -
Page 26: Waterproofing Kit Op16-61 (For Ic-219)
4. HOW TO INSTALL OPTIONAL EQUIPMENT Attach the grommet to this notch. Color Blue Brown Purple Gray Pan head screw Green (M4x8, 2 pcs.) Attach the cover Yellow gasket to here Orange (reverse side). Pink Light-green Cable assy. 11 White (w/black dots) XM-FD-361 White (w/red dots) Black... - Page 27 4. HOW TO INSTALL OPTIONAL EQUIPMENT Cables connected 1. Unfasten two binding screws to detach the LAN cover from the communication unit. 2. Peel the paper and attach the LAN packing 2 (supplied with OP16-61) to the communication unit. 3. Re-attach the LAN cover. LAN packing 2 (16-023-4512) LAN cover...
-
Page 28: Waterproofing Kit Op16-68 (For Ic-307)
4. HOW TO INSTALL OPTIONAL EQUIPMENT Waterproofing Kit OP16-68 (for IC-307) Note: This kit cannot be used if the IC-307 is mounted face upward. OP16-68 (Code No.: 001-189-400) Name Type Code No. Water proofing Cover 16-023-5501 100-374-950-10 Fixing Tape 24-009-1225 100-368-200-10 1. -
Page 29: How To Change Power Supply Specifications
HOW TO CHANGE POWER SUP- PLY SPECIFICATIONS The AC-DC power supply PR-240 is shipped ready for connection to a 200-230 VAC ship’s mains. If the ship’ mains is 100 VAC, change the tap connection and terminal board connection as below. Attach a label supplied as accessories to the front panel according to the ship’s mains. -
Page 30: Appendix 1 Jis Cable Guide
EX: DPYCYS - 1.5 MPYC - 5 TTYCS-4 Designation type Designation type # of cores Core Area (mm The following reference table lists gives the measurements of JIS cables commonly used with Furuno products: Core Cable Core Cable Diameter Diameter... - Page 35 Y.NISHIYAMA 17/May/2012...
- Page 36 Y.NISHIYAMA 30/Apr/2012...
- Page 37 Y.NISHIYAMA 30/Apr/2012...
- Page 39 Y.NISHIYAMA 17/May/2012...
- Page 40 Y. NISHIYAMA 6/Oct/2010...
- Page 43 Y.NISHIYAMA 31/May/2012...
Need help?
Do you have a question about the FELCOM 19 and is the answer not in the manual?
Questions and answers