Pitney Bowes DM220i Operator's Manual
Hide thumbs
Also See for DM220i:
- Operator's manual (112 pages) ,
- Setup manual (65 pages) ,
- Update instructions (2 pages)

Related Manuals for Pitney Bowes DM220i


Summary of Contents for Pitney Bowes DM220i
- Page 1 Shipping & Mailing Franking Machines Operator Guide DM220i Series Digital Mailing System (models DM110i, DM160i and DM220i)
-
Page 3: Table Of Contents
Table of Contents Chapter 1 Introduction About Your Digital Mailing System ........... 1-2 What is IntelliLink™ .................. 1-3 Postal Requirements ................1-3 Safety ....................... 1-4 Specifications ....................1-6 Chapter 2 Getting to Know Your Machine Machine Features–Front ................ 2-2 Control Panel ....................2-4 Machine Features–Rear ................ - Page 4 Table of Contents Text Messages ..................3-12 What is a Text Message? ............3-12 Selecting a Text Message ............3-12 Viewing a Text Message .............3-12 Creating a Text Message ............3-13 Delete a Text Message ..............3-13 Edit a Text Message ..............3-14 Chapter 4 Normal and Custom Presets What is a Preset? ..................
- Page 5 Table of Contents Printing a Funds (Postage) Report ............ 5-5 Connections between the Data Centre and Your Machine 5-5 System Update .................5-6 Envelope Messaging ...............5-6 Software Update (mandatory) ...........5-6 Postal Code Update (mandatory) ..........5-6 Postal Inspection (mandatory)...........5-6 Postal Rate Update (mandatory) ..........5-7 Connecting to the Data Centre (other than for Postage) ..
- Page 6 Table of Contents Chapter 7 Maintenance Replacing the Ink Cartridge/Printhead .......... 7-2 Fitting the Optional Moistener ............7-6 Filling the Optional Moistener ............7-6 Maintaining the Optional Moistener ..........7-7 Removing the Moistener Brush ..........7-7 Removing the Holder and Wick ..........7-9 Running Print Tests ................
- Page 7 Table of Contents Chapter 10 Reports Overview of Reports ................10-2 Printable Reports ..................10-2 Add Postage Report ..............10-2 Single Account Report ..............10-3 Multi-Account Summary Report ..........10-3 Account List Report ..............10-3 Register (Funds) Report .............10-4 Configuration Report ..............10-4 System Setup Report ..............10-4 Error Report ..................10-5 Rates Summary Report ..............10-5 Permit Summary Report ............10-6...
- Page 8 Table of Contents SDC974B...
- Page 9 1 • Introduction This chapter lists the key features of your mailing system, tells you what's in this book, and presents important safety information. About Your Digital Mailing System ......... 1-2 What is IntelliLink™ ..............1-3 Postal Requirements .............. 1-3 Safety .....................
-
Page 10: About Your Digital Mailing System
Mailmark™ compliant. NOTE: Although this guide describes all the features listed above, your DM220i Series is a configurable system and availability of the features will depend on your model, options purchased and your country requirements. Inclusion within this guide does not guarantee availability of a particular model or feature within your country. -
Page 11: What Is Intellilink
Call your local machine supplier for advice. • Your DM220i series is a Mailmark™ compliant system. At regular intervals defined by Royal Mail, it connects to the Pitney Bowes Data Centre to provide usage data to Royal Mail. The connection will normally happen in the background without you needing to do anything. -
Page 12: Safety
Safety Follow the normal safety precautions for all office equipment: • Use only Pitney Bowes approved supplies, in particular aerosol dusters. Improper storage and use of aerosol dusters or flammable aerosol dusters can cause an explosive-like condition that could result in personal injury and/or property damage. - Page 13 1 • Introduction • Be certain the area in front of the wall receptacle into which the machine is plugged is free from obstruction. • Before clearing a stoppage, be sure machine mechanisms have come to a stop. • When removing stalled material, avoid using too much force to protect against minor personal injury and damaging equipment.
-
Page 14: Specifications
1 • Introduction Specifications Equipment Size of Base Model 245 mm H x 345 mm W x 400 mm D Size of Base Model with Scale: 260 mm H x 345 mm W x 400 mm D Size of Base Model with Scale and Moistener: 260 mm H x 470 mm W x 400 mm D Stacker: The stacker adds 265mm to the width of the system Weight: 6.8 kg, approximate. - Page 15 1 • Introduction It is certified that the Mailing System meets all applicable EU Directives SDC974B...
- Page 16 1 • Introduction Material (see figure below) Minimum Size: 127 mm x 76 mm Maximum Size: 381 x 330 mm Minimum Flap Depth: 22 mm Maximum Flap Depth: 76 mm Minimum Thickness: 0.18 mm Maximum Thickness: 9.5 mm Maximum Stack Height for Mail: 60 mm IMPORTANT: For best results, always make sure your material conforms to our published specifications.
- Page 17 2 • Getting to Know Your System In this chapter you'll find out where everything is and what it does. Machine Features–Front ............2-2 Control Panel ................2-4 Machine Features–Rear ............2-6 SDC974B...
-
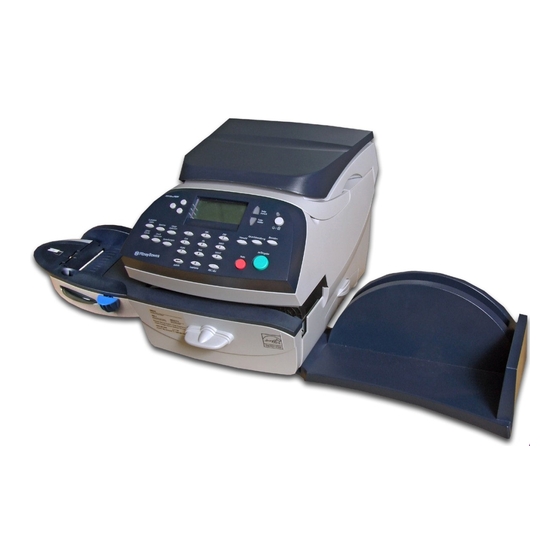
Page 18: Machine Features-Front
2 • Getting to Know Your System Machine Features–Front SDC974B... -
Page 19: Control Panel
2 • Getting to Know Your System 1. Control Panel—allows you to enter and setup information on your machine. 2. Top Cover—opens up to allow replacement of the ink cartridge. See Chapter 7, Maintenance for instructions. 3. Weighing Platform—allows you to weigh and calculate postage of a mail piece based on the service selected. - Page 20 2 • Getting to Know Your System Control Panel 1. Screen Selection Keys—allows you to select a line (one key for each line) on the operator display. Whenever the left arrow (◄) occupies the first position in one of the display lines, you may press the corresponding Screen Selection key to select that line.
- Page 21 2 • Getting to Know Your System 6. Alpha/Numeric Keypad—allows you to type in numbers and letters for account names, postage values, and other information. See Appendix A, How to Enter Text for more information. 7. Feature Keys—allows you quick access to the most common features on the system.
-
Page 22: Machine Features-Rear
2 • Getting to Know Your System Machine Features—Rear 1. USB (B) Port—allow connection to a PC for use with PC Meter Connect software. 2. USB Ports—allow you to connect a USB cable to peripherals (scanner, LAN, scale). 3. Power Receptacle—connects to AC power cord (supplied). 4. - Page 23 3 • Running Mail This chapter explains how to run mail, your printing options, and using the optional weighing platform. Before You Begin ..............3-2 Checklist ..................3-2 Home Screen ................3-2 Selecting Postage ..............3-3 Entering Weight Manually ........3-4 Using the Weighing Platform ........
-
Page 24: Before You Begin
3 • Running Mail Before You Begin Before you run mail on your system, review the Checklist, Home Screen, and Applying Postage sections below and on the next page. Checklist • Make sure your mailing system is plugged into a properly grounded power receptacle. -
Page 25: Selecting Postage
3 • Running Mail Selecting Postage There are several ways you can select postage using your mailing system. These may vary dependant on your postal authority requirements: • Enter the weight of the mail piece manually and have the system calculate the postage amount using the system's internal rating feature. -
Page 26: Entering Weight Manually
3 • Running Mail Entering Weight Manually This procedure is used when you already know the weight of a mail piece and you are not using the integrated weighing platform. 1. Press Weigh/Rate. 2. Select “Enter Manual Weight”. 3. Select “Change to g/kg” to switch between entering the weight in grammes or kilogrammes, as required. -
Page 27: Differential Weighing
Differential Weighing Differential weighing is an option that is available on certain models in the DM220i series only. It allows you to process mixed mail using the attached platform (scale). Put a number of pieces of mail onto the scale. The system calculates the postage for each piece of mail you remove from the scale automatically. -
Page 28: Selecting An Account To Track Postage
3 • Running Mail Selecting an Account to Track Postage You can select an account to track postage if the departmental accounting feature is available on your machine and is turned on. Departmental accounting may not be available on some models. See Chapter 11, Departmental Accounts, for information on setting up this feature. -
Page 29: Checking And Clearing The Batch Count
3 • Running Mail Checking and Clearing the Batch Count You can view the accumulated postage value and piece count information from the batch register and print this for your records. You can also clear or reset the batch count to zero. Checking the Batch Count 1. -
Page 30: Date/Time Of Next Call
3 • Running Mail Date/Time of next call You can view the date and time that the next upload to the Data Centre is due. 1. Press Funds. 2. Press Page Down twice and the date and time of the next connection due is displayed. -
Page 31: Printing Options
3 • Running Mail IMPORTANT: Always ensure that your prints are clear and complete. Poor prints may be rejected by your Postal Authority. If you notice missing lines in the print as shown in the illustration, perform a printhead purge as described on page 7-11 of this guide. -
Page 32: Printing Envelope Messaging, Date & Time On Incoming Mail
3 • Running Mail Printing the Date and Time on Incoming Mail You can set up your mailing system to print the date and time on incoming pieces of mail. 1. Press Print Menu. 2. Select "Date & Time Only". The "DATE AND TIME ONLY - NO POSTAGE PRINTING"... -
Page 33: Printing Envelope Messaging Only
3 • Running Mail Printing Envelope Messaging only You can set up your mailing system to just print Envelope Messaging of your choice onto pieces of mail. 1. Press Print Menu. 2. Select "Ad and Text Only". The "AD AND TEXT ONLY" screen appears. 3. -
Page 34: Text Messages
3 • Running Mail Text Messages What is a Text Message? A Text Message is a user defined message typed in via the machine’s keyboard that can be printed on your digital meter stamp. It can be up to 5 lines, each of 20 alpha/numeric characters and prints in a position to the left of the meter stamp. -
Page 35: Creating A Text Message
3 • Running Mail Creating a new Text Message 1. From the Home Screen, press Page Down once. 2. Select "TEXT", then "Create a Text Msg.". 3. Accept the warning regarding the use of Text Messages. 4. Select “Start” and enter your first line of text. It can be up to 20 alpha/numeric characters long. -
Page 36: Edit A Text Message
3 • Running Mail Edit a Text Message 1. Press Page Down. 2. Select “TEXT”, then Page Down, then "Edit a Text Msg.". The display lists all messages created on your system. 3. Press Page Down to see additional choices (if available). 4. - Page 37 4 • Normal and Custom Presets This chapter discusses the Normal and Custom Presets feature available on your machine. What is a Preset? ..............4-2 Normal Preset ................4-2 Selecting the Normal Preset ........4-3 Viewing the Normal Preset ........4-3 Defining New Values for Normal Preset .....
-
Page 38: What Is A Preset
4 • Normal and Custom Presets What is a Preset? A preset is a setting you can call up at the touch of a button that holds pre-defined values such as class of mail, Envelope Messaging, account number, etc. within your machine. Your system has a "normal"... -
Page 39: Selecting The Normal Preset
4 • Normal and Custom Presets Selecting the Normal Preset The Normal Preset can be selected by simply pressing Normal Preset. The system will always set itself to the Normal Preset values when power is turned on. Viewing the Normal Preset 1. -
Page 40: Custom Presets
4 • Normal and Custom Presets Custom Presets Your system can store up to 5 custom presets. Press Custom Presets to access the Custom Preset menu: Selecting a Custom Preset 1. Press Custom Presets. 2. Select "Select Preset". The display lists all presets created on your system. -
Page 41: Defining A New Custom Preset
4 • Normal and Custom Presets Defining a New Custom Preset To define (create) a new Custom Preset: 1. Establish the proper settings on the machine (such as No Ad, Mail Class, a specific account, etc.) that you want the preset to contain. 2. -
Page 42: Editing A Custom Preset Name
4 • Normal and Custom Presets Editing a Custom Preset Name You may change the name of a preset if you want. 1. Press Custom Presets. 2. Press Page Down and select "Edit Preset Name". 3. The display lists all the Custom Presets. Select the preset you want to edit. - Page 43 5 • Adding Postage/Connecting to Data Centre This chapter explains how to add postage to your system using the Postage By Phone Service and ® connecting to the Data Centre. About the Postage by Phone System® ....... 5-2 How does the system operate? ......5-2 Preparing to Refill with Postage ........
-
Page 44: About The Postage By Phone® System
Adding postage funds to your system is fast, easy and convenient. Your system must be connected to the internet via a LAN (Local Area Network) or a nearby PC running the free Pitney Bowes PC Meter Connect™ (PCMC) software. Important: For printing postage, your DM220i does not have to be connected. -
Page 45: Connecting Your System Via A Lan
5 • Adding Postage/Connecting to Data Centre Connecting Your System via a Wired LAN The requirements for LAN connection in the table on the previous page will allow simple plug-and-play connection of your system. If you cannot meet these requirements, more detailed information on LAN requirements and alternative configurations are given in a guide which you can download. -
Page 46: Checking Funds (Postage) Available In Machine
5 • Adding Postage/Connecting to Data Centre Checking Funds (Postage) Available in Machine 1. Press Funds. 2. View the funds available. 3. Press Page Down for additional information on batch values. 4. Press Home to return to Home screen. Checking Your Postage by Phone® Account Balance You can check your Postage By Phone®... -
Page 47: Printing A Funds (Postage) Report
5 • Adding Postage/Connecting to Data Centre Printing a Funds (Postage) Report A funds report allows you to print a record of how much postage has been used and how much is remaining in the machine. 1. Press Funds. 2. Press Page Down to the third screen. 3. -
Page 48: System Update
5 • Adding Postage/Connecting to Data Centre System Update If there has been a feature enhancement or other non-essential update to the software that runs your machine, you will be notified that a system update is available. Envelope Messaging If there are new envelope messages that you ordered available, you will be notified that you can perform a download to obtain these. -
Page 49: Postal Rate Update (Mandatory)
5 • Adding Postage/Connecting to Data Centre Postal Rate Update (mandatory) Postal rates change periodically as defined by your Postal Authority. If new rates are available, you can download them quickly and easily directly from the Data Centre. The new rates are normally available for download at least 7 days before the effective date. -
Page 50: Connecting To The Data Centre (Other Than For Postage)
5 • Adding Postage/Connecting to Data Centre Connecting to the Data Centre (other than for Postage) If you need to connect to the Data Centre for purposes other than adding or checking postage, follow these steps. NOTE: Machine must be connected to a LAN or PC Meter Connect™. - Page 51 6 • System Options This chapter presents system options you can setup or modify, such as setting time, date, passwords, warnings, etc. System Options ................ 6-2 Basic Options Include ........... 6-2 Advanced Options Include ........6-2 Basic Options ................6-3 Advancing the Date on the Machine ....
-
Page 52: Basic Options Include
6 • System Options System Options System options allow you to customise the machine settings for the way you run your mail and add security to those features that are sensitive to your organisation. Because of the many options available, the options are categorised into "Basic"... -
Page 53: Basic Options
6 • System Options Basic Options Advancing the Date on the Machine NOTE: You can only advance the date for your mail, you can never “backdate” mail to a date prior to the current date. 1. Press Options. 2. Select “Advance the date”. 3. -
Page 54: Turning Features On And Off
6 • System Options Turning Features (Already Purchased) On and Off You can turn on and off features that you have already purchased and downloaded into your machine. For turning on or off the scale (if purchased), see Setting Scale Options later in this chapter. 1. -
Page 55: Setting The Timeouts
6 • System Options Setting the Timeouts You can set the amount of time your system can remain inactive before reverting to the normal preset values and the amount of time before it enters sleep mode. Setting the Normal Preset Timer The normal preset is a set of values (Envelope Messaging, class of mail and so on) that your machine display automatically returns to after a set period of time. -
Page 56: Setting The Low Funds Warning
6 • System Options Setting the Low Funds Warning You can set up the system so that when the postage remaining reaches a certain level, the system will remind you to add postage. 1. Press Options. 2. Press Page Down. 3. -
Page 57: Changing The Lock Code And Password
3. Press Clear (back arrow key) twice to return to Options menu. IMPORTANT INFORMATION Your DM220i mailing machine contains postal funds and if you opt to use the 4-digit Lock Code to secure the funds, it is important that you do not allow your Lock Code to be compromised if the machine is used in an open area. - Page 58 6 • System Options Setting/Disabling the Supervisor Password The supervisor password prevents unauthorised access to the account setup procedures. 1. Press Options. 2. Press Page Down twice. 3. Select "LockCode/Passwords". 4. Select "Supervisor Password". Enter a 4-digit code, this becomes your supervisor password.
-
Page 59: Setting Scale Options
6 • System Options Setting Scale Options There are several options you can set with your scale such as zeroing the weight on the scale, Enter Manual Weight (see Chapter 3- Running Mail) and Differential Weighing (see Chapter 3- Running Mail). - Page 60 6 • System Options View Imperial Weight This function will not be available in all countries. You may view the weight currently displayed on the scale in pounds and ounces. 1. At the Home screen, press the selection key next to SCALE:. 2.
-
Page 61: Connecting To Data Centre
6 • System Options Connecting to Data Centre You can modify the connection settings on your machine such as user ID, password, and server IP address. The Data Centre menu choices are: • Uploads and Downloads • Phone Parameters (not used) •... - Page 62 6 • System Options Network Settings • LAN Settings • Firewall Settings For information on how to set up your machine for Network Settings consult our LAN guide which you can download. Visit europe.pitneybowes-support.com and enter the reference number 8026 to download the guide. Distributor Values This option allows you to modify the connection parameters that your machine uses to connect to the Data Centre.
- Page 63 6 • System Options Account and User ID This is the account number and the user ID that your system uses to connect to the internet service provider (ISP) that allows you to connect to the Data Centre. Global Password This is the password your system uses to connect to your internet service provider.
-
Page 64: Advanced Features
6 • System Options Advanced Features Advanced Features allow you access to features that are used very infrequently such as meter withdrawal, etc. The Advanced Feature menu includes: • Barcode Scanner. • Maintenance Mode (refer to Chapter 7, Maintenance for information on this option) •... - Page 65 7 • Maintenance This chapter explains how to maintain your mailing system. Replacing the Ink Cartridge/Printhead ......7-2 Fitting the Optional Moistener ......... 7-6 Filling the Optional Moistener .......... 7-6 Maintaining the Optional Moistener ......7-7 Removing the Moistener Brush ......7-7 Removing the Holder and Wick ......
-
Page 66: Replacing The Ink Cartridge/Printhead
Replacing the Ink Cartridge/Printhead IMPORTANT INFORMATION Pitney Bowes recommends that you only use genuine replacement ink cartridges that are available from Pitney Bowes. Pitney Bowes blue ink cartridges have been checked and comply with Postal Authority readability requirements. If alternative cartridges or refills are obtained, the ink used must be approved by your Postal Authority. - Page 67 7 • Maintenance Replacing the Ink Cartridge/Printhead (continued) 3. Flip open the ink cartridge guard. Ink Cartridge Guard 4. Lift up and remove old ink cartridge. NOTE: If you are NOT changing the printhead, skip to Step 5. If you have been directed by a representative of your machine supplier to change the Print Head, continue with step 4A below.
- Page 68 7 • Maintenance Replacing the Ink Cartridge/Printhead (continued) 4C. Remove the protective tape from the bottom of the new printhead. 4D. Squeeze the two grey tabs on either side of the new printhead and slightly angle the printhead while sliding it back into its holder.
- Page 69 7 • Maintenance Replacing the Ink Cartridge/Printhead (continued) 5. Remove the tape from the bottom of the new ink cartridge. This should automatically be removed with the packaging. 6. Lower the ink cartridge into the cavity. The ridges on either side of the cartridge will slide into the grooves.
- Page 70 7 • Maintenance Fitting the Moistener (if supplied) Slide the moistener onto the machine. You should hear a click as it engages. Filling the Moistener (if fitted) Refer to the following procedure to refill the moistener. 1. Check the moistener tank to see how much sealing solution is left.
-
Page 71: Removing The Moistener Brush
7 • Maintenance Maintaining the Moistener (if fitted) If you notice incomplete or poor sealing and the moistener tank is full, you may need to clean the moistener brush or wick. If seal quality doesn't improve after cleaning, you can replace the moistener brush or wick as needed. - Page 72 7 • Maintenance Removing the Moistener Brush (continued) 5. Clean the brush in plain water, and rinse thoroughly. 6. Position the brush as shown so its bottom edge is under the mounting tabs. 7. Slide the brush back towards the rear of the moistener.
-
Page 73: Removing The Holder And Wick
7 • Maintenance Removing the Holder and Wick Holder 1. Pull up and remove the holder and wick from the moistener as Wick shown. 2. Separate the wick from its metal holder. Clean the wick in plain water, and rinse thoroughly. 3. -
Page 74: Running Print Tests
7 • Maintenance Running Print Tests The system has several tests that let you check print performance and help you determine printing problems: Test Print The test print allows you to print a test pattern to see if the printhead is functioning properly and has no blocked printing jets. -
Page 75: Purge
7 • Maintenance Purge This function allows you to purge the printheads in an effort to fix a printing problem. IMPORTANT: Always ensure that your prints are clear and complete. Poor prints may be rejected by Royal Mail. If you notice missing lines in the print as shown in the illus- tration, perform a printhead purge as described below. -
Page 76: Replacement
7 • Maintenance Replacement (of Printhead or Cartridge) This option steps you through the procedure to replace either the printhead or ink tank (cartridge). NOTE: See "Replacing the Ink Cartridge/Printhead" at the beginning of this chapter which explains this procedure in detail using illustrations. - Page 77 8 • Troubleshooting This chapter explains how to troubleshoot your mailing system. Getting Help ................8-2 Display Messages ..............8-2 Power Problems ............... 8-2 Printing Problems ..............8-3 Feeding Problems ..............8-4 Display Problems ..............8-4 Problems Adding Postage ........... 8-5 Moistening Problems .............
-
Page 78: Getting Help
8 • Troubleshooting Getting Help Please read the troubleshooting information in this chapter. In many cases, it can help you resolve the problem. You can often restore normal operation by turning your system off and then back on. If you still cannot resolve the problem, call your machine supplier for help. -
Page 79: Printing Problems
8 • Troubleshooting Printing Problems Machine won't print Machine is in seal-only mode This mode disables printing. Press Home to return to Home screen and resume printing. Digital meter stamp is incomplete or streaked; poor print quality Print nozzles clogged IMPORTANT: Always ensure that your prints are clear and complete. -
Page 80: Feeding Problems
8 • Troubleshooting Feeding Problems Clearing a stalled envelope 1. Rotate transport release lever clockwise to the "released" position. 2. Carefully pull envelope out from right. 3. Make sure deck is clear of paper fragments. 4. Rotate transport release lever anticlockwise to the "home" position. -
Page 81: Problems Adding Postage
You cannot meet the requirements of LAN or PC Meter Connet™ connection If do not have a LAN connection or an internet enabled PC available to allow your franking machine to connect to the Pitney Bowes Data Centre, please contact your machine supplier to discuss other possible options. -
Page 82: Moistening Problems
8 • Troubleshooting Moistening Problems (if moistener is fitted) Envelopes don't seal Incorrect feeding Make sure you slide the envelope flap under the blue edge of the feed deck. If you don't, the moistener can't wet the flap. Low sealant level Check the sight glass on the left side of the moistener tank. - Page 83 9 • Supplies and Options This chapter explains how to order supplies and accessories for your digital mailing system. It also tells you a little about options that can help you get the most value from your equipment Options..................9-2 Moistener ................
-
Page 84: Options
You can purchase Graphic Ads if your needs require it, up to a total of 20 Ads. Optional Graphic Ads are conveniently loaded into your machine over your connection to the Pitney Bowes Data Centre via software downloads. Departmental Accounting The accounting feature tracks postage costs for departmental accounts. - Page 85 10 • Reports This chapter explains how to take advantage of the reports feature of your system. Overview of Reports ............10-2 Printable Reports ..............10-2 Add Postage Report ........... 10-2 Single Account Report ..........10-3 Multi-Account Summary Report ......10-3 Account List Report ............
-
Page 86: Overview Of Reports
10 • Reports Overview of Reports Your system allows you to print reports for funds usage, postage refills, postage tracked by account, and other valuable data. You can print these reports directly from your machine on an envelope or tape sheet. The reports are accessed by pressing Reports. Printable Reports on Your Machine Printable reports include: •... -
Page 87: Single Account Report
10 • Reports Single Account Report This report provides the postage history for a single account (if the Departmental Accounting feature is set up on your system). 1. Press Reports. 2. Select "Single Account Rpt". 3. Key in an account. 4. -
Page 88: Register (Funds) Report
10 • Reports Register Report (Funds Report) This report lists the postage used, postage available, pieces processed, and other information about your machine usage. 1. Press Reports. 2. Select "Register Report". 3. When prompted, insert tape sheet or envelope into machine. The report is printed and you return back to the Printable reports menu. -
Page 89: Error Report
10 • Reports Error Report This report provides a history of error codes that your machine has encountered. 1. Press Reports. 2. Select "Error Report". 3. When prompted, insert tape sheet or envelope into machine. The report is printed and you return back to the Printable reports menu. -
Page 90: Permit Summary Report
10 • Reports Permit Summary Report This report provides the count of the number of pieces processed on each permit. For an accurate count the number of pieces must be reset after the report has been printed. 1. Press Reports 2. - Page 91 11 • Departmental Accounting This chapter explains how to take advantage of the optional accounting features of the system. If you have the optional INVIEW Accounting package please see note on page 11-2. Overview of the Accounting Feature......11-2 Turning On Accounting (if purchased) ...... 11-3 Turning Off Accounting .............
-
Page 92: Overview Of The Accounting Feature
11 • Departmental Accounting Overview of the Accounting Feature If your model has the departmental accounting feature, you can setup your system to track postage costs incurred by individuals or departments in your organisation (e.g., Engineering, Sales, etc.). The number of accounts available on your system is based on the amount purchased or supplied with your model. -
Page 93: Turning On Accounting (If Purchased)
11 • Departmental Accounting Turning On Accounting (if available) 1. At the home screen, press Options. 2. Press Page Down and select "Turn items ON/OFF". 3. Select "Accounting". 4. Select "Turn Accounting ON". 5. Select Type of Accounting, Select ‘Standard Accounting’. 6. -
Page 94: Creating An Account
11 • Departmental Accounting Creating an Account You need to create an account before you can use the departmental accounting feature to track postage. 1. From Home screen, press the selection key next to “ACCT” or “Select an Account” to display the Accounts menu. 2. -
Page 95: Editing An Account/Setting Up Account Passwords
11 • Departmental Accounting Editing an Account/Setting Up Account Passwords You can edit an account name and establish passwords for each account if you wish. 1. From Home screen, press the selection key next to “ACCT” or “Select an Account” to display the Accounts menu. 2. -
Page 96: Turning On Account Passwords
11 • Departmental Accounting Turning On Account Passwords You can turn on the requirement for all operators to enter passwords (if passwords are set up) when choosing an account. NOTES: • The Supervisor Password must be turned on before you can use this feature. -
Page 97: Selecting An Account
11 • Departmental Accounting Selecting an Account You can select an account to track postage if the optional departmental accounting feature has been bought and turned on. 1. From Home screen, press the selection key next to “ACCT” or “Select an Account” to display the Accounts menu. 2. -
Page 98: Clearing An Account
11 • Departmental Accounting Clearing an Account You can clear the postage totals on an account when necessary. CAUTION: Make sure your really want to clear an account. Once you do, the account information is gone forever. 1. From Home screen, press the selection key next to “ACCT” or “Select an Account”... -
Page 99: Clearing All Accounts
11 • Departmental Accounting Clearing All Accounts You can clear the postage totals on all accounts (for example, at the beginning of a new fiscal year) with this option. CAUTION: Make sure your really want to clear all your accounts. Once you do, the account information is gone forever. -
Page 100: Deleting An Account
11 • Departmental Accounting Deleting an Account You can delete an account and remove it and its contents from the system. CAUTION: Make sure your really want to delete an account. Once you do, the account information is gone forever. 1. -
Page 101: Appendix A How To Enter Text
Appendix A • How to Enter Text When is Text Entry Used? Text is entered for these functions: • International mail (selecting a country) • Entering Postal Codes • Naming a Custom Preset • Naming an Account (with optional Departmental Accounting) •... -
Page 102: Special Characters
Appendix A • How to Enter Text Special Characters Special characters are accessed by repeatedly pressing the “1” key. Special characters include: Symbol Name Comma Asterisk Period Colon $ / £ / € Currency symbol Minus sign (dash) Question mark Forward slash Backward slash Open parenthesis... - Page 103 Glossary Account—A department (e.g., “Human Resources”) to which postage is charged. Your machine may allow you to set up and choose a number of different accounts. You can assign a unique name to each. The machine stores the total postage used and the number of mail pieces processed for each account.
- Page 104 Data Centre. It also permits convenient postal inspection. PC Meter Connect™ — Pitney Bowes software for your PC that allows your system to access the Data Centre using your PC's internet connection.
- Page 106 For Service and Supplies: Form No. SDC974B RevB (6-15) © Pitney Bowes Limited, 2015 We have made every reasonable effort to assure the accuracy and usefulness of this guide, however we cannot assume responsibility for errors or omissions or liability for the misuse or misapplication of our products.
Need help?
Do you have a question about the DM220i and is the answer not in the manual?
Questions and answers