
Related Manuals for Shoprider QT-8 LITTLE BEAUTY


Summary of Contents for Shoprider QT-8 LITTLE BEAUTY
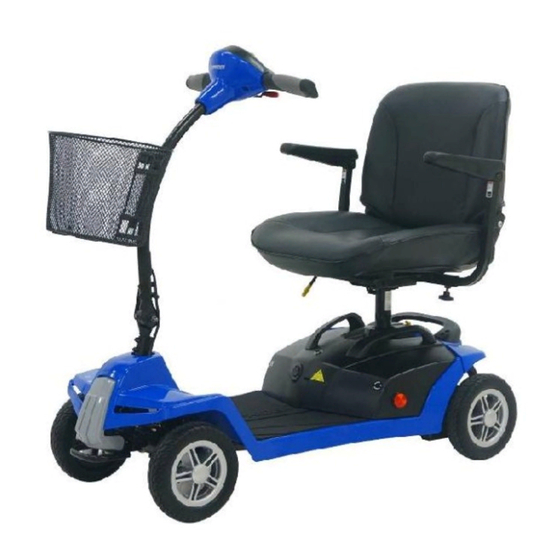
- Page 1 ATTENTION Please read your owner’s manual before driving your scooter. QT-8 LITTLE BEAUTY Owner’s Manual...
-
Page 2: Table Of Contents
CONTENTS INTRODUCTION .....................3 FEATURE GUIDE ....................3 SAFETY ADVICE ....................4 EMI Warning ......................6 ADJUSTMENT ......................8 SCOOTER TILLER CONTROLS ................10 FREE WHEEL OPERATION ...................12 STARTING TO DRIVE YOUR SCOOTER..............13 EXTRA GUIDELINES IN THE CONTROL OF YOUR SCOOTER ......14 BATTERIES AND BATTERY CHARGER ...............15 MAINTENANCE ......................17 TROUBLE SHOOTING GUIDE ................18 WARRANTY TERMS &... -
Page 3: Introduction
This scooter can be used in confined spaces both indoors and outdoors. Direct ® drive transaxles and electromagnetic brakes give a safe and efficient ride. This Shoprider scooter is designed for persons with limited mobility. Please read this manual carefully and thoroughly before using your scooter and make sure you understand all the instructions. -
Page 4: Safety Advice
SAFETY ADVICE • Do not carry passengers. • This mobility Product is intended to assist you. For your own safety, please read the Owner’s Manual before using the Scooter. If in any doubt, contact your supplier directly for advice. • Do not exceed inclines over 6 degrees (10% grade). •... - Page 5 • Do not connect any foreign device to the scooter battery or charging port. This could cause failure of the device, the scooter and personal injury. • Make sure the tiller is properly adjusted and locked to the user or damage and injury could result.
-
Page 6: Emi Warning
EMI Warning ® Shoprider scooters may be susceptible to electromagnetic interference (EMI), which is a kind of interfering electromagnetic energy (EM) emitted from sources such as radio stations, TV stations, amateur radio (HAM) transmitters, two-way radio, and cellular phones. The interference (from radio wave sources) can cause the scooter to release its brakes, move by itself, or move in unintended directions. - Page 7 EMI. NOTE! There is no easy way to evaluate the overall immunity of the scooter. ® 5. Report all incidents of unintended movement or braking to your Shoprider dealer, and note whether there are sources of EMI nearby.
-
Page 8: Adjustment
ADJUSTMENTS Tiller Adjustment Lever Tiller Angle Adjustment (Fig. 1) At the base of the tiller is a lever. Releasing the lever to loosen the tiller and select the desired tiller angle. Clamp the lever to secure the tiller at the appropriate position. Fig. - Page 9 Labels and Warnings Warning Sticker OFF-Brake-ON Label CIRCUIT CIRCUIT BREAKER BREAKER UL 40A UL 40A FUSE FUSE UL10A UL 40A UL5A UL 40A FUSE FUSE FUSE FUSE CHARGE CHARGE BATTERY BATTERY BATTERY BATTERY N53-9 N53-27 INHIBIT INHIBIT Battery Wiring Diagram (for 22Ah) Battery Wiring Diagram (for 14Ah)
-
Page 10: Scooter Tiller Controls
SCOOTER TILLER CONTROLS (Fig. 4) Fig. 4 (1) Speed Controls The speed control allows you to set a speed between 1 (minimum) and 10 (maximum). Turn the dial knob counter-clockwise to “minimum” to decrease speed, and clockwise towards “maximum” to increase your speed. (2) LED Battery Level Indicator The gauge is marked from “E”... -
Page 11: Free Wheel Operation
FREE WHEEL OPERATION (Fig. 5) The free wheel release lever (yellow handle) is located inside the right rear wheel. To disengage the motor, lift up the lever (the scooter can now be pushed). To re-engage the motor push down on the lever. WARNING! Always re-engage the free wheeling device after use. -
Page 12: Tiller Adjustment Lever 8
TRANSPORT / STORAGE The portable scooter is designed to be quickly and easily disassembled into sections for transportation and storage. Follow these simple guidelines for disassembly: Disassembly (Fig 6 & 7) 1) Remove the front basket: Lift basket up and off. 2) Fold the seat down and remove: Pull yellow swivel seat lever up and lift seat up and off. -
Page 13: Starting To Drive Your Scooter
STARTING TO DRIVE YOUR SCOOTER Getting Started • Select a level area with plenty of space. • Mount the scooter, either by lifting the arm and sliding on to the seat or rotate the seat outwards and then rotate the seat back to face the tiller. •... -
Page 14: Extra Guidelines In The Control Of Your Scooter
EXTRA GUIDELINES IN THE CONTROL OF YOUR SCOOTER Ramps The stability of your scooter is governed by several factors such as the seating position, the angle of the slope and your height and weight. When approaching an incline, do so directly and not at an angle and whenever possible avoid making turns. -
Page 15: Batteries And Battery Charger
A/C cord from the wall then unplug the 3-pin lead from the battery pack. ® WARNING: Only use the original Shoprider approved charger! This charger is for indoor use only. DO NOT expose it to rain or water spray. - Page 16 Battery Information 1. Do not mix using different batteries & cables. Two batteries must be consistent when connected. 2. The dual portable battery packs must be engaged together and installed onto a scooter properly before driving or charging. 3. Fully recharge new batteries prior to initial use. 4.
-
Page 17: Maintenance
MAINTENANCE Servicing Ensure the scooter is serviced every 12 months to ensure it remains in safe working order failure to do so may cause catastrophic failure with possible injury and damage to surrounding property. Regular servicing will ensure trouble free operation. Please Note Heavy users of the scooter may require more frequent servicing Tires... -
Page 18: Trouble Shooting Guide
Please consult your dealer if your scooter does not run after checking these points. Please consult your selling Shoprider provider if your scooter does not run after checking these points. -
Page 19: Warranty Terms & Conditions
Shoprider® will as noted below supply spare parts as required as part of this agreement. Structural Frame – 3 Years Shoprider Australia warrants that the frame will be free from defects under normal use, for a period of three (3) years from the date of purchase by the original customer. - Page 20 NOTE: In the event of a warranty issue, Always contact your selling Shoprider® dealer who will arrange any work and return any faulty parts. Parts will be assessed and replaced within 3-5...
-
Page 21: Technical Specifications
TECHNICAL SPECIFICATIONS Model Name (TE-7A) QT-8 LITTLE BEAUTY Overall Dimensions: L x W x H mm(in) 1110(43.7) x 540(21.3) x 925(36.4) Front Tire Diameter pcs x in 2 x 8 Rear Tire Diameter pcs x in 2 x 8 Suggested User Weight... -
Page 22: Disclaimer
This owner's manual is printed based on the latest specifications and product information available at the time of publication. SHOPRIDER® reserves the right to make changes as they become necessary. Any changes to the SHOPRIDER® range may cause slight variations between the illustrations and explanations in this manual and the scooter model that was purchased.
Need help?
Do you have a question about the QT-8 LITTLE BEAUTY and is the answer not in the manual?
Questions and answers