Table of Contents
Advertisement
Available languages
Available languages
BEDIENUNGSANLEITUNG
USER MANUAL
MODE D'EMPLOI
MANUAL DEL USUARIO
MH - 640
MH - 640
Washlight
Version 2.0
© Copyright
Für weiteren Gebrauch aufbewahren!
Keep this manual for future needs!
Nachdruck verboten!
Gardez ce mode d'emploi pour des
Reproduction prohibited!
utilisations ultérieures!
Réproduction interdit!
Guarde este manual para posteriores usos.
Prohibida toda reproducción.
Advertisement
Chapters
Table of Contents

Related Manuals for Future light MH - 640


Summary of Contents for Future light MH - 640
- Page 1 BEDIENUNGSANLEITUNG USER MANUAL MODE D'EMPLOI MANUAL DEL USUARIO MH - 640 MH - 640 Washlight Version 2.0 © Copyright Für weiteren Gebrauch aufbewahren! Keep this manual for future needs! Nachdruck verboten! Gardez ce mode d’emploi pour des Reproduction prohibited! utilisations ultérieures! Réproduction interdit!
- Page 2 Weitere Produkte aus dem FUTURELIGHT-Sortiment: Further products from the FUTURELIGHT-range: Autres produits de l’assortiment de FUTURELIGHT: Otros productos del surtido FUTURELIGHT: www.futurelight.com FUTURELIGHT LICHTEFFEKTE FUTURELIGHT LIGHTING EFFECTS FUTURELIGHT EFFETS LUMINEUX FUTURELIGHT EFECTOS LUMINOSOS FUTURELIGHT RT-240 lighting effect 51830510 FUTURELIGHT SPIDER centre-piece 51832065 FUTURELIGHT DF-250 lighting effect 51832085...
-
Page 3: Table Of Contents
MH - 640 Washlight Bedienungsanleitung Inhaltsverzeichnis Einführung ............................4 Features ............................4 Strahlenverlauf..........................4 Geräteübersicht..........................5 Sicherheit ............................6 Sicherheitshinweise........................6 Bestimmungsgemäße Verwendung...................6 Installation............................8 Einsetzen/Wechseln der Lampe....................8 Projektormontage .........................9 Anschluss ans Netz........................10 Anschluss an DMX-512 Controller/Verbindung Projektor-Projektor........10 DMX-Protokoll ..........................11 Funktionen der Steuerkanäle....................11 Funktionen der Steuerkanäle - 8 Bit-Protokoll ...............13 Adressierung des Projektors .....................13... -
Page 4: Einführung
ACHTUNG! Gerät vor Feuchtigkeit und Nässe schützen! Vor Öffnen des Gerätes Netzstecker ziehen! LESEN SIE VOR DER ERSTEN INBETRIEBNAHME ZUR EIGENEN SICHERHEIT DIESE BEDIENUNGSANLEITUNG SORGFÄLTIG DURCH! Einführung Wir freuen uns, dass Sie sich für einen FUTURELIGHT MH-640 entschieden haben. Sie haben hiermit ein intelligens, leistungsstarkes und vielseitiges Beleuchtungssystem erworben. -
Page 5: Geräteübersicht
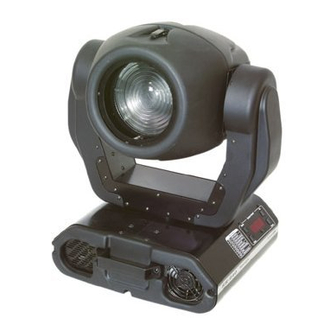
Geräteübersicht 1 - Projektorkopf 2 - Aufhängung 3 - Tragegriffe 4 - Base 5 - Base - Seite 6 - Steuereinheit Base - Seite: 7 - DMX-Ausgang 8 - DMX-Eingang 9 - Netzanschluss 10 - Sicherungshalter 11 - Netzschalter Control Board: 12 - Mode-Taste 13 - Display 14 - Enter-Taste... -
Page 6: Sicherheit
Sicherheit Sicherheitshinweise Dieses Gerät hat das Werk in sicherheitstechnisch einwandfreiem Zustand verlassen. Um diesen Zustand zu erhalten und einen gefahrlosen Betrieb sicherzustellen, muss der Anwender die Sicherheitshinweise und die Warnvermerke unbedingt beachten, die in dieser Bedienungsanleitung enthalten sind. Unbedingt lesen: Bei Schäden, die durch Nichtbeachtung der Anleitung verursacht werden, erlischt der Garantiean- spruch. - Page 7 Dieses Gerät ist für professionelle Anwendungen, z. B. auf Bühnen, in Diskotheken, Theatern etc. vorgesehen. Lichteffekte sind nicht für den Dauerbetrieb konzipiert. Denken Sie daran, dass konsequente Betriebspausen die Lebensdauer des Gerätes erhöhen. Das Gerät darf niemals ohne Lampe in Betrieb genommen werden! Vermeiden Sie Erschütterungen und jegliche Gewaltanwendung bei der Installation oder Inbetriebnahme des Gerätes.
-
Page 8: Installation
Installation Einsetzen/Wechseln der Lampe LEBENSGEFAHR! Lampe nur bei ausgeschaltetem Gerät einsetzen! Netzstecker ziehen! Lampensystem Einsetzen Lampe (MSD 230 V/250 W oder MSD 230 V/200 W) öffnen Sie die kleine Abdeckung an der Rückseite Kopfes nebenstehender Zeichnung, indem Sie die Kreuzschlitzschrauben lösen. Ziehen vorsichtig Lampensystem heraus. -
Page 9: Projektormontage
Projektormontage BRANDGEFAHR! Achten Sie bei der Installation des Gerätes bitte darauf, dass sich im Abstand von mind. 0,5 m keine leicht entflammbaren Materialien (Deko, etc.) befinden. ACHTUNG! Montieren Sie den Projektor ausschließlich über zwei geeignete Haken. Bitte beachten Sie auch die Installationshinweise auf der Unterseite der Base. -
Page 10: Anschluss Ans Netz
Anschluss ans Netz Schließen Sie das Gerät über den Netzstecker ans Netz an. Die Belegung der Anschlussleitungen ist wie folgt: Leitung International Braun Außenleiter Blau Neutralleiter Gelb/Grün Schutzleiter Der Schutzleiter muss unbedingt angeschlossen werden! Anschluss an DMX-512 Controller/Verbindung Projektor-Projektor Achten Sie darauf, dass die Adern der Datenleitung an keiner Stelle miteinander in Kontakt treten. -
Page 11: Dmx-Protokoll
DMX-Protokoll Funktionen der Steuerkanäle Steuerkanal 1 - Drehbewegung (Pan) Wenn Sie den Regler verschieben, bewegen Sie den Kopf horizontal (PAN). Allmähliches Einstellen des Kopfes bei langsamen Schieben des Reglers (0-255, 128-Mitte). Der Kopf lässt sich um 530° drehen und kann in jeder gewünschten Position angehalten werden. - Page 12 0 - 17 Offen/weiß 18 - 35 36 - 53 Blau 54 - 72 Grün 73 - 90 Korrekturfilter 3200 K 91 - 108 Korrekturfilter 5600 K 109 - 127 UV-Filter 128 - 190 Rainboweffekt vorwärts mit absteigender Geschwindigkeit 191 - 192 Keine Rotation 193 - 255 Rainboweffekt rückwärts mit zunehmender Geschwindigkeit...
-
Page 13: Funktionen Der Steuerkanäle - 8 Bit-Protokoll
Steuerkanal 13 - Effektrad 0 - 70 Full beam 71 - 230 Beam shaper 231 - 255 Frost-Filter Steuerkanal 14 - Ohne Funktion Steuerkanal 15 - Shutter, Strobe 0 - 31 Shutter geschlossen 32 - 63 Keine Funktion (Shutter offen) 64 - 95 Strobe-Effekt langsam bis schnell (max. -
Page 14: Fernsteuerbare Funktionen
-wenn der Controller ausgeschaltet oder defekt ist. -das Kabel oder der Stecker defekt ist oder das Signalkabel nicht richtig eingesteckt ist. Ω Achtung: Am letzten Projektor muss die DMX-Leitung durch einen 120 . Widerstand abgeschlossen werden damit die Geräte korrekt funktionieren. Fernsteuerbare Funktionen Lampe Der MH-640 wird mit einer MSD 230 V/250 W GY-9,5 oder MSD 230 V/200 W GY-9,5 Lampe betrieben. -
Page 15: Control Board
1. „HIGH“- Lüftergeschwindigkeit maximal Der Projektor wird mit maximaler Lüfterleistung gekühlt. 2. „reG“ - automatische Anpassung der Lüftergeschwindigkeit Ab einer gewissen Temperatur wird die Lüftergeschwindigkeit automatisch erhöht, um einen Ausfall des Gerätes zu verhindern. Diese Automatik kann sich bis zu sieben Mal wiederholen, bis die Innnentemperatur wieder ein unkritischen Niveau erreicht hat. -
Page 16: Spec - Spezialfunktionen
Sie die Enter-Taste zur Bestätigung oder die Mode-Taste, um abzubrechen. - Demonstrationsprogramm Mit dieser Funktion können Sie das Demonstrationsprogramm des Projektors aktivieren. So lassen sich einige der Möglichkeiten des MH-640 ohne externen Controller vorführen. Drücken Sie die Up-/Down- Tasten, um die Sequenzen „Mod1“ oder „Mod2“ auszuwählen. Die Sequenzen unter „Mod1“ eignen sich besonders für Projektionen an der Wand, Decke oder auf dem Boden, ohne dass der Kopf sich bewegt. - Page 17 - Automatische Displayabschaltung: Mit dieser Funktion lässt sich einstellen, dass das Gerät das Display nach 2 Minuten automatisch abschaltet wenn keine Taste mehr gedrückt wurde. Drücken Sie die Up-/Down-Tasten, um „ON“ oder „OFF“ einzustellen. Drücken Sie die Enter-Taste zur Bestätigung oder die Mode-Taste, um abzubrechen. - Displaybeleuchtung: Mit dieser Funktion können Sie die Displaybeleuchtung zwischen 20 und 100 einstellen.
- Page 18 Eigenschaft Display Vorgabewert (Unterlegt) Pan reverse Tilt reverse Auflösung Autom. Lam- penschaltung Automat. Displayabsch Displaybe- leuchtung DMX- Lampensch. Lüfterleist. - Einstellung der Ausgangspositionen: Mit dieser Funktion lassen sich das Farb- und CMY-Rad auf die korrekten Ausgangspositionen kalibrieren. Drücken Sie die Up-/Down-Tasten, um sich im Menü zu bewegen. Auf dem Display erscheinen von Schritt zu Schritt die Folgenden Funktionen: „PAn, Tilt, SPEd, Colo, CYan, MAGE, YELL, MACr EFEC, Stro, dimr, FCAL“...
-
Page 19: Fehlermeldungen
DMX Kalibrierungsprotokoll: Nachdem Sie die benötigten Funktionen kalibriert haben und mit der Enter-Taste bestätigt haben, muss die Funktion „ArES“ gewählt werden, um die eingestellten Werte in das EEPROM zu übertragen und einen Reset auszuführen. Fehlermeldungen Diese Fehlermeldung erscheint, wenn Sie versuchen, die Lampe zu zünden bevor die 5 Minuten Abkühlzeit verstrichen sind. -
Page 20: Technische Daten
Diese Fehlermeldung erscheint, wenn die Netzversorgung nicht auf 50 oder 60 Hz lautet. Technische Daten Spannungsversorgung EU-Modell: 210/230/250 V AC, 50/60 Hz ~ US-Modell: 100/120/210/230/250 V AC, 50/60 Hz ~ Leistungsaufnahme: 400 W Sicherung: T 3,15 A, 250 V Lampe MSD 230 V/250 W GY-9,5 oder MSD 230 V/200 W GY-9,5 Optisches System - Parabolischer Spiegel für optimalen Lichtaustritt... -
Page 21: Reinigung Und Wartung
Montage Steht direkt auf dem Boden Kann über zwei geeignete Haken horizontal oder vertikal montiert werden Befestigungspunkt für Sicherheitsfangseil Temperaturentwicklung Maximale Umgebungstemperatur t : 45° C Maximale Leuchtentemperatur im Beharrungszustand t : 80° C Maße und Gewicht Länge der Grundfläche (mit Griffen): 372 mm Breite der Aufhängung: 426 mm... -
Page 22: Anhang
irgendwelche Lösungsmittel zur Reinigung verwenden! Die Fresnell-Linse sollte wöchentlich gereinigt werden, da sich sehr schnell Nebelfluidrückstände absetzen, die die Leuchtkraft des Gerätes erheblich reduzieren. Den Lüfter monatlich reinigen. Reinigen Sie das Innere des Projektors mindestens einmal im Jahr einem Staubsauger oder einer Luftbürste. - Page 23 MH - 640 Washlight User manual Table of contents Introduction ............................24 Features ............................24 Beampath.............................24 Description of the fixture......................25 Safety..............................26 Safety instructions ........................26 Operating determinations ......................26 Installation............................28 Fitting/Exchanging the lamp......................28 Rigging the fixture........................29 Connection to the mains ......................30 DMX-512 connection / connection between fixtures.............30 DMX-Protocol..........................31...
-
Page 24: Introduction
CAUTION! Keep this device away from rain and moisture! Unplug mains lead before opening the housing! FOR YOUR OWN SAFETY, PLEASE READ THIS USER MANUAL CAREFULLY BEFORE YOU INITIAL START - UP! Introduction Thank you for having chosen a FUTURELIGHT MH-640. You acquired a versatile, powerful and intelligent lighting-effect. -
Page 25: Description Of The Fixture
Description of the fixture 1 - Projector-head 2 - Yoke 3 - Carring handles 4 - Base 5 - Base - side panel 6 - Control Board Base - side panel: 7 - DMX-output 8 - DMX-input 9 - Powercord 10 - Fuseholder 11 - Power-switch Control Board:... -
Page 26: Safety
Safety Safety instructions This device has left our premises in absolutely perfect condition. In order to maintain this condition and to ensure a safe operation, it is absolutely necessary for the user to follow the safety instructions and warning notes written in this user manual. Important: Damages caused by the disregard of this user manual are not subject to warranty. - Page 27 Never run the device without lamp! Do not shake the device. Avoid brute force when installing or operating the device. Never lift the fixture by holding it at the projector-head, as the mechanics may be damaged. Always hold the fixture at the transport handles. When choosing the installation-spot, please make sure that the device is not exposed to extreme heat, moisture or dust.
-
Page 28: Installation
Installation Fitting/Exchanging the lamp DANGER! Install the lamp with the device switched off only. Unplug from mains before! Lamp assembly To insert the lamp MSD 230V/250W or MSD 230V/200W open the small cover at the rear of head (see the drawings) by loosening the 2 Phillips screws on the cover. -
Page 29: Rigging The Fixture
Rigging the fixture DANGER OF FIRE! When installing the device, make sure there is no highly inflammable material (decoration articles, etc.) in between a distance of min. 0.5 m. CAUTION! Use 2 appropriate clamps to rig the fixture on the truss. Follow the instructions mentioned at the bottom of the base. -
Page 30: Connection To The Mains
Connection to the mains Connect the fixture to the mains with the power-plug. The occupation of the connection-cables is as follows: Cable International Brown Live Blue Neutral Yellow/Green Earth The earth has to be connected! DMX-512 connection / connection between fixtures The wires must not come into contact with each other, otherwise the fixtures will not work at all, or will not work properly. -
Page 31: Dmx-Protocol
DMX-Protocol Function of the control channels - 16 bit protocol Channel 1 - Horizontal movement (Pan) Push slider up in order to move head horizontally (PAN). Gradual head adjustment from one end of the slider to the other (0-255, 128-center). The head can be turned by 530° and stopped at any position you wish. - Page 32 Channel 7 - Colour-wheel Linear colour change following the movement of the slider. In this way you can stop the colour-wheel in any position - also between two colours creating double-coloured beams. Between 128 and 190 and between 193 and 255, the colour-wheel rotates continuously the so-called "Rainbow"...
-
Page 33: Function Of The Control Channels - 8 Bit Protocol
Channel 13 - Effect-wheel 0 - 70 Full beam 71 - 230 Beam-shaper 231 - 255 Frost-filter Channel 14 - No function Channel 15 - Shutter, Strobe 0 - 31 Shutter closed 32 - 63 No function (Shutter open) 64 - 95 Strobe-effect from slow to fast (max. -
Page 34: Remotely Controllable Functions
in the input connector. Note: It’s necessary to insert the XLR termination plug (with 120 Ohm) in the last lighting in the link in order to ensure proper transmission on the DMX data link. Remotely controllable functions Lamp The MH-640 is to be operated with a MSD 230 V/250 W GY-9.5 or MSD 230 V/200 W GY-9.5 lamp. A relay inside of the MH-640 allows you to switch on and off the lamp via the Control Board on the top side or via your controller without affecting the rest of the lighting. -
Page 35: Control Board
automatically switches off the lamp. 4. "Lo.HI"- low/high speed of the fan operating The fan keeps the adjusted low speed until the temperature exceeds max. inside temp. of the fixture, then the MH-640 automatically switches from low to high the fan speed. Control Board The Control Board situated on the top side of the MH-640 offers several features. -
Page 36: Spec -Special Functions
- Reset Function Press [Enter] key to run reset. This option enables the MH-640 to index all effects (functions) and return to their standard positions. SPEC -Special functions Use the [Up] and [Down] keys to browse through the special functions and select the one by pressing [Enter]. - Page 37 This function allows you to keep the display on or to turn off automatically 2 minutes after last pressing any key on the control board. Use the [Up] and [Down] keys to select "On" if you wish to keep the display on or "Off"...
- Page 38 - Default settings Press [Enter] to reset all fixture personalities (not the adjusting functions) to the default values. On the display will appear „rSt” meaning that the fixture makes the reset. See the table of personality setting and their default positions. Personality Display Default values...
-
Page 39: Error And Information Messages
DMX Calibration protocol: After having calibrated required functions press [Enter] to confirm (or [Mode] to cancel and return to the menu without reset by the "ArES" function) and use the "ArES" function in order to write the calibration values to the memory (EEPROM) and to make a reset in order to check the new adjusted positions of the colour, effect and rot. -
Page 40: Technical Specifications
Technical specifications Power supply EU-model: 210/230/250 V AC, 50/60 Hz ~ US-model: 100/120/210/230/250 V AC, 50/60 Hz ~ Power consumption: 400 W Fuse: T 3.15 A, 250 V Lamp MSD/HSD 230 V/250 W GY-9.5 or MSD/HSD 230 V/200 W GY-9.5 Optical System igh luminous-efficiency parabolic mirror - Light-output via Fresnell-lens with a diameter of 150 mm... -
Page 41: Cleaning And Maintenance
Width of yoke: 426 mm Height (head horizontal): 500 mm Weight (net): 16 kg Shipping weight: 25 kg Cleaning and maintenance The operator has to make sure that safety-relating and machine-technical installations are inspected by an expert after every four years in the course of an acceptance test. The operator has to make sure that safety-relating and machine-technical installations are inspected by a skilled person once a year. -
Page 42: Appendix
Replacing the fuse If the lamp burns out, the fine-wire fuse of the device might fuse, too. Only replace the fuse by a fuse of same type and rating. Before replacing the fuse, unplug mains lead. Procedure: Step 1: Unscrew the fuseholder on the rearpanel with a fitting screwdriver from the housing (anti- clockwise). - Page 43 MH - 640 Washlight Mode d'emploi Sommaire Introduction ............................44 Features ............................44 Cours de rayons ..........................44 Description de l'appareil......................45 Sécurité............................46 Instructions de sécurité ......................46 Emploi selon les prescriptions ....................46 Installation............................48 Installer/remplacer de la lampe ....................48 Montage du projecteur .......................49 Alimentation..........................50 Connexions au contrôleur DMX-512 / raccord projecteur - projecteur.......50 Protocole DMX ..........................51...
-
Page 44: Introduction
ATTENTION! Protéger de l‘humidité! Débrancher avant toute manipulation! POUR VOTRE PROPRE SÉCURITÉ, VEUILLEZ LIRE CE MODE D‘EMPLOI ATTENTIVEMENT AVANT LA PREMIÈRE MISE EN SERVICE! Introduction Nous vous remerçions et vous félicitons d’avoir choisi un FUTURELIGHT MH-640. Vous êtes en possession d’un effet lumineux puissant, intelligent et aux possibilités multiples. -
Page 45: Description De L'appareil
Description de l'appareil 1 - Tête rotatif 2 - Bras rotatifs 3 - Poignée de transport 4 - Base 5 - Base - côté 6 - Unité de contrôle Base - côté: 7 - Sortie DMX 8 - Entrée DMX 9 - Câble d’alimentation 10 - Porte-fusible 11 - Interrupteur secteur... -
Page 46: Sécurité
Sécurité Instructions de sécurité Cet appareil a quitté les ateliers dans un état irréprochable. Pour assurer un bon fonctionnement, sans danger, l'utilisateur doit suivre les instructions contenues dans ce mode d'emploi. Attention: Tout dommage occasionné par la non observation des instructions de montage ou d'utilisation n'est pas couvert par la garantie. - Page 47 Effets lumineux ne sont pas conçus pour un usage continu. Accordez leur une pause de temps à autre, cela prolongera leur durée de vie. Il ne faut jamais mettre l'appareil en service sans lampe! Eviter les secousses et l’emploi de force lors de l’installation ou l’utilisation de l’appareil. Il ne faut jamais lever l'appareil à...
-
Page 48: Installation
Installation Installer/remplacer de la lampe DANGER DE MORT! Toujours débrancher l’appareil avant de mettre en place la lampe! Système de lampe Pour mettre en place la lampe (MSD 230 V/250 W ou MSD 230 V/200 W), ouvrez le petit couvercle au dos de la tête comme décrit dans le dessin. -
Page 49: Montage Du Projecteur
Montage du projecteur DANGER D’INCENDIE! Assurez-vous, lors du montage qu’il n’y ait pas de matériau facilement inflammable en contact avec le boîtier (distance minimale 0,5 m). ATTENTION! N’installez le projecteur que par deux crochets appropriés. Svp observez de même les indications d’installation sur le côté bas de l’unité de base. Veillez à... -
Page 50: Alimentation
Alimentation Connecter l’appareil avec le câble d'alimentation au secteur. L'occupation des câbles de connection est: Câble International Brun Phase Bleu Neutre Jaune/Vert Terre La terre doit être connecteé! Connexions au contrôleur DMX-512 / raccord projecteur - projecteur Faites attention que les câbles n'ont pas de contact entre eux. Il se peut autrement que les appareil ne fonctionneront pas correctement. -
Page 51: Protocole Dmx
Protocole DMX Fonctions des canaux de contrôle Canal de contrôle 1 - Mouvement pivotant (Pan) Les mouvements horizontaux de la tête (PAN) sont contrôles par le régulateur. Ajuster la tête peu à peu en poussant lentement le régulateur (0-255, 128-center). Il est possible de tourner la tête jusqu'à 530°. Vous pouvez arrêter la tête à... - Page 52 0 - 17 Ouvert/blanc 18 - 35 Rouge 36 - 53 Bleu 54 - 72 Vert 73 - 90 Filtre correcteur 3200 K 91 - 108 Filtre correcteur 5600 K 109 - 127 Filtre UV 128 - 190 Effet "Rainbow" avant 191 - 192 Pas de rotation 193 - 255 Effet "Rainbow"...
-
Page 53: Fonction Des Canaux De Contrôle - Protocole 8 Bit
Canal de contrôle 15 - Shutter, Strobe 0 - 31 Shutter fermé 32 - 63 Pas de fonction (Shutter ouvert) 64 - 95 Effet stroboscopique lente à vite (max. 10 flash par seconde) 96 - 127 Pas de fonction (Shutter ouvert) 128 - 159 Effet pulse en sequences 160 - 191... -
Page 54: Fonctions Contrôlables À Distance
Fonctions contrôlables à distance Lampe: Le MH-640 est equipé avec une lampe MSD 230 V/250 W ou MSD 230 V/200 W. Un relais dans l'interieur du MH-640 permet d'allumer ou d'éteindre la lampe via l'unité de contrôle our via le contrôleur DMX. -
Page 55: L'unité De Contrôle
projecteur éteind la lampe automatiquement. 4. "Lo.HI"- vitesse du ventilateur bas/maximale La vitesse du ventilateur reste bas jusqu'à la temperature intérieure a augmentée au maximum. Après, le projecteur commute le ventilateur à la vitesse maximale. L'unité de contrôle L'unité de contrôle se trouve à la tête du MH-640 et offre plusieurs caractéristiques, par exemple pour ajuster l’addresse DMX, indiquer les heures de maniement du projecteur ou de la lampe, allumer ou éteindre la lampe, commencer les séquence de demonstration, faire un reset ou utiliser des fonctions spéciales pour contrôle manuel ou l'entretien. -
Page 56: 7.2 Spec - Fonctions Speciales
- Fonction reset: Pressez la touche Enter pour le débuter le reset. Toutes les fonctions et positions vont être ajustées à leur positions standards. 7.2 SPEC - fonctions speciales Pressez les touches Up/Down jusqu'à ce que l'affichage indique les différents fonctions. Pressez la touche Enter pour confirmer la séléction. - Page 57 - blackout automatique de l'affichage: Cette fonction permet de maintenir l'affichage ou de la éteindre après 2 minutes sans fonction sur l'unité de contrôle.Pressez les touches Up/Down pour sélectioner "ON“ pour maintenir l'affichage ou "OFF“ pour le éteindre automatiquement. Pressez la touche Enter pour confirmer la séléction ou la touche Mode pour l'annuler.
- Page 58 - Valeurs prédéterminées Cette fonction permets de remettre à zéro toutes les données individuelles du projecteur sur la valeur prédéterminée à l’usine. Appuyez sur la touche Enter pour remettre les valeurs à zéro. Sur l‘affichage “rSt” apparaît. Svp prenez les valeurs prédéterminées individuelles du tableau en bas. Fonction Affichage Valeur prédé-...
-
Page 59: Avis D'erreur Et D'information
Protocôle de calibration DMX: Après avoir ajusté les positions, utilisez la fonction ´ArES´ pour mémoriser la calibration dans l'EEPROM et pour faire un reset. Avis d'erreur et d'information Cet avis est indiqué quand vous essayez d'allumer la lampe avant les 5 minutes après avoir mis l'appareil hors tension (la lampe est trop chaude). -
Page 60: Caractéristiques Techniques
Caractéristiques techniques Alimentation Modèle EU : 210/230/250 V, 50/60 Hz ~ Modèle US : 100/120/210/230/250 V, 50/60 Hz ~ Puissance de rendement: 400 W Fusible: T 3,15 A, 250 V Lampe MSD 230 V/250 W GY-9,5 ou MSD 230 V/200 W GY-9,5 Système optique - Miroir parabolique pour une sortie de lumière optimale - Sortie de lumière via lentille Fresnell avec un diamètre de 150 mm... -
Page 61: Nettoyage Et Maintenance
Maximale température du boîtier (à l'équilibre) t : 80° C Dimensions et poids Longeur de la surface de base (avec poignées): 372 mm Largeur de la suspension: 426 mm Hauteur (tête horizontale): 500 mm Poids (net): 16 kg Poids (emballage): 25 kg Nettoyage et maintenance L’entrepreneur doit assurer à... -
Page 62: Appendice
L'intérieur de l'appareil ne contient pas de partys nécéssitant un entretien sauf la lampe et le fusible. L'entretien et les réparations doivent être effectuées par un technicien compétent! Veuillez faire attention aux instructions sous "Installer/Remplacer la lampe". Remplacer le fusible Une ampoule défectueuse peut entraîner un fusible "grillé". - Page 63 MH - 640 Washlight Manual del usuario Contenido Introducción ...........................64 Características ..........................64 Marcha de los rayos ........................64 Descripción de las partes ......................65 Seguridad............................66 Instrucciones de seguridad .......................66 Instrucciones de manejo......................66 Instalación............................68 Instalación/reemplazar de la lámpara ..................68 Montaje del projector........................69 Conexión a la red........................70 Conexión al controlador DMX / conexión proyector - proyector .........70...
-
Page 64: Introducción
¡PRECAUCION! ¡Evite el contacto de este aparato con la lluvia y la humedad! ¡Desconectar de la corriente antes de abrir la caja! ¡POR SU PROPIA SEGURIDAD, POR FAVOR LEA ESTE MANUAL DEL USUARIO DETENIDAMENTE ANTES DE LA CONEXIÓN INICIAL ! Introducción Gracias por haber elegido un FUTURELIGHT MH-640. -
Page 65: Descripción De Las Partes
Descripción de las partes 1 - Cabeza del proyector 2 - Suspensión 3 - Asas de transporte 4 - Base 5 - Base - lado 6 - Unidad de control Base - lado: 7 - Salida DMX 8 - Entrada DMX 9 - Conexion a la red 10 - Portafusible 11 - Conmutador de alimentación... -
Page 66: Seguridad
Seguridad Instrucciones de seguridad Este aparato ha salido de nuestro establecimiento en absolutas perfectas condiciones. Para mantener esta condición y asegurar un manejo seguro, es absolutamente necesario para el usuario seguir las instrucciones de seguridad y notas de advertencia escritas en este manual del usuario. Importante: Los daños causados por no hacer caso de las instrucciones de este manual del usuario no están sujetos a garantía. - Page 67 Efectos de luz no son diseñados para un uso permanente. Considere Vd. que pausas de operación aumentan la vida de su aparato. ¡Por favor no haga funcionar el aparato sin lámpara! No agite el aparato. Evite la fuerza bruta al instalar y durante el manejo del aparato. Nunca alzar el aparato por la cabeza del projector.
-
Page 68: Instalación
Instalación Instalación/reemplazar de la lámpara ¡PELIGRO DE MUERTE! ¡Instale la lámpara únicamente con el aparato desenchufado! ¡Desenchufe-lo de la corriente! Sistema de lámpara Para instalar la lámpara (MSD 230 V/200 W GY-9,5 o MSD 230 V/200 W GY-9,5) abrir la caja pequeña de la cabeza como descrito en el dibujo. -
Page 69: Montaje Del Projector
Montaje del projector ¡PELIGRO DE INCENDIO! Al instalar el aparato asegúrese de que no hay ningún material altamente inflamable (artículos de decoración, etc.) a una distancia mínima de 0,5 m. ¡PRECAUCION! Sólo monte el projector mediante dos ágrafes adecuadas. Por favor dirijase a las explicaciones en la parte inferior de la base. -
Page 70: Conexión A La Red
Conexión a la red Conectar el proyector a la red mediante el cable eléctrico. La ocupación de los cables de conexión es: Cable Internacional Marrón Fase Azul Neutro Amarillo/Verde Tierra La tierra debe ser conectada. Conexión al controlador DMX / conexión proyector - proyector Asegúrese de que los conductores del cable de datos no hagan contacto entre si. -
Page 71: Protocolo Dmx
Protocolo DMX Fonctions de los canales de control Canal 1: Movimientos de arrastre (Pan) Establezca los ajustes para mover la cabeza horizontalmente. Los movimientos graduales de la cabeza mediante el ajuste lento de los valores DMX (0-255; 128 = centro). La cabeza puede girar en un ángulo de 530°... - Page 72 0 - 17 Abierto/blanco 18 - 35 Rojo 36 - 53 Azul 54 - 72 Verde 73 - 90 Filtro correctivo 3200 K 91 - 108 Filtro correctivo 5600 K 109 - 127 Filtro UV 128 - 190 Efecto arco iris hacia adelante con velocidad decreciente 191 - 192 No rotación 193 - 255...
-
Page 73: Funciones De Los Canales - Protócolo 8 Bit
Canal 15 - Shutter, efecto flash 0 - 31 Shutter cerrado 32 - 63 No funcion (Shutter abierto) 64 - 95 Efecto flash de lento hasta rápido (10 flashes/segondo como máximo) 96 - 127 No funcion (Shutter abierto) 128 - 159 Efecto de impulso en secuencias 160 - 191 No funcion (Shutter abierto) -
Page 74: Funciones Controlables A Distancia
Funciones controlables a distancia Lámpara El MH-640 tiene que ser operado con una lámpara MSD 230 V/250 W GY-9,5 o MSD 230 V/200 W GY-9,5. Un relais en el proyector ofrece la posibilidad de encender y apagar la lámpara mediante la unidad de control en la cabeza del proyector o mediante el controlador conectado. -
Page 75: Unidad De Control
3. "Lo.OF" - velocidad del ventilador baja/apagar la lámpara La velocidad del ventilador queda baja hasta que la temperatura interna haya excedido el nivel máximo. Después, el proyector apaga la lámpara automaticamente. 4. "Lo.HI"- velocidad del ventilador baja/máxima La velocidad del ventilador queda baja hasta que la temperatura interna haya llegado el nivel máximo. Después, el proyector conmuta automaticamente a la potencia máxima del ventilador. -
Page 76: 7.2 Spec - Funciones Especiales
- Ejecutar un Reset: Pulse la tecla Enter para ejecutar un Reset. De esta manera, los motores son equilibrados en un reajuste. 7.2 SPEC - Funciones especiales Vd. puede moverse en el menú mediante las teclas Up/Down y seleccionar la funcion deseada mediante la tecla Enter. - Page 77 - Iluminación de la pantalla: Con esta funcion, Vd. puede ajustar la intensidad de la iluminación de la pantalla entre 20 y 100. Pulse las teclas Up/Down para ajustar la intensidad deseada. Pulse la tecla Enter para confirmar o la tecla Mode para cancelar.
- Page 78 - Ajustes predertiminados Con esta función, Vd. puede ajustar todos los datos individuales del proyector a los ajustes predertiminados ex fábrica. Pulse la tecla Enter para volver a colocar a los ajustes predertiminados. La pantalla muestra „rSt”. Vd. puede comprobar los datos individuales de la tabla siguiente. Función Pantalla Ajuste predet.
-
Page 79: Avisos De Error
Protocolo de calibrado: Después de haber ajustado los parámetros de calibrado deseados y de haber confirmarlos con la tecla Enter, Vd. tiene que seleccionar la funcion "ArES" para transmitir los valores ajustados en el EEPROM y para ejecutar un Reset. Avisos de error Este aviso aparece cuando Vd. -
Page 80: Especificaciones Técnicas
Especificaciones técnicas Alimentación Modelo EU : 210/230/250 V, 50/60 Hz ~ Modelo US : 100/120/210/230/250 V, 50/60 Hz ~ Consumo: 400 W Fusible: T 3,15 A, 250 V Lampára MSD 230 V/250 W GY-9,5 o MSD 230 V/200 W GY-9,5 Sistema óptico - Espejo parabólico para una salida de luz óptima - Salida de luz mediante lente Fresnell con un diámetro de 150 mm... -
Page 81: Limpieza Y Mantenimiento
Témperaturas Máxima temperatura ambiente t : 45° C Máxima temperatura de la casa (inercia) t : 80° C Dimensiones y peso Dimensiones y peso Anchura/Altura/Profundidad: 532 x 212 x 215 mm Peso: 15 kg Largo de la base (con asas): 372 mm Anchura de la suspensión: 426 mm... -
Page 82: Apéndice
La lente Fresnell requiere una limpieza semanal ya que el líquido de humo tiende a acumular residuos reduciendo la emisión de luz muy rápidamente. El ventilador debe ser limpiado mensualmente. El interior del proyector debe ser limpiado al menos una vez al año utilizando un aspirador o aire a presión. Las operaciones de mantenimiento y servicio deben ser llevadas a cabo únicamente por distribuidores autorizados.
Need help?
Do you have a question about the MH - 640 and is the answer not in the manual?
Questions and answers