Table of Contents
Advertisement
Quick Links
Download this manual
See also:
User Manual
2.4" Digital Video Baby Monitor / Moniteur vidéo bébé numérique 2,4po /
User Manual / Manuel de l'utilisateur / Manual del usuario
Sophia™
Video Monitor Digital para Bebé 2.4"
WARNING
MISE EN GARDE
•
Strangulation
Risque de
Hazard!
Strangulation !
Children have
Enfants ont
STRANGLED in
étranglé dans les
cords. Keep this
cordons. Gardez
cord out of the
ce cordon
reach of children
d'alimentation
(more than 3 ft
hors de portée
0.9 m away).
des enfants (plus
de 3 pieds 0,9 m
de distance).
ADVERTENCIA
•
Peligro de
Estrangulación !
Los niños tienen
ESTRANGULADO
en cuerdas.
Mantener este
cordón fuera del
alcance de niños
(más de 3 pies
0,9 metros de
distancia).
Advertisement
Table of Contents

Related Manuals for Levana SOPHIA


Summary of Contents for Levana SOPHIA
- Page 1 Sophia™ 2.4” Digital Video Baby Monitor / Moniteur vidéo bébé numérique 2,4po / Video Monitor Digital para Bebé 2.4” User Manual / Manuel de l’utilisateur / Manual del usuario WARNING MISE EN GARDE ADVERTENCIA • • Strangulation Risque de Peligro de...
-
Page 2: Safety Warnings
SAFETY WARNINGS CAUTION: Keep small parts away This product cannot replace responsible adult from children. supervision. Use only with provided power supply. Strangulation Hazard: Children can become entangled in cords. Power cords should be The socket-outlet shall be installed near the kept more than 3 feet away from the crib and equipment and shall be easily accessible. -
Page 3: Fcc Statement
We reserve the right to change models, configuration, or specifications without notice or liability. Product may not be exactly as shown. ©2014 LEVANA®. All rights reserved. LEVANA®, the LEVANA® logo, Sophia™ and other LEVANA® marks may be registered. All other Trademarks are the property of their respective owners. -
Page 4: Warranty
4. The warranty expressly provided for herein is the sole warranty provided in connection with the product itself and no other warranty, expressed or implied is provided. LEVANA assumes no responsibilities for any other claims not specifically mentioned in this warranty. -
Page 5: Table Of Contents
TABLE OF CONTENTS Safety Warnings ..........................2 FCC Statement ..........................3 Disclaimers ............................3 Warranty ............................. 4 What’s Included ..........................5 Buttons and Connections ....................... 6 Setup ..............................7 Battery installation - Monitor ..................... 7 Battery installation - Camera (optional) ................8 Connecting Power to the Monitor / Charging Battery .......... -
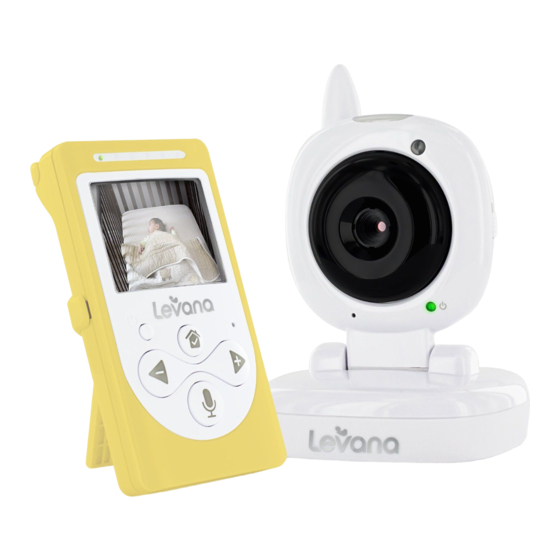
Page 6: Buttons And Connections
BUTTONS AND CONNECTIONS 1 LED Sound Bar 9 Antenna 2 LCD Screen 10 Night Vision LEDs 3 Power & Screen ON/OFF 11 Camera Lens Press and hold to turn monitor ON/OFF; Press once to turn screen ON/OFF 12 Microphone 4 Volume - & Left 13 Nightlight 5 Microphone 14 Night Vision Light Sensor... -
Page 7: Setup
BUTTONS AND CONNECTIONS 1 Antenna 6 Speaker 2 Speaker 7 Pairing Button 3 Table Stand 8 Antenna 4 Battery Compartment 9 Power Input 5 Power Input SETUP Battery Installation - Monitor 1. Remove the Table Stand. 2. Slide Battery Compartment Cover down to remove. -
Page 8: Battery Installation - Camera (Optional)
SETUP Battery Installation - Camera (optional) Battery Compartment The camera unit can be powered using 4 AAA batteries (not cover included) instead of the included adapter. 1. Gently remove the Battery Compartment Cover on the bottom of the camera base, using a small phillips (cross) head screwdriver. -
Page 9: Get The Most Out Of Your Rechargeable Battery
SETUP Get the Most Out of Your Rechargeable Battery Fully charge your battery before Turn LCD screen OFF. Press first use POWER button on the front of monitor ONCE. Charge battery before battery is fully drained. PEEP Mode: After 1 minute of inactivity, monitor enters standby/ Avoid extreme heat or cold as this sleep mode (when activated) -
Page 10: Pairing The Monitor And The Camera(S)
SETUP Pairing the Monitor and the Camera(s) The camera and monitor come paired (connected) to each other automatically. However, if upon opening this package the devices do not automatically connect and transmit, you may do so manually. To pair additional cameras, repeat steps below and be sure to assign a different camera number to each additional camera. -
Page 11: Mounting The Camera On A Tabletop Safely
SETUP Mounting the Camera on a Tabletop Safely 1. Place the Camera on a tabletop no less than 3 feet away from your baby’s crib. 2. Feed the power cord down the back of the table or use wall clips (not included) to secure the cord away so the baby cannot reach it. -
Page 12: Mounting The Camera On A Wall Safely
SETUP Mounting the Camera on a Wall Safely Before drilling the holes, it is important to check the reception and camera positioning in the intended location on the wall. Ensure you are hanging the camera no less than 3 feet away from baby’s crib. -
Page 13: Operation
OPERATION Adjusting the volume Mute High Note: Placing the monitor and camera too close together will create feedback. DECREASE or MUTE the volume and move the camera away from the monitor. Using the Talk to Baby™ Two-Way Intercom With the simple press of a button you can talk to your child at any time without entering the nursery. -
Page 14: Changing The Camera View
OPERATION Changing the Camera View 1. Press the Menu / Save button and use the Navigational arrow keys to navigate the Camera View options. – 2. Press the Menu / Save button to confirm your choice. 3. Use the Navigational arrow keys to navigate to EXIT –... -
Page 15: Temperature Settings
OPERATION Temperature Settings Studies indicate your baby’s room should be between 68-71° F (20- 21° C). This camera includes a temperature monitor for your baby’s room. The temperature of the nursery can be shown with your video monitor’s on-screen display in your choice of Fahrenheit or Celsius so you will always know that your baby is comfortable. -
Page 16: Troubleshooting
TROUBLESHOOTING ISSUE POSSIBLE SOLUTION • Confirm that the Camera and Monitor are ON • The battery may be depleted; charge battery Equipment does not function • The power adapter(s) may not be properly connected • Camera and monitor may not be properly paired; No reception move the Camera and Monitor closer together •... -
Page 17: Specifications
SPECIFICATIONS MONITOR Monitor Type TFT LCD Screen Size 2.4” Resolution 320x240 Frame Rate 25 FPS LCD Brightness Adjustable: 0,1,2,3,4 Frequency 2.4GHz Private Signal Technology Digital FHSS No. of hop/sec No. of hopping channels Channel bandwidth 3.375 MHz Data Rate 3 Mbps Transmission Power +19 dBm Max Transmission Range... - Page 18 SPECIFICATIONS CAMERA Image Sensor CMOS Resolution 640 x 480 Viewing Angle 73° Focal Length 4.95mm Focus Type 2G2P Optimal Focal Distance 2-10 feet Private Signal Max Transmission Range (Line of Sight) 500ft Optimum Transmission Range (Line of Sight) 150ft Number if IR LEDs Nightlight Night Vision Distance 15ft...
- Page 19 NOTES...
Need help?
Do you have a question about the SOPHIA and is the answer not in the manual?
Questions and answers