Advertisement
WHAT'S INCLUDED

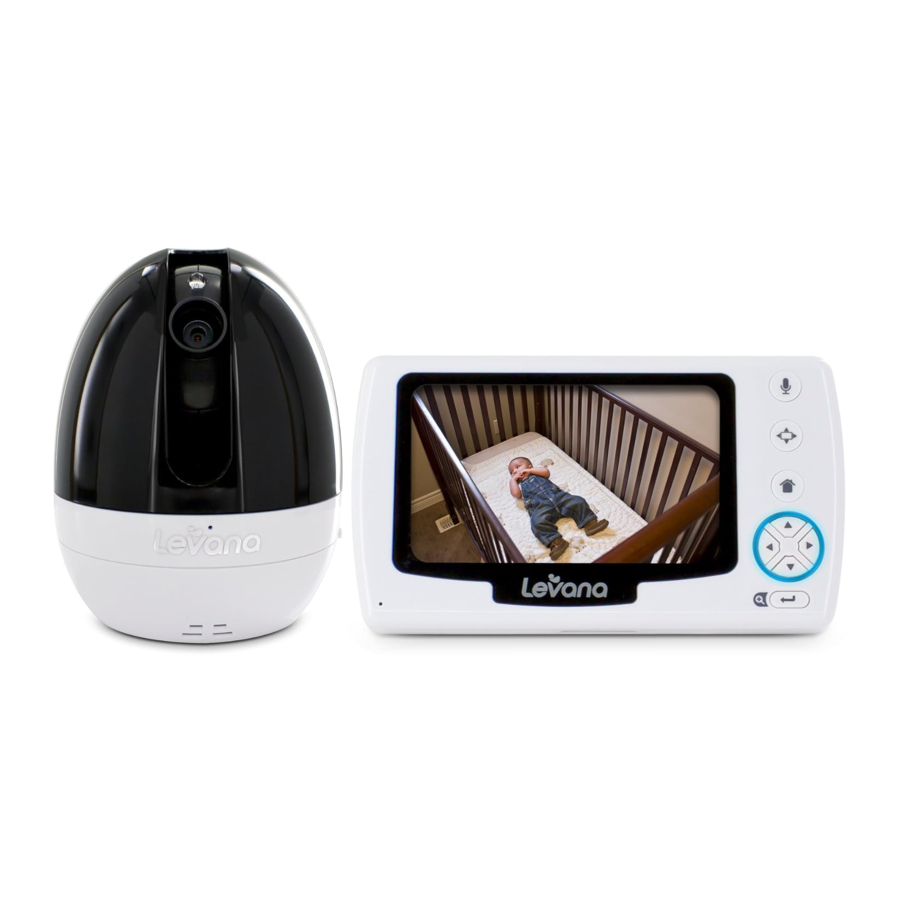
- Pan/Tilt/Zoom Night Vision Camera
- Baby Video Monitor
- Rechargeable Battery
- 2 Power Adapters
- Quick Start Guide
- 1 Year Warranty
- Lifetime Live Customer Support
This product is not a toy.
This product contains small parts. Exercise care when unpacking and assembling the product.
This equipment should be installed and operated with a minimum distance of 20 centimeters between the radiator and your body.
This product does not replace responsible adult supervision. Check on your child at regular intervals and make sure your monitor is always adequately charged.
MONITOR

- LCD SCREEN
- MICROPHONE
- POWER ON/OFF
- TALK TO BABY™ Press and hold to talk, release to listen
- LOCK / UNLOCK BUTTON Disables ALL function buttons in the LOCK position
- PAN / TILT BUTTON
- MENU
- COLOR-CHANGING LED RING Ring changes color with sound intensity
- DIRECTIONAL ARROWS / VOLUME CONTROL
- POWER INPUT
- SELECTION / ZOOM BUTTON
- SPEAKER
- TABLE STAND
- ANTENNA Extend to improve signal
- BATTERY COMPARTMENT
CAMERA

- PHOTO SENSOR
- PTZ CAMERA
- MICROPHONE
- SPEAKER
- INVISIBLE LEDs
- POWER ON/OFF
- ANTENNA
- POWER LED
- POWER INPUT
SETUP
LET'S GET STARTED!
Battery Installation


- Gently remove the BATTERY COMPARTMENT COVER on the back of the monitor.
- Slide the BATTERY COMPARTMENT COVER down to remove.
- Insert the battery; the battery connectors on the battery should line up with the connectors inside the battery compartment.
- Slide the BATTERY COMPARTMENT COVER back into place.
Get the Most Out of Your Rechargeable Battery
- Fully charge battery (6-7 hours) before first use.
- To maximize battery life, charge battery before battery is fully drained.
- Avoid extreme heat or cold as this will affect the life of the battery.
- Turn LCD screen OFF; press POWER button on the top of the monitor ONCE.
- Stella ™ menu settings that increase battery life:
![]() PEEP Mode: After 1 minute of inactivity, monitor enters standby/sleep mode.
PEEP Mode: After 1 minute of inactivity, monitor enters standby/sleep mode.
![]() Adjustable Brightness: Decreasing screen brightness will extend battery life.
Adjustable Brightness: Decreasing screen brightness will extend battery life.


- For extended periods of non-use, please remove battery from baby monitor.
Connecting Power to the Monitor / Charging Battery

- Connect the small end of one power adapter into the DC input on the side of the monitor as shown in the diagram. Connect the other end of the adapter into an available wall outlet.
- Press and hold the POWER button on top of the monitor to turn the monitor ON.
- The icon in the top right corner of the main screen will show you thebattery power status.
- TheLED Ring on the front of the monitor also indicates the battery power status.
SOLID BLUE = BATTERY FULLY CHARGED
SLOW FLASHING BLUE = BATTERY CHARGING
QUICK FLASHING BLUE = BATTERY LOW
FLASHING PINK = PAIRING UNSUCCESSFUL
*Please note the above lights with the exception of the pink flashing will only present when the LED ring is not turned off in the menu - For safety reasons, ONLY use the adapters included in the package.
![]()

Connecting Power to the Camera

- Take the second power adapter and connect the small end of the power adapter into ON / OFF the DC input on the side of the camera base. For safety reasons, ONLY use the adapters Switch included in the package.
- On the side of the camera, slide the POWER switch
![]() LEFT to the ON position. The POWER LED will light up.
LEFT to the ON position. The POWER LED will light up.
Note: Baby monitors and cameras with power cords should never be hung on or near the crib as it is a strangulation hazard. Power cords should be kept no less than 3 feet away from the crib and the baby's reach at all times.
 LEFT to the ON position. The POWER LED will light up.
SCREEN ICONS
![]()
OPERATION
Turn the MONITOR ON/OFF
Press and hold the POWER  button on top of the monitor to turn the monitor ON.
Press and hold the POWER button again to turn OFF the monitor.
Pairing the Camera(s) and Monitor
The camera and monitor come paired (connected) to each other automatically. However, if upon opening this package the devices do not automatically connect and transmit, you may do so manually.
Note: Before you begin pairing, be sure to have the monitor and the camera(s) side by side.

- To pair your camera and monitor, press the MENU
![]() button. Using the navigational arrows
button. Using the navigational arrows ![]() on the front of the monitor, highlight the PAIRING icon and press the SELECT
on the front of the monitor, highlight the PAIRING icon and press the SELECT ![]() button once to select.
button once to select. - Use the navigational arrows
![]() to highlight the the
to highlight the the![]() icon.
icon. - Press the SELECT
![]() button. When you see
button. When you see ![]() flashing next to camera
flashing next to camera![]() icon, quickly press and hold the PAIRING
icon, quickly press and hold the PAIRING ![]() button on the BOTTOM of the camera. A checkmark
button on the BOTTOM of the camera. A checkmark ![]() will appear next to camera
will appear next to camera ![]() confirming pairing is successful. Video/audio will be transmitted automatically.
confirming pairing is successful. Video/audio will be transmitted automatically. - To pair additional cameras, repeat steps 1 to 3 and be sure to select camera number
![]() in the Pairing menu when pairing each additional camera.
in the Pairing menu when pairing each additional camera.
 button. Using the navigational arrows
  on the front of the monitor, highlight the PAIRING icon and press the SELECT
  button once to select.
 to highlight the the
 flashing next to camera
 will appear next to camera
  in the Pairing menu when pairing each additional camera.
Placement of the Monitor
This monitor can be placed on a tabletop.

- You can place the monitor on a tabletop by using the retractable table stand on the back of the monitor. When not in use, simply tuck the table stand away into the back of the monitor until you hear a "click".
Placement of the Camera
This camera can be placed on a tabletop or hung on the wall above the area being monitored.
- Place the camera within 6 feet of the area being monitored for best picture results.
- Do not place objects within 2 feet of the field of vision of the camera as the night vision will not activate correctly if objects are too close.
Mounting the Camera on a Tabletop Safely:

- Place the camera on a tabletop no less than 3 feet away from your baby's crib.
- Feed the power cord down the back of the table or use wall clips (not included) to secure the cord away so the baby cannot reach it.
- Plug in the power cord, check the monitor to ensure that you are getting a good view of your child and there are no obstructions.
Note: Baby monitors and cameras with power cords should never be hung on or near the crib as it is a strangulation hazard. Power cords should be kept no less than 3 feet away from the crib and the baby's reach at all times.
Mounting the Camera on a Wall Safely:
Before drilling the holes, it is important to check the reception and camera positioning in the intended location on the wall. Ensure you are hanging the camera no less than 3 feet away from baby's crib.
Note: Baby monitors and cameras with power cords should never be hung on or near the crib as it is a strangulation hazard. Power cords should be kept no less than 3 feet away from the crib and the baby's reach at all times.

- Pre-drill one hole in the wall using a 3/16", 4.8mm drill bit.
- Insert a wall anchor (not included) into the hole and tap gently with a hammer until the anchor is flush with the wall.
- Insert a screw (not included) into the wall anchor and tighten until the screw only sticks out about a 1/2 inch.
- Plug the power cord into the power input of the camera.
- Locate the wall mounting hole on the bottom of the camera base.
- Slide the hole over the screw sticking out of the wall.
- Confirm that the camera is secure, if it is loose you may have to tighten the screws more.
- Use wall clips (not included) to secure the power cord away from the crib or the baby's reach.
- Connect the other end of the adapter into an available wall outlet.
Night Vision
The camera is equipped with NEW Invisible IR (infrared) LEDs which keep the nursery dark. The LEDs are located on the front of the camera and allow you to see up to 12 feet in complete darkness so you can check on your baby at any time of night. The night vision LEDs will activate automatically when the Light Sensor on the side of the camera detects that the light levels are too low.
Adjusting the Camera Angle - PTZ
The camera is equipped with Pan / Tilt / Zoom (PTZ). You can adjust the angle 270° degrees horizontal and 110° degrees vertical from the center position.

- Press the
![]() button on the front of the monitor.
button on the front of the monitor. - Using the NAVIGATIONAL KEYS, move the camera to the desired position.
- When set, press the
![]() button again.
button again.
Using the ZOOM Function
In LIVE VIEW mode, press the SELECT ![]() button. To return to normal view, press the SELECT
button. To return to normal view, press the SELECT ![]() button again.
button again.
Volume
Use the navigational arrows ![]() to increase /decrease /mute the VOLUME.
to increase /decrease /mute the VOLUME.

- Press the
![]() button to INCREASE the volume in LIVE VIEW; the VOLUME icon will display the volume level in the top left corner of the screen.
button to INCREASE the volume in LIVE VIEW; the VOLUME icon will display the volume level in the top left corner of the screen. - Press the
![]() button to DECREASE the volume; to MUTE, decrease the volume until the
button to DECREASE the volume; to MUTE, decrease the volume until the ![]() icon appears in the top left corner of the screen.
icon appears in the top left corner of the screen.
 button to INCREASE the volume in LIVE VIEW; the VOLUME icon will display the volume level in the top left corner of the screen.
 button to DECREASE the volume; to MUTE, decrease the volume until the
  icon appears in the top left corner of the screen.
Note: Placing the monitor and camera too close together will create feedback. DECREASE or MUTE the volume and move the camera away from the monitor.
Using the Talk to Baby™ Two-Way Intercom
With the simple press of a button you can talk to your child at any time without entering the nursery.

- To talk, press and hold the
![]() button on the front of the monitor and release to listen.
button on the front of the monitor and release to listen. - To talk when using multiple cameras, select the camera in the MENU and press the
![]() button, release to listen.
button, release to listen.
Setting a lullaby
Choose from three different lullabies to soothe your baby to sleep.

- To select a lullaby, press the MENU
![]() button. Using the navigational arrows
button. Using the navigational arrows ![]() on the front of the monitor, highlight the LULLABY icon.
on the front of the monitor, highlight the LULLABY icon. - Use the
![]() to toggle to select the LULLABY icon of your choice and press the SELECT
to toggle to select the LULLABY icon of your choice and press the SELECT ![]() button once to select.
button once to select. - To turn OFF the lullabies, select the
![]() and press the
and press the ![]() button once to select.
button once to select.
 on the front of the monitor, highlight the LULLABY icon.
 button once to select.
Setting the lullaby volume
Control the lullaby volume with a choice of three volume settings.

- Select a lullaby, the volume icon
![]() will appear to the right of the lullaby selected. Press the SELECT
will appear to the right of the lullaby selected. Press the SELECT ![]() button. The default volume setting is
button. The default volume setting is ![]() .
. - Use the navigational arrows
![]() on the front of the monitor to increase
on the front of the monitor to increase ![]() / decrease
/ decrease ![]() the volume.
the volume. - To return to continuous live view, press the MENU
![]() button.
button.
 will appear to the right of the lullaby selected. Press the SELECT
 Using PEEP Mode
When in PEEP Mode, the monitor enters standby/sleep mode after 1 minute of inactivity.
When sound is detected, the screen changes to live view.

- To access live view manually when the screen is off, press the POWER
![]() button ONCE.
button ONCE. - PEEP Mode extends the battery life over 36 hours.
- To setPEEP Mode, press the MENU
![]() button. Using the navigational arrows
button. Using the navigational arrows ![]() on the front of the monitor, highlight one of the PEEP Mode icons.
on the front of the monitor, highlight one of the PEEP Mode icons. - Use the
![]() to select
to select ![]() to turn PEEP mode ON and press the SELECT
to turn PEEP mode ON and press the SELECT ![]() button once to select.
button once to select. - To return to continuous live view, press the MENU
![]() button.
button. - To turn offPEEP Mode, follow step 1 and select
![]() .
.
 button.
 .
.NOTE: The Peep Mode feature for this monitor only works on the primary camera (Camera 1). When additional cameras are paired with the monitor the Peep Mode will still only activate when sound is heard on the primary camera (Camera 1). The Peep mode will deactivate itself when in sequential/sequence on any monitors that support sequential/sequence mode.
Changing the Camera View

- To change the camera view, press the MENU
![]() button. Using the navigational arrows
button. Using the navigational arrows ![]() on the front of the monitor, highlight the CAMERA icon.
on the front of the monitor, highlight the CAMERA icon. - Use the
![]() to toggle to select the CAMERA icon of your choice and press the SELECT
to toggle to select the CAMERA icon of your choice and press the SELECT ![]() button once to select.
button once to select. - Select
![]() to cycle though cameras 1 through 4 and press the SELECT
to cycle though cameras 1 through 4 and press the SELECT ![]() button once to select.
button once to select. - To return to continuous live view, press the MENU
![]() button.
button.
 to cycle though cameras 1 through 4 and press the SELECT
 Sound Sensitivity Settings
Sensitivity Mode allows you to adjust the sensitivity of the sound the that the camera picks up. This also allows you the option to turn the LED light off entirely.

- To set theSensitivity Mode, press the MENU
![]() button. Using the navigational arrows
button. Using the navigational arrows ![]() on the front of the monitor, highlight the SENSITIVITY icon.
on the front of the monitor, highlight the SENSITIVITY icon. - Use the
![]() to toggle to the your desired sensitivity and press the SELECT
to toggle to the your desired sensitivity and press the SELECT ![]() button once to select.
button once to select. - The LED Ring on the front of the monitor indicates how loud the sound in the room is.
![]()
![]()


Setting the Brightness
Brightness Mode sets the brightness of the the screen. Brightness Mode also extends the battery life.

- To set theBrightness Mode, press the MENU
![]() button. Using the navigational arrows
button. Using the navigational arrows ![]() on the front of the monitor, highlight the BRIGHTNESS icon.
on the front of the monitor, highlight the BRIGHTNESS icon. - Use the
![]() to toggle to the your desired brightness and press the SELECT
to toggle to the your desired brightness and press the SELECT ![]() button once to select.
button once to select.
Contacting Customer Support
Customer Support is just a click away whenever you need it! Our customer support team can be reached by live web chat or on our website at www.mylevana.com/support. Our experts will be happy to assist you in English, French and Spanish.

- To accessCustomer Support, press the MENU
![]() button. Using the navigational arrows
button. Using the navigational arrows ![]() on the front of the monitor, highlight the SUPPORT
on the front of the monitor, highlight the SUPPORT ![]() icon press the SELECT
icon press the SELECT ![]() button once to select.
button once to select. - This will take you to the screen which displays ourCustomer Support information. Press the MENU
![]() button once to EXIT the Customer Support screen.
button once to EXIT the Customer Support screen.
 button. Using the navigational arrows
  button once to EXIT the Customer Support screen.
Support: www.mylevana.com/support
Web: www.mylevana.com
Online Live Web Chat: www.mylevana.com
TROUBLESHOOTING
| ISSUE | POSSIBLE SOLUTION |
Equipment does not function |
|
No reception |
|
Reception Interference (static) |
|
Feedback (screeching, static) |
|
Noise (static, beeping) |
|
The buttons are not working |
|
Picture works but there is no sound |
|
Picture is black and white |
|
The rechargeable battery will not charge |
|
Maintenance
- Clean the surfaces of the camera and monitor with a soft, fluff-free cloth
- If the units become dirty, use a lightly damp cloth to wipe surfaces, taking care to not allow water into any openings
- Never use cleaning agents or solvents
SPECIFICATIONS
MONITOR
| Monitor Type | TFT LCD | Talk to Baby | Yes |
| Screen Size | 4.3" | Lullabies | Yes |
| Resolution | 480 x 272 | Battery Type | Li-Ion |
| Frame Rate | 12 FPS | Battery Capacity | 3.7V 1700mAh 6.290Wh |
| LCD Brightness | Adjustable: 0,1,2,3,4 | Battery Connection | Charging Contact |
| Frequency | 2.4GHz | Battery Life (video + audio on) | 8 hours |
| Private Signal | Yes | Battery Life (LCD off) | 10 hours |
| Technology | Digital FHSS | Battery Life (PEEP Mode) | Up to 36 hours |
| No. of hop/sec | 300 | Battery Low - Visual Warning | Yes |
| No. of hopping channels | 19 | Battery Low - Audible Warning | Yes |
| Channel bandwidth | 3.375 MHz | PEEP Mode (Power Save): | Yes |
| Data Rate | 3 Mbps | Volume Indicator LED | Yes |
| Transmission Power | +19 dBm | Key Lock | Yes |
| Max Transmission Range | 750 feet | Housing Material | ABS Plastic |
| Optimum Transmission Range | 200 feet | Power Adapter Input | 100~240VAC |
| Expandable | Up to 4 Cameras | Power Adapter | 5.9V 1A DC |
| Zoom | 2x | Limited charge voltage | 4.2V |
| Scan View | Yes, 8 seconds/camera | Operating Temperature | 0 to 50 Degrees Celsius |
| Speaker | Yes | Dimensions | 6" x 3.5" x ¾" |
| Microphone | Yes | Weight | 0.5 lbs |
CAMERA
| Image sensor | CMOS | Housing Material | ABS Plastic |
| Resolution | 640 x 480 | Wall Mountable | Yes |
| Viewing Angle | 50 Degree | Power Adapter Input | 100~240VAC, 50/60Hz 150mA |
| Focal Length | 2.8mm | Power Adapter | 5.9V 1A DC |
| Optimal Focal Distance | 2-10 feet | Operating Temperature | 0 to 50 Degrees Celsius |
| PTZ | Yes | Dimensions | 3.5" x 4 ¾" x 3.5" |
| Range of Motion - Horizontal | 270 Degrees | Weight | 0.65 lbs |
| Range of Motion - Vertical | 110 Degrees | ||
| Frequency | 2.4GHz | ||
| Private Signal | Yes | ||
| Technology | Digital FHSS | ||
| Max Transmission Range | 750 feet | ||
| Optimum Transmission Range | 200 feet | ||
| Number of IR LEDs | 8 | ||
| IR Wavelength | 940nm | ||
| Night Vision Distance | 12 feet | ||
| Battery Operable | No | ||
| Microphone | Yes | ||
| Speaker | Yes | ||
POWER
Adapter: BLJ5W059100P—U; Input: 100– 240VAC 50/60Hz 150mA; Output: 5.9V,1000mA.

- Use only with provided power supply.
- The socket-outlet shall be installed near the equipment and shall be easily accessible.
Battery: Model: 464854P, Li-ion battery, 3.7V 1700mAh 6.290Wh, Limited charge voltage: 4.2V. or Battery: Model: 495255AR; Li-ion battery, 3.7V 1700mAh 6.290Wh, Limited charge voltage: 4.2V. or Battery: Model: 495255; Li-ion battery, 3.7V 1700mAh 6.290Wh, Limited charge voltage: 4.2V.
Dispose of used batteries according to the instructions.
Use Only Batteries/Power Supplies Listed in the user Instructions.
Risk of explosion if battery is replaced by an incorrect type.
SAFETY WARNINGS

Keep small parts away from children.
 Strangulation Hazard: Children can become entangled in cords. Power cords should be kept more than 3 feet away from the crib and baby's reach at all times. Baby monitors and cameras with power cords should never be hung on or near the crib.
This product is not a toy and should be kept out of children's reach.
This product contains small parts. Exercise care when unpacking and assembling the product.
Read and Keep Instructions: All the safety and operating instructions should be read before the video baby monitor is operated.
This product cannot replace responsible adult supervision.
Use only with provided power supply.
The socket-outlet shall be installed near the equipment and shall be easily accessible.
RISK OF EXPLOSION IF BATTERY IS REPLACED BY AN INCORRECT TYPE!
Dispose of used batteries according to the instructions.
Use only batteries/power supplies listed in the user manual.
Water and Moisture: This product is designed for indoor use only. The unit should not be exposed to rain, moisture, dripping or splashing. No objects filled with liquid should be placed on top of, or beside the product, such as a glass or vase. This item should not be used near water.
Non-Use Periods: Always unplug the AC adapters from the wall outlets during long periods of non-use.
Ventilation: This baby monitor should not be used on a bed, sofa, rug or similar surface that may block the ventilation openings, or be placed in an enclosed area, such as a bookcase or drawer that may impede air flow.
Keep Away from Sources of Heat: This unit should not be exposed to direct heat sources such as a candle, fireplace, radiator, heat register, stove or other appliance that emits heat. The unit should not be left in direct sunlight.
Power Source: This unit should only be used with the AC power adapters included in this package (rated 5.9V 1A) Damage Requiring Service: This unit should be serviced by qualified personnel only when:
- Objects have fallen or liquid has been spilled into the product
- The units have been exposed to rain
- The units do not appear to operate normally or exhibits a distinct change in performance
- The units have been dropped or the enclosure damaged
Documents / Resources
References
Download manual
Here you can download full pdf version of manual, it may contain additional safety instructions, warranty information, FCC rules, etc.
Advertisement


Need help?
Do you have a question about the Stella and is the answer not in the manual?
Questions and answers