Advertisement
T E C H N O L O G I E S
User Guide
HDD Duplicator Pro
(
)
HDUSI325-A
www.addonics.com
Technical Support
If you need any assistance to get your unit functioning properly, please have
your product information ready and contact Addonics Technical Support at:
Hours: 8:30 am - 6:00 pm PST
Phone: 408-453-6212
Email: http://www.addonics.com/support/query/
Advertisement
Table of Contents

Subscribe to Our Youtube Channel
Related Manuals for Addonics Technologies HDUSI325-A


Summary of Contents for Addonics Technologies HDUSI325-A
- Page 1 T E C H N O L O G I E S User Guide HDD Duplicator Pro HDUSI325-A www.addonics.com Technical Support If you need any assistance to get your unit functioning properly, please have your product information ready and contact Addonics Technical Support at:...
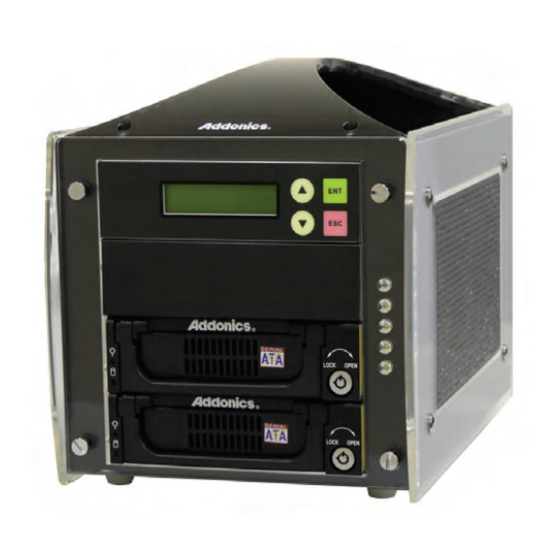
- Page 2 1. LCD Mangement Console 2. Source Drive 3. Target Drive 4. Diamond IDE enclosure 5. Diamond SATA enclosure HDUSI325-A One additional Diamond One set of keys and mounting SATA enclosure screws for each Diamond enclosure 44 pin to 40 pin Power Cord (U.S.
- Page 3 Drive InstallationGuide Step 1. Use a Philips screwdriver to turn the cover securing screw clockwise into the "OPEN" position. Step 2. Slide the aluminum cover towards the back end of the Diamond enclosure and remove it. Step 3. For SATA Drive: Carefully place the SATA hard drive with the label facing up into the Diamond Enclosure.
- Page 4 Step 4. Turn the Diamond enclosure over with the hard drive mounting holes facing up. Use the included flat head screws to secure the hard drive onto the bottom of the enclosure. Turn the Diamond enclosure back over, slide the cover back into place and turn in the screw to the “LOCK”...
- Page 5 Quick Start Insert the source and target drives and power up the unit. By default, the duplicator will initialize, scan for drives, and offer the copy function. When the copy function appears, press ENT to begin copying. Canceling Functions When selecting menu options, canceling is done by pressing ESC. When the unit is busy performing an operation such as copy, verify, or overwrite, the operation can be canceled by holding the ESC button until the unit beeps.
- Page 6 data on all HDDs connected to the duplicator (including Source HDD) by writing data to all sectors. There are 3 sub-options: One pass , 3 pass and 7 pass. 8. Setup Enters the Setup menu. See Setup Options for details. 9.
-
Page 7: Advanced Setup
8-09. Fast Copy When this setting is ON, the duplicator will attempt to copy the source drive's contents instead of the entire disk. Also controls Compare function. Default setting is OFF. NOTE: Target drive size is still required to be equal to or greater than source. Only works with source drives formatted using Master Boot Record. - Page 8 10-08. Link Option Enables USB Mode option on the Main Menu. This feature is not supported. Default setting is ON. 10-09. USB Auto-Link Automatically enables USB Mode. This feature is not supported. Default setting is ON. 10-10. COPY HPA Enables copy functions to duplicate the source drive's Host Protected Area. Normally this area is defined as not available to a host controller as defined by ATA/SATA specifications.
Need help?
Do you have a question about the HDUSI325-A and is the answer not in the manual?
Questions and answers