Table of Contents
Advertisement
Quick Links
Technical Support
If you need any assistance to get your unit functioning properly, please have your
product information ready and contact Addonics Technical Support at:
Hours: 8:30 am - 6:00 pm PST
Phone: 408-453-6212
Email: http://www.addonics.com/support/query/
T E C H N O L O G I E S
User Guide
1:1 HDD Duplicator PRO-S
HDUSI325AES
(
www.addonics.com
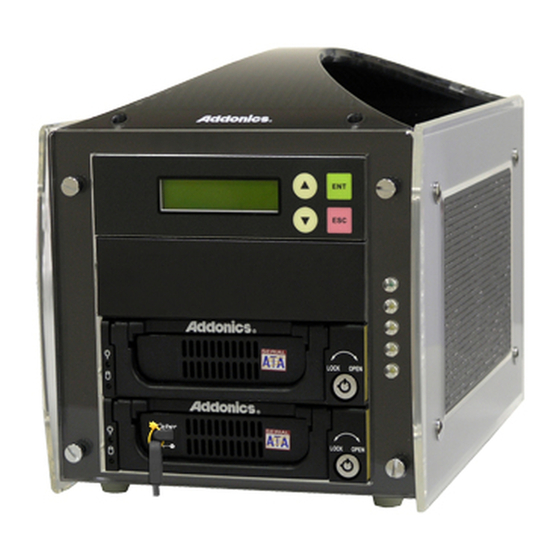
Duplicator Panel
Power Switch
Source Drive Bay
Target Drive Bay
)
v3.1.11
Advertisement
Table of Contents

Related Manuals for Addonics Technologies HDUSI325AES


Summary of Contents for Addonics Technologies HDUSI325AES
-
Page 1: Power Switch
T E C H N O L O G I E S Duplicator Panel Power Switch Source Drive Bay Target Drive Bay User Guide 1:1 HDD Duplicator PRO-S HDUSI325AES www.addonics.com v3.1.11 Technical Support If you need any assistance to get your unit functioning properly, please have your product information ready and contact Addonics Technical Support at: Hours: 8:30 am - 6:00 pm PST Phone: 408-453-6212... -
Page 2: Table Of Contents
Table Of Contents ... . . Page 3 Basic Instructions ... . . Page 5 Functions ... . . Page 6 Copy HDD ... . . Page 6 Compare HDD .. -
Page 3: Basic Instructions
Basic Instructions Installing drive into the HDD Duplicator Note: Make sure that the capacity of the target hard disk is equal or larger than the source hard disk. For installing a hard drive on the various enclosures that come with the HDD duplicator, refer to the bundled enclosure installation guides. - Page 4 IV. Duplicating a drive When the duplicator powers on, it initializes and goes through the steps below Copy HDD copies data directly from the source hard disk to the target hard disk. Press ENT button to begin copy. The system will auto-detect the hard disks and show the following info on the LCD.
-
Page 5: Functions
Functions The copy controller has 8 functions in total, with the th (Adv Setup) being a hidden system function that only appears when the ESC key is pressed for 2 seconds until there is a beep. These are shown below. 1. -
Page 6: Copy Hdd
Copy HDD Copy HDD copies data directly from the source hard disk to the target hard disk. Please make sure that the capacity of the target hard disk is equal o r larger than the source hard disk. Choose option 1 from the menu: 1. -
Page 7: Prescan Source
PreScan Source PreScan HDD is used to check if the source hard disk can be accessed properly. It also tests the read speed. Choose option 3 from the menu: 3. PreScan Source HDD : 1 232.9GB Press ENT to begin scan. The LCD will display the following info Scan-90MB/s 1% 230.6GB 00:00:27 Once the scan is complete, the LCD will display the corresp onding results... -
Page 8: Overwrite
In Process Elapsed 01:00 Overwrite Overwrite is used to overwrite the data of the hard d isk, it will erase all HDDs connected to the duplicator (including Source HDD). There are 3 sub-options: One pass, 3 pass and 7 pass. Choose option 7 from the menu: 7. -
Page 9: Startup Menu
Copy Size This option is used to specify the size of the source hard disk for simplifying further copying operations. 8-02. Setup Copy Size Press ENT and the LCD will display a detailed list of options a s shown below Copy Size 100%~1% (*MB) Use the Up and Down arrow keys to choose di erent copy si zes. -
Page 10: Usb Mode
Button Sound This option is used to control the sound of a button whe n you press it. 8-06. Setup Button Sound Press ENT and the LCD will display the following info. Use the Up and Down arrow keys to choose whether button sound is on or o . -
Page 11: Adv Setup
Adv Setup Adv Setup o ers expert users access to more advanced system settings. To access this option, hold down the ESC key for two seconds until it appears. 10. Adv Setup Detect HDD Delay This function is used to set the time interval betw een the system's re-scans of all connected HDD devices. -
Page 12: H/W Diagnostic
Press ENT again and the LCD will prompt you to con rm the er ase operation. All data will be lost,Erase? No Quick Erase HDD This function is used to quickly erase all data on the HDD . Please backup any important data before using this function. -
Page 13: Secure Erase
Source Size Source Size is used to show the capacity of the source. Choose option 5 from the menu: 5. Source Size Press ENT and the LCD will show the following info. HDD:Hitachi Size:232.9GB Then press ENT and the LCD will show the data's size info. HDD:Hitachi Data:200.9GB Secure Erase... -
Page 14: Load Default
Load Default Press ESC to return to the main menu then use the ENT button to select. This function resets all settings to their factory default. This function helps th e system recover from errors caused by an illegal operation. 10-07.Adv Setup Load Default Press ENT to enter the following screen. -
Page 15: Basic Troubleshooting
Basic Troubleshooting If the LCD blank after the device is turned on, check that the power cable is properly connected and that the power supply is on. Error Message When the system is running a copy operation or hardware diagnostics, if the operation is manually terminated by pressing ESC an error message will be shown by the LCD. -
Page 16: Error Messages List
Error Messages List Error Messages Description Applied to Source Drive Not Exist! No source HDD exist Copy, Async Copy, Compare, during operating Async Compare, PreScan Source, Source Size, Copy Size, Tolerance Size User Abort! Cancel operating Any function and any time No Drive Exist Device Info No HDD exist during... -
Page 17: Firmware Update Procedure
Firmware Update Procedure (Requires one hard drive containing the rmware le): 1. Create a 50MB HDD partition with FAT/FAT32 or NTFS les system on any SATA hard drive 2. Download the rmware and unzip the le to .BIN le format 3.
Need help?
Do you have a question about the HDUSI325AES and is the answer not in the manual?
Questions and answers