Table of Contents
Advertisement
Quick Links
Technical Support
If you need any assistance to get your unit functioning properly, please have your
product information ready and contact Addonics Technical Support at:
Hours: 8:30 am - 6:00 pm PST
Phone: 408-453-6212
Email: http://www.addonics.com/support/query/
T E C H N O L O G I E S
User Guide
1:1 Duplicator
(HDUSAS)
www.addonics.com
E N T
E S C
v3.1.11
Advertisement
Table of Contents

Related Manuals for Addonics Technologies HDUSAS


Summary of Contents for Addonics Technologies HDUSAS
- Page 1 T E C H N O L O G I E S E N T E S C User Guide 1:1 Duplicator (HDUSAS) www.addonics.com v3.1.11 Technical Support If you need any assistance to get your unit functioning properly, please have your...
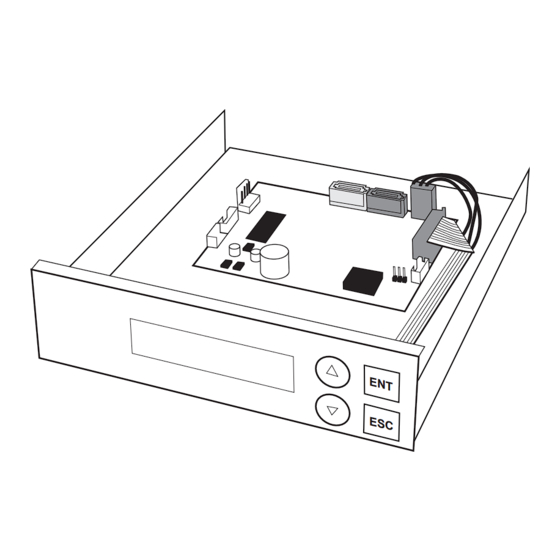
- Page 2 Diagram Destination Source SATA Port SATA Port 4-pin Floppy Power Connector E N T Mounting Holes (2 on each side) E S C Scroll Up Duplicator Panel Executes Function Cancels Function Scroll Down www.addonics.com Technical Support (M-F 8:30am - 6:00pm PST) Phone: 408-453-6212 Email: www.addonics.com/support/query/...
-
Page 3: Duplicating Drive(S)
Quick Guide Installing the 1:1 duplicator Step 1 Insert the 1:1 duplicator into standard 5.25” drive bay. Step 2 Connect the power cable from you system to the 4-pin floppy power connector. Step 3 Connect the source drive to the source SATA port via SATA cable and the target drives to the destination SATA port via SATA cable. - Page 4 Scroll Up Duplicator Panel Executes Function Cancels Function Scroll Down The Duplicator has 6 functions to choose from: 1. Copy 2. Compare 3. PreScan Source 4. ReScan BUS 5. Source Size 6. Setup Within function 6, there are 8 Subfunctions 6-1.
-
Page 5: Prescan Source
1. Copy Make sure that the capacity of the target is equal or larger than the source. Copies data directly from the source to the target. Choose option 1 from the menu and press ENT to begin copying. The system will auto detect the source/target and display info about the copying process. -
Page 6: Setup Functions
Setup Functions 6-1. Language Use this option to select the language of the system, by default it’s set at English. 6-2. Copy Size This option is used to specify the size of the source for simplifying further copying operations. Press ENT on this option and the LCD will display Copy Size ALL. Use the up and down arrow keys to change the copy size. -
Page 7: Troubleshooting
6-7. Device Info This option will diplay the details of everything connected to the controller. 6-8. System Info This option will display the system information. 7. USB Mode NOTE: Though this is an active menu option, we recommend you not use this option since there is no USB connection for this unit. -
Page 8: Lcd Messages
LCD Messages Connecting with a HDD: No Valid HDD! The system cannot find a hard disk. All data will be lost, format? All data will be lost. Confirm formatting. Partition Damage The partition is damaged. Delete Image in Partition xx? Confirm the deleting of data image in partition xx.
Need help?
Do you have a question about the HDUSAS and is the answer not in the manual?
Questions and answers