Table of Contents
Advertisement
Quick Links
Advertisement
Table of Contents

Related Manuals for Elvid OCM-10-PSM


Summary of Contents for Elvid OCM-10-PSM
- Page 1 FIELDVISION OCM-10-PSM 10.1″ PRO LCD MONITOR USER MANUAL...
- Page 2 INTRODUCTION Thank you for choosing Elvid. The Elvid OCM-10-PSM FieldVision 10.1″ Pro LCD Monitor with Scopes is perfect as a director’s monitor. Its signature all-scopes setting displays a histogram, audio column, vector, RGB histogram, and YUV waveform on the sides with an uninterrupted view of your incoming video frame, enabling instant and constant feedback without disrupting your view of the image.
-
Page 3: Precautions
PRECAUTIONS • Please read and follow these instructions and • Do not block the vents in this product. keep this manual in a safe place. • Disconnect this product from its power source • Exposure to high sound levels can cause before storage and during electrical storms. -
Page 4: Table Of Contents
TABLE OF CONTENTS RGB Histogram ........13 Precautions ..........3 Product Contents ........5 Waveform ..........13 Overview ..........6 All Scopes ..........13 Powering the FieldVision ..... 8 Picture Setting Menu ......14 Monitoring Sound ........9 Scan Mode ..........14 Mounting the FieldVision ..... 9 Camera Mode .........14 Connecting to Your Camera .... -
Page 5: Product Contents
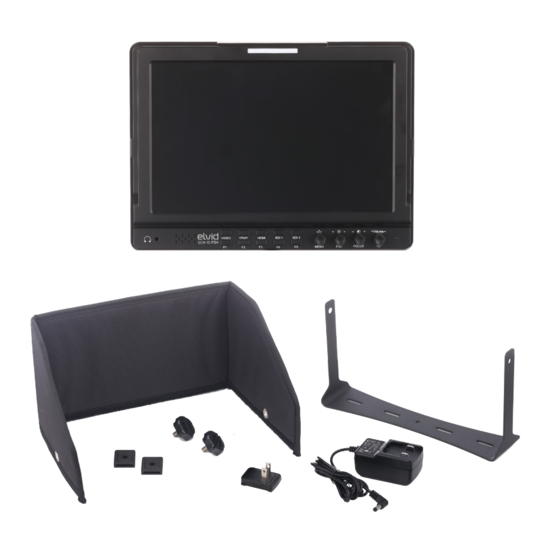
PRODUCT CONTENTS · 10.1″ Field Monitor · Adhesive touch strip · Sunshade · Tally kit · Sunshade thumbscrews (×2) · 4-pin XLR power supply · Tabletop bracket · AC power cable · Tabletop bracket thumbscrews (×2) · User manual... -
Page 6: Overview
OVERVIEW 1/4″-20 threaded sockets Screen Tally Light Contrast/Focus knob Speaker Volume/Camera knob Headphone jack Brightness/Esc knob Selector/Menu knob Video input buttons (Video, YPbPr, HDMI, SDI 1, SDI 2) Function buttons (F1, F2, F3, F4, F5) Power LED... - Page 7 Tally connector Power switch Battery plate HDMI input DC power input HDMI output XLR input SDI ports Audio inputs YPbPr component video ports...
-
Page 8: Powering The Fieldvision
POWERING THE FIELDVISION There are three ways to power the V DC INPUT FieldVision: 4-pin XLR input, 12 V DC To power the FieldVision via the 12 V DC input, and a Sony L-Series camera input, use a 12 V DC adapter with the battery. -
Page 9: Monitoring Sound
GETTING STARTED MONITORING SOUND LOOP THROUGH You can monitor sound via the The FieldVision is equipped with loop- integrated speaker or the 3.5 mm through, also known as pass-through, for stereo headphone jack. To monitor via all of its video inputs. To loop the video the headphone jack, plug in a pair of signal through the monitor, connect your compatible headphones. -
Page 10: The Sunshade
SUNSHADE THE SUNSHADE The sunshade prevents glare on the monitor’s screen by blocking out stray light and is useful when shooting outdoors. To attach the included sunshade, follow these steps: 1. Unfold the sunshade and place it along the top and sides of the monitor. Tip: For a more secure fit, attach the included adhesive touch strip along the top edge of the monitor. -
Page 11: The Menu
THE MENU Before using the FieldVision, you will through the chart. This mode is useful need to make sure the monitor’s settings for quickly and accurately determining are properly configured. All of the your shot exposure. setting configurations are located in the Zebra Crossing: Displays animated black main menu, which has seven submenus: and white stripes through areas of the... -
Page 12: Marker Type
THE MENU Marker Type: Displays an onscreen box as a safety frame marker at a specific aspect ratio. You can set this to 16:9, 4:3, 2.35:1, or 1.85:1. Safety Area: Displays an onscreen box as a safety frame marker at a percentage of the screen size. -
Page 13: Scopes Menu
SCOPES MENU Vector: Displays a vectorscope, which All Scopes: Display all the scopes in is an overall color saturation meter the Scopes menu (Histogram, Audio for all colors in the image. Column, Vector, RGB Histogram, and YUV Waveform) on the sides of the frame with an uninterrupted view of your incoming video image. -
Page 14: Picture Setting Menu
PICTURE SETTING MENU Scan Mode: Adjusts the aspect ratio for the FieldVision’s screen. You can choose Auto (default), Over Scan, or Full Screen. Auto displays the image at the video signal’s native aspect ratio so you can see the entire video image (e.g., if the signal’s native aspect ratio is 4:3, it will display at 4:3). -
Page 15: Color Setting Menu
COLOR SETTING MENU In the Color Setting menu, you can adjust Brightness, Contrast, Hue, Chroma, and Sharpness from 0 to 100. You can also adjust brightness, contrast, and volume without opening the menu. While on the main screen, rotate the Esc knob for brightness, the Focus knob for contrast, and the Camera knob for volume. -
Page 16: Osd Setting Menu
OSD SETTING MENU Language: You can set the onscreen language to English or Chinese. Osd Time: Determines the number of seconds the menu remains onscreen. You can choose 5, 10, 15, 20, 25, or 30 seconds (default). Osd Trans: Makes the menu translucent. The default setting is Off (opaque). Volume: Adjusts the monitoring volume from 0 to 100. -
Page 17: Specifications
SPECIFICATIONS • Panel size: 10.1″ IPS panel • Backlight: LED • Native resolution: 1280 × 800 • Aspect ratio: 16:10 • Brightness: 650 cd/m² • Contrast ratio: 800:1 • Response time: 25 ms • Viewing angle: 178°, 89°/89° (U/D) • Inputs: 3G-SDI (×2), HDMI, component, composite, analog audio •... -
Page 18: Supported Resolutions And Frame Rates
SUPPORTED RESOLUTIONS AND FRAME RATES SINGAL RESOLUTION SUPPORT HDMI 1080i 60, 50 1080p 60, 50, 30, 25, 24 720p 60, 50 576p 576i 480p 480i 1080PsF 25, 24 1080p 60, 50 1080i 60, 50 720p 60, 50 576i 480i 480p... -
Page 19: Troubleshooting
TROUBLESHOOTING PROBLEM SOLUTION The FieldVision will not • If you are powering the FieldVision with a camera battery, make sure that turn on. the battery is fully charged. • If you are powering the FieldVision via AC power, check your power connection to make sure it’s reliable and properly connected. -
Page 20: One-Year Limited Warranty
ONE-YEAR LIMITED WARRANTY This Elvid product is warranted to the original purchaser to be free from defects in materials and workmanship under normal consumer use for a period of one (1) year from the original purchase date or thirty (30) days after replacement, whichever occurs later.
Need help?
Do you have a question about the OCM-10-PSM and is the answer not in the manual?
Questions and answers