Pinguino PAC T100P Instructions For Use Manual
Hide thumbs
Also See for PAC T100P:
- Instructions for use manual (20 pages) ,
- Instructions for use manual (20 pages)
Table of Contents
Advertisement
Available languages
Available languages
PAC T100P / T110P
PAC T100P / T110P
SISTEMA DE AIRE ACONDICIONADO PORTÁTIL
Register this product on-line and receive a free trial issue of Cook's Illustrated.
Visit www.prodregister.com/delonghi.
Visit www.delonghi.com for a list of service centers near you. (U.S. Only)
Enregistrez ce produit en ligne et recevez un numéro gratuit de Cook's Illustrated.
Visitez www.prodregister.com/delonghi.
Visitez www.delonghi.com pour y voir une liste des centres de réparation proches de chez vous.
(É.-U. uniquement)
Registre este producto en línea y reciba un ejemplar gratis de Cook's Illustrated.
Visite www.prodregister.com/delonghi.
Visite www.delonghi.com para ver la lista de centros de servicios cercanos a usted. (Solamente
en los Estados Unidos)
Registra questo prodotto "on-line" per ricevere una copia omaggio della rivista.
Visita www.prodregister.com/delonghi.
Visita www.delonghi.com per una lista dei centri di servizio a te piu vicini. (Solo negli Stati Uniti)
PORTABLE AIR-CONDITIONER
CONDITIONNEUR D'AIR PORTATIF
CONDIZIONATORE D'ARIA
Instructions for use
Keep these instructions
Mode d'emploi
Conservez cette notice
Instrucciones para el uso
Repase y guarde estas instrucciones
Istruzioni per l'uso
Leggere e conservare queste istruzioni
ELECTRICAL SPECIFICATIONS 115V ~ 60Hz
DONNEES ELECTRIQUES 115V~60Hz
CARACTERISTICAS ELECTRICAS 115V ~ 60Hz
CARATTERISTICHE ELETTRICHE 115V~60Hz
Advertisement
Table of Contents

Related Manuals for Pinguino PAC T100P


Summary of Contents for Pinguino PAC T100P
- Page 1 PAC T100P / T110P PAC T100P / T110P PORTABLE AIR-CONDITIONER CONDITIONNEUR D’AIR PORTATIF SISTEMA DE AIRE ACONDICIONADO PORTÁTIL CONDIZIONATORE D’ARIA Register this product on-line and receive a free trial issue of Cook's Illustrated. Visit www.prodregister.com/delonghi. Visit www.delonghi.com for a list of service centers near you. (U.S. Only) Enregistrez ce produit en ligne et recevez un numéro gratuit de Cook's Illustrated.
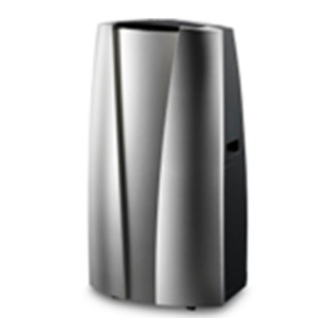
- Page 2 DESCRIPTION • DESCRIPTION D E S C R I P TC I Ó N D E S C R I Z I O N E • • S e e d e s c r i p t i o n a t p a g e 3 f o r e n g l i s h •...
-
Page 3: Description
IMPORTANT SAFEGUARDS • Use this appliance only as described in this instruction manual. As with any electrical appliance, the instructions aim to cover as many eventualities as possi- ble. Caution and common sense should be used when operating and installing this air conditioner. •... - Page 4 What are the Pinguino portable air conditioners? uring the summer, you feel comfortable at a temperature of between 75 and 81°F (24 and 27°C) with a relative humidity of about 50%. An air conditioning unit removes excess moisture and heat from the room where it is located.
-
Page 5: Non Permanent Installation
Just a few simple steps and your comfort is outlet (13) of the exhaust hose (12) into the ensured with Pinguino: slot, then connect the hose to the air condi- • Fit the air exhaust hose (11) in the housing (5) tioner (fig. -
Page 6: Semi-Permanent Installation
(11 ) as shown in fig. G. MAX 39.37 inches MAX100 cm SEMI-PERMANENT INSTALLATION If required, the Pinguino can also be installed semi-permanently (Fig. E and E1). MIN 13.77 inches MIN 35 cm When the hose (12/19) is not fitted, the drilled 11,8 inches hole can be closed with the flange cap (11). -
Page 7: The Control Panel
Control panel THE CONTROL PANEL S R Q DESCRIPTION OF THE CONTROL PANEL A ON/Stand-by button B MODE selection button Air conditioning, dehumidifying, air purifying/fan, Smart. C Air conditioning mode indicator light D Dehumidifying mode indicator light Fan mode with air filtration indicator light “Sleep”... -
Page 8: Air-Conditioning Mode
Operation Depending on the model, the temperature in the display is shown in °C or in °F , however all the drawings show anly °C. TURNING THE APPLIANCE ON Plug the appliance into the socket. Two lines appear on the display indicating that the appliance is in standby. -
Page 9: Fan Mode With Air Filtration
Operation When full, the appliance shuts down and (tank full) appears on the display. The tank must be extracted and emptied (fig. H). Once emptied, replace the tank: the appliance starts up again. The accessory continuous drain hose (21) enables the condensate produced to be eliminated without requiring the tank to be emp- tied periodically. -
Page 10: Setting The Timer
Operation SETTING THE TIMER The timer can be used to delay appliance start up or shut down. This avoids wasting electricity by optimizing operating periods How to program delayed start up • Plug the appliance into a socket and press the ON/STAND BY (A) button, then select the requi- red operating mode and other settings (temperature, fan speed, etc). -
Page 11: The Remote Control
The remote control Depending on the model, the temperature in the display is shown in °C or in °F , however all the drawings show anly °C. THE REMOTE CONTROL Inserting/replacing batteries (included) • Remove the back cover (see figure). •... -
Page 12: Description Of The Remote Control
Description of the remote control THE REMOTE CONTROL A. MODE button Selects the operating mode (air conditio- ning, dehumidification, air filtration, smart). B. Buttons for SETTING THE ROOM TEMPERATU- Set room temperature or program the timer. C. SPEED button Sets fan speed to automatic, high, medium or low in sequence. -
Page 13: Remote Control Functions
Remote control functions AIR-CONDITIONING MODE • Press the button to turn the appliance on. • The symbol flashes on the display and a beep indicates that the air-conditioning unit is on. • Press the MODE button a number of times until the air-conditio- ning symbol appears on the display. -
Page 14: Sleep Function
Remote control functions and the symbol appears on the display. NB: in “SMART” function, the temperature is controlled automatical- ly. However, if the required temperature has not yet been reached, it can be reduced or increased by a maximum of 4°F (approx. 2°C) by pressing the buttons. -
Page 15: Self-Diagnosis
Self diagnosis/Troubleshooting SELF DIAGNOSIS The appliance has a self diagnosis system to identify a number of malfunctions. IF THE DISPLAY SHOWS … …WHAT SHOULD YOU DO? When appears on the display, the ice prevention device has been triggered. LOW TEMPERATURE The appliance starts up again automatically when the defrosting process is (frost prevention) completed. - Page 16 T i p s To get the best from your air conditioning unit, • Never use the appliance in very damp follow these recommendations: rooms (laundries for example). • Never use the appliance outdoors. • close the windows and doors in the room to be air conditioned.
-
Page 17: Cleaning And Maintenance
Cleaning and Maintenance Before cleaning or maintaining, turn the Use a vacuum cleaner to remove the dust appliance off by pressing the ON/STAND BY collected on the filter. button (A) or button (I) on the remote control If the dust filter is very dirty, immerse in warm and always unplug the appliance from the water and rinse a number of times. -
Page 18: Technical Specification
Technical specification TECHNICAL SPECIFICATION LIMIT CONDITIONS Power supply voltage see rating plate Max. power input Room temperature range of the air-condi- during air conditioning “ tioned space 64-95°F (18 - 35°C) Refrigerant “ Cooling capacity “ Appliance dimensions: • width 18.6 inc. -
Page 19: Limited Warranty
Limited Warranty De’Longhi is the distributor of Kenwood home appliances. This warranty applies to all home appliances with De’Longhi or Kenwood brand names. FOR CONTIGUOUS UNITED STATES ONLY Limited Warranty We warrant each De’Longhi AIR CONDITIONER to be free from defects in material and workman- ship. -
Page 20: Mesures De Protection Importantes
MESURES DE PROTECTION IMPORTANTES • Utilisez cet appareil en suivant exclusivement ce manuel d’instructions. Comme pour tous les appareils électriques, ces instructions visent à traiter autant de situations que possible. Vous devez faire preuve de bon sens et de prudence lors de l’utilisation et de l’installation de ce conditionneur d’air. - Page 21 Les conditionneurs d’air Pinguino endant les mois d’été, les conditions de confort sont atteintes avec une température com- prise entre 75 et 81°F (24°C et 27°C) et avec une humidité relative d’environ 50%. Un appareil de conditionnement de l’air élimine l’humi- dité...
- Page 22 I n s t a l l a t i o n d u c o n d i t i o n n e u r d ’ a i r p o r t a t i f BRANCHEMENTS ÉLECTRIQUES Avant de brancher la fiche dans la prise électrique, vérifiez que: •...
-
Page 23: Installation Semi-Permanente
• Réglez l’extrémité du tuyau (12/19) à la bride (11 ) tel qu’illustré à la fig. G. MAX 39.37 inches MAX100 cm INSTALLATION SEMI-PERMANENTE Si vous le désirez, Pinguino peut également être installé de manière semi permanente (Fig. E et E1). MIN 13.77 inches MIN 35 cm Quand le tuyau (12/19) n’est pas en place, le... - Page 24 Panneau de commande PANNEAU DE COMMANDE S R Q DESCRIPTION DU PANNEAU DE COMMANDE A Touche ON/OFF et Stand-By (veille) B Touche de sélection du MODE Conditionnement d’air, déshumidification, filtration/ventilation, Smart. C Témoin du mode conditionnement d’air D Témoin du mode déshumidification Témoin du mode ventilation avec filtration Témoin de la fonction "...
-
Page 25: Mettre L'appareil En Marche
Fonctionnement Selon le modèle, la température à l'écran s’affiche en °C ou en °F. Cependant, toutes les repré- sentations graphiques dans le manuel sont en °F. METTRE L’APPAREIL EN MARCHE Branchez l’appareil dans la prise. Deux lignes s’affichent à l’é- cran indiquant que l’appareil est en veille. -
Page 26: Mode Boost
Fonctionnement L’appareil s’éteint et (tank full) s’affiche à l’écran quand vous devez vider le réservoir. TRetirez alors le réservoir et videz-le (fig. H). Once emptied, replace the tank: the appliance starts up again. Replacez-le une fois vidé: l’appareil se remet en marche. Le tuyau d'écoulement continu (21) permet au condensas produit d'être éli- miné... -
Page 27: Programmation De La Minuterie
Fonctionnement PROGRAMMATION DE LA MINUTERIE La minuterie peut être utilisée pour différer la mise en marche ou l'arrêt de l'appareil. Ceci permet d’optimiser les périodes de fonctionnement en économisant l’électricité. Comment programmer le démarrage différé • Branchez l’appareil dans la prise et appuyez sur la touche ON/STAND BY (A) sélectionnez ensuite le mode de fonctionnement désiré... -
Page 28: Utilisation Adéquate
La télécommande Selon le modèle, la température à l'écran s’affiche en °C ou en °F. Cependant, toutes les repré- sentations graphiques dans le manuel sont en °F. LA TÉLÉCOMMANDE Insertion/remplacement des piles (fournies) • Retirez le couvercle arrière (voir figure). •... -
Page 29: Description De La Télécommande
Description de la télécommande LA TÉLÉCOMMANDE A. Touche MODE Sélectionne le mode de fonctionnement (conditionnement d’air, déshumidifica- tion, filtration de l’air, smart). B. Touches pour le RÉGLAGE DE LA TEMPÉRA- TURE DE LA PIÈCE Règle la vitesse du ventilateur à automati- que, élevée, moyenne ou basse. -
Page 30: Fonctions De La Télécommande
Fonctions de la télécommande MODE CONDITIONNEMENT D’AIR • Appuyez sur la touche pour mettre l’appareil en marche. • Le symbole clignote sur l’écran et un bip signale que le con- ditionneur d'air est en marche. • Appuyez sur la touche MODE un certain nombre de fois jusqu’à ce que le symbole de conditionnement d’air s’affiche à... -
Page 31: Fonction Sleep
Remote control functions 2°C) en appuyant sur les touches L’appareil règle automatiquement le mode de fonctionnement (conditionnement de l’air, ventilation, chauffage) et la vitesse du ventilateur optimale. Lorsque la fonction " SMART " est activée, s'affiche à l'écran du panneau de commande et les trois témoins (C/D/E) s'allument. FONCTION SLEEP La fonction automatique "... -
Page 32: Dépannage
Autodiagnostic AUTODIAGNOSTIC L’appareil possède un système d’autodiagnostic pour identifier certaines défectuosités SI L'ÉCRAN AFFICHE … … QUE DEVEZ-VOUS FAIRE ? Quand s’affiche à l’écran, le dispositif de prévention de glace est LOW TEMPERATURE déclenché. (température basse) L’appareil se remet en marche automatiquement quand le dégivrage est (prévention du gel) terminé... - Page 33 C o n s e i l s Pour optimiser le rendement de votre condition- • N’utilisez jamais l’appareil dans des pièces neur, suivez les recommandations suivantes: très humides (buanderie par exemple). • N’utilisez jamais l’appareil à l’extérieur. • Fermez les fenêtres et les portes dans la pièce à...
-
Page 34: Nettoyage Et Entretien
Nettoyage et entretien Avant le nettoyage et l’entretien, éteignez 2. Retirez le filtre à poussière en le détachant l’appareil en appuyant sur la touche de la grille (Fig. M). Retirez le filtre électro- ON/STAND BY (A) ou la touche (I) de la télé- statique 3M®... - Page 35 Caractéristique technique CARACTÉRISTIQUE TECHNIQUE CONDITIONS DE FONCTIONNEMENT Tension d’alimentation Voir la plaque CONSEILLÉES signalétique Puissance maximum admise Température dans la pièce en conditionne- Pendant le conditionnement de l’air “ ment 64-95°F (18 - 35°C) Réfrigérant “ Puissance réfrigérante “ Dimensions de l’appareil : •...
-
Page 36: Garantie Limitée
Garantie limitée De’Longhi est le distributeur de électroménagers de marque Kenwood. Cette garantie s’appli- que à tous les électroménagers portant les marques De’Longhi ou Kenwood. RÉSERVÉ UNIQUEMENT AUX ÉTATS-UNIS CONTIGUS Garantie limitée Nous garantissons que chaque CLIMATISEUR de DeLonghi est exempt de défauts de matériau et de fabrication.
Need help?
Do you have a question about the PAC T100P and is the answer not in the manual?
Questions and answers