Table of Contents

Related Manuals for Stel THOR 123


Summary of Contents for Stel THOR 123
- Page 1 6934900000 - MANUALE DI ISTRUZIONE PER TAGLIO PLASMA - INSTRUCTION MANUAL FOR PLASMA CUTTING MACHINE THOR 123 THOR 123 THOR 123 THOR 123 Info : www.stelgroup.it - tel. +39 0444 639525...
- Page 2 The EMC Directive 2004/108/EC The RoHS Directive 2011/65/EU Type of equipment Plasma equipment Type of designation 600403000L - Thor 123 Brand name or trade mark STEL Manufacturer or his authorized representatives established within the EEA: Name, address, phone, website: STEL s.r.l Via Del Progresso 59;...
- Page 3 6934900000 SICUREZZE WARNING LO SHOCK ELETTRICO PUÒ UCCIDERE Disconnettere macchina dalla rete alimentazione prima di intervenire sul generatore. - Non lavorare con i rivestimenti dei cavi deteriorati. - Non toccare le parti elettriche scoperte. - Assicurarsi che tutti i pannelli di copertura del generatore di corrente siano ben fissati al loro posto quando la macchina è...
-
Page 4: Dati Tecnici
Reclami merce difettosa: Tutte apparecchiature spedite da STEL sono state Questo generatore è stato progettato per essere sottoposte ad un rigoroso controllo di qualità. Tuttavia utilizzato in ambiente professionale ed industriale. Per se la Vs. apparecchiatura non dovesse funzionare altri tipi di applicazione contattare il costruttore. -
Page 5: Installazione
ATTENZIONE: ALLACCIAMENTO CIRCUITO PNEUMATICO: Questa apparecchiatura in CLASSE A non e’ Il THOR 123/123S usa aria compressa come gas per destinata all’uso in ambienti residenziali dove la il plasma. Può essere usata quindi qualsiasi bombola potenza elettrica e’ fornita dal sistema pubblico di di aria compressa oppure aria proveniente da un alimentazione a bassa tensione. -
Page 6: Messa In Opera
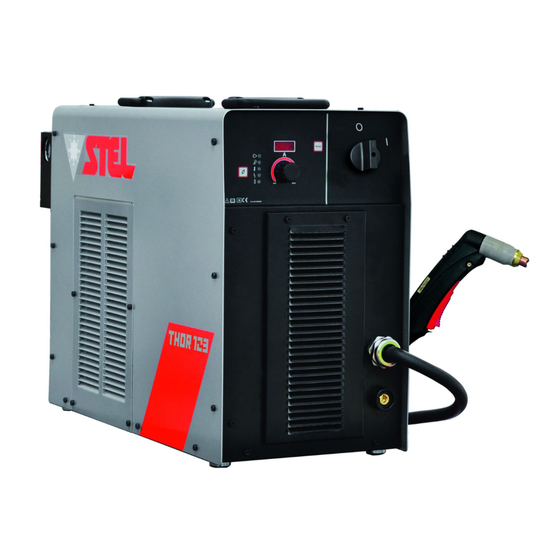
6934900000 SOLLEVAMENTO DESCRIZIONE PANNELLO ATTENZIONE: FRONTALE THOR 123 peso 50kg / 110lbs - THOR 123 Sollevamento manuale Per sollevare manualmente il generatore servirsi delle due apposite maniglie. Led presenza aria Led allarme protezione Pulsante test aria Led sovratemperatura Sollevamento tramite gancio e cinghia... - Page 7 6934900000 - Collegare il cavo positivo (Cavo Massa) - La velocità di taglio è troppo bassa. saldamente al pezzo da tagliare. (N.B: non - I componenti della torcia sono consumati. attaccare la pinza alla parte di materiale che verrà - La corrente è troppo alta. staccata con il taglio).
- Page 8 6934900000 cablaggi e le connessioni di potenza siano ben AVVERTENZE fissati. Scollegare l’alimentazione principale dal sistema RICAMBIO PARTI CONSUMATE prima di smontare la torcia o i conduttori della Attenzione! L’ugello della torcia e le parti torcia. NON toccare alcun componente interno limitrofe raggiungono temperature...
- Page 9 6934900000 Sostituirla ove del caso. ISPEZIONE E SOSTITUZIONE DEI COMPONENTI USURATI NELLA TORCIA AVVERTENZE Scollegare l’alimentazione principale dal sistema prima di smontare la torcia o i conduttori della torcia. NON toccare alcun componente interno 5. Estrarre l’elettrodo direttamente dal corpo torcia. della torcia quando la spia di segnalazione Verificare che la faccia dell’elettrodo non presenti dell’alimentatore è...
- Page 10 6934900000 2. Shield cup non montata correttamente. sulla torcia Risoluzione dei guasti: a. Verificare che la shield cup sia perfettamente alloggiata contro la testa della torcia (non stringere A. La fiamma pilota della torcia non si accende eccessivamente). quando si attiva l’interruttore della torcia 1.
- Page 11 6934900000 a. Verificare la fonte per accertarsi che la pressione operativa del gas sia corretta 2. Componenti malfunzionanti nella torcia e conduttori ALLARME PULSANTE a. Ispezionare i componenti della torcia e sostituirli Il led (2) è acceso e lampeggia velocemente e il ove necessario.
- Page 12 6934900000 RESET DUTY CYCLE E Il led (2) è acceso senza lampeggiare e il display SOVRATEMPERATURA visualizza l’amperaggio. Il led 3 è acceso e il display visualizza HT (1,3,5,7) Il ciclo di intermittenza è la percentuale di utilizzo della saldatrice su 10 minuti che l’ operatore deve rispettare per evitare che scatti il blocco di erogazione per sovratemperatura.
- Page 13 6934900000 environment, he must take extreme care and wear insulating footwear and gloves. - check the machine power cable frequently: it must be free from damage to the insulation. BARE SAFETY CABLES ARE DANGEROUS. Do not use the ELECTRIC SHOCK CAN KILL machine if the power cable is damaged;...
-
Page 14: General Characteristics
Complaints for faulty goods: All the equipment - never use the machine for welding containers of shipped by STEL is subjected to strict quality potentially inflammable material. These containers control. However, if your equipment does not work must be completely cleaned before they are properly, consult your authorise dealer. -
Page 15: Installation
A pressure higher than 5 bar (5-5.5 bar) must be The Inverter operates from a mains voltage supply: applied to the air filter located on the rear panel of THOR 123 400V +/- 15% and Fuse rating di 25A the THOR (100l/min). The pressure must not exceed 6 bar. - Page 16 6934900000 LIFTING FRONT PANEL DESCRIPTION WARNING: - THOR 123 THOR 123 peso 50kg / 110lbs Lifting by hand: Lift the machine using the two handles provided Air presence led Protection alarm led Air test button Lifting with hoist and strap...
- Page 17 6934900000 - The red Led (2) switches off The cutting speed is too fast. − - When the yellow Led (4) is off it means that the The torch components are worn. − THOR working temperature is within normal Incorrect torch angle −...
- Page 18 6934900000 equipped with proper gloves, clothing, eye and ear protection. Make sure no part of the operator’s PREVENTIVE MAINTENANCE OF POWER body comes into contact with the work-piece while SOURCE. the torch is active. ALWAYS DISCONNECT INPUT PRIMARY SUPPLY!!! CAUTION Inspect the inside of the POWER SOURCE Sparks from the cutting process can cause INVERTER from time to time (every 3-4 weeks...
- Page 19 6934900000 4. Short Life of Torch parts a. Oil or moisture in air source b. Exceeding system capability (material too thick) c. Excessive pilot arc time d. Air flow too low (incorrect air pressure) 4. Remove the starter cartridge. Check for e.
- Page 20 6934900000 a. Check that shield cup is properly installed. a. return for repair or have qualified technician repair as per service manual 2.Upper O-ring on torch head is in wrong position. a. Remove shield cup from torch; check position of C.
- Page 21 6934900000 2. The unit is now blocked. 3. Turn Off the unit and check torch. See section SERVICE. PIP (PART IN PLACE) FAULTY The Led (2) is ON , slow blinking and the display shows "PIP" This section describes more common malfunctions and unit indications.
-
Page 22: Disposal Of Electrical And Electronic Equipment
6934900000 DISPOSAL OF ELECTRICAL DUTY CYCLE AND AND ELECTRONIC EXCESSES TEMPERATURE EQUIPMENT The Led indicator light 3 is ON, and the ‘A’ LED dispose electrical displays HT(1,3,5,7) equipment together with normal waste! In observance of European Directive 2002/96/EC on Waste Electrical and Electronic Equipment implementation accordance... - Page 23 6934900000 WIRING DIAGRAM THOR 123...
-
Page 24: Spare Parts
6934900000 N° DESCRIPTION THOR 123 Knob 66106200 Grid 6206720K Front Label 66128200 Front Panel 6206690K Encoder 61190200 Power switch 64701000 Power Switch Knob 66231000 Cable Relief 66042200 Socket 64280000 Bus Filter Inductance 61312500 Fan 120x120x38 64016000 Rear Panel 6206710K Solenoid Valve... - Page 25 6934900000 TORCH CONSUMABLES VIEW...
- Page 26 6934900000 CONSUMABLES LIST EXPLODED VIEW TORCH DESCRIPTION CODE DEFAULT DESCRIPTION CODE N° Tip Cutting Drag 30A 9-8206 601048000L Tip Cutting Drag 40A 9-8207 607380000L Handle Replacement Kit (included 2 and 3) 600715 Tip Cutting Drag 60A 9-8252 601238000L Trigger Assembly Replacement kit 600716 Tip Cutting 60A 9-8210 607390000L...
- Page 27 6934900000 CONSUMABLES LIST APPLICATION GUIDE Drag Tip Cutting The preferred method of cutting light gauge metal up to 1/4” (6 mm) thickness. Produces the best cut quality narrowest kerf width, fastest cutting speeds, and with little to no distortion. Traditional drag cutting was limited to 40 Amps or less, now with 1-torch technology it is possible to cut up to 60 Amps.
- Page 28 6934900000 Drag Shield Cutting This is an operator -friendly method of cutting between 70 to 120 Amps while maintaining a constant standoff distance. For metal thickness greater than 1/4” (6mm), simply drag the shield cap in contact with the work piece.
- Page 29 6934900000 Info : www.stelgroup.it - tel. +39 0444 639525...
Need help?
Do you have a question about the THOR 123 and is the answer not in the manual?
Questions and answers