Advertisement
Quick Links
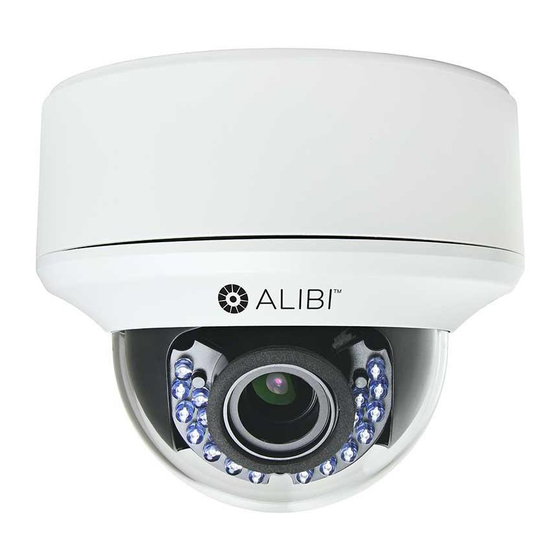
ALI-CD1080PVF HD-TVI Outdoor
Infrared Dome Camera
Quick Installation and User Guide
The ALI-CD1080PVF camera feature a 1/3" CMOS image sensor that delivers HD-TVI high-definition video
resolution over RG59 coax or any standard analog CCTV cabling. These HD video camera is ideal for security
applications that require a high level of detail, such as facial recognition or license plate identification.
Features
CMOS image sensor
•
HD-TVI technology produces 1080p HD video for sharp, detailed images
•
2.8 ~ 12 mm vari-focal lens with viewing angle of 78° ~ 28°
•
Built-in IR LEDs enables the camera to see up to 131 feet in the dark
•
Smart IR technology reduces over-exposure of the IR LEDs at the center of the image
•
True day/night (ICR) captures sharp, clear images in low light and at night
•
OSD (On-Screen Display) controls for customizing the camera settings for the installation venue
•
Dual power: 12 Vdc and 24 Vac capable
•
-4 °F ~ 140 °F operating temperature range
•
IP66 weather-rated housing, vandal proof IK10 rating
•
Camera
base
housing
Captive
screw (3)
Camera
dome
cover
assembly
ALI-CD1080PVF camera
12 Vdc power polarity
ALI-CD1080PVF Camera drop cable connectors
www.observint.com
1
HD-TVI video BNC
Connector
CVBS video BNC
Connector
Power
Connector
What's in the box
Camera assembly
•
Mounting screws and wall
•
inserts (four each)
Security L-wrench
•
Video test cable
•
Drill template
•
This installation guide
•
TOOLS YOU NEED
To install the camera, you will need:
12 Vdc or 24 Vac power source. See Specifications for wattage requirement.
•
Tools and additional fasteners (may be required) for mounting the camera
•
Phillips #2 screwdriver
•
Video and power extension cables
•
CCTV video setup monitor (optional)
•
Black
liner
Camera
module
assembly
OSD
joystick
Hole for
cover
dome
screw (3)
Camera
module
mounting
screw (3)
Camera
base
housing
Camera front view (without dome cover)
Camera
module
gimbal
Gimbal
elevation
pivot
point
WDR /
CVBS
switch)
Plug for
video test
cable
Threaded
side access
port for
conduit
Camera back view (without dome cover and liner)
Video Test
cable
IR LED array
Vari-focal lens
(2.8 ~ 12 mm)
Focus - zoom
adjustments
Screw
for dome
cover
assembly
tether
ALI-CD1080PVF_CQ
160225
Advertisement

Subscribe to Our Youtube Channel
Related Manuals for ALIBI ALI-CD1080PVF


Summary of Contents for ALIBI ALI-CD1080PVF
- Page 1 Video test cable • The ALI-CD1080PVF camera feature a 1/3” CMOS image sensor that delivers HD-TVI high-definition video Drill template • resolution over RG59 coax or any standard analog CCTV cabling. These HD video camera is ideal for security This installation guide •...
- Page 2 Step 1. Install the camera NOTE Camera drop cable connectors are not waterproof. The camera includes hardware to install it directly to a mounting surface. You can also easily install the camera onto a single- or double-gang electrical box. Camera drop cables can be routed through the Connect the camera drop cables to the video and power extension cables, and then secure the conduit port on the side of the camera base housing, through the mounting surface or into an electrical camera module to the housing using the security L-wrench provided.
- Page 3 MENU menu: Rock the joystick up or down to select either VIDEO STANDARD, LANGUAGE, or SETUP. VIDEO STANDARD: Rock the joystick right or left to select either NTSC or PAL. LANGUAGE: Rock the joystick right or left to select either English, Japanese, CHN1, CHN2, Korean, German, French, Italian, Spanish, Polish, Russian, Portuguese, Dutch, Turkish, Hebrew and Arabic.
- Page 4 SPECIAL • Menu CAMERA TITLE: Rock the joystick right or left to select either OFF or ON. If ON, press the joystick — Scene Indoor, Outdoor, Indoor1, LOW-LIGHT in to compose a camera title. Navigate through the virtual keyboard by rocking the joystick left, Camera ID ON / OFF (15 characters, position programmable) right, up or down.
Need help?
Do you have a question about the ALI-CD1080PVF and is the answer not in the manual?
Questions and answers