Advertisement
Quick Links
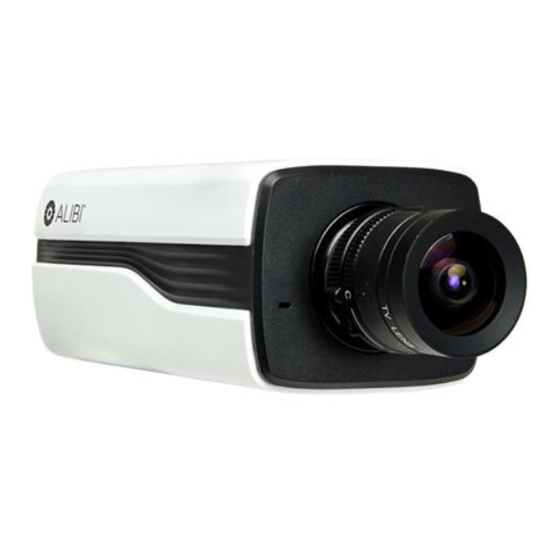
ALI-CS1080P HD-TVI Box Camera
Quick Installation and User Guide
The ALIBI HD-TVI 1080P resolution C-mount box security camera provides high-resolution video over RG59
coax or any standard analog CCTV cabling in diverse and challenging lighting conditions. A unique defog
setting improves the camera's visibility in rainy and foggy weather conditions.
High performance CMOS imager for high definition video
•
Low illumination 0.01 lux @ (F1.2,AGC ON), 0 lux with IR
•
ICR infrared filter auto switch
•
OSD menu controlling, enable user to configure the detailed parameters
•
3D NR noise reduction
•
Wide Dynamic Range (WDR) function
•
Defogging function
•
Auto white balance, auto gain control
•
Support coaxial camera controller
•
Lens assembly
ALI-CS1080P camera (lens assembly not included)
HD-TVI
Video Out
CVBS Video Out
Power LED
Power input
terminations for
12 Vdc or 24 Vac
Camera back panel connectors
What's in the box
Camera assembly
•
This installation guide
•
Tools you need
To install the camera, you will need:
C- or CS-type lens
•
12 Vdc or 24 Vac power source. See Specifications for wattage requirement.
•
Pedestal mounting bracket
•
Video and power extension cables
•
Tools and additional fasteners (may be required) for mounting the camera
•
CCTV video setup monitor (optional)
•
www.observint.com
1
Holes for mounting screws on top and underside
Auto-iris drive interface plug
Joystick
(for OSD)
Ground
terminal
Alarm IN
D/N
RS-485 D+, D-
Ground
Alarm OUT
Notes:
Lens: The camera accommodates a standard C or CS mount lens.
•
Camera holder hole: Provided on the upper side and underside of the camera housing.
•
Auto-iris interface: DC driven (DD). Mode uses Damp+, damp-, drive+, drive- pins.
•
3
4
1
2
Installation notes
Before installation:
Make sure that the device is in good condition and all the assembly parts are included.
•
Check the specification of the products for the installation environment.
•
Make sure that the wall or the ceiling is strong enough to withstand 3 times the weight of the camera.
•
To avoid fire or shock hazard, use only UL listed power supplies. Verify that the power supply will
•
provide the rated voltage and wattage for the camera. See the Specifications section.
During installation:
Camera Lens: Handle the camera carefully to prevent scratching or soiling the lens. If the lens or IR
•
array shield becomes soiled, clean it only with approved products. See the
Monitor impedance: Set the monitor impedance switch to 75 Ω.
•
Power connector: The camera can be powered by 12 Vdc or 24 Vac. When applying 12 Vdc power,
•
observe the power polarity. The polarity is marked on the back panel.
Step 1.
Install the camera mounting bracket
The camera can be attached to a mounting bracket on the upper side or the underside of the camera.
Follow the manufacturer's instructions to attach the camera mounting bracket to the mounting surface.
Step 2.
Attach the lens
The camera will accommodate a video-drive or DC-drive C- or CS-type lens. To attach the lens, do the
following:
1.
Remove the lens protective cap from the lens mounting ring.
Use care to prevent dust from contaminating the area between the lens mount and the lens.
•
NOTE
Install the lens assembly in a clean environment.
The weight of the lens must be less than 2.2 lbs (1 kg).
•
2.
If you are installing a C-type lens assembly, attach the C adaptor provided to the lens mounting ring
on the camera body.
3.
Carefully screw the lens assembly clockwise onto the lens mounting ring (or adapter for C-type
lenses) until it is fully seated. Tighten until snug.
Auto-iris drive interface plug
Lens assembly
Pin
Function
1
Damping -
2
Damping +
3
Drive +
4
Drive +
section.
Cleaning
ALI-CS1080P_CQ
12/17/14
Advertisement

Subscribe to Our Youtube Channel
Related Manuals for ALIBI ALI-CS1080P


Summary of Contents for ALIBI ALI-CS1080P
- Page 1 Auto-iris interface: DC driven (DD). Mode uses Damp+, damp-, drive+, drive- pins. • The ALIBI HD-TVI 1080P resolution C-mount box security camera provides high-resolution video over RG59 coax or any standard analog CCTV cabling in diverse and challenging lighting conditions. A unique defog Function setting improves the camera’s visibility in rainy and foggy weather conditions.
- Page 2 Step 5. Configure the camera with the OSD If you installed an auto-iris lens, verify that the cable pin definitions match the lens output iris connector, then plug the lens cable into the auto-iris interface plug (see above). Use the OSD (On Screen Display) to adjust the internal settings of the camera to customize it for the installation venue.
- Page 3 SENS-UP: Rock the joystick right or left to set the SENS-UP to OFF or AUTO. SELECT: Rock the joystick right or left to select the privacy shape (AREA 1 .. AREA8). — BRIGHTNESS: Rock the joystick right or left to select the brightness value (1 .. 100). DISPLAY: Select either COLOR, MOSAIC, INVERT, or OFF.
- Page 4 CLEANING Clean the camera with an approved glass cleaning solution and a lint free cloth. Dust can be removed from the unit by wiping it with a soft damp cloth. To remove stains, gently rub • the surface with a soft cloth moistened with a mild detergent solution, then rinse and dry it with a soft cloth.
Need help?
Do you have a question about the ALI-CS1080P and is the answer not in the manual?
Questions and answers