Advertisement
VP-428H2 Quick Start Guide
This guide helps you install and use your VP-428H2 for the first time.
Go to
upgrades are available.
Scan for full manual
Step 1: Check what's in the box
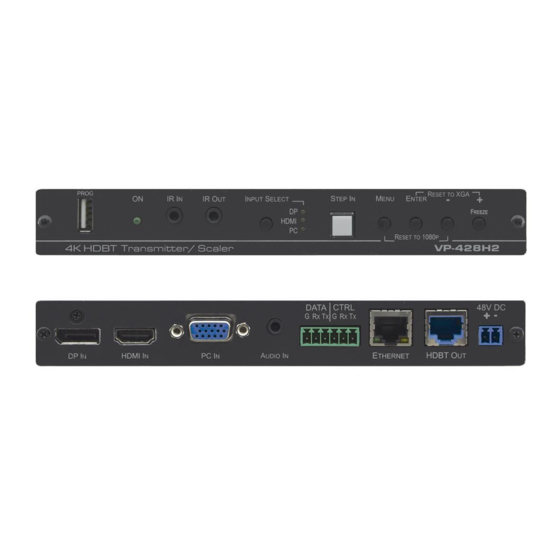
VP-428H2 4K HDBT Transmitter/Scaler
1 Power adapter and cord
Step 2: Get to know your VP-428H2
#
Feature
1
PROG USB Connector
2
ON LED
3
IR IN 3.5mm Mini Jack
4
IR OUT 3.5mm Mini Jack
5
INPUT SELECT Button
INPUT SELECT LEDs
6
STEP-IN Button
7
MENU Button
8
ENTER Button
9
–
10
+/FREEZE Button
11
DP IN DisplayPort Connector
12
HDMI IN Connector
13
PC IN 15-pin HD Connector
VP-428H2 Quick Start (P/N: 2900-300855QS REV 1)
www.kramerav.com/downloads/VP-428H2
Function
Connects to a USB memory stick for programming upgrade.
Lights green when the unit is powered on.
Connects to an IR sensor.
Connects to an IR emitter.
Press to cycle between inputs.
The selected input lights.
Press to activate the input on the switcher to which the VP-428H2 is connected.
Press to enter/exit the on-screen display (OSD) menu. Press together with the – button to
reset to 1080p.
In OSD, press to choose the highlighted menu item. Press together with the +/FREEZE
button to reset to XGA.
In OSD, press to move back through the list or to decrement the parameter value.
In OSD, press to move forward through the list or to increment the parameter value. When
not in OSD, press to freeze the display.
Connect to a DisplayPort source.
Connect to an HDMI source.
Connect to a computer graphics source.
to download the latest user manual and check if firmware
1 Bracket set
4 Rubber feet
P/N:
2900- 300855QS
1 Quick start guide
Rev:
1
Advertisement
Table of Contents

Related Manuals for Kramer VP-428H2


Summary of Contents for Kramer VP-428H2
- Page 1 INPUT SELECT LEDs The selected input lights. STEP-IN Button Press to activate the input on the switcher to which the VP-428H2 is connected. MENU Button Press to enter/exit the on-screen display (OSD) menu. Press together with the – button to reset to 1080p.
- Page 2 Step 4: Connect the inputs and outputs Always switch OFF the power on each device before connecting it to your VP-428H2. For best results, we recommend that you always use Kramer high-performance cables to connect AV equipment to the VP-428H2.
Need help?
Do you have a question about the VP-428H2 and is the answer not in the manual?
Questions and answers